
- SAP Community
- Products and Technology
- Human Capital Management
- HCM Blogs by Members
- Legacy Report Distributor Tool - Email
Human Capital Management Blogs by Members
Gain valuable knowledge and tips on SAP SuccessFactors and human capital management from member blog posts. Share your HCM insights with a post of your own.
Turn on suggestions
Auto-suggest helps you quickly narrow down your search results by suggesting possible matches as you type.
Showing results for
jaideepshetty
Participant
Options
- Subscribe to RSS Feed
- Mark as New
- Mark as Read
- Bookmark
- Subscribe
- Printer Friendly Page
- Report Inappropriate Content
05-19-2020
11:48 PM
Many clients have a requirement of receiving the ORD or Table reports to their email. The new Scheduler in Report Center is only available for destination as either Offline or File Transfer Protocol. This blog is to explain the configurations related to the Legacy Report Scheduler through which we can send reports to email.
Please make sure that Report center is enabled, and the admin has respective permissions for configuration
Navigation:
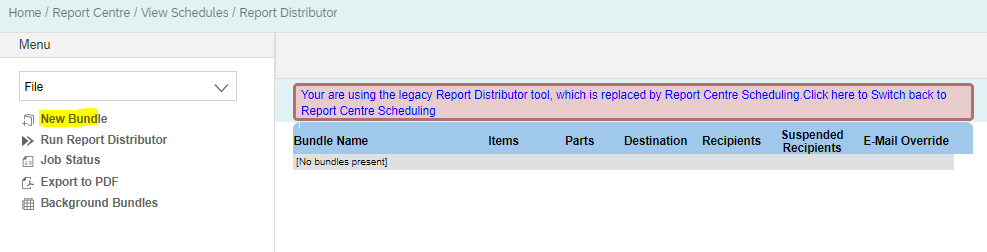
Report Centre > View Schedules > Switch to Legacy report Distributor Tool
Design a Report:
Configuration:
The Legacy distributor page looks like below, the scheduling of the reports and the recipients comes under the concept of Bundle.
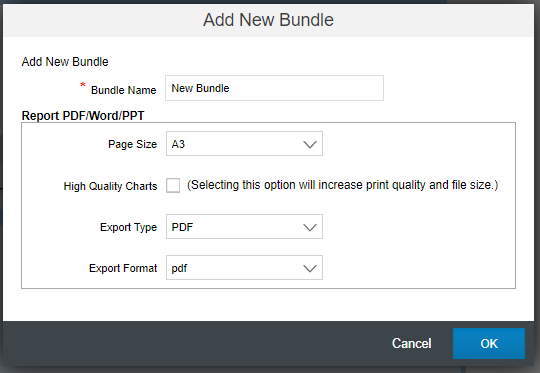
First you create a bundle, each new bundle creation will ask you to decide on below parameter.
Bundle Name is the name for group of reports you want to schedule.
Page size is basically the report size, i found the A3 is bigger in size compared to others.
A limitation here is that the system allows only to distribute only PDF, Microsoft Word (doc and docx) and Microsoft PowerPoint (ppt and pptx) .
Hence when designing the report be careful on the number of columns used. If the report has more columns than the ones which can’t be fit inside the PDF report, then we might have to opt for offline download feature rather than email or FTP.
Each bundle will then have 4 tabs: Items, Destination, recipients and Schedule.
Items is to select the report you want to add to the bundle. Click on Add Item and select the reports.
In my example, I will be adding 4 reports into this bundle.
The second tab Destination is to decide whether the report destination should be offline, FTP or email. (If we are opting for FTP and Offline, we can go for new scheduler instead of using legacy ones.)
Select the email as destination.
You have edit recipients under email radio button which will take you to next tab Recipients.
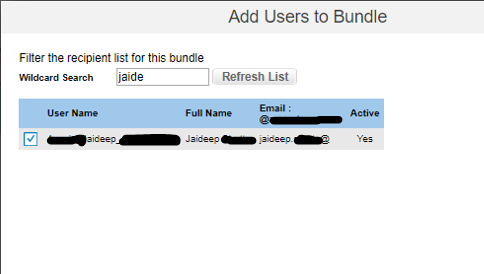
Click on add recipients and select the ones who should receive the mailers with the report attached.
In case you do not find the user in the list, please ask the user to access the report center page or proxy as user and go to the report center page. As soon as the user access the report center, the recipient list will be synched and will be available for selection as recipient.
Note: If you want to manually sync the any user’s specific data please got to Admin > User Maintenance
Bulk user Load is to import the list of users. It is suggested to not use the add new user manually in using user Maintenance.
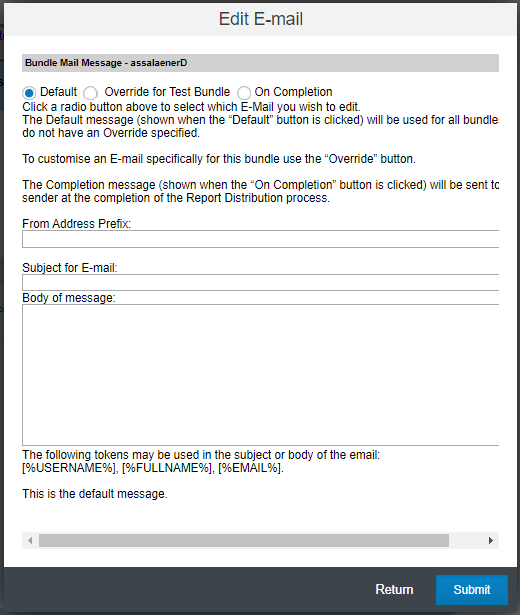
Before Scheduling the report lets design the email format that recipients are supposed to receive once the scheduled jobs are completed.
The email can be designed by selected Edit Email in the bundle,
There are 3 options.
We can use 3 tags [USERNAME], [FULLNAME] and [EMAIL] to address the user.
If we leave the Address Prefix in the email format as blank, recipient will receive email from Reportnig@successfactors.com. If you want to customize the email sender address as clientname@successfactors.com or clientnameHR@successfactors.com. Input the prefix in the From address prefix field.
Once the emails are configured, lets schedule the report
Screenshot of email received by the sender after the job completion.
Screenshot of email received by the recipients.
Thank you!
Please make sure that Report center is enabled, and the admin has respective permissions for configuration
Navigation:
Report Centre > View Schedules > Switch to Legacy report Distributor Tool


Design a Report:
First you should have a report designed which should be sent through email.
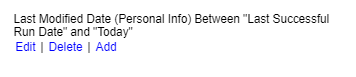
In my case, requirement was to send the data from EC which was modified from last successful run.
Hence, I have incorporated field selection filter to the ‘Last Modified Date’ as below
Configuration:
The Legacy distributor page looks like below, the scheduling of the reports and the recipients comes under the concept of Bundle.
First you create a bundle, each new bundle creation will ask you to decide on below parameter.
Bundle Name is the name for group of reports you want to schedule.
Page size is basically the report size, i found the A3 is bigger in size compared to others.
A limitation here is that the system allows only to distribute only PDF, Microsoft Word (doc and docx) and Microsoft PowerPoint (ppt and pptx) .
Hence when designing the report be careful on the number of columns used. If the report has more columns than the ones which can’t be fit inside the PDF report, then we might have to opt for offline download feature rather than email or FTP.
Each bundle will then have 4 tabs: Items, Destination, recipients and Schedule.

Items is to select the report you want to add to the bundle. Click on Add Item and select the reports.
In my example, I will be adding 4 reports into this bundle.


The second tab Destination is to decide whether the report destination should be offline, FTP or email. (If we are opting for FTP and Offline, we can go for new scheduler instead of using legacy ones.)
Select the email as destination.

You have edit recipients under email radio button which will take you to next tab Recipients.
Click on add recipients and select the ones who should receive the mailers with the report attached.
In case you do not find the user in the list, please ask the user to access the report center page or proxy as user and go to the report center page. As soon as the user access the report center, the recipient list will be synched and will be available for selection as recipient.

Note: If you want to manually sync the any user’s specific data please got to Admin > User Maintenance
Bulk user Load is to import the list of users. It is suggested to not use the add new user manually in using user Maintenance.


Before Scheduling the report lets design the email format that recipients are supposed to receive once the scheduled jobs are completed.
The email can be designed by selected Edit Email in the bundle,

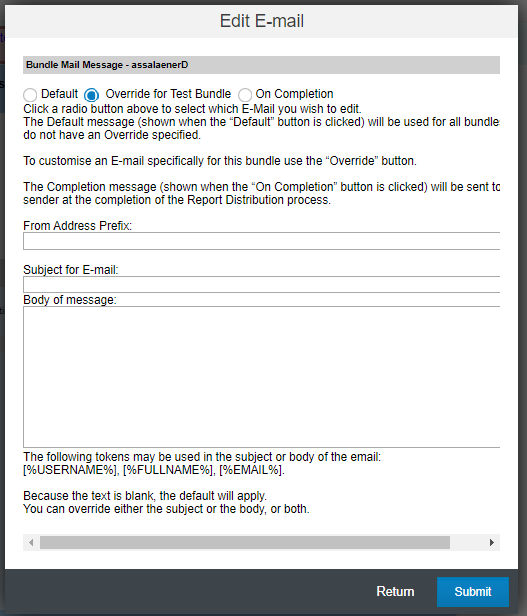
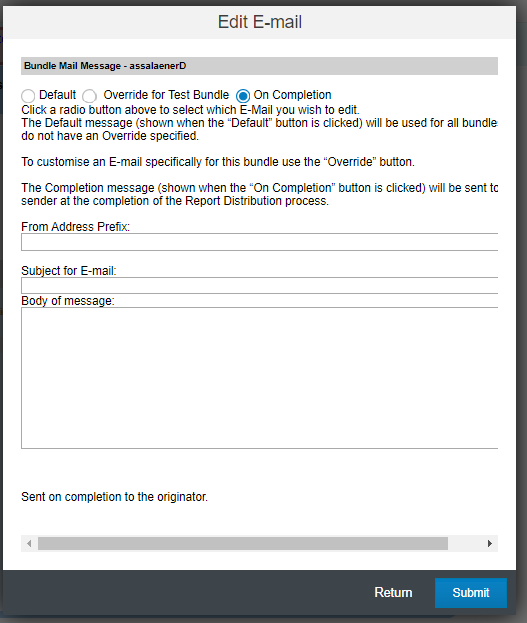
There are 3 options.
- Default: This email format is used to all bundles which do not have its own email override format. I recommend we always opt for Override for bundle instead of default.
- Override for bundle: This is email format designed for respective bundles. Edit this section and design on how the email should be sent to the recipients.
- On Completion: On completion email is sent to the admin who scheduled the report distributor. This email will consist of the logs and status of the scheduled job.
We can use 3 tags [USERNAME], [FULLNAME] and [EMAIL] to address the user.
If we leave the Address Prefix in the email format as blank, recipient will receive email from Reportnig@successfactors.com. If you want to customize the email sender address as clientname@successfactors.com or clientnameHR@successfactors.com. Input the prefix in the From address prefix field.
Once the emails are configured, lets schedule the report


Screenshot of email received by the sender after the job completion.

Screenshot of email received by the recipients.

Thank you!
- SAP Managed Tags:
- SAP SuccessFactors Employee Central,
- SAP SuccessFactors HXM Core
1 Comment
You must be a registered user to add a comment. If you've already registered, sign in. Otherwise, register and sign in.
Labels in this area
-
1H 2024 Product Release
5 -
2H 2023 Product Release
1 -
ACCRUAL TRANSFER
1 -
Advanced Workflow
1 -
Anonymization
1 -
BTP
1 -
Business Rules
1 -
Canvas Report
1 -
Career Development
1 -
Certificate-Based Authentication
1 -
Cloud Platform Integration
1 -
Compensation
1 -
Compensation Information Management
1 -
Compensation Management
1 -
Compliance
2 -
Content
1 -
Conversational AI
2 -
Custom Data Collection
1 -
custom portlet
1 -
Data & Analytics
1 -
Data Integration
1 -
Dayforce
1 -
deep link
1 -
deeplink
1 -
Delimiting Pay Components
1 -
Deprecation
1 -
Employee Central
1 -
Employee Central Global Benefits
1 -
Employee Central Payroll
1 -
employee profile
1 -
Employee Rehires
1 -
external terminal
1 -
external time events
1 -
Generative AI
2 -
Getting Started
1 -
Global Benefits
1 -
Guidelines
1 -
H2 2023
1 -
HR
2 -
HR Data Management
1 -
HR Transformation
1 -
ilx
1 -
Incentive Management Setup (Configuration)
1 -
Integration Center
2 -
Integration Suite
1 -
internal mobility
1 -
Introduction
1 -
learning
3 -
LMS
2 -
LXP
1 -
Massively MDF attachments download
1 -
Mentoring
1 -
Metadata Framework
1 -
Middleware Solutions
1 -
OCN
1 -
OData APIs
1 -
ONB USA Compliance
1 -
Onboarding
2 -
Opportunity Marketplace
1 -
Pay Component Management
1 -
Platform
1 -
portlet
1 -
POSTMAN
1 -
Predictive AI
2 -
Recruiting
1 -
recurring payments
1 -
Role Based Permissions (RBP)
2 -
SAP CPI (Cloud Platform Integration)
1 -
SAP HCM (Human Capital Management)
2 -
SAP HR Solutions
2 -
SAP Integrations
1 -
SAP release
1 -
SAP successfactors
5 -
SAP SuccessFactors Customer Community
1 -
SAP SuccessFactors OData API
1 -
SAP Workzone
1 -
SAP-PAYROLL
1 -
skills
1 -
Skills Management
1 -
sso deeplink
1 -
Stories in People Analytics
3 -
Story Report
1 -
SuccessFactors
2 -
SuccessFactors Employee central home page customization.
1 -
SuccessFactors Onboarding
1 -
successfactors onboarding i9
1 -
Table Report
1 -
talent
1 -
Talent Intelligence Hub
2 -
talents
1 -
Tax
1 -
Tax Integration
1 -
Time Accounts
1 -
Workflows
1 -
XML Rules
1
Related Content
- 3 key steps to kick-start your migration to Stories in People Analytics in Human Capital Management Blogs by Members
- Unable to get the legacy report bundle expiry notification. in Human Capital Management Q&A
- Impact of enabling Story Reporting on legacy reporting in Human Capital Management Q&A
- Job Requisition Approved Date in Story Reports in Human Capital Management Blogs by Members
- Usage Statistics of Table and Canvas Reports to Plan Transition to Stories in Human Capital Management Blogs by SAP
Top kudoed authors
| User | Count |
|---|---|
| 14 | |
| 12 | |
| 5 | |
| 3 | |
| 3 | |
| 1 | |
| 1 | |
| 1 | |
| 1 | |
| 1 |