
- SAP Community
- Products and Technology
- Technology
- Technology Blogs by SAP
- SAP Cloud Platform Backend service: Tutorial [0.5]...
Technology Blogs by SAP
Learn how to extend and personalize SAP applications. Follow the SAP technology blog for insights into SAP BTP, ABAP, SAP Analytics Cloud, SAP HANA, and more.
Turn on suggestions
Auto-suggest helps you quickly narrow down your search results by suggesting possible matches as you type.
Showing results for
Product and Topic Expert
Options
- Subscribe to RSS Feed
- Mark as New
- Mark as Read
- Bookmark
- Subscribe
- Printer Friendly Page
- Report Inappropriate Content
04-29-2019
9:06 AM
This blog is part of a series of tutorials explaining the usage of SAP Cloud Platform Backend service in detail.
This post explains how to configure security for Backend service.
At the current point in time, SAP Cloud Platform Backend service supports only a very limited set of authorization mechanisms:
Reason is the targeted usage by frontend applications rather than human testers.
Since Basic Authentication is - currently - not supported, it is necessary to do some configuration steps to enable OAuth
Note:
This blog is not necessary if you use the Backend service cockpit to call your APIs.
Configuring security is only required if you want to call your APIs from external application or tool like e.g. REST client
We need a couple of preparation steps, to be done in our cloud account, before we can request an authorization token: For that purpose there's the service offering "Authorization & Trust Management" in the SAP Cloud Platform.
Note:
Below section describes how to create a service instance in your Cloud Foundry space.
If you're new to SAP Cloud Platform trial account and Cloud Foundry and if you followed my tutorials in detail, then you probably don't have a space yet.
The good news: Especially for YOU, I created a tutorial, describing how to enable Cloud Foundry and assign quota in your trial account.
Go to your BETA-enabled subaccount, I mean that subaccount which you use to open your SAP Cloud Platform Backend service subscription.
Go into your space
Note:
Make sure that you choose a space which is located in the same subaccount like your Backend service subscription.
In the left navigation pane, expand “Services >” and click on “Service Marketplace”
Here you can see all the services that are offered in your cloud account:

Click on the tile “Authorization & Trust Managem…”
Then click on “Instances” in the left pane
Afterwards you can click on the “New Instance” button

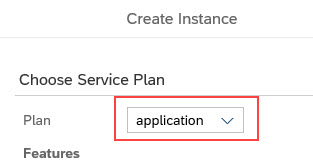
In the creation dialog, make sure your "service plan" is chosen as “application”:
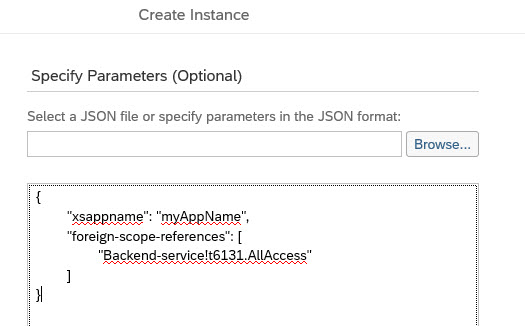
In the next wizard page, “Specify Parameters”, enter the following JSON snippet in the text field:
Note:
The value for property "xsappname" has to be unique
Note:
The syntax for foreign scope lets XSUAA resolve the scope based on the variable.
Here's an alternative, using the hard-coded name of the foreign scope:
{
"xsappname": "myAppName",
"tenant-mode" : "dedicated",
"foreign-scope-references": [
"Backend-service!t6131.AllAccess"
]
}
Note:
The reference name of the foreign scope can be found in the details page of the Backend service, then expand the "Security" menu entry and view the "Role Templates" (see here)
The next wizard page allows to bind to an existing application.
You can ignore and press next.
Finally, enter a name of your choice for the new instance

Press “Finish”.
Your instance of xsuaa service is created in your space.
Now proceed with service key creation.
Note:
Creating a service key is required because we want to call the Backend service API from externally.
Means, not from an app deployed in the Cloud Foundry Space, but from a REST client on our local Laptop. That's why a service key needs to be explicitly created and properties need to be noted.
See documentation
Click on your newly created instance of xsuaa service

Ignore the “Referencing Apps” screen, click on “Service Keys” in the left navigation pane.
Then you can hit the button “Create Service Key”

In the creation popup, you can give an name of your choice, then press “Save”

The result is presented to your delighted eyes:

We’ve created a service instance of the xsuaa service and we’ve created a service key for it.
In the service key details we see 3 values which we'll need later
Thus, we take a note of those 3 property values (I've marked them in the screenshot above)
In my example (slightly obfuscated):
Note:
If you don't see a property like the "url", the last one, you might need to maximize your browser window or use a different browser
Note:
clientid and clientsecret are used like user credentials by the client when it connects to the XSUAA instance.
Note:
Again, we need the client credentials because we want to connect to XSUAA instance from outside, from local REST client tool.
If we would write a web application and deploy it to SAP Cloud Platform, then we would bind it to an XSUAA instance and the client credentials would be assigned automatically under the hood
In this blog, we've created a service instance of xsuaa service with the parameters required for SAP Cloud Platform Backend service, subscribed in your trial account.
Furthermore, we've created a service key for the xsuaa service instance, required for the client authentication to the oauth endpoint
After these 2 preparation steps, you're able to call your Backend service APIs from an external application, like e.g. a REST client.
This post explains how to configure security for Backend service.
Background
At the current point in time, SAP Cloud Platform Backend service supports only a very limited set of authorization mechanisms:
- OAuth authentication flow
- nothing else
Reason is the targeted usage by frontend applications rather than human testers.
Since Basic Authentication is - currently - not supported, it is necessary to do some configuration steps to enable OAuth
Note:
This blog is not necessary if you use the Backend service cockpit to call your APIs.
Configuring security is only required if you want to call your APIs from external application or tool like e.g. REST client
Configure security in Cloud account
We need a couple of preparation steps, to be done in our cloud account, before we can request an authorization token: For that purpose there's the service offering "Authorization & Trust Management" in the SAP Cloud Platform.
Note:
Below section describes how to create a service instance in your Cloud Foundry space.
If you're new to SAP Cloud Platform trial account and Cloud Foundry and if you followed my tutorials in detail, then you probably don't have a space yet.
The good news: Especially for YOU, I created a tutorial, describing how to enable Cloud Foundry and assign quota in your trial account.
1. Create xsuaa service instance
Go to your BETA-enabled subaccount, I mean that subaccount which you use to open your SAP Cloud Platform Backend service subscription.
Go into your space
Note:
Make sure that you choose a space which is located in the same subaccount like your Backend service subscription.
In the left navigation pane, expand “Services >” and click on “Service Marketplace”
Here you can see all the services that are offered in your cloud account:
Click on the tile “Authorization & Trust Managem…”
Then click on “Instances” in the left pane
Afterwards you can click on the “New Instance” button
In the creation dialog, make sure your "service plan" is chosen as “application”:
In the next wizard page, “Specify Parameters”, enter the following JSON snippet in the text field:
{

  "xsappname": "myAppName",

  "tenant-mode" : "dedicated",

  "foreign-scope-references": [

    "$XSAPPNAME(application,4bf2d51c-1973-470e-a2bd-9053b761c69c,Backend-service).AllAccess"

  ]

}
Note:
The value for property "xsappname" has to be unique
Note:
The syntax for foreign scope lets XSUAA resolve the scope based on the variable.
Here's an alternative, using the hard-coded name of the foreign scope:
{
"xsappname": "myAppName",
"tenant-mode" : "dedicated",
"foreign-scope-references": [
"Backend-service!t6131.AllAccess"
]
}
Note:
The reference name of the foreign scope can be found in the details page of the Backend service, then expand the "Security" menu entry and view the "Role Templates" (see here)
The next wizard page allows to bind to an existing application.
You can ignore and press next.
Finally, enter a name of your choice for the new instance
Press “Finish”.
Your instance of xsuaa service is created in your space.
Now proceed with service key creation.
2. Create Service Key
Note:
Creating a service key is required because we want to call the Backend service API from externally.
Means, not from an app deployed in the Cloud Foundry Space, but from a REST client on our local Laptop. That's why a service key needs to be explicitly created and properties need to be noted.
See documentation
Click on your newly created instance of xsuaa service
Ignore the “Referencing Apps” screen, click on “Service Keys” in the left navigation pane.
Then you can hit the button “Create Service Key”
In the creation popup, you can give an name of your choice, then press “Save”
The result is presented to your delighted eyes:
We’ve created a service instance of the xsuaa service and we’ve created a service key for it.
In the service key details we see 3 values which we'll need later
Thus, we take a note of those 3 property values (I've marked them in the screenshot above)
In my example (slightly obfuscated):
"clientid": "sb-baas_access!t12345",
"clientsecret": "2abcdefghijklmnopqrstuvwxy=",
"url": "https://betasubaccount.authentication.eu10.hana.ondemand.com"
Note:
If you don't see a property like the "url", the last one, you might need to maximize your browser window or use a different browser
Note:
clientid and clientsecret are used like user credentials by the client when it connects to the XSUAA instance.
Note:
Again, we need the client credentials because we want to connect to XSUAA instance from outside, from local REST client tool.
If we would write a web application and deploy it to SAP Cloud Platform, then we would bind it to an XSUAA instance and the client credentials would be assigned automatically under the hood
Summary
In this blog, we've created a service instance of xsuaa service with the parameters required for SAP Cloud Platform Backend service, subscribed in your trial account.
Furthermore, we've created a service key for the xsuaa service instance, required for the client authentication to the oauth endpoint
After these 2 preparation steps, you're able to call your Backend service APIs from an external application, like e.g. a REST client.
Labels:
6 Comments
You must be a registered user to add a comment. If you've already registered, sign in. Otherwise, register and sign in.
Labels in this area
-
ABAP CDS Views - CDC (Change Data Capture)
2 -
AI
1 -
Analyze Workload Data
1 -
BTP
1 -
Business and IT Integration
2 -
Business application stu
1 -
Business Technology Platform
1 -
Business Trends
1,658 -
Business Trends
93 -
CAP
1 -
cf
1 -
Cloud Foundry
1 -
Confluent
1 -
Customer COE Basics and Fundamentals
1 -
Customer COE Latest and Greatest
3 -
Customer Data Browser app
1 -
Data Analysis Tool
1 -
data migration
1 -
data transfer
1 -
Datasphere
2 -
Event Information
1,400 -
Event Information
66 -
Expert
1 -
Expert Insights
177 -
Expert Insights
301 -
General
1 -
Google cloud
1 -
Google Next'24
1 -
GraphQL
1 -
Kafka
1 -
Life at SAP
780 -
Life at SAP
13 -
Migrate your Data App
1 -
MTA
1 -
Network Performance Analysis
1 -
NodeJS
1 -
PDF
1 -
POC
1 -
Product Updates
4,577 -
Product Updates
346 -
Replication Flow
1 -
REST API
1 -
RisewithSAP
1 -
SAP BTP
1 -
SAP BTP Cloud Foundry
1 -
SAP Cloud ALM
1 -
SAP Cloud Application Programming Model
1 -
SAP Datasphere
2 -
SAP S4HANA Cloud
1 -
SAP S4HANA Migration Cockpit
1 -
Technology Updates
6,873 -
Technology Updates
429 -
Workload Fluctuations
1
Related Content
- Govern SAP APIs living in various API Management gateways in a single place with Azure API Center in Technology Blogs by Members
- SAP Fiori for SAP S/4HANA - Empowering Your Homepage: Enabling My Home for SAP S/4HANA 2023 FPS01 in Technology Blogs by SAP
- Supporting Multiple API Gateways with SAP API Management – using Azure API Management as example in Technology Blogs by SAP
- Consuming SAP with SAP Build Apps - Mobile Apps for iOS and Android in Technology Blogs by SAP
- Onboarding Users in SAP Quality Issue Resolution in Technology Blogs by SAP
Top kudoed authors
| User | Count |
|---|---|
| 44 | |
| 25 | |
| 17 | |
| 15 | |
| 11 | |
| 7 | |
| 7 | |
| 7 | |
| 7 | |
| 6 |