
- SAP Community
- Products and Technology
- Technology
- Technology Blogs by SAP
- SAP Cloud Platform Backend service: Tutorial [0.4]...
Technology Blogs by SAP
Learn how to extend and personalize SAP applications. Follow the SAP technology blog for insights into SAP BTP, ABAP, SAP Analytics Cloud, SAP HANA, and more.
Turn on suggestions
Auto-suggest helps you quickly narrow down your search results by suggesting possible matches as you type.
Showing results for
Product and Topic Expert
Options
- Subscribe to RSS Feed
- Mark as New
- Mark as Read
- Bookmark
- Subscribe
- Printer Friendly Page
- Report Inappropriate Content
04-29-2019
8:48 AM
This blog is part of a series of tutorials explaining the usage of SAP Cloud Platform Backend service in detail.
The following description is only required as long as the SAP Cloud Platform Backend service is in BETA mode.
Because during this period, you need to create a separate subaccount, in order to enable it to use the BETA features.
Creating a BETA-enabled subaccount is described here. But the description of enabling Cloud Foundry is missing there.
If you wish to call your Backend service APIs from external application, you need Cloud Foundry, a space and service instances.
If you run 2 subaccounts in your Trial account, you might run into problems, due to lack of quota.
However, there's one solution: follow my description below;-)
Below description is divided into 2 steps:
1. Enable Cloud Foundry
2. Assign quota
BTW, this description is meant for users of the free Trial account, where some limited free quota is available
When you created a new subaccount for enabling and using BETA features, as described in this blog, it wasn’t required to enable Cloud Foundry.
So, if you haven’t done already, now it is the right moment to go to your BETA-subaccount and click on “Enable Cloud Foundry”:

A little popup is displayed, asking for a name of the organization, which will be created for Cloud Foundry.
You can leave the proposed default name and click “Create”

Then wait short time while processing

After successful creation, click on “Spaces” in the left navigation pane.
Then click on “New Space”

In the popup, enter a name of your choice, then press “Save”

A tile with the new Space is displayed in the “Spaces” screen.
First you’ll be happy – it looks so green - but after having a closer look….

You realize that the nice new space is (almost) useless, because it doesn’t have any quota for memory, so you cannot deploy an application.
Note:
The sceenshot above shows that there is no memory and no routing allowed, but is it possible to create 10 service instances.
If you only need e.g. an xsuaa instance, then you can skip the following description of quota assignment
What do we have to do?
In fact, there is not much, but enough quota in a public Trial account. But initially it was all assigned to the one trial subaccount.
When we created a second subaccount, it was not automatically provided with quota, this has to be done by admin, after careful consideration etc
OK, we're admins and have considered enough.
Go to your global account.
If it is a Trial account, it usually starts with P and ends with trial
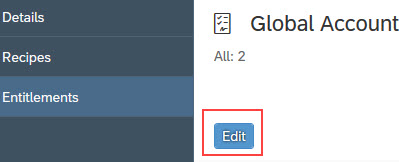
Once you’ve found it, click on “Entitlements” on the left navigation pane

Here in the "Entitlements" screen, you can distribute the available quota among the existing subaccounts
Press “Edit” on the top of the page
Scroll down to “Application Runtime”.
Here you can assign memory for applications to your new subaccount.

First, click on the little "minus" next to the trial subaccount account, to reduce the assigned memory

Afterwards, you want to increase the memory assignment of your new beta-enabled subaccount, but there seems to be a bug, such that the little "plus" doesn’t get enabled
To workaround it, scroll up to the top of the page and press "Save" to save the memory reduction.

Then press “Edit” again and scroll down to “Application Runtime”.
Now the little “+” of your second subaccount is enabled and you can increase the memory of your second subaccount.

That's it.
Now, if required, you may continue distributing the quota of other assets.
At the end, scroll up and press “Save”
Now you can go to your Beta-Subaccount.
If you have more than one Space, then you need to do an additional step:
Create "Quota plans" and distribute the quota among the spaces.
If you have only one space, then you don't need to do anything: it anyways gets all the available quota.

Finally, you can check your space, which looks different now:

The screenshot shows that memory and routes are available.
So we're done.
In the previous preparation blog, we had created a new subaccount in our global Trial account.
And we started using SAP Cloud Platform Backend service.
In this blog, we've enabled Cloud Foundry for this new subaccount.
Furthermore,we've assigned quota to this new subaccount.
Now it is possible to properly use that new subaccount.
The following description is only required as long as the SAP Cloud Platform Backend service is in BETA mode.
Because during this period, you need to create a separate subaccount, in order to enable it to use the BETA features.
Creating a BETA-enabled subaccount is described here. But the description of enabling Cloud Foundry is missing there.
If you wish to call your Backend service APIs from external application, you need Cloud Foundry, a space and service instances.
If you run 2 subaccounts in your Trial account, you might run into problems, due to lack of quota.
However, there's one solution: follow my description below;-)
Below description is divided into 2 steps:
1. Enable Cloud Foundry
2. Assign quota
BTW, this description is meant for users of the free Trial account, where some limited free quota is available
Step 1: Enable Cloud Foundry
When you created a new subaccount for enabling and using BETA features, as described in this blog, it wasn’t required to enable Cloud Foundry.
So, if you haven’t done already, now it is the right moment to go to your BETA-subaccount and click on “Enable Cloud Foundry”:
A little popup is displayed, asking for a name of the organization, which will be created for Cloud Foundry.
You can leave the proposed default name and click “Create”
Then wait short time while processing
After successful creation, click on “Spaces” in the left navigation pane.
Then click on “New Space”
In the popup, enter a name of your choice, then press “Save”
A tile with the new Space is displayed in the “Spaces” screen.
First you’ll be happy – it looks so green - but after having a closer look….
You realize that the nice new space is (almost) useless, because it doesn’t have any quota for memory, so you cannot deploy an application.
Note:
The sceenshot above shows that there is no memory and no routing allowed, but is it possible to create 10 service instances.
If you only need e.g. an xsuaa instance, then you can skip the following description of quota assignment
Step 2: Assign quota
What do we have to do?
In fact, there is not much, but enough quota in a public Trial account. But initially it was all assigned to the one trial subaccount.
When we created a second subaccount, it was not automatically provided with quota, this has to be done by admin, after careful consideration etc
OK, we're admins and have considered enough.
Go to your global account.
If it is a Trial account, it usually starts with P and ends with trial
Once you’ve found it, click on “Entitlements” on the left navigation pane
Here in the "Entitlements" screen, you can distribute the available quota among the existing subaccounts
Press “Edit” on the top of the page
Scroll down to “Application Runtime”.
Here you can assign memory for applications to your new subaccount.
First, click on the little "minus" next to the trial subaccount account, to reduce the assigned memory
Afterwards, you want to increase the memory assignment of your new beta-enabled subaccount, but there seems to be a bug, such that the little "plus" doesn’t get enabled
To workaround it, scroll up to the top of the page and press "Save" to save the memory reduction.
Then press “Edit” again and scroll down to “Application Runtime”.
Now the little “+” of your second subaccount is enabled and you can increase the memory of your second subaccount.
That's it.
Now, if required, you may continue distributing the quota of other assets.
At the end, scroll up and press “Save”
Now you can go to your Beta-Subaccount.
If you have more than one Space, then you need to do an additional step:
Create "Quota plans" and distribute the quota among the spaces.
If you have only one space, then you don't need to do anything: it anyways gets all the available quota.
Finally, you can check your space, which looks different now:
The screenshot shows that memory and routes are available.
So we're done.
Summary
In the previous preparation blog, we had created a new subaccount in our global Trial account.
And we started using SAP Cloud Platform Backend service.
In this blog, we've enabled Cloud Foundry for this new subaccount.
Furthermore,we've assigned quota to this new subaccount.
Now it is possible to properly use that new subaccount.
Labels:
You must be a registered user to add a comment. If you've already registered, sign in. Otherwise, register and sign in.
Labels in this area
-
ABAP CDS Views - CDC (Change Data Capture)
2 -
AI
1 -
Analyze Workload Data
1 -
BTP
1 -
Business and IT Integration
2 -
Business application stu
1 -
Business Technology Platform
1 -
Business Trends
1,661 -
Business Trends
87 -
CAP
1 -
cf
1 -
Cloud Foundry
1 -
Confluent
1 -
Customer COE Basics and Fundamentals
1 -
Customer COE Latest and Greatest
3 -
Customer Data Browser app
1 -
Data Analysis Tool
1 -
data migration
1 -
data transfer
1 -
Datasphere
2 -
Event Information
1,400 -
Event Information
64 -
Expert
1 -
Expert Insights
178 -
Expert Insights
273 -
General
1 -
Google cloud
1 -
Google Next'24
1 -
Kafka
1 -
Life at SAP
784 -
Life at SAP
11 -
Migrate your Data App
1 -
MTA
1 -
Network Performance Analysis
1 -
NodeJS
1 -
PDF
1 -
POC
1 -
Product Updates
4,577 -
Product Updates
326 -
Replication Flow
1 -
RisewithSAP
1 -
SAP BTP
1 -
SAP BTP Cloud Foundry
1 -
SAP Cloud ALM
1 -
SAP Cloud Application Programming Model
1 -
SAP Datasphere
2 -
SAP S4HANA Cloud
1 -
SAP S4HANA Migration Cockpit
1 -
Technology Updates
6,886 -
Technology Updates
403 -
Workload Fluctuations
1
Related Content
- Kerberos Error when task "deploy" from db-deployer in Technology Q&A
- Top Picks: Innovations Highlights from SAP Business Technology Platform (Q1/2024) in Technology Blogs by SAP
- Consuming SAP with SAP Build Apps - Connectivity options for low-code development - part 2 in Technology Blogs by SAP
- Cloud Integration: Manually Sign / Verify XML payload based on XML Signature Standard in Technology Blogs by SAP
- Identity Federation: SAP Ariba SSO with SAP Cloud Identity Services - Identity Authentication in Technology Blogs by SAP
Top kudoed authors
| User | Count |
|---|---|
| 12 | |
| 10 | |
| 9 | |
| 7 | |
| 7 | |
| 7 | |
| 6 | |
| 6 | |
| 5 | |
| 4 |