
- SAP Community
- Products and Technology
- Technology
- Technology Blogs by SAP
- How to package and release Java based SuccessFacto...
Technology Blogs by SAP
Learn how to extend and personalize SAP applications. Follow the SAP technology blog for insights into SAP BTP, ABAP, SAP Analytics Cloud, SAP HANA, and more.
Turn on suggestions
Auto-suggest helps you quickly narrow down your search results by suggesting possible matches as you type.
Showing results for
Product and Topic Expert
Options
- Subscribe to RSS Feed
- Mark as New
- Mark as Read
- Bookmark
- Subscribe
- Printer Friendly Page
- Report Inappropriate Content
03-27-2018
6:42 PM
Overview
SAP Cloud Platform allows you to achieve isolation between the different application lifecycle stages (development, testing, productive) by using multiple sub accounts. In the previous blog, you learned how to develop and deploy java based extension application to SAP Cloud Platform account which is modeled as development account paired with SuccessFactors development instance. In this blog, you’ll will learn how to package and deploy sample Benefits java extension application onto extension account modeled as QA or Production account .

SAP offers various Life cycle management tools to manage lifecycle of an extension application, In the previous blog we learned how to use SAP Cloud Platform SDK neo commands to deploy extension application during development phase which includes multiple set of commands. Executing same set of commands may not be feasible or cumbersome when it comes to production deployment. Especially in the context of SuccessFactors extension application which is comprised of various application types and configurations, designed to serve a certain scenario or a task. Typically the comprised parts of the solution are interconnected and have a common lifecycle. They are explicitly deployed, updated, deleted, configured, and monitored together. That too for managing external dependencies which might consists of several artifacts across SAP Cloud Platform and SuccessFactors but belong to the same logical application and share common lifecycle. And for managing these kinds of dependencies, SAP Cloud Platform tool support is quite important.
On SAP Cloud Platform, we have a Solutions "Lifecycle Management tool" which allows you to easily manage complex deployable artifacts. You can compose a solution by yourself, or you can acquire one from partners. Furthermore, you can use the solutions to deploy artifacts that are comprised by entities external to SAP Cloud Platform, such as SAP SuccessFactors entities. This allows you to have a common management and lifecycle of artifacts spread across various SAP platforms and systems.
The following entities are required for creating a solution:
- A Multi-Target Application (MTA) archive, which contains all required application types and configurations as well as a deployment descriptor file. It is intended to be used as a generic artifact that can be deployed and managed on several SAP Cloud Platform subaccounts. For example, you can reuse one MTA archive on your QA and productive subaccounts.
- (Optionally) An МТА extension descriptor file that contains a deployment-specific data. It is intended to be used as a specific data source for a given SAP Cloud Platform subaccount. For example, you can have different extension descriptors for your QA and productive subaccounts. Alternatively, you can also provide this data manually during the solution deployment.
To learn more about Multi-Target Application and how to create MTA archive file, please check out Open SAP course on Cloud-Native Operations with SAP Cloud Platform, Week 2 : Lifecycle Management Basics units.
Solutions can be deployed as :-
- Standard Solution :The solution is only deployed and can be used in the current SAP Cloud Platform subaccount and subscription to it is not possible. All entities that are part of the solution will be deployed and managed within this subaccount.
- Provided Solution : Mostly Multitenant application are deployed in this mode, When providing a solution for subscription, you can define which parts of it will be deployed to your subaccount, and which parts will be deployed to the subscriber's subaccount.
In this blog, i'm going to focus more on standard solution deployment option. if your interested in learning about Provided solution deployment go this blog.
Production Deployment Steps:
Steps for deploying extension solution using MTA archive file.
To demonstrate packing and deployment process, we will work with previously used sample benefits application to generate MTA archive file and deploy using Solutions. To make things easier, sample benefits application comes with pre-package content to facilitate learning of packing and deployment process.
Step1: Open Eclipse IDE and navigate to the Java Resources -> resources -> folder of benefits sample extension application.
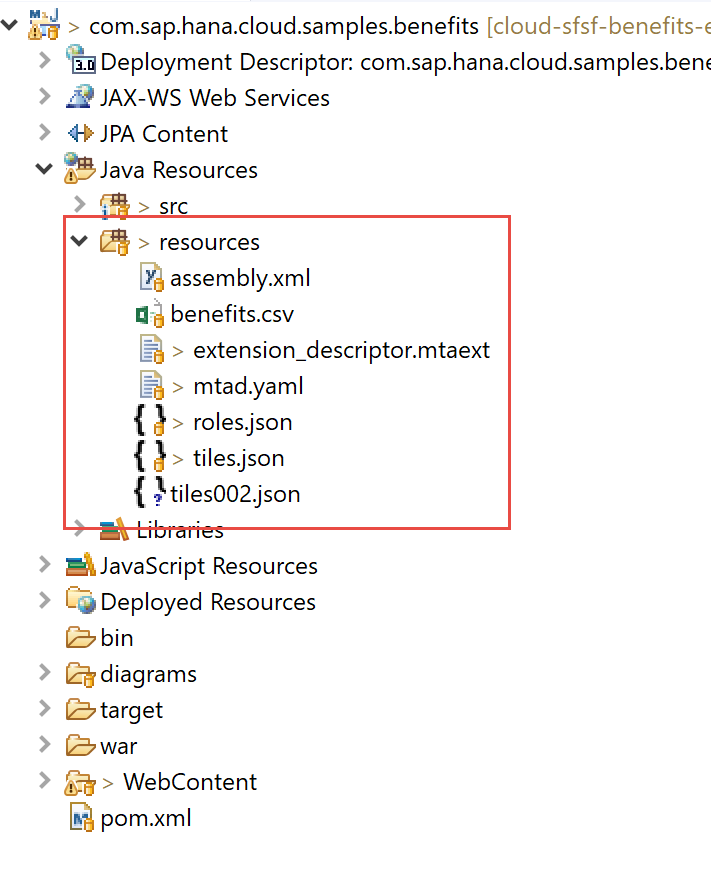
In order to create MTA archive file, at minimum MTA archive should consists of the following:
The MANIFEST.MF file - Contain a name section for each MTA module part of the archive file.
The mtad.yaml MTA deployment descriptor file - This section contains the parameters and options that can be used to compose the structure of an MTA deployment descriptor.
Plus any other dependencies or resource types as defined in mtad.yaml file.
Note:- Both MTA deployment descriptor and MTA extension descriptor uses the YAML file format, strictly adhere to the following syntax practices:
- The parameter names are case-sensitive
- The indents and spacing are specific
Step2: Open tiles.json file to make sure that you have right tiles.json file depending on the home page tile set in SuccessFactors Instance your working with. Since all these dependency files like tiles.json and roles.json gets package into resources folder of MTA archive file during build process. Mismatch of wrong tiles.json file could lead to deployment failure.

Please refer on line documentation for sample tiles.json file.
During Maven build process, MTA archive file is auto generated. Take a look at pom.xml for the configuration steps to generate auto MTA archive file.
Note:- Rename rolesXXX.json to roles.json and tilesXXX.json to tiles.json before doing maven build.
Step3: Changes to corresponding tiles parameter in mtad.yaml file.
Change reference to use “sfsf-home-page-tiles” for tiles parameter in yaml descriptor file.

In the example above, you can see the following:
- The sample “Benefits” Java application module requires both database binding resource and the SAP SuccessFactors Roles module.
- The SAP SuccessFactors tile is defined as a parameter of the sample “Benefits” Java application and points to a JSON file within the Multi-Target Application archive
- SAP SuccessFactors is role provider which is defined as a parameter for the sample “Benefits” Java application
- The sample “Benefits” Java application is going to use the SAP SuccessFactors IDP for authentication
- The sample “Benefits” Java application is going to use the default connectivity options when accessing the SAP SuccessFactors system
Step4: Edit the Java Resources -> resources -> extension_descriptor.mtaext file
Set the following values for the parameters at the end of the file since benefits extension app has dependency on database to persist data.
Database details for the target account where solution is going to be deployed
id: <HANADBID> See the screen shot on how to get DB ID.
user-id: <userid> HANA database user id if applicable
password: <PWD> HANA database password if applicable
account: <Primary SAP Cloud Platform account in which database is provisioned> - Mostly in case of shared database.


Save the changes and do the maven build. Please refer previous blog on how to do Maven build.
The following example shows the basic structure of an MTA archive. It contains a Java application .war file and a META-INF directory, which contains an MTA deployment descriptor with a module and a MANIFEST.MF file and resources directory with tiles.json and roles.json which are dependency defined within mtad.yaml.
Example:-

/benefits.war

/META-INF

/META-INF/mtad.yaml

/META-INF/MANIFEST.MF

/resources/tiles000.json

/resources/roles000.json


Note:-The Multi-Target Application (MTA) archive is created in a way compatible with the JAR file specification.

This allows us to use common tools for creating, modifying, and signing such types of archives.


Refer this link to learn more about Modeling SAP SuccessFactors Extensions.
Step5: Logon to QA or Production extension sub account where the solution needs to be deployed.
Select the Solutions tab on the left-hand side and the select Deploy option.

Step6: Browse for the following files under your Eclipse project:
MTA Archive: target -> com.sap.hana.cloud.samples.benefits.mtar
MTA Extension Descriptor:Java Resources -> resources -> extension_descriptor.mtaext

Finally click on Deploy button.
Step7: Wait for the deployment to complete and finally click on Finish button.

Step8: You will notice that the Solution is deployed successfully. Click on the solution application tile.

Step9: Under Solution Components,You can check status of each artifacts deployed as part of the Solution.

Step10: Navigate to Applications ->Java Application -> your Application on the SAP Cloud Platform cockpit. Check out Destinations, Data Source Bindings and Roles section.
All the artifacts got created based on parameters defined as part of mtad.yaml file.

Step11: Configure extension application’s home page tile. By default, the new extension application tile is not visible until a customer’s SAP SuccessFactors HR Administrator explicitly assigns to end users. Reason being, SuccessFactors HR Administrator knows best whom to assign based on the roles. To configure the group assignment and make the tile available go to Manage Home Page tool in SAP SuccessFactors
Login to SAP SuccessFactors instance where solution was deployed.Start typing Manage Home Page in the search field and select the entry once it is found.

Step12: Switch to the Not Used tab and select the pen button to edit the SAP Corporate Benefits sample app home page tile

.
Step13: Switch to the Assignments tab and select the + button to create a new Group

Step14: Populate the Group Definition dialog window with values
• Group Name: BenefitsXXX Tile Group
• People Pool category: User
• User: <userid>

Click on Done buttons when finished.
Step15: Select the newly created Group and click on finish button

Step16: Select Default from the Move To dropdown for your tile. The tile will disappear – it will be immediately moved to the Default group

Click on Save button.
Step17: Once the above configuration steps are done, you can see the extension application’s tile appearing on the SAP SuccessFactors home page. Open the application by selecting the tile.

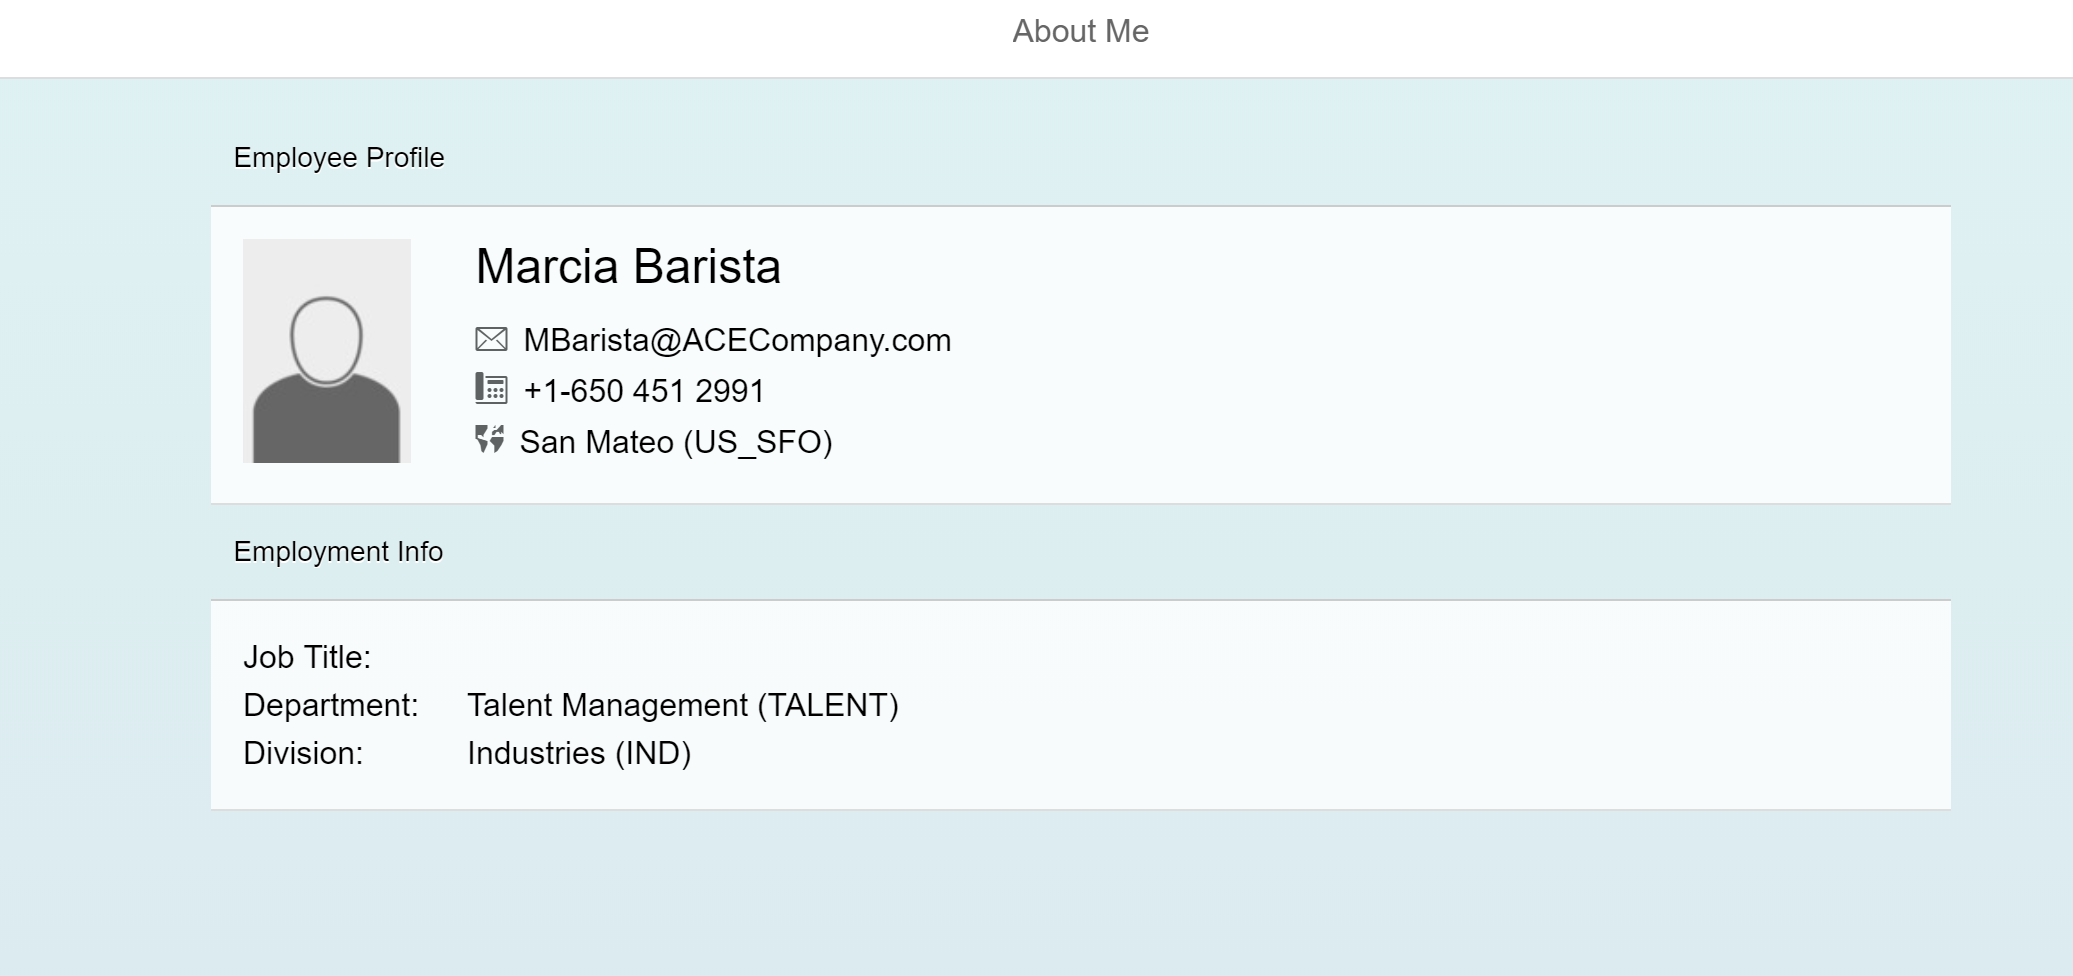
Step18: You should see three tiles as shown below. Click on About me Tile to look at the current user information fetched from the SAP SuccessFactors OData API.

Step19: You should see output as shown below.
Step20: Go ahead and assign custom role imported into SuccessFactors instance to your user id. After that you should see 2 additional tabs displayed after role assignment as shown below.
Refer previous blog for detailed steps. ( Part 5 : Step 1 to Step 4)

Summary
In this blog, you learned how to manage lifecycle of an SuccessFactors extension application. Basically by creating Multi-Target Application (MTA) archive file which includes both artifacts of SAP Cloud Platform and SAP SuccessFactors. An MTA archive file is a hand-over artifact between developers and admins and a delivery construct for Partners. It can be delivered, transported, linked to SAP software components, and deployed.The process can be automated in a Continuous Integration pipeline.
You also learned how solutions "Lifecycle Management tool" can be used to deploy Multi-target Applications (MTAs), which allows you to easily manage complex deployable artifacts. This allows you to have a common management and lifecycle of artifacts spread across various SAP platforms and systems.
In the next blog, You will learn how solutions can be deployed as multi tenant(provider) in the account of the provider and how subscriptions can be managed for an consumer account with granted entitlement on provider account.
To learn more about Lifecycle Management of SAP Cloud Platform Applications check out learning journey.
Happy Learning !!
- SAP Managed Tags:
- SAP Business Technology Platform
Labels:
You must be a registered user to add a comment. If you've already registered, sign in. Otherwise, register and sign in.
Labels in this area
-
ABAP CDS Views - CDC (Change Data Capture)
2 -
AI
1 -
Analyze Workload Data
1 -
BTP
1 -
Business and IT Integration
2 -
Business application stu
1 -
Business Technology Platform
1 -
Business Trends
1,658 -
Business Trends
93 -
CAP
1 -
cf
1 -
Cloud Foundry
1 -
Confluent
1 -
Customer COE Basics and Fundamentals
1 -
Customer COE Latest and Greatest
3 -
Customer Data Browser app
1 -
Data Analysis Tool
1 -
data migration
1 -
data transfer
1 -
Datasphere
2 -
Event Information
1,400 -
Event Information
66 -
Expert
1 -
Expert Insights
177 -
Expert Insights
299 -
General
1 -
Google cloud
1 -
Google Next'24
1 -
Kafka
1 -
Life at SAP
780 -
Life at SAP
13 -
Migrate your Data App
1 -
MTA
1 -
Network Performance Analysis
1 -
NodeJS
1 -
PDF
1 -
POC
1 -
Product Updates
4,577 -
Product Updates
345 -
Replication Flow
1 -
RisewithSAP
1 -
SAP BTP
1 -
SAP BTP Cloud Foundry
1 -
SAP Cloud ALM
1 -
SAP Cloud Application Programming Model
1 -
SAP Datasphere
2 -
SAP S4HANA Cloud
1 -
SAP S4HANA Migration Cockpit
1 -
Technology Updates
6,872 -
Technology Updates
427 -
Workload Fluctuations
1
Related Content
- FAQ for C4C Certificate Renewal in Technology Blogs by SAP
- 10+ ways to reshape your SAP landscape with SAP BTP - Blog 3 Interview in Technology Blogs by SAP
- What you need to know about Finance in SAP S/4HANA Cloud Public Edition in Technology Blogs by SAP
- Available Business Add-Ins (BAdIs) for Key User Extensibility for Production Planning and Control in Technology Q&A
- SAP PI/PO migration? Why you should move to the Cloud with SAP Integration Suite! in Technology Blogs by SAP
Top kudoed authors
| User | Count |
|---|---|
| 41 | |
| 25 | |
| 17 | |
| 14 | |
| 9 | |
| 7 | |
| 6 | |
| 6 | |
| 6 | |
| 6 |