
- SAP Community
- Products and Technology
- Technology
- Technology Blogs by SAP
- How to deploy Java based SuccessFactors extension ...
Technology Blogs by SAP
Learn how to extend and personalize SAP applications. Follow the SAP technology blog for insights into SAP BTP, ABAP, SAP Analytics Cloud, SAP HANA, and more.
Turn on suggestions
Auto-suggest helps you quickly narrow down your search results by suggesting possible matches as you type.
Showing results for
Product and Topic Expert
Options
- Subscribe to RSS Feed
- Mark as New
- Mark as Read
- Bookmark
- Subscribe
- Printer Friendly Page
- Report Inappropriate Content
03-21-2018
8:10 PM
Overview
In the previous blog, you learned how to deploy java based extension application to SAP Cloud Platform trial account. In this blog, you'll will learn how to build, deploy and run sample Benefits java extension application on extension account to take advantage of SAP Cloud Platform, Extension Package for SAP SuccessFactors.
The Sample benefits apps used in this blog will be cloned from the GitHub application repository, application is build using the maven build and finally deploy the application binary to SAP Cloud Platform extension account paired with SuccessFactors instance.
SAP Employee Benefits Management is a sample extension application for SuccessFactors Employee Central. By making use of authorization objects this extension application serves different persona’s like employee and HR benefits administrator. The application can be used by employees to make orders in specific benefit campaigns and by HR managers to manage employee benefits and set up new benefit campaigns based on role assigned to them.
This sample application reads data from SAP SuccessFactors using OData API’s and uses Persistency to store certain data like benefits campaigns , employee benefits assignment and employee orders on SAP Cloud Platform database layer. Read documentation on GitHub to understand more about application use cases, functionality and architecture. In this blog,you learn how to deploy sample java benefits extension application to development extension account paired with SuccessFactors instance. The steps mainly described in this blog are development steps which are typically done in development environment. In later blogs, you will learn how to deploy the same sample benefits extension application to production environment using Multi Target Application "MTA" via Solution.

Note:- This blog mainly focus on development and deploy aspects of SuccessFactors extension application using life cycle management tools like SAP Cloud Platform SDK neo commands during development phase on extension account which is modeled as development extension account as highlighted in the above diagram.
This blog is mainly intended for learning purposes and most importantly to showcase how to deploy java extension application, how to protect extension application by various roles , how to consume SuccessFactors OData from java runtime, how to persist data on HANA database on SAP Cloud Platform and eventually register extension java application as an tile on SuccessFactors home page.
System prerequisites:
- SAP SuccessFactors instance with Administrator access.
- SAP SuccessFactors provisioning - Initiall to set-up pairing of SAP Cloud Platform with your SAP SuccessFactors instance.
- SAP Cloud Platform enterprise account in the Neo environment.
Development prerequisites:
- Java JDK - (Java SE Development Kit), version 7 or greater
- Eclipse IDE Recent version of IDE like “Neon” or “Oxygen”
- SAP Cloud Platform SDK
- SAP Cloud Platform tools for Eclipse
- Git plugin for eclipse
- Maven Plugin for eclipse
Setting Up the Development Environment : Before you can start developing your application, you need to download and set up the necessary tools, which include Eclipse IDE for Java EE Developers, SAP Cloud Platform Tools, and SDK.
SAP Cloud Platform Tools, SAP Cloud Platform SDK for Neo environment, SAP JVM can be downloaded from the SAP Development Tools for Eclipse page.
A step-by-step procedure on how to configure the Eclipse IDE for Java development on SAP Cloud Platform, Please refer this link.
To install Maven plugin for eclipse IDE refer this link (Step1 /Step5 /Step 6)
Refer this link for any trouble shooting tips during initial set-up.
Steps: How to deploy Java extension sample application to SAP Cloud Platform extension account
************************* Part 1************************************************
You use the Git perspective to import the sample application into Eclipse.Be sure to select the exact branch referred in the blog as it is specially tailored for it.
Part1: Launch Eclipse IDE , switch to Git perspective and select Clone a Git repository option

Part2: Copy URL https://github.com/SAP/cloud-sfsf-benefits-ext.git and select TechEd2017 for Branch Selection by leaving everything else as default.

Select TechEd2017 for Branch Selection

Click next and complete the wizard. Now you should see cloned project.
Step3: Switch to the Java EE perspective and import the just cloned maven project from the previous step.
Select File -> Import -> Existing maven project, select next.
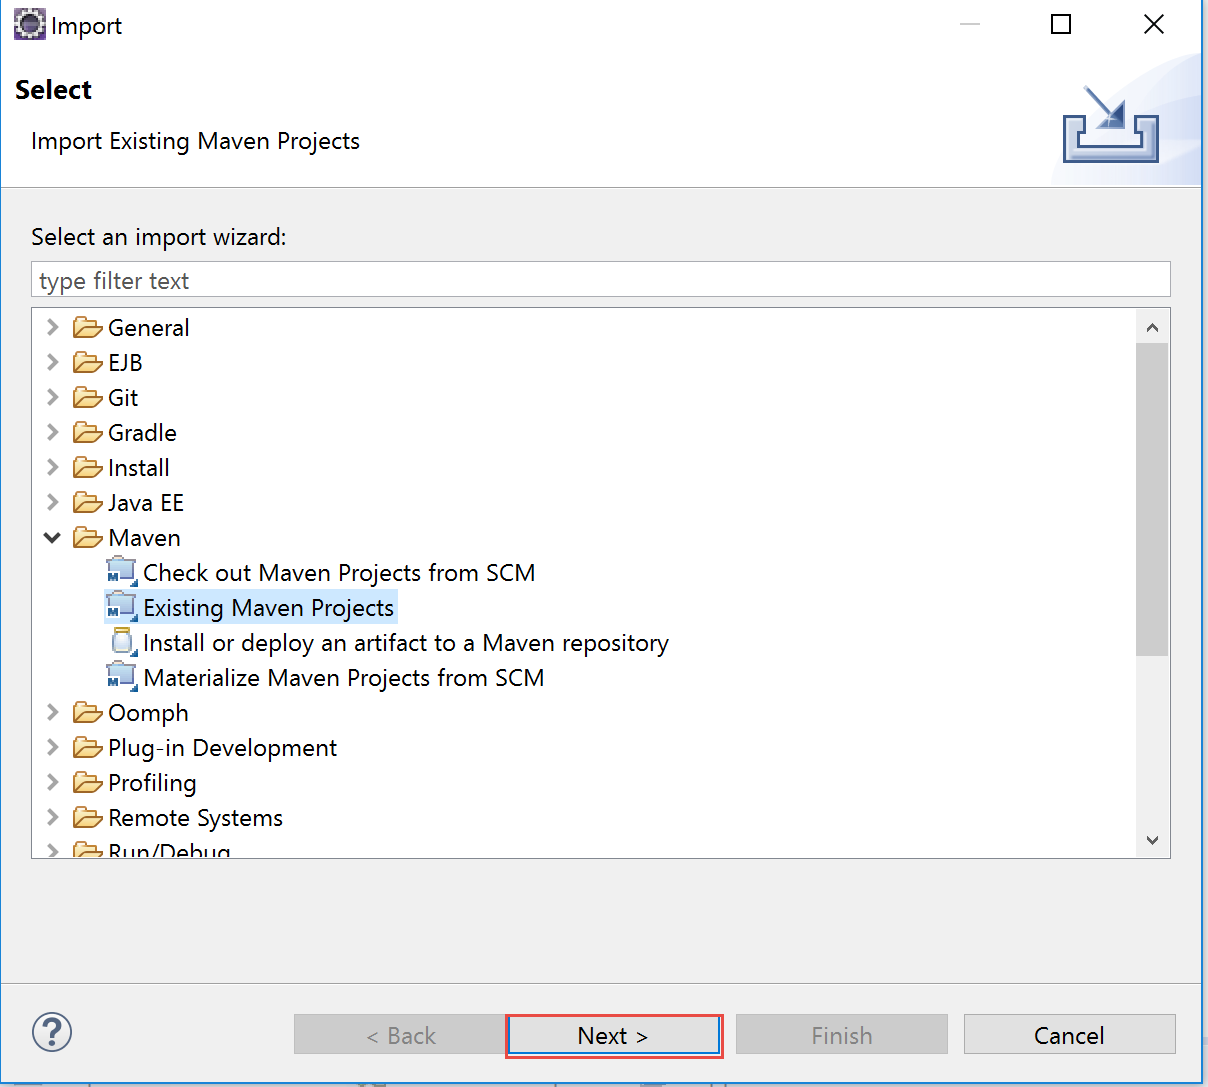
Enter the path to the folder where you had cloned the Git Repository and Click Finish

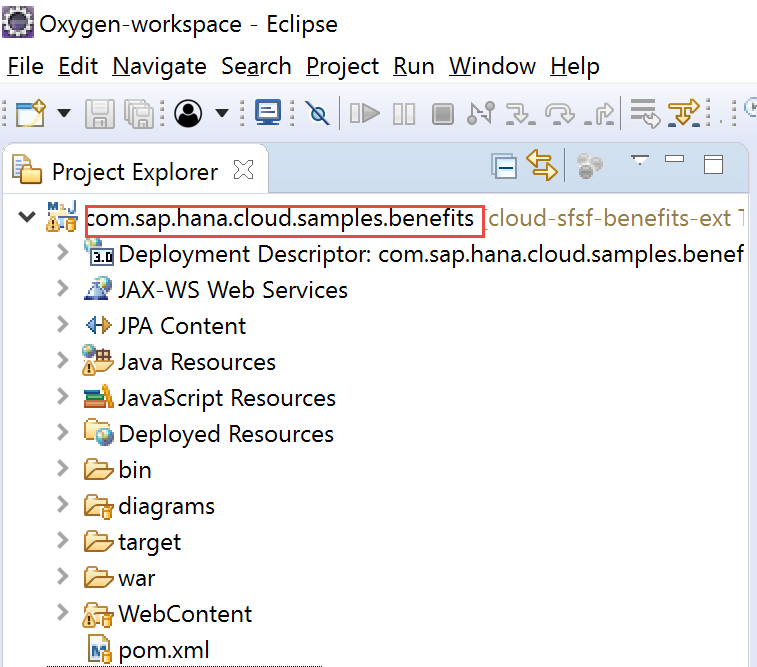
Step4: The Sample Benefits Java application is imported into eclipse
Step5: Build the imported maven project ( Right click on the project and select Run as Maven Build)

Step6: Specify goal type
For example: clean install –Dbenefits.id=001

Step7: Make sure that you got BUILD SUCCESS status in the Console view
Right click on the Eclipse project and select refresh to see changes.

************************* Part 2*************************************************
Steps: How to deploy Java extension sample application to SAP Cloud Platform extension account
Step1: Open the Servers view and select the link to create a new server

Step2: Choose server type and specify region host
Specify the following values:
Server type: SAP Cloud Platform Region host: e.g us2.hana.ondemand.com depending on your SAP Cloud platform region.

Click on Next
Step3: Specify application name, subaccount and your SAP Cloud Platform user credentials
Application name: e.g benefits000
Subaccount name: dfa8fX8XXX ( Extension account where you would like to deploy sample apps)

Click Next
Step4: Add the application to the list of configured server resources
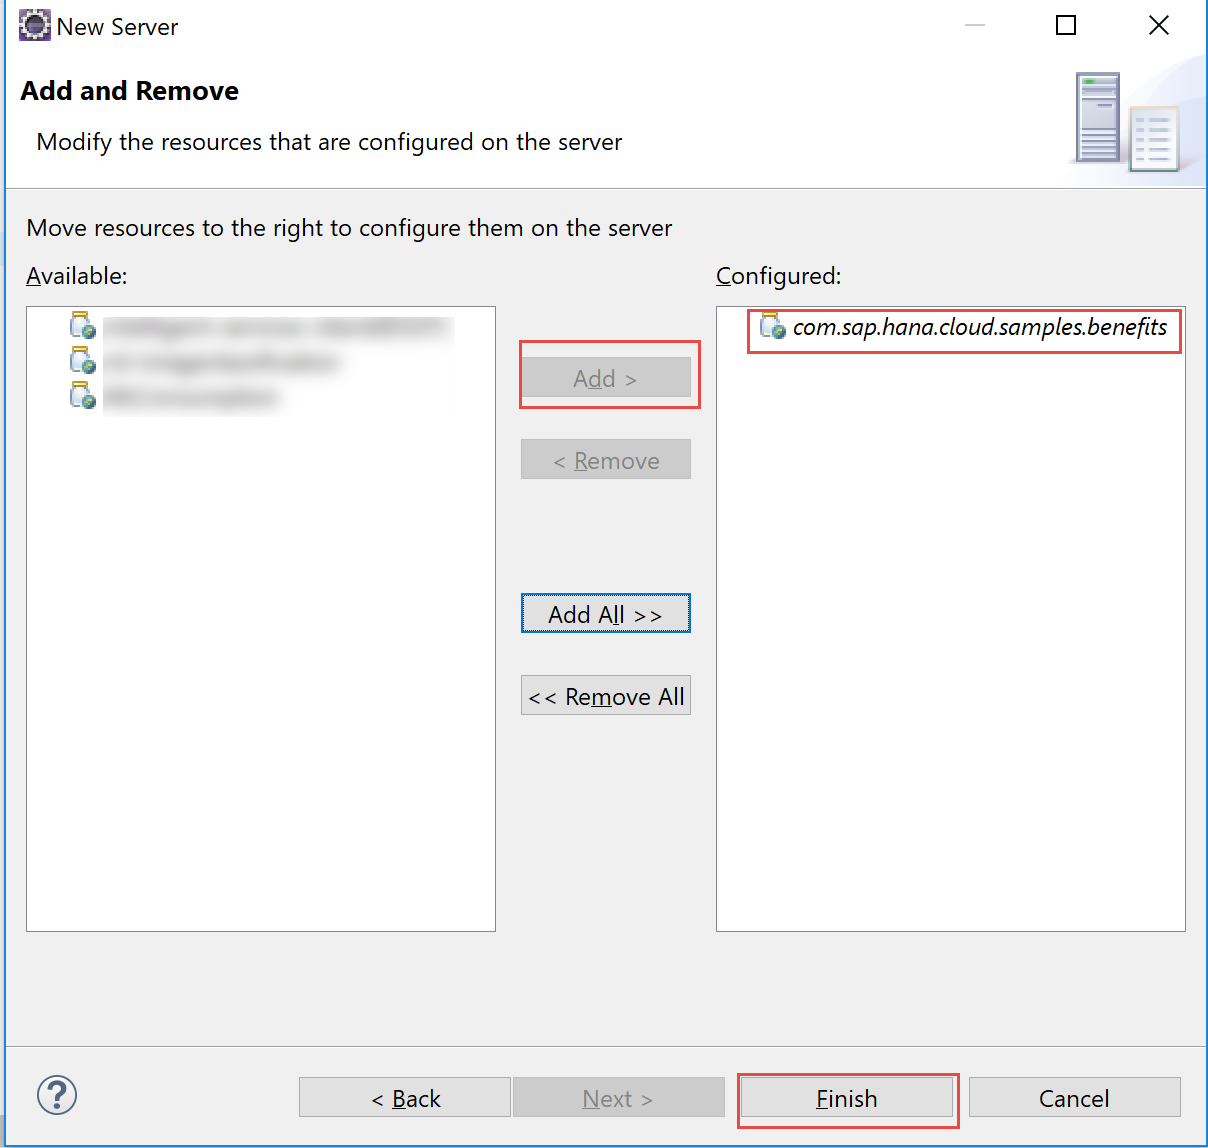
Click on Finish
Step5: Right click on the newly created server and select Publish

Your application is successfully deployed to the SAP Cloud Platform.
Step6: Start the application from SAP Cloud Platform Cockpit.
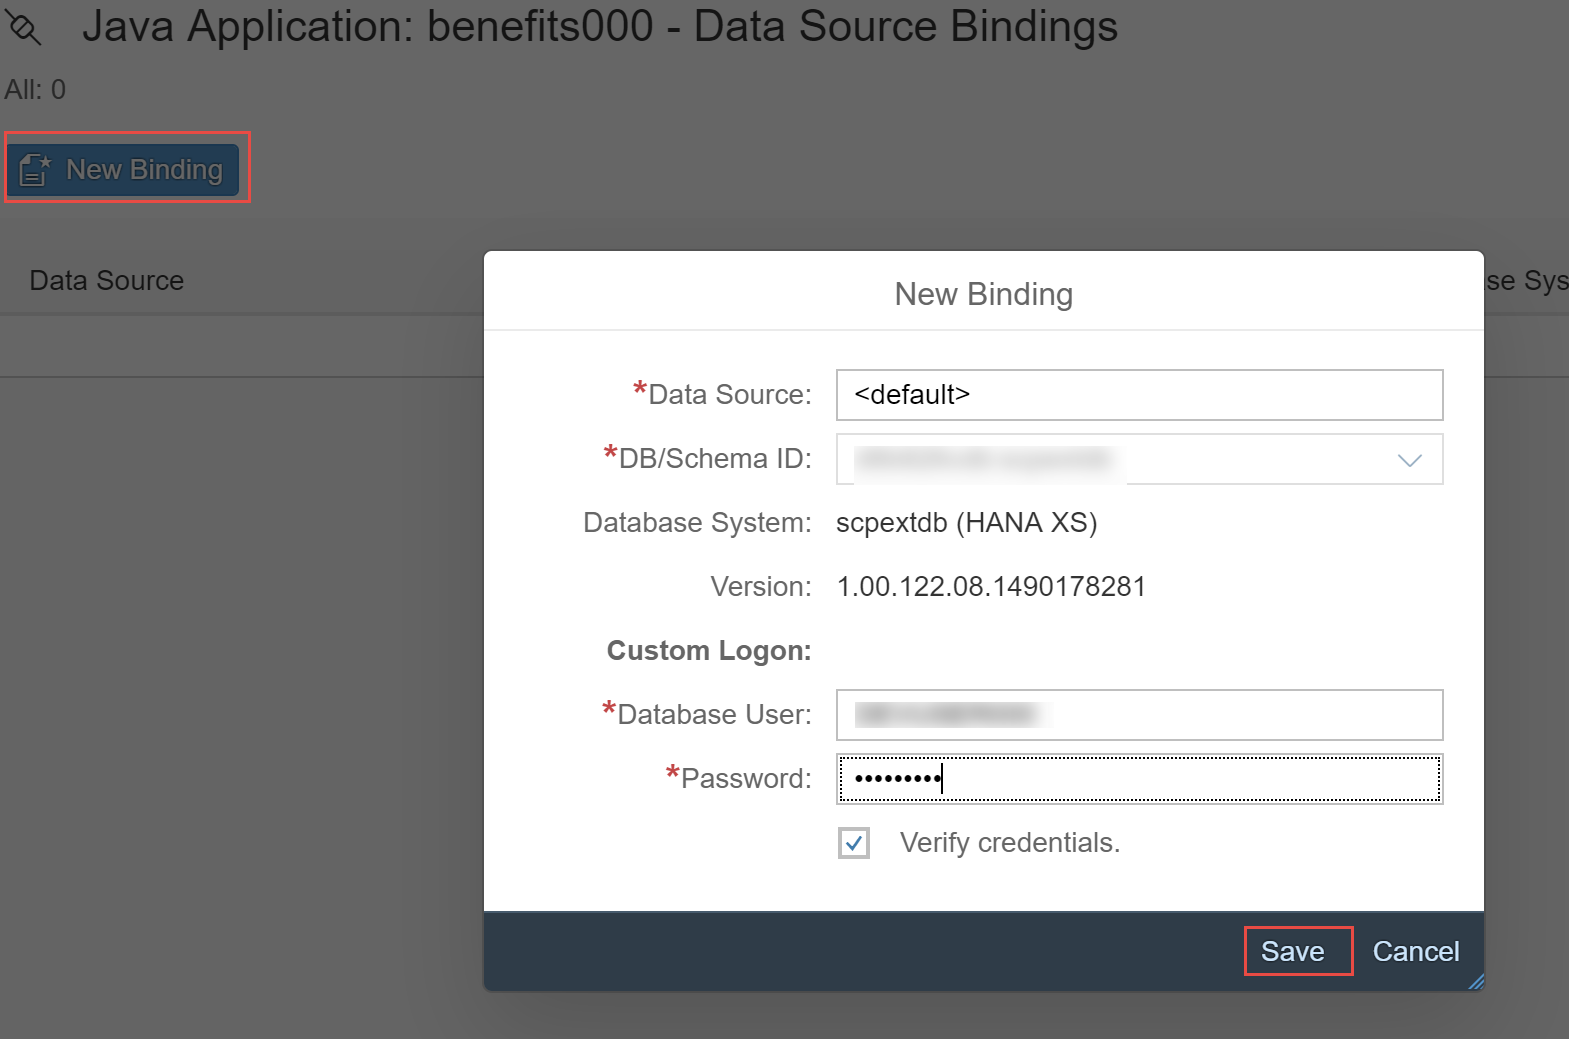
Because the application requires database connection, you first need to create a data source binding for it and then start it.
Launch Google chrome and login to your extension account where sample extension application was deployed. Select the Java Applications tab on the left-hand side, then choose your application from the list.

Step7: Do Database binding : Select Configurations -> Data Source Bindings and then click New Binding. Save the changes
Step7: Navigate to the Overview section for your application and start it


Your Application is started now.
if your Java application was not started, please check the Java application logs for any hints.
************************* Part 3********************************************************
Configuring Extension Application
Once your application is up and running in the development subaccount, You can use SAP Cloud Platform SDK console commands to do configurations without doing it manually.
To understand what each of the neo commands does in detail. Please refer online documentation https://help.sap.com/viewer/65de2977205c403bbc107264b8eccf4b/Cloud/en-US/fd92f749a9374f9190d716171f9...
Step1: Open the command line tool by navigating to SAP Cloud Neo SDK tools folder.

Note:-In the command line tool, make sure that you are under tools subfolder “e,g. tomcat8/tools” before executing neo commands.
Step2: Configure the connectivity to access SAP SuccessFactors APIs. For this you use the hcmcloud-create-connection SDK command.
Execute the neo command to create connection to the SAP SuccessFactors instance.
neo hcmcloud-create-connection –a <account name> -b <app name>-u <username> -h <hostname>
Replace above parameter values with that of your SAP Cloud Platform account.

If command worked correctly then you should see destination with pre-defined name“ sap_hcmcloud_core_odata“ created. The above destination will be used by benefits000 application to connect to SuccessFactors instance to fetch User and Photo details for the logged user.
Log back to SAP Cloud development account,select Applications-> Java application ->Benefits000 apps, click on configuration->destination tab on the left
Step3: Enable (SSO) application access: To enable single sign-on (SSO) for your tenant, you have to add an Assertion Consumer Service entry in SAP SuccessFactors specifying the tenant specific URL and single logout service URL. Once this is done, end users are able to directly access your application (without login) if already authenticated with SAP SuccessFactors, and vice versa. You manage this configuration with the hcmcloud-enable-application-access SDK command.

Step4: Enable SuccessFactors role provider for your application: To check the permissions of the currently authenticated user, your Java application uses the Java EE Servlet HttpServletRequest isUserInRole method. The default implementation performs the check against the role assignments in the SAP Cloud Platform – default role provider. However, you can switch to an alternative implementation that uses the roles defined in the SAP SuccessFactors instance integrated with your extension. It relies on the already established connectivity to check the role assignments in SAP SuccessFactors. You switch to SAP SuccessFactors as a role provider, with the hcmcloud-enable-role-provider SDK command.

You can check what happend on SAP Cloud Plattform side as a result of hcmcloud-enable-role-provider neo command. Log back to SAP Cloud development account Applications-> Java application ->Benefits000, click on roles tab on the left. You will notice that SAP SuccessFactors is set as default role provider.
Step5: Import Corporate Benefits Administrator role in SuccessFactors : Once the SAP Cloud Platform runtime is configured to use the SAP SuccessFactors role provider, you can create custom roles in the SAP SuccessFactors instance. This can be done using the respective native tools in SAP SuccessFactors or with the hcmcloud-import-roles SDK command. It takes a JSON file with role definitions and imports them into the SAP SuccessFactors instance.
neo hcmcloud-import-roles -a <account> -h <hostname> -u <YOUR_SAP_USER> --location "<PATH TO rolesXXX.json>"
Path to roles.json can be found from eclipse IDE. Navigate to resource folder->rolesXXX.json and right click on roles.json file to get path.

Execute neo command to import custom role into SuccessFactors.

Note: The command only creates roles if they don't exists, but doesn't configure any user or permission group assignments in SuccessFactors.
Step6: Register a corporate benefits tile in the SuccessFactors home page :The last step of application configuration is to configure a SAP SuccessFactors home page tile to access the extension application. You make this configuration with the hcmcloud-import-home-page-tiles SDK command. It takes a JSON file with tile definitions and imports them in the SAP SuccessFactors instance.
Copy the text below into tiles.json and use this tiles.json path when you execute neo command to register home page tile or alternatively you can also overwrite tiles.json file under "Java Resources -> resources ->tiles.json" with sample file below. Which ever option works best for you.
Sample tiles.json file for SuccessFactors New Home Page tile. Change description as needed.
[{
"tileVersion": "NEW_HOME_PAGE",
"tiles": [{
"name": "SAP Corporate Benefits_000",
"description": "SAP Corporate Benefits home page tile",
"section": "News",
"metadata": [{
"title": "SAP Corporate Benefits apps",
"subTitle": "SAP Corporate Benefits_000",
"locale": "en_US"
}],
"type": "static",
"configuration": {
"icon": "sap-icon://suitcase"
},
"navigation": {
"type": "url",
"configuration": {
"openInNewWindow": true,
"url": "com.sap.hana.cloud.samples.benefits"
}
}
}]
}]
neo hcmcloud-register-home-page-tiles --location "<PATH TO tilesXXX.json>" --application-type java -a <accountname> -b <app name> -u <username> -h <hostname>

Note: Imported tiles will not be instantly available to the end users. An SAP SuccessFactors administrator must explicitly make them available to the groups of users for whom they are intended.
************************* Part 4**************************************
Configure application’s home page tile
Once your register home page tile for your extension application in the SAP SuccessFactors instance. The next step is configure the new tile to end users. The idea behind is the fact that the administrator knows best to which groups of end users this tile shall be made available.
Step1: Logon onto your SAP SuccessFactors development instance i.e that is SuccessFactors instance paired with SAP Cloud Platform extension account.

Step2: Type keyword "Manage Home Page" in the search field and select the entry once it is found
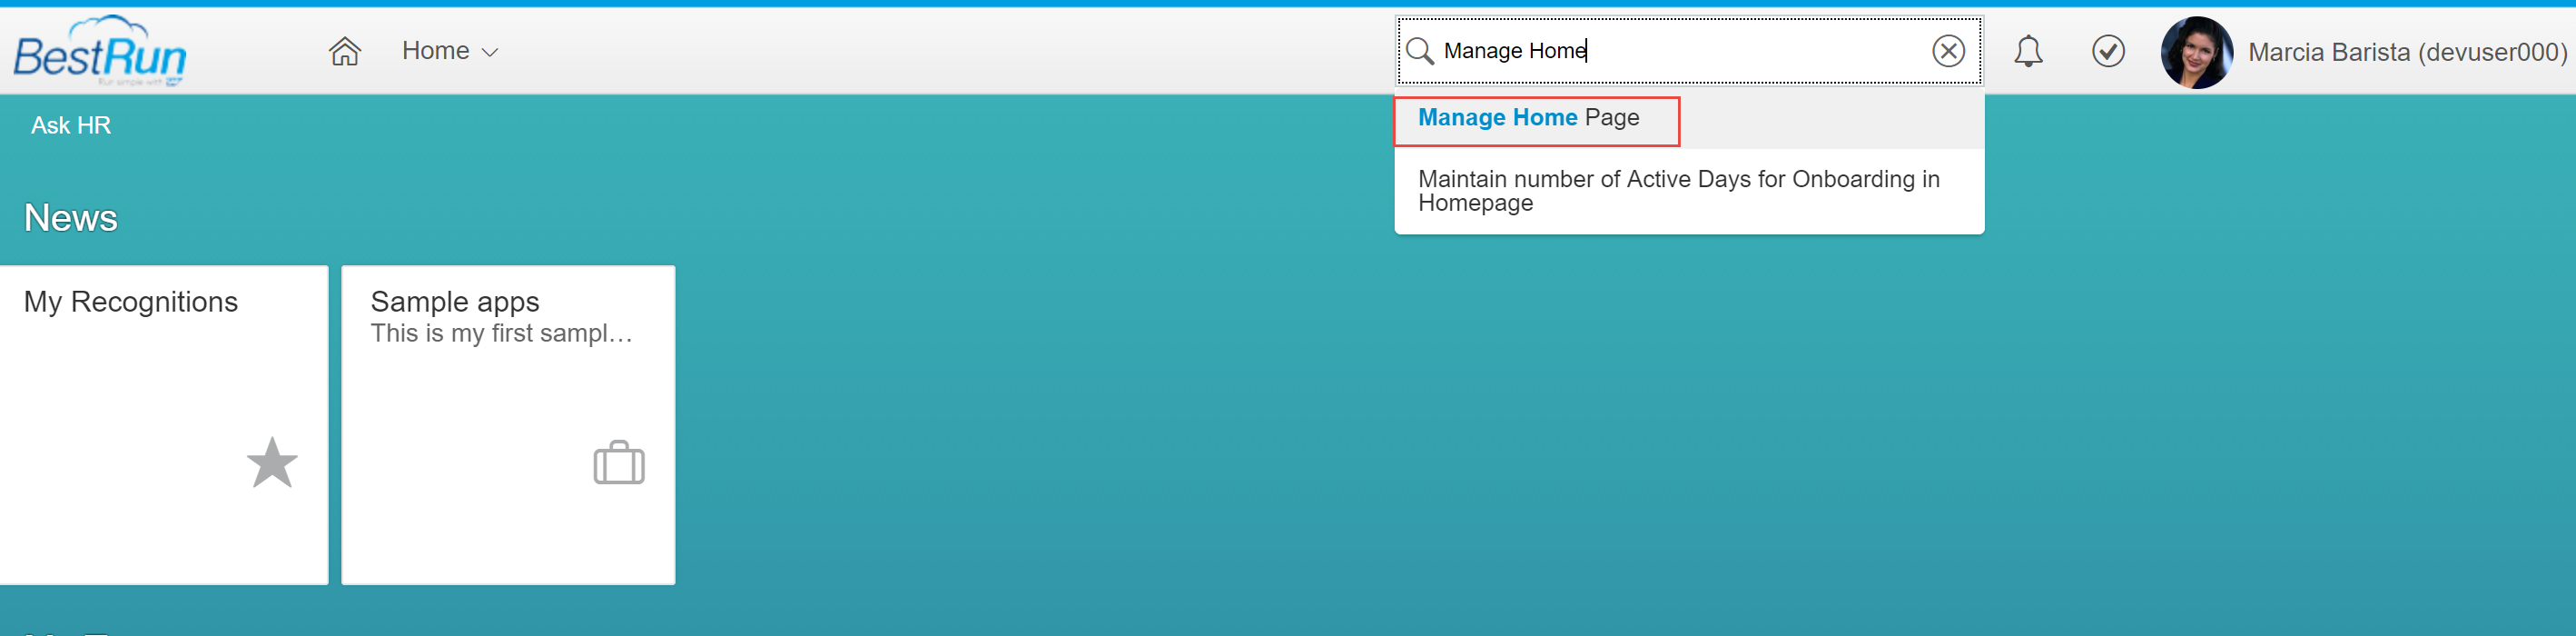
Step3: Switch to the "Not Used" tab and select the pen icon to edit the SAP Corporate Benefits 000 custom tile.

Step4: Switch to the Assignments tab and select the + button to create a new Group

Step5: Populate the following values in the Group Definition dialog box.
Group Name: <Provide Group Name > e.g. Benefits000 Tile Group
People Pool category: <User> . i.e Pick Category as per your requirement
User: <userid> -> Provide user id,if you choose Pool Category as User
Click on Done button when finished.

Step6: Select the newly created Group from the previous step and click on Finish button

Step7: Select Default from the Move To dropdown for your custom tile and click on Save button to apply changes.

Note: The Custom tile will disappear – it will immediately moved to the Default group.
Step8: Access the configured extension application by selecting extension application’s tile on the SAP SuccessFactors home page. Switch to the Home Page to access the extension application.
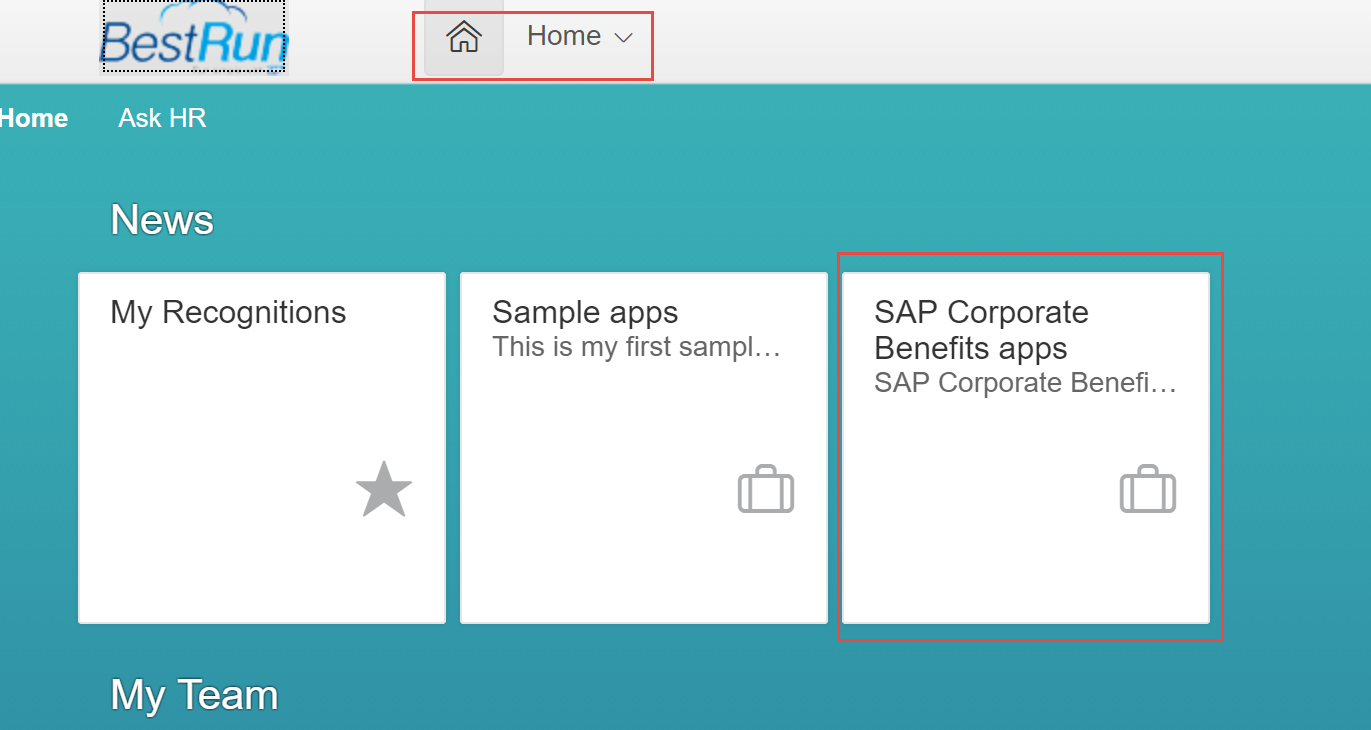
Step9: Your Sample extension application is opened in a new browser tab

Step10: Select the About Me tile to see the current user information fetched from the SAP SuccessFactors OData API.

************************* Part 5**************************************
Assign SAP Corporate Benefits Administrator role
The sample application renders its user interface taking into account the user roles. When the user has the "SAP Corporate Benefits Admin 000" custom role that we imported into SuccessFactors, the application gives him the opportunity to manage benefit campaigns by displaying two additional application tiles – Manage Benefits of Employees and Benefit Campaigns.
To assign this role to you user you use the SAP SuccessFactors Manage Permission Roles tool.
Step1: Go back to SuccessFactors Home page and search for "Manage Permission Roles" in the search window. Select Manage Permission Roles from the search results.

Step2: Search for custom permission role imported into SuccessFactors "SAP Corporate Benefits Admin 000" or with whatever role name you have provided in the roles.json file and select it.

Step3: Grant select custom role to the permission group "Benefits Tile Group 000" and Save Changes .

Note:- In this blog we have created permission group called "Benefits Tile Group 000". You can create any permission group of your choice or re-use existing one depending on your requirement.
Also make sure to assign permission group to the required user. Check with your SuccessFactors Administrator for permission groups and roles assignment to required users.
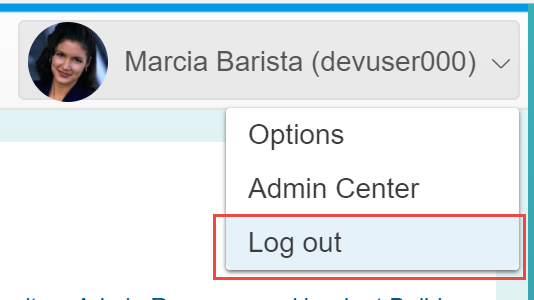
Step4: Logout and then login again
Step5: Select the Corporate Benefits apps tile on the SuccessFactors home to open the application, Application now displays two more tiles due to the granted custom SAP Corporate Admin 000 role.

Summary
So by completing hands-on as described in the blog, you learned how SAP Cloud Platform serves as a dedicated and isolated secure application container (hosting Java or HTML5 applications, or both) to develop loosely coupled extension applications for SuccessFactors. On one hand, it provides the API-level access to the extended SAP solution. SAP Cloud Platform provides a secure application container which decouples the extension applications from the extended SAP solution via a public API layer. This container ensures that extension applications have no impact on the stability of the extended solutions. It also ensures that data access is governed through the same roles and permission checks as those of any other SAP interface. SAP Cloud Platform simplifies many of the system integration challenges, handling aspects such as identity propagation, subaccount onboarding, dynamic theming and branding and installation automation and provisioning.
SAP Cloud Platform is the de-facto extension platform from SAP. It enables developers to develop loosely coupled extension applications securely, thus implementing additional workflows or modules on top of the existing SAP cloud solution they already have.
In the next blog, i'm going to discuss how to package and deploy extension application to production extension account once the development is completed.
Refer SAP SuccessFactors Extensions on SAP Cloud Platform - for Developers learning journey to further explore SuccessFactors extension topics on SAP Cloud Platform.
Happy Learning !!
- SAP Managed Tags:
- SAP SuccessFactors platform,
- SAP Business Technology Platform
Labels:
1 Comment
You must be a registered user to add a comment. If you've already registered, sign in. Otherwise, register and sign in.
Labels in this area
-
ABAP CDS Views - CDC (Change Data Capture)
2 -
AI
1 -
Analyze Workload Data
1 -
BTP
1 -
Business and IT Integration
2 -
Business application stu
1 -
Business Technology Platform
1 -
Business Trends
1,658 -
Business Trends
91 -
CAP
1 -
cf
1 -
Cloud Foundry
1 -
Confluent
1 -
Customer COE Basics and Fundamentals
1 -
Customer COE Latest and Greatest
3 -
Customer Data Browser app
1 -
Data Analysis Tool
1 -
data migration
1 -
data transfer
1 -
Datasphere
2 -
Event Information
1,400 -
Event Information
66 -
Expert
1 -
Expert Insights
177 -
Expert Insights
293 -
General
1 -
Google cloud
1 -
Google Next'24
1 -
Kafka
1 -
Life at SAP
780 -
Life at SAP
12 -
Migrate your Data App
1 -
MTA
1 -
Network Performance Analysis
1 -
NodeJS
1 -
PDF
1 -
POC
1 -
Product Updates
4,577 -
Product Updates
340 -
Replication Flow
1 -
RisewithSAP
1 -
SAP BTP
1 -
SAP BTP Cloud Foundry
1 -
SAP Cloud ALM
1 -
SAP Cloud Application Programming Model
1 -
SAP Datasphere
2 -
SAP S4HANA Cloud
1 -
SAP S4HANA Migration Cockpit
1 -
Technology Updates
6,873 -
Technology Updates
417 -
Workload Fluctuations
1
Related Content
- FAQ for C4C Certificate Renewal in Technology Blogs by SAP
- What’s new in Mobile development kit client 24.4 in Technology Blogs by SAP
- Handle the behavior of extension field by toggle button using SDK UI designer. in Technology Blogs by Members
- Embracing TypeScript in SAPUI5 Development in Technology Blogs by Members
- Accelerate Business Process Development with SAP Build Process Automation Pre-Built Content in Technology Blogs by SAP
Top kudoed authors
| User | Count |
|---|---|
| 32 | |
| 24 | |
| 8 | |
| 7 | |
| 7 | |
| 6 | |
| 6 | |
| 6 | |
| 5 | |
| 4 |