
- SAP Community
- Products and Technology
- Technology
- Technology Blogs by SAP
- Getting Started with the SAP Cloud Platform SDK fo...
Technology Blogs by SAP
Learn how to extend and personalize SAP applications. Follow the SAP technology blog for insights into SAP BTP, ABAP, SAP Analytics Cloud, SAP HANA, and more.
Turn on suggestions
Auto-suggest helps you quickly narrow down your search results by suggesting possible matches as you type.
Showing results for
Product and Topic Expert
Options
- Subscribe to RSS Feed
- Mark as New
- Mark as Read
- Bookmark
- Subscribe
- Printer Friendly Page
- Report Inappropriate Content
02-14-2018
4:27 PM
Previous (Setup) Home Next (Logging)
A first step in an enterprise application is to have the app onboard or register against an app configuration defined in the SAP Cloud Platform Mobile Services. SAPFioriFlows provide an API to simplify this process which includes a welcome screen, a registration screen, a EULA screen, as well as app protection using a passcode, Touch ID or Face ID.
The following are some additional sources of documentation on SAPFioriFlows.
SAPFioriFlows API Reference
On-boarding Flow Recommendations
Authentication with Native iOS Mobile Interactive Tutorial
The following steps add the logic to onboard or register using basic authentication with the SAP Cloud Platform Mobile Services the first time the app starts. The second time the app starts, the saved credentials will be used so the user does not have to re-enter them.
- Right click on the parent folder of ViewController.swift (GettingStarted) and create a new file with the template Property List. Choose New File, then scroll down to the Resource section and select Property List. Name it ConfigurationProvider.plist and click Create.

- Right click on the ConfigurationProvider.plist file and choose Open As, Source Code.
Place the below contents into the file.
<?xml version="1.0" encoding="UTF-8"?>
<!DOCTYPE plist PUBLIC "-//Apple//DTD PLIST 1.0//EN" "http://www.apple.com/DTDs/PropertyList-1.0.dtd">
<plist version="1.0">
<dict>
<key>auth</key>
<array>
<dict>
<key>config</key>
<dict/>
<key>type</key>
<string>basic.default</string>
</dict>
</array>
<key>host</key>
<string>hcpms-XXXXXXtrial.hanatrial.ondemand.com</string>
<key>protocol</key>
<string>https</string>
<key>appId</key>
<string>com.iossdk.gs</string>
<key>authPath</key>
<string>com.sap.edm.sampleservice.v2</string>
</dict>
</plist>
- Replace the XXXXXX value in host so it is correct for your SAP Cloud Platform Mobile Services server. The value can be seen on the APIs tab of the application.

- Add the following import to the other imports at the top of ViewController.
import SAPFioriFlows
- In ViewController add the following under the declaration for numberOfPresses.
let presentationDelegate = ModalUIViewControllerPresenter()
var myContext: OnboardingContext!
var appId: String = ""
var authPath: String = ""
var serviceURL: URL = URL.init(string: "http://empty.org")!
//Steps executed during Onboarding
private var onboardingSteps: [OnboardingStep] {
return [
self.configuredWelcomeScreenStep(),
SAPcpmsSessionConfigurationStep(),
BasicAuthenticationStep(),
SAPcpmsSettingsDownloadStep(),
SAPcpmsLogSettingsApplyStep(),
self.configuredStoreManagerStep(),
]
}
//Steps executed during Restoring
private var restoringSteps: [OnboardingStep] {
return [
self.configuredStoreManagerStep(),
self.configuredWelcomeScreenStep(),
SAPcpmsSessionConfigurationStep(),
BasicAuthenticationStep(),
SAPcpmsSettingsDownloadStep(),
SAPcpmsLogSettingsApplyStep(),
]
}
- Add the following functions to ViewController.swift
func configuredWelcomeScreenStep() -> WelcomeScreenStep {
let discoveryConfigurationTransformer = DiscoveryServiceConfigurationTransformer(applicationID: appId, authenticationPath: authPath)
//use the values from ConfigurationProvider.plist
let welcomeScreenStep = WelcomeScreenStep(transformer: discoveryConfigurationTransformer, providers: [FileConfigurationProvider()])
welcomeScreenStep.welcomeScreenCustomizationHandler = { welcomeScreen in
welcomeScreen.isDemoModeAvailable = false
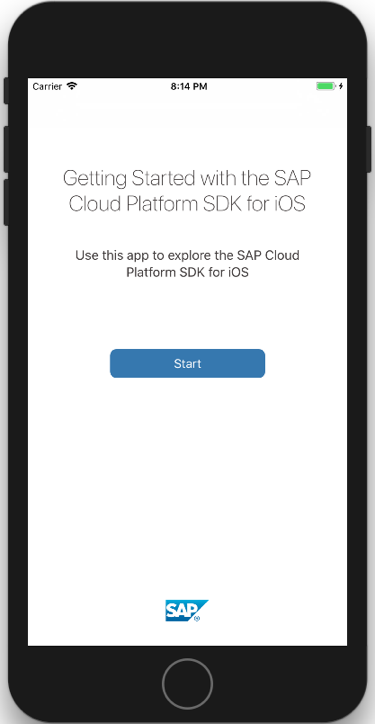
welcomeScreen.headlineLabel.text = "Getting Started with the SAP Cloud Platform SDK for iOS"
welcomeScreen.detailLabel.text = "Use this app to explore the SAP Cloud Platform SDK for iOS"
welcomeScreen.primaryActionButton.titleLabel?.text = "Start"
}
return welcomeScreenStep
}
func configuredStoreManagerStep() -> StoreManagerStep {
let step = StoreManagerStep()
//If passcode policy is disabled on the server and the next line is uncommented, the app won’t be protected with a passcode
//step.defaultPasscodePolicy = nil
return step
}
func onboardOrRestore() {
myContext = OnboardingContext(presentationDelegate: presentationDelegate)
//If we previously onboarded
if let savedUUIDString = UserDefaults.standard.string(forKey: "userOnboardingID"), let uuid = UUID(uuidString: savedUUIDString) {
myContext.onboardingID = uuid
OnboardingFlowController.restore(on: restoringSteps, context: myContext) { result in
print("and the result is ...")
switch result {
case let .success(context):
print("Successfully restored")
self.myContext = context
//get host port from registration rather than hardcoded in plist with Discovery Service
//does not work when offline
//self.serviceURL = context.authenticationURL!
case let .failed(error):
print("Failed to restore: \(error)")
if (error.localizedDescription == "Passcode reset!") {
self.unregister()
}
}
}
}
//First time the app is opened so perform the onboarding flow
else {
OnboardingFlowController.onboard(on: onboardingSteps, context: myContext) { result in
print("and the result is ...")
switch result {
case let .success(context):
self.myContext = context
//get host port from registration rather than hardcoded in plist with Discovery Service
//does not work when offline
//self.serviceURL = context.authenticationURL!
UserDefaults.standard.set(context.onboardingID.uuidString, forKey:"userOnboardingID")
print("Successfully onboarded")
case let .failed(error):
print("Failed to onboard, retrying due to: \(error)")
URLCache.shared.removeAllCachedResponses()
HTTPCookieStorage.shared.removeCookies(since: Date.distantPast)
self.onboardOrRestore()
}
}
}
}
func unregister() {
OnboardingFlowController.reset(on: self.restoringSteps, context: myContext) {
URLCache.shared.removeAllCachedResponses()
HTTPCookieStorage.shared.removeCookies(since: Date.distantPast)
UserDefaults.standard.set(nil, forKey:"userOnboardingID")
self.onboardOrRestore()
}
}
func getAppConfig() {
var host = ""
if let path = Bundle.main.path(forResource: "ConfigurationProvider", ofType: "plist") {
let myDict = NSDictionary(contentsOfFile: path)
appId = myDict?.object(forKey: "appId") as! String
authPath = myDict?.object(forKey: "authPath") as! String
host = myDict?.object(forKey: "host") as! String
}
serviceURL = URL.init(string: "https://\(host)/\(authPath)")!
}
- At the end of viewDidLoad function, start the onboarding process.
getAppConfig()

UINavigationBar.applyFioriStyle()

onboardOrRestore()
- Run the app and the following screens are shown.
Note the LaunchScreen is shown first but it is an empty screen by default.
Welcome Screen
Basic authentication screen

Touch ID or Face ID screen
Not Now was pressed. The Touch ID option can be enabled via the simulator's Hardware,
Touch ID or Face ID, Enrolled menu.

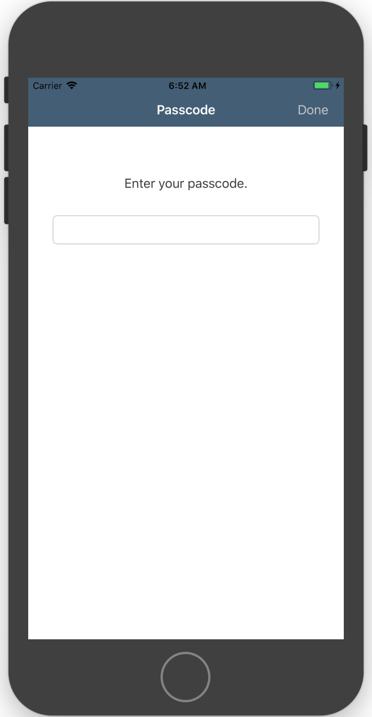
Passcode screen
This screen is shown if the device does not support Touch ID or Face ID or the Not Now button was pressed.

By default, a Passcode Policy specifying that 8 characters must be entered is enforced.
The Passcode Policy for the app can be managed by the Client Policy in the SAP Cloud Platform Mobile Services management cockpit for new registrations.
 Note, next time the app opens, just the passcode screen will be shown and the previously entered credentials will be used to fulfill any authentication challenges to the SAP Cloud Platform Mobile Services server.
Note, if your app does not need a passcode screen, it can be disabled by unchecking the Enable Passcode Policy and uncommenting the below line in the method configuredStoreManagerStep.
step.defaultPasscodePolicy = nil
- Notice that following a registration, the management cockpit will show the application's registrations.
 Registrations that have not been used after a specified time can be automatically deleted. See the Automatic Removal section of the previous screen shot.
 - This step is optional.
In the above registration, the values for SAP Mobile Services server host and port are taken from the ConfigurationProvider.plist file that is part of the application. Another option to provide these values is the SAP Discovery Service or from a Mobile Device Management solution. See also Enabling Applications to Discover Configurations and App Configuration Using a Discovery Service Provider. To try this out using the SAP Discovery Service follow the below steps.
In the function configuredWelcomeScreenStep, replace FileConfigurationProvider with DiscoveryServiceConfigurationProvider and pass in the appId.
//use values published in the discovery service.

let welcomeScreenStep = WelcomeScreenStep(transformer: discoveryConfigurationTransformer, providers: [DiscoveryServiceConfigurationProvider(applicationID: appId)])
To publish the configuration, click Publish to Discovery Service.

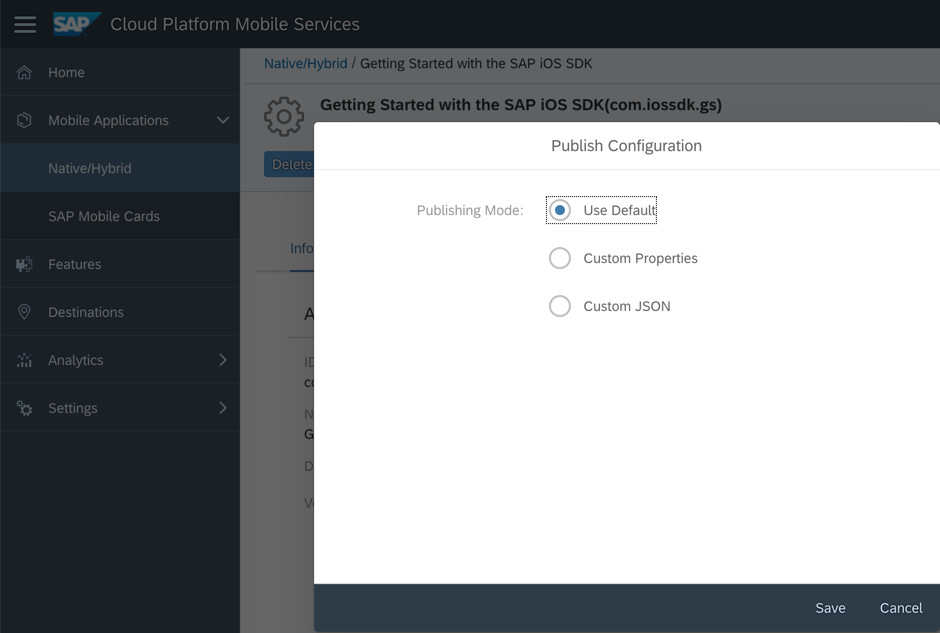

Notice below that the supplied domains match one of the configured domains in the SAP Discovery Service.

- Note, that a JSON string containing the published configuration can be seen by making a request in the browser as shown below.

https://discovery.sapmobilesecure.com/config-api.svc/ApplicationConfigurations/getApplicationConfiguration(AppConfigID='com.iossdk.gs:1.0',EmailAddress='dan@trial-pXXXXXXXtrial.sapmobileplace.com')
Previous (Setup) Home Next (Logging)
- SAP Managed Tags:
- SAP Mobile Services,
- iOS,
- SAP BTP SDK for iOS
Labels:
17 Comments
You must be a registered user to add a comment. If you've already registered, sign in. Otherwise, register and sign in.
Labels in this area
-
ABAP CDS Views - CDC (Change Data Capture)
2 -
AI
1 -
Analyze Workload Data
1 -
BTP
1 -
Business and IT Integration
2 -
Business application stu
1 -
Business Technology Platform
1 -
Business Trends
1,658 -
Business Trends
93 -
CAP
1 -
cf
1 -
Cloud Foundry
1 -
Confluent
1 -
Customer COE Basics and Fundamentals
1 -
Customer COE Latest and Greatest
3 -
Customer Data Browser app
1 -
Data Analysis Tool
1 -
data migration
1 -
data transfer
1 -
Datasphere
2 -
Event Information
1,400 -
Event Information
67 -
Expert
1 -
Expert Insights
177 -
Expert Insights
301 -
General
1 -
Google cloud
1 -
Google Next'24
1 -
GraphQL
1 -
Kafka
1 -
Life at SAP
780 -
Life at SAP
13 -
Migrate your Data App
1 -
MTA
1 -
Network Performance Analysis
1 -
NodeJS
1 -
PDF
1 -
POC
1 -
Product Updates
4,577 -
Product Updates
346 -
Replication Flow
1 -
REST API
1 -
RisewithSAP
1 -
SAP BTP
1 -
SAP BTP Cloud Foundry
1 -
SAP Cloud ALM
1 -
SAP Cloud Application Programming Model
1 -
SAP Datasphere
2 -
SAP S4HANA Cloud
1 -
SAP S4HANA Migration Cockpit
1 -
Technology Updates
6,873 -
Technology Updates
429 -
Workload Fluctuations
1
Related Content
- Exclusive Binance Referral Code: Unlock $3000 Welcome Bonus and Enjoy 20% Discount in Technology Q&A
- Deployment of Seamless M4T v2 models on SAP AI Core in Technology Blogs by SAP
- Govern SAP APIs living in various API Management gateways in a single place with Azure API Center in Technology Blogs by Members
- SAP Fiori for SAP S/4HANA - Empowering Your Homepage: Enabling My Home for SAP S/4HANA 2023 FPS01 in Technology Blogs by SAP
- Consuming SAP with SAP Build Apps - Mobile Apps for iOS and Android in Technology Blogs by SAP
Top kudoed authors
| User | Count |
|---|---|
| 34 | |
| 17 | |
| 16 | |
| 15 | |
| 11 | |
| 9 | |
| 8 | |
| 8 | |
| 8 | |
| 7 |