
- SAP Community
- Products and Technology
- Technology
- Technology Blogs by SAP
- Getting Started with the SAP Cloud Platform SDK fo...
Technology Blogs by SAP
Learn how to extend and personalize SAP applications. Follow the SAP technology blog for insights into SAP BTP, ABAP, SAP Analytics Cloud, SAP HANA, and more.
Turn on suggestions
Auto-suggest helps you quickly narrow down your search results by suggesting possible matches as you type.
Showing results for
Product and Topic Expert
Options
- Subscribe to RSS Feed
- Mark as New
- Mark as Read
- Bookmark
- Subscribe
- Printer Friendly Page
- Report Inappropriate Content
02-14-2018
4:12 PM
Table of Contents
Overview
Setup
Installing Xcode
Installing the SAP Cloud Platform SDK for iOS
Enabling SAP Cloud Platform Mobile Services
Configuring an App in the SAP Cloud Platform Mobile Services Cockpit
SAP Cloud Platform SDK for iOS Assistant
Creating and Debugging an Xcode Project
Adding the SDK Libraries to the Xcode Project
Learning Swift
Using the SAP Cloud Platform SDK
Registration using Fiori Flows
Logging
Online OData
Offline OData
SAP Fiori for iOS
Overview
This blog series covers the SAP Cloud Platform SDK for iOS 3.0 SP01 which enables development of iOS native apps that make use of the features of the SAP Cloud Platform such as registration, logging, online OData, offline OData, push notification and SAP Fiori for iOS. My goal in writing this blog series is to demonstrate some of the key functionality provided by the SDK and to further my learnings with the SDK and iOS development. Please post any comments/corrections/suggestions so this content can be improved.
The SAP Cloud Platform and SDK are available as a free trial for non-productive use.
SAP provides multiple tools and SDKs to create mobile apps. For a description of available options see SAP Cloud Platform Mobile Services Development Options and SAP Cloud Platform SDK for Android.
The following are some other locations containing content on the SAP Cloud Platform SDK for iOS.
What is the SAP Cloud Platform SDK for iOS
Questions Tagged SAP Cloud Platform SDK for iOS
Blogs Tagged SAP Cloud Platform SDK for iOS
Blog posts by the chief product owner andreas.schlosser are good sources of information such as What's new in SAP Cloud Platform SDK for iOS 3.0 SP01.
Roadmaps for the SAP Cloud Platform are available at SAP Cloud Platform Roadmaps.
Setup
Development must occur on a Mac machine that has Xcode installed. Note, there is a dependency between the Xcode version and the SDK version.
The following steps detail how to setup the required software and create an iOS app that contains the SDK libraries. This app will be used in the following blog posts in this series.
Installing Xcode
Xcode 10 is available for free from the Mac App Store. Note that a given version of the SDK has been tested with a specific version of Xcode.
Installing the SAP Cloud Platform SDK for iOS
Download the latest release version of the SDK from the SAP Store and click on Trial Version.

Note that it is important that the SDK and Xcode versions match.
Once downloaded, double click on the dmg file which will open the dialog shown below and then drag the SAP Cloud Platform for iOS Assistant onto the Applications shortcut.

Additional installation information is available at Installing the SAP Cloud Platform SDK for iOS.
Enabling SAP Cloud Platform Mobile Services
The following steps demonstrate how to register for a trial account on the SAP Cloud Platform and then to enable the Mobile Services.
- Register for the Neo Trial account at SAP Cloud Platform Cockpit Trial. Note the SAP Cloud Platform is available in two environments, Neo (hosted on SAP infrastructure) and Cloud Foundry (can be hosted by Amazon, Google or Microsoft). The SAP Cloud Platform Mobile Services is currently available for trial on Neo.

- Once registered, click on your User ID.

- Under Services, find Mobile Services and enable it. Note this may take a few minutes to complete.

- Click on Mobile Services.
- Click on Go to Service to open the service.
 The Mobile Services cockpit should now appear.
Configuring an App in the SAP Cloud Platform Mobile Services Cockpit
The following steps demonstrate how to configure an application in the Mobile Services Cockpit. Specifically, the app will be configured to use basic authentication and will specify an OData URL that can provide the app with data.
- Click on the New button to add a new configuration for an app. Note that the trial account has a limit of five apps.
- Create a new app using the native template with the following id.
com.iossdk.gs

- Click on the + icon to add the Sample Back End feature which will provide the data for the application. This will add a mobile destination to the app under Connectivity, removing the warning on the Connectivity feature.
 Select the Sample Back End feature.
 The Sample OData service contains a UI where the data can be reset, or additional purchase and sales orders can be generated.
 Optionally, view the data directly in the browser with the Runtime Metadata URL using Chrome.For more details on OData see Appendix A: OData in Getting Started with Kapsel.
 - Notice that under the Connectivity feature, a new destination has been added.

- Click on Security to configure it.
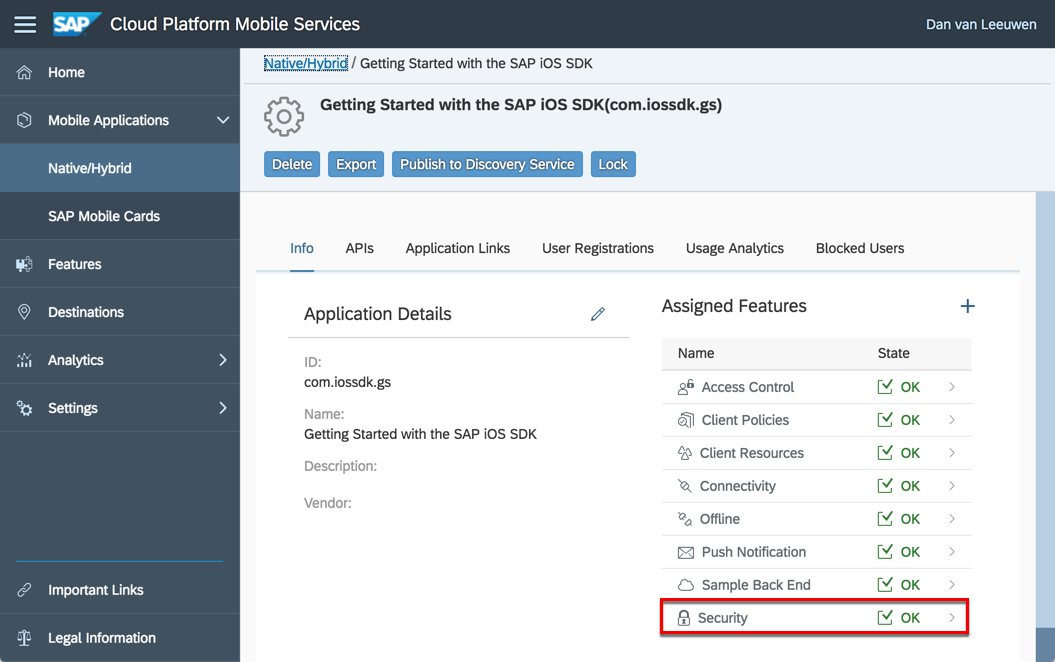 Change the Security Configuration to Basic.

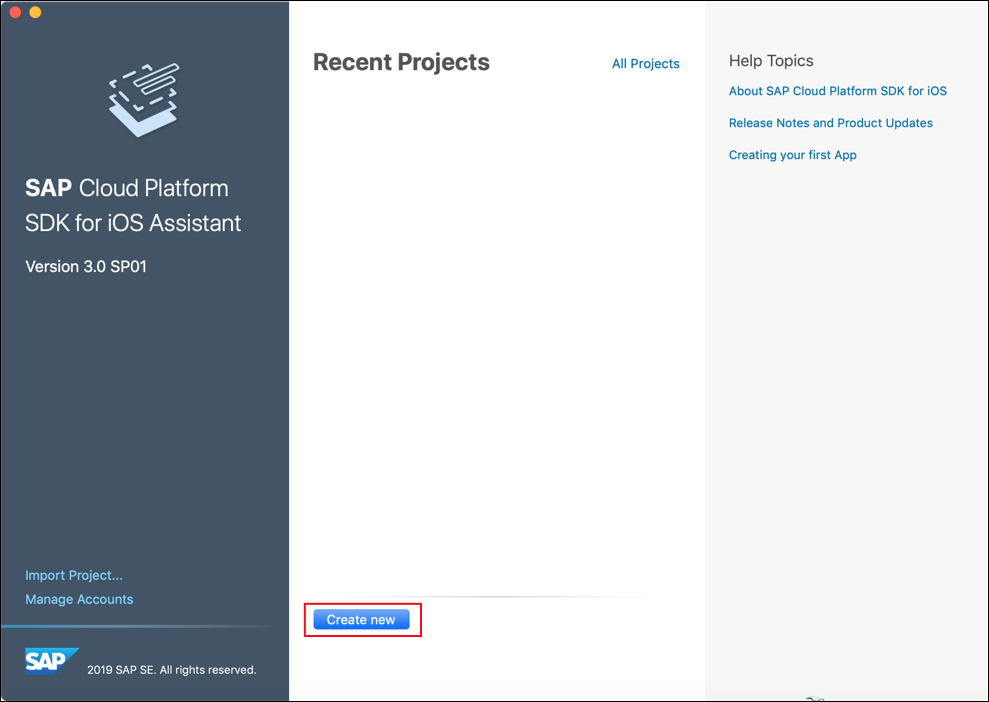
SAP Cloud Platform SDK for iOS Assistant
The Assistant app can be used to access the API documentation and export the tools of the SDK as well as generate a starter app.
- In the management cockpit, go to the Important Links section and click on Importing URLs directly into Assistant to configure the Assistant with the server URLs.
 Clicking on the link opens the Assistant to the settings screen and pre-fills it with the required URL's.
 Close the configuration dialog to return to the main screen of the Assistant.

- The API docs can be accessed from the Assistant menu.
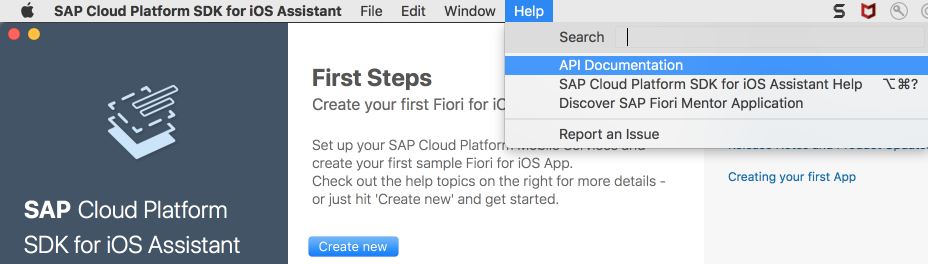 Below is the API documentation for each component of the SDK.

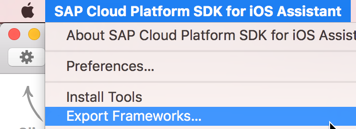
- Install Tools.
 A popup appears showing where the tools were installed.
 ILOData is a utility that can be used to create and test offline stores outside of an application. The proxy class generation tool is covered in the Online OData section of this blog series.
 - Export Frameworks.
 The fat binaries are useful for development as they support both simulators and devices. The iPhoneOS is needed when publishing to the App Store.

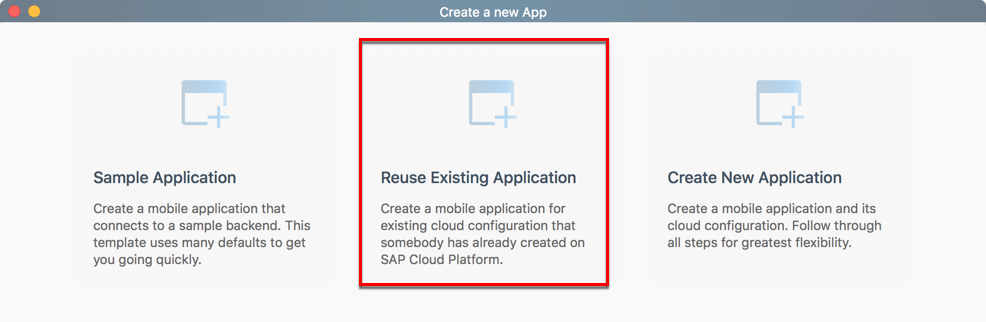
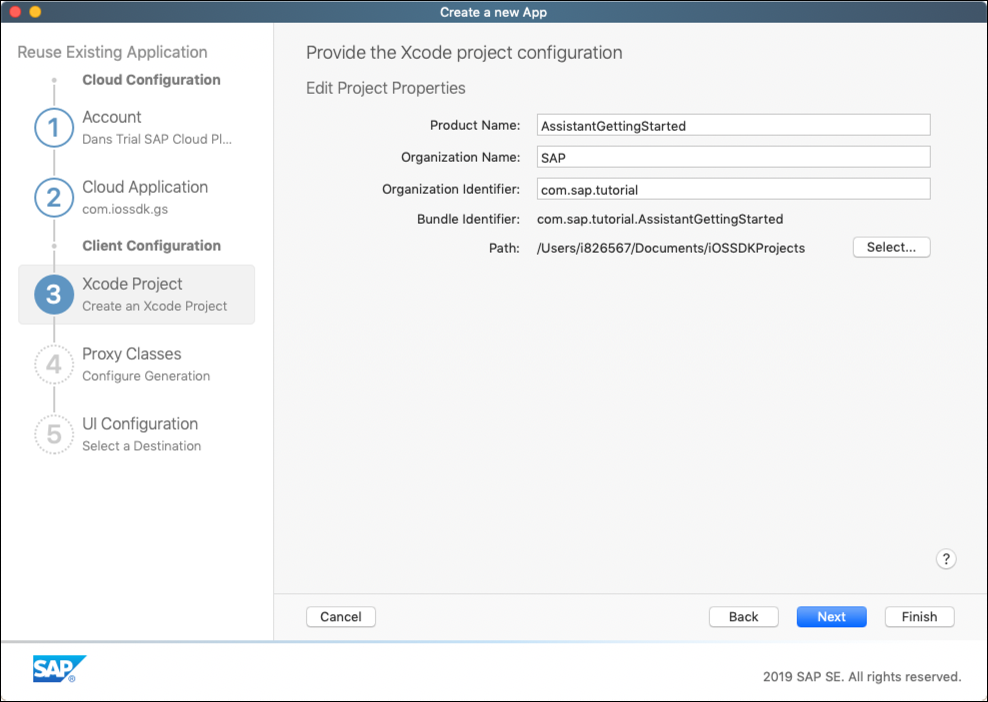
- The Assistant can be used to create a starter project. The following steps demonstrate how this is done using the previously created app configuration.
Click the Create new button to create a new project.
 Select Reuse as the configuration has already been created in the Mobile Services Cockpit.
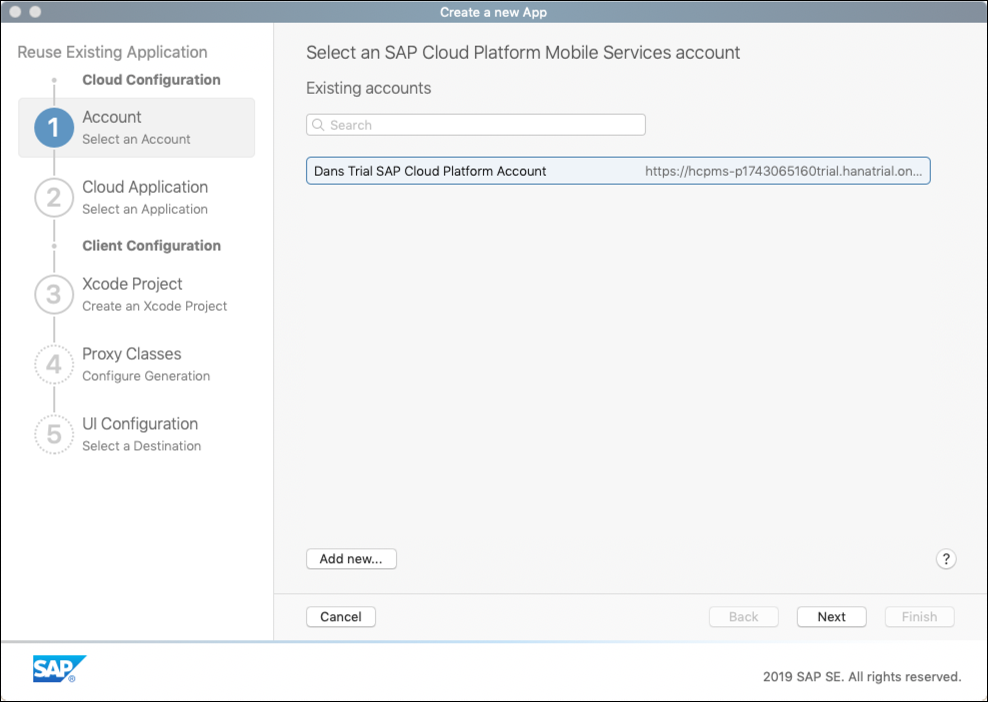
 Select Use the previously created account.
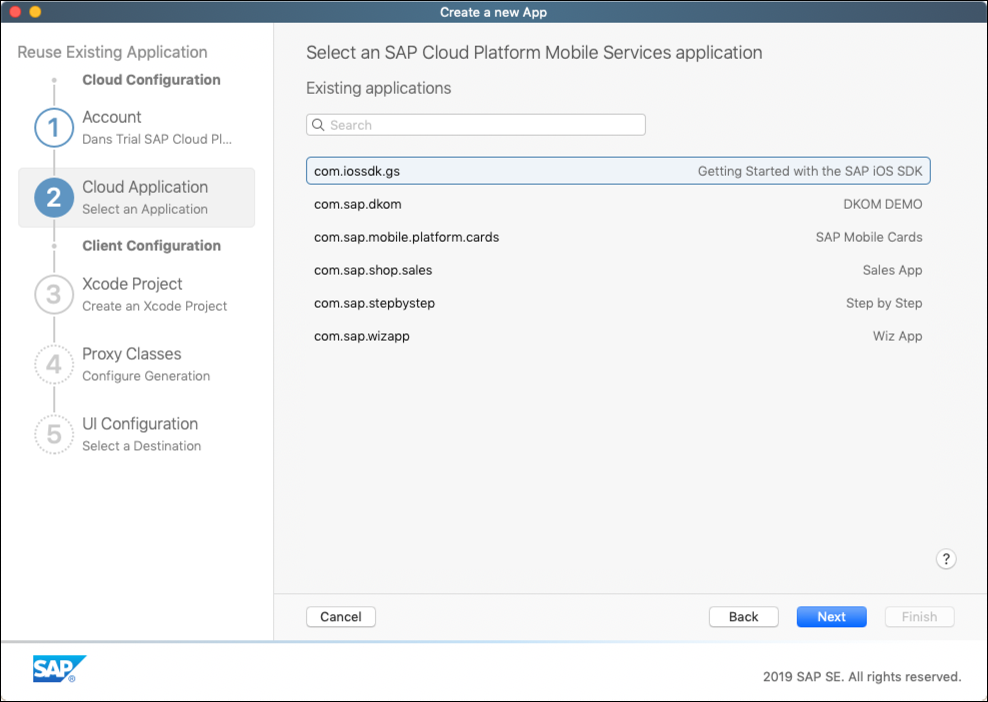
Select the previously created application configuration.
Provide some of the project details.
The OData service used is the sample back end OData service.
Additional generation options for a destination's proxy classes can be specified by hovering over the destination and choosing edit. One option is to specify a prefix should you wish to use multiple destinations that have entities with the same name.

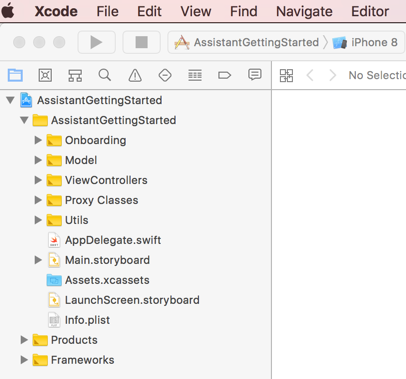
The final page enables the selection of which destination to use for the generated screens or if an empty project should be generated. If you choose Single View, an empty project that contains the SAP Cloud Platform SDK for iOS libraries and the proxy classes to access the destination will be created.

Note that the features such as push, log upload, offline and the discovery service are all enabled or disabled based on the application configuration specified in the Mobile Services Cockpit. To see these options, when choosing to create new in the assistant, choose create a new application instead of reuse.After clicking Finish, an Xcode project will be created and opened.
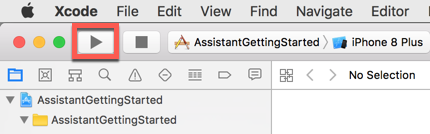
Xcode will ask for your password the first time it build and runs a project and requires administrator rights.
After clicking on the run icon, the app can be viewed on the simulator.

Note that the data can be modified and if needed using the management cockpit, the sample back end data can be reset.

For another example of using the Assistant to create a sample project see the following video and Creating an app using the SAP Cloud Platform SDK for iOS Assistant.Note, we will be creating everything from scratch in the guide. This project will not be used further other than for reference.
Creating and Debugging an Xcode Project
The following steps demonstrate how to create a new project that will be used in the subsequent sections of this guide. The app will contain a button that when pressed, updates a variable numberOfPresses and prints the value to the All Output screen in Xcode. A breakpoint will then be set and using the LLDB debugger, a method will be called on the variable numberOfPresses to change its sign. For further details see Debugging Tools.
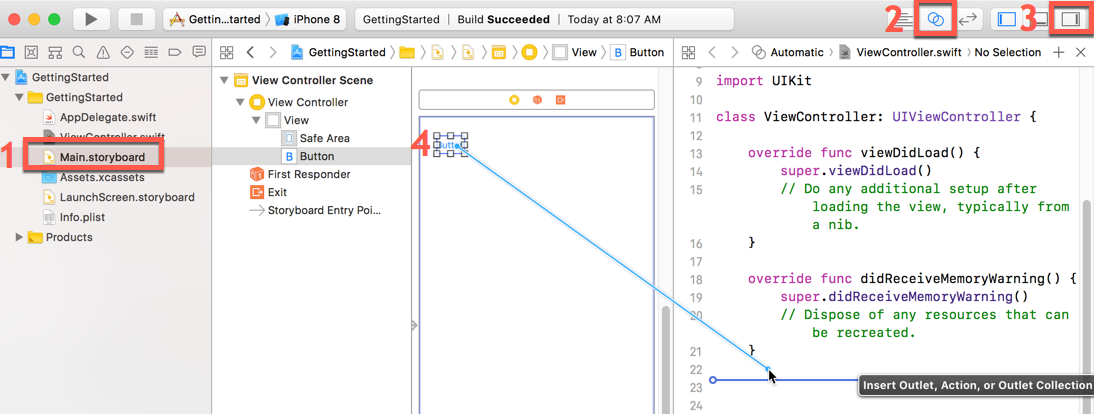
- In Xcode choose File, New Project. Choose iOS, Single View App and click Next.
 Fill in the Project Name, your Organization Name, and Organization Identifier, uncheck Include Unit Tests and Include UI Tests.
 On the next screen, uncheck Create Git repository on my Mac.
 - Drag a button onto the View.

- Create an action named buttonPressed of type UIButton by holding down the control key while dragging from the button to the ViewController file.

- Below the class definition for ViewController, add the following variable definition.
var numberOfPresses = 0
Then add the following code for the method buttonPressed.
numberOfPresses = numberOfPresses + 1

print("Button pressed \(numberOfPresses) times")
- Run the app and notice that the method buttonPressed is logging entries in the All Output view

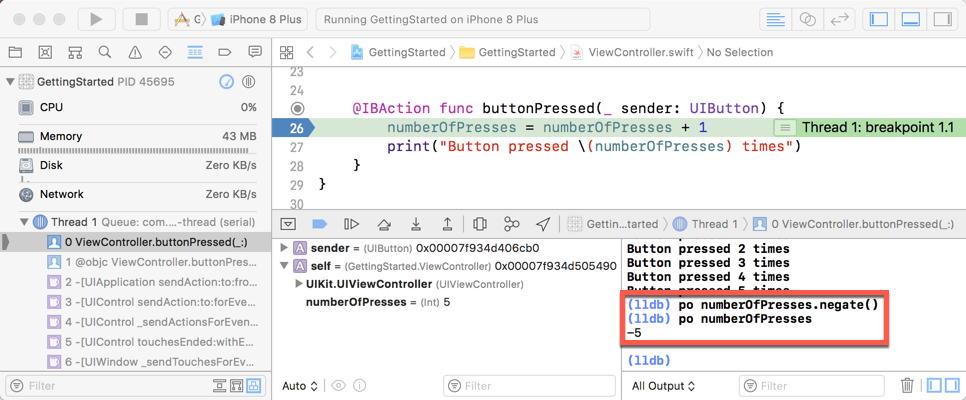
- Add a breakpoint in the buttonPressed method by clicking on a line number.Then in the simulator, press the button.
- Notice that the breakpoint is hit, and the value of the variable is shown. Also note that you can call methods on a variable. For example, execute the following lldb debugger command.
po numberOfPresses.negate()

po numberOfPresses
Adding the SDK Libraries to the Xcode Project
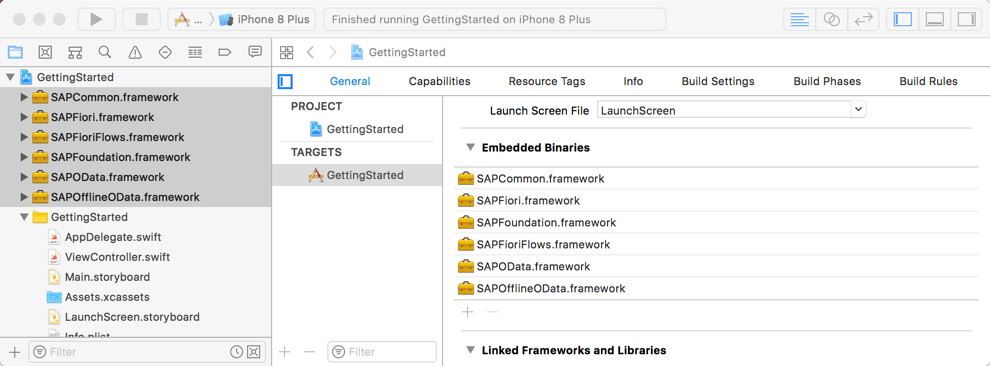
SAP Cloud Platform SDK for iOS contains functionality in libraries that can be added to Xcode projects. There are two types of libraries, ones that are specific to a simulator or device and ones that can be used in both instances (fat). The fat libraries are useful during development, but when you submit the app to the Apple App Store, you must not use fat libraries. For additional details see 3. Add the SDK to an Xcode project.
- Drag and drop the fat libraries into the Embedded Binaries section of your project. The libraries were previous exported using the Assistant's Install Tools menu option.

 Choose Copy items if needed and Create groups.

Near the top of the file ViewController.swift, below the import for UIKit, add the following import.
import SAPFoundation
- In ViewController.swift, in the method buttonPressed, add the following code. ConnectivityUtils is a class from the Foundation framework of the SAP Cloud Platform SDK for iOS.
if ConnectivityUtils.isConnected() {

    if ConnectivityUtils.isWiFiConnected() {

        print("Currently connected by WiFi")

    }

    else if ConnectivityUtils.isMobileConnected() {

        print("Currently connected by mobile data")

    }

}

else {

    print("Currently offline with no network connection")

}
- Rerun the app, press the button, and this time in the debugger notice that the SDK class ConnectivityUtils is successfully called to determine the network state of the simulator.

Learning Swift
The SAP Cloud Platform SDK for iOS makes use of the Swift language. The following are some links that may be of interest while learning Swift and using the Interface Builder in Xcode.
Xcode Introduction
Build Swift App
A Swift Tour
Start Developing iOS Apps (Swift)
Stanford University: Developing iOS 10 Apps with Swift (iTunes U)
Intro to App Development in Swift (iBook)
Using the SAP Cloud Platform SDK
The following sections provide step by step instructions demonstrating some key features of the SAP Cloud Platform SDK for iOS.
Registration using Fiori Flows
Logging
Online Application
Offline OData
SAP Fiori for iOS
Next (Registration using Fiori Flows)
Note that comments are not easily searchable in blog posts. If you have a question that is not specific to the above content it would be best to create a new question.
- SAP Managed Tags:
- SAP Mobile Services,
- iOS,
- SAP BTP SDK for iOS
Labels:
13 Comments
You must be a registered user to add a comment. If you've already registered, sign in. Otherwise, register and sign in.
Labels in this area
-
ABAP CDS Views - CDC (Change Data Capture)
2 -
AI
1 -
Analyze Workload Data
1 -
BTP
1 -
Business and IT Integration
2 -
Business application stu
1 -
Business Technology Platform
1 -
Business Trends
1,661 -
Business Trends
87 -
CAP
1 -
cf
1 -
Cloud Foundry
1 -
Confluent
1 -
Customer COE Basics and Fundamentals
1 -
Customer COE Latest and Greatest
3 -
Customer Data Browser app
1 -
Data Analysis Tool
1 -
data migration
1 -
data transfer
1 -
Datasphere
2 -
Event Information
1,400 -
Event Information
64 -
Expert
1 -
Expert Insights
178 -
Expert Insights
275 -
General
1 -
Google cloud
1 -
Google Next'24
1 -
Kafka
1 -
Life at SAP
784 -
Life at SAP
11 -
Migrate your Data App
1 -
MTA
1 -
Network Performance Analysis
1 -
NodeJS
1 -
PDF
1 -
POC
1 -
Product Updates
4,577 -
Product Updates
329 -
Replication Flow
1 -
RisewithSAP
1 -
SAP BTP
1 -
SAP BTP Cloud Foundry
1 -
SAP Cloud ALM
1 -
SAP Cloud Application Programming Model
1 -
SAP Datasphere
2 -
SAP S4HANA Cloud
1 -
SAP S4HANA Migration Cockpit
1 -
Technology Updates
6,886 -
Technology Updates
407 -
Workload Fluctuations
1
Related Content
- SAP BTP, Kyma Runtime internally available on SAP Converged Cloud in Technology Blogs by SAP
- Activation of IAS in Technology Q&A
- SAP HANA Cloud Vector Engine: Quick FAQ Reference in Technology Blogs by SAP
- FCO-00011 The step start with step key |NW_ABAP_OneHost|ind|ind|ind|ind|0|0|NW_Onehost_System|ind|i in Technology Q&A
- 10+ ways to reshape your SAP landscape with SAP Business Technology Platform - Blog 7 in Technology Blogs by SAP
Top kudoed authors
| User | Count |
|---|---|
| 13 | |
| 10 | |
| 10 | |
| 7 | |
| 7 | |
| 6 | |
| 5 | |
| 5 | |
| 5 | |
| 4 |