
- SAP Community
- Products and Technology
- Technology
- Technology Blogs by SAP
- SAP HANA Cloud Platform Virtual Machines.
Technology Blogs by SAP
Learn how to extend and personalize SAP applications. Follow the SAP technology blog for insights into SAP BTP, ABAP, SAP Analytics Cloud, SAP HANA, and more.
Turn on suggestions
Auto-suggest helps you quickly narrow down your search results by suggesting possible matches as you type.
Showing results for
Employee
Options
- Subscribe to RSS Feed
- Mark as New
- Mark as Read
- Bookmark
- Subscribe
- Printer Friendly Page
- Report Inappropriate Content
01-19-2017
9:18 AM
SAP HANA Cloud Platform has a new service added to the offering list which is Virtual Machines. Using this service you can install your own applications that are not covered by the platform as of now for example a node.js or an R application, a bobj application etc.
Note: Before we proceed there are few pointers that you have to keep in mind for using this service.
How do I check whether the quota is assigned or not ?
Once you login to your global account on the cockpit click on the account
then click on quota management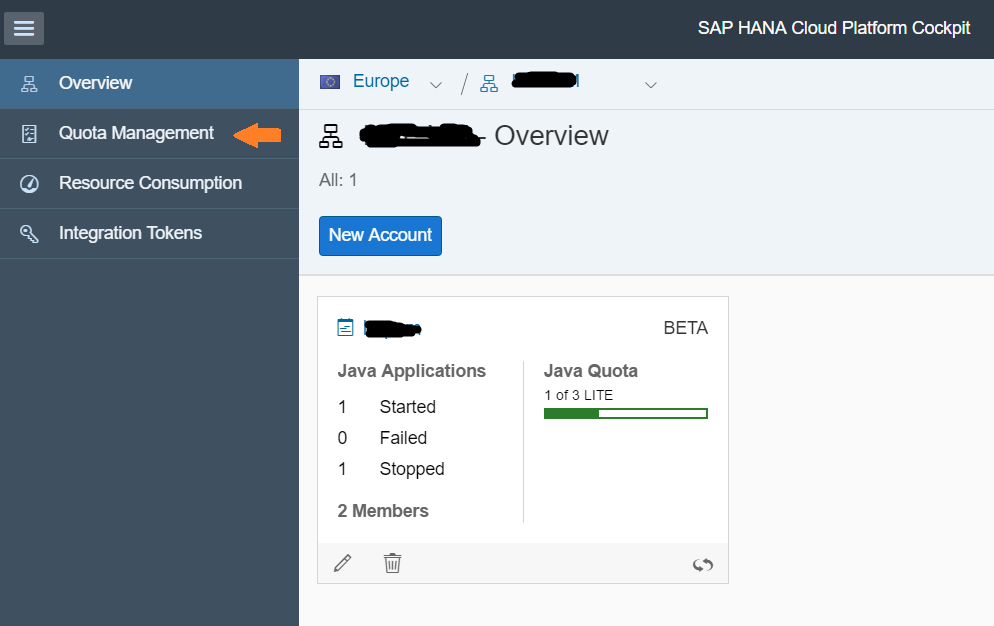
here you will see the quota assigned based on the purchase you made.

Exercise 1: System Setup
In this step we will download the necessary sdk/tools/software and extract them under a common location to make our work easier.
1. Double click on “My Computer” from the Windows desktop.
2. Double Click on “C directory”.
3. Create a New folder. Right click. Click on “New”.
4. Click on “Folder”.
5. Name the new folder as “Work”. Press Enter.
6. Open your "Chrome Browser”.
7. Download OpenSSL from https://code.google.com/archive/p/openssl-for-windows/downloads
Note: Download the latest version.
8. Download putty from http://www.chiark.greenend.org.uk/~sgtatham/putty/download.html
Note: Download the zip file putty.zip
9. Download the SAP HANA Cloud Platform Tools from https://tools.hana.ondemand.com/ from Cloud tool.
Note: Download the latest version of sdk (Java web).
10. neo-java-web-sdk-1.102.26, putty and openssl-0.9.8k_X64 zip files are available now in the “Downloads” folder of your windows machine.
11. Right click on “neo-java-web-sdk-1.102.26” then click on “Extract All”.
12. Click on “Browse”.
13. Change the location where the “neo-java-web-sdk-1.102.26” will be extracted to “C:\Work\SDK”. Click “Extract”.
Note: This step will save the SDK to the “Work” folder in C drive.
14. Extract putty and openssl the same way.
15. Change the name of “openssl-0.9.8k_X64” to openssl.
You will have the following folders inside “Work” as shown in the below screenshot.

Congratulations ! You have successfully setup your system by downloading required tools/softwares that are required for creating a Virtual Machine.
Summary: On your windows machine you have created a new folder named “Work” inside “Work” folder you have extracted “neo-java-web-sdk-1.102.26, openssl-0.9.8k_X64 and putty” and renamed them to “SDK, openssl” respectively.
Exercise 2: Create a Virtual Machine
In this exercise we will be creating a Virtual Machine.
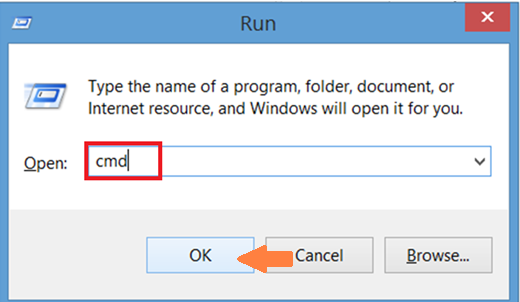
1. Press “Windows key” and “R” and then type cmd and then Press OK.
2. Execute: cd C:\Work\SDK\tools

Note: If you are behind a proxy then execute
set HTTPS_PROXY_HOST=proxy
set HTTPS_PROXY_PORT=8080
3. Execute: neo create-vm --size x-small --name <any_name> --account <your account name>--host hana.ondemand.com --user <your s/p/i user id>
4. When prompted password for your user: Enter your s/p/i user password. Press Enter.
5. You will receive a warning as shown below press ‘y’ when the command prompts to save the key. Press Enter.

6. Enter a passphrase by which you want to encrypt the key. Enter passphrase again to confirm. This is done to secure the key.
Note: Remember this passphrase.
VM is created.
7. Execute the command to see the created VM
neo list-vms --account <your account name> --host hana.ondemand.com --user <user id>
You can see the status of the VM as started.
8. Open the browser enter https://account.eu1.hana.ondemand.com/ and login by providing your username and password.
You will see the dashboard.

Note: If you have multiple accounts, select the account and then the sub-account for which the VM quota is assigned to you.

9. Click on Virtual Machines.

10. Click on <your vm name> that you created. You will see more details about the VM.

11. Execute: cd "C:\Work\openssl\bin
12. Execute this command: openssl.exe rsa -in "C:\Work\SDK\tools\hana.ondemand.com\your_hcp_account_name\your_vm_name.key" -out your_vm_name.pem
Note: Here the path "C:\Work\SDK\tools\hana.ondemand.com\your_hcp_account_name\your_vm_name.key" is the one where the key is saved (Exercise 2 Step 5), you can change the name of the .pem file for simplicity keep it same as the .key file.
13. The command will prompt for passphrase. Enter the passphrase that you gave to encrypt the key in Exercise 2 step 6.
Note: You will now have a file named your_vm_name.pem in bin folder of
openssl under Work, which will be used further. This file is generated by OpenSSL.
14. From your Windows desktop under C:\Work double click on “putty”.
15. Double click on "puttygen.exe"
16. Click on Conversions and then on Import key.
17. Browse for your_vm_name.pem file and select it.

18. Enter the Key passphrase to encrypt the key and then confirm. Press “Save private key”.

19. Save the file as "your_vm_name.ppk" under C:\Work\openssl\bin
20. Delete the file "your_vm_name.pem" for security because the file your_vm_name.pem contains unencrypted data.
Summary: You have successfully created Virtual Machine, along with it there are two files that are available on your system your_vm_name.key and your_vm_name.ppk.
Exercise 3: Connect to Virtual Machine
In this exercise we will open up a SSH tunnel and connect to the Virtual Machine.
1. Go to your SAP HANA Cloud Platform cockpit and get the VM id from there for your virtual machine.

2. Execute the command in the command prompt. cd "C:\Work\SDK\tools
3. Execute: neo open-ssh-tunnel --vm-id 1b68bf45-938c-46f8-9464-d57bf0252d16 --account <your_hcp_account_name> --host hana.ondemand.com --user <your s/p/i user id>
4. Execute neo list-ssh-tunnels
Note: This command will check if the tunnel was opened by listing the currently opened SSH tunnels.
5. From the windows desktop start putty by going to C:\Work\putty. Double click on “putty.exe”
6. Provide the following details:
Hostname: root@localhost
Port: The port number that is generated for you.

7. Double click on “SSH”. Click on "Auth"
8. Select the file your_vm_name.ppk from “C:\Work\openssl\bin\your_vm_name.ppk”

9. Click on "Session" and then on "Open".
10. Press “Yes” when the prompt asks to proceed.

11. Provide the passphrase used for encrypting the key in Exercise 2 Step 18. Press Enter
12. You are logged in to the VM as root user.

Congratulations! You are now connected to the virtual machine.
Summary: You have used putty to connect to the Virtual Machine in SAP HANA Cloud Platform and logged in to it as root user.
What’s Next?
Other useful commands:
close-ssh-tunnel : neo close-ssh-tunnel --vm-id <vm_id>
delete-vm : neo delete-vm --account <account_name> --user <e-mail_or_user> --host <landscape_host> --name <vm_name>
Follow this blog to use Tomcat 8
Follow this blog to see how Virtual Machine can be used to install any software (we will install R Server).
Note: Before we proceed there are few pointers that you have to keep in mind for using this service.
- As on January'17 this service is only available in Europe data center.
- Once you create a virtual machine you are the owner of a virtual machine, you are responsible for applying patches on the operating system (the VM comes with SUSE Linux Enterprise Server installed) and for triggering backups via snapshots.
- In this series we are using a Windows 64 bit machine and Google Chrome as a browser and command prompt for running the console commands.
- You hava Java installed and environment variable JAVA_HOME is set to the Java installation folder.
- An account in SAP HANA Cloud Platform Europe data center with Admin roles and with Virtual Machine quota provisioned.
How do I check whether the quota is assigned or not ?
Once you login to your global account on the cockpit click on the account
then click on quota management
here you will see the quota assigned based on the purchase you made.
Exercise 1: System Setup
In this step we will download the necessary sdk/tools/software and extract them under a common location to make our work easier.
1. Double click on “My Computer” from the Windows desktop.
2. Double Click on “C directory”.
3. Create a New folder. Right click. Click on “New”.
4. Click on “Folder”.
5. Name the new folder as “Work”. Press Enter.
6. Open your "Chrome Browser”.
7. Download OpenSSL from https://code.google.com/archive/p/openssl-for-windows/downloads
Note: Download the latest version.
8. Download putty from http://www.chiark.greenend.org.uk/~sgtatham/putty/download.html
Note: Download the zip file putty.zip
9. Download the SAP HANA Cloud Platform Tools from https://tools.hana.ondemand.com/ from Cloud tool.
Note: Download the latest version of sdk (Java web).
10. neo-java-web-sdk-1.102.26, putty and openssl-0.9.8k_X64 zip files are available now in the “Downloads” folder of your windows machine.
11. Right click on “neo-java-web-sdk-1.102.26” then click on “Extract All”.
12. Click on “Browse”.
13. Change the location where the “neo-java-web-sdk-1.102.26” will be extracted to “C:\Work\SDK”. Click “Extract”.
Note: This step will save the SDK to the “Work” folder in C drive.
14. Extract putty and openssl the same way.
15. Change the name of “openssl-0.9.8k_X64” to openssl.
You will have the following folders inside “Work” as shown in the below screenshot.
Congratulations ! You have successfully setup your system by downloading required tools/softwares that are required for creating a Virtual Machine.
Summary: On your windows machine you have created a new folder named “Work” inside “Work” folder you have extracted “neo-java-web-sdk-1.102.26, openssl-0.9.8k_X64 and putty” and renamed them to “SDK, openssl” respectively.
Exercise 2: Create a Virtual Machine
In this exercise we will be creating a Virtual Machine.
1. Press “Windows key” and “R” and then type cmd and then Press OK.
2. Execute: cd C:\Work\SDK\tools
Note: If you are behind a proxy then execute
set HTTPS_PROXY_HOST=proxy
set HTTPS_PROXY_PORT=8080
3. Execute: neo create-vm --size x-small --name <any_name> --account <your account name>--host hana.ondemand.com --user <your s/p/i user id>
4. When prompted password for your user: Enter your s/p/i user password. Press Enter.
5. You will receive a warning as shown below press ‘y’ when the command prompts to save the key. Press Enter.
6. Enter a passphrase by which you want to encrypt the key. Enter passphrase again to confirm. This is done to secure the key.
Note: Remember this passphrase.
VM is created.
7. Execute the command to see the created VM
neo list-vms --account <your account name> --host hana.ondemand.com --user <user id>
You can see the status of the VM as started.
8. Open the browser enter https://account.eu1.hana.ondemand.com/ and login by providing your username and password.
You will see the dashboard.
Note: If you have multiple accounts, select the account and then the sub-account for which the VM quota is assigned to you.
9. Click on Virtual Machines.
10. Click on <your vm name> that you created. You will see more details about the VM.
11. Execute: cd "C:\Work\openssl\bin
12. Execute this command: openssl.exe rsa -in "C:\Work\SDK\tools\hana.ondemand.com\your_hcp_account_name\your_vm_name.key" -out your_vm_name.pem
Note: Here the path "C:\Work\SDK\tools\hana.ondemand.com\your_hcp_account_name\your_vm_name.key" is the one where the key is saved (Exercise 2 Step 5), you can change the name of the .pem file for simplicity keep it same as the .key file.
13. The command will prompt for passphrase. Enter the passphrase that you gave to encrypt the key in Exercise 2 step 6.
Note: You will now have a file named your_vm_name.pem in bin folder of
openssl under Work, which will be used further. This file is generated by OpenSSL.
14. From your Windows desktop under C:\Work double click on “putty”.
15. Double click on "puttygen.exe"
16. Click on Conversions and then on Import key.
17. Browse for your_vm_name.pem file and select it.
18. Enter the Key passphrase to encrypt the key and then confirm. Press “Save private key”.
19. Save the file as "your_vm_name.ppk" under C:\Work\openssl\bin
20. Delete the file "your_vm_name.pem" for security because the file your_vm_name.pem contains unencrypted data.
Summary: You have successfully created Virtual Machine, along with it there are two files that are available on your system your_vm_name.key and your_vm_name.ppk.
Exercise 3: Connect to Virtual Machine
In this exercise we will open up a SSH tunnel and connect to the Virtual Machine.
1. Go to your SAP HANA Cloud Platform cockpit and get the VM id from there for your virtual machine.
2. Execute the command in the command prompt. cd "C:\Work\SDK\tools
3. Execute: neo open-ssh-tunnel --vm-id 1b68bf45-938c-46f8-9464-d57bf0252d16 --account <your_hcp_account_name> --host hana.ondemand.com --user <your s/p/i user id>
4. Execute neo list-ssh-tunnels
Note: This command will check if the tunnel was opened by listing the currently opened SSH tunnels.
5. From the windows desktop start putty by going to C:\Work\putty. Double click on “putty.exe”
6. Provide the following details:
Hostname: root@localhost
Port: The port number that is generated for you.
7. Double click on “SSH”. Click on "Auth"
8. Select the file your_vm_name.ppk from “C:\Work\openssl\bin\your_vm_name.ppk”
9. Click on "Session" and then on "Open".
10. Press “Yes” when the prompt asks to proceed.
11. Provide the passphrase used for encrypting the key in Exercise 2 Step 18. Press Enter
12. You are logged in to the VM as root user.
Congratulations! You are now connected to the virtual machine.
Summary: You have used putty to connect to the Virtual Machine in SAP HANA Cloud Platform and logged in to it as root user.
What’s Next?
Other useful commands:
close-ssh-tunnel : neo close-ssh-tunnel --vm-id <vm_id>
delete-vm : neo delete-vm --account <account_name> --user <e-mail_or_user> --host <landscape_host> --name <vm_name>
Follow this blog to use Tomcat 8
Follow this blog to see how Virtual Machine can be used to install any software (we will install R Server).
- SAP Managed Tags:
- development tools for SAP BTP, Neo environment,
- SAP Business Technology Platform
8 Comments
You must be a registered user to add a comment. If you've already registered, sign in. Otherwise, register and sign in.
Labels in this area
-
ABAP CDS Views - CDC (Change Data Capture)
2 -
AI
1 -
Analyze Workload Data
1 -
BTP
1 -
Business and IT Integration
2 -
Business application stu
1 -
Business Technology Platform
1 -
Business Trends
1,658 -
Business Trends
93 -
CAP
1 -
cf
1 -
Cloud Foundry
1 -
Confluent
1 -
Customer COE Basics and Fundamentals
1 -
Customer COE Latest and Greatest
3 -
Customer Data Browser app
1 -
Data Analysis Tool
1 -
data migration
1 -
data transfer
1 -
Datasphere
2 -
Event Information
1,400 -
Event Information
67 -
Expert
1 -
Expert Insights
177 -
Expert Insights
301 -
General
1 -
Google cloud
1 -
Google Next'24
1 -
GraphQL
1 -
Kafka
1 -
Life at SAP
780 -
Life at SAP
13 -
Migrate your Data App
1 -
MTA
1 -
Network Performance Analysis
1 -
NodeJS
1 -
PDF
1 -
POC
1 -
Product Updates
4,577 -
Product Updates
346 -
Replication Flow
1 -
REST API
1 -
RisewithSAP
1 -
SAP BTP
1 -
SAP BTP Cloud Foundry
1 -
SAP Cloud ALM
1 -
SAP Cloud Application Programming Model
1 -
SAP Datasphere
2 -
SAP S4HANA Cloud
1 -
SAP S4HANA Migration Cockpit
1 -
Technology Updates
6,873 -
Technology Updates
429 -
Workload Fluctuations
1
Related Content
- Consuming SAP with SAP Build Apps - Mobile Apps for iOS and Android in Technology Blogs by SAP
- SAP Signavio is the highest ranked Leader in the SPARK Matrix™ Digital Twin of an Organization (DTO) in Technology Blogs by SAP
- Top Picks: Innovations Highlights from SAP Business Technology Platform (Q1/2024) in Technology Blogs by SAP
- SAP S/4HANAとSAP Datasphereのデータ連携 : Cloud Connectorの設定 in Technology Blogs by SAP
- Digital Twins of an Organization: why worth it and why now in Technology Blogs by SAP
Top kudoed authors
| User | Count |
|---|---|
| 32 | |
| 17 | |
| 15 | |
| 13 | |
| 11 | |
| 9 | |
| 8 | |
| 8 | |
| 8 | |
| 7 |