- SAP Community
- Products and Technology
- Enterprise Resource Planning
- ERP Blogs by Members
- Business Rule Framework Plus(BRF+)
- Subscribe to RSS Feed
- Mark as New
- Mark as Read
- Bookmark
- Subscribe
- Printer Friendly Page
- Report Inappropriate Content
What is BRF Plus? Why we need to use BRF+ ?
There will always be some amount of custom business logic available in the SAP system, even if we strive to minimize customization. Such ABAP-based customization must be handled carefully in order to prevent duplication of business logic and to keep it in line with other functional areas. Herein lies the value of SAP Business Rules Framework Plus (BRF Plus), a feature that enables centralized and reusable management of all custom business logic.
In general, BRF Plus features can be accessed on any SAP NetWeaver-based system with the relevant enhancement pack installed.
Both technical users (programmers, system administrators) and business users who manage operational business processes (like bidding, procurement, tax form validation, etc.) can benefit from BRF Plus's unified modeling and run-time environment for business rules.
The application programming interface and user interface that BRF+, or Business Rule Framework Plus, offers is extensive for defining business rules. We can define business rules with it without having to write ABAP code.
Application : In BRF+, to start anything first we must have to create the application.
Type of Storage Types :
| Storage Type | Client | Transport Request | Cross-Application Usage |
| System | Client-Independent | Transportable or Local | Can use system objects. |
| Customizing | Client-Dependent | Transportable or Local | Can use system and customizing objects |
| Master Data | Client-Dependent | Local | Can use system, customizing, and master data objects |
Data Objects: Describes data types of the variable. They are the data carriers helping in signature or context of a function, variables in a rule or rulesets, building blocks for Decision tables, Etc. You can create data objects by defining attributes like element type, length, decimals or you can directly bind to existing DDIC elements.
Expressions: Expressions are the computational units with well-defined logic. Usually, expressions are self-sustained and process the user input and gives result back to the caller.
Rules: Rule is a central entity in BRF+ which builds the business logic. Evaluation of rule gives you the decision for the question in context
Rule sets: Simply, collection of rules. Each rule set can be assigned to exactly one function. Priority can be set at rule set level for defining the order of execution.
To Create Application : BRF+ or BRFPLUS is the transaction code to access the application.
Next, we click the Create Application Pushbutton. Below Pop-up will opened up and enter the required fields.
Next, we'll press the "Save & Activate" button.
Next, within this application, we will talk about the following elements.
1. Create an element in the data object.
2. Create a structure in the data object.
3. Make a Table Data Object
4. Produce a Decision Table Expression
There are 3 ways to bind the data object in Binding Type :
Create an element in the data object : The following steps are shown in the figure below after you right-click on the application: After completing all the required fields, we will click the designated button.

Bind to DDIC Element: Select a DDIC Element that shares your attributes.
Bind to an Existing BRF+ Element: Select an Existing BRF+ Element that possesses the same attributes.
No Binding: Maintain the details freely.
However, if we select the No Binding option, we will have to enter all necessary information, including the element name, text, short text, element length, and element type.
After entered all the required fields, click on Create and Navigate To Object button and then click Save & Activate buttons to activate it.
Structure Creation: The same application should be used to create the structure.
It is not necessary to build a structure if our result contains just one column. There is also no need to create a structure if the output for a single condition is a single row. If more than one column appears in our result, we should make a structure with all of those columns. Additionally, a structure must be shown if the output consists of multiple rows. The generated structure must be used to create a table in order to produce multiple rows as output.
To Create a Structure, Select our application and follow the instructions shown in the figure below 
a) Bind to Structure Type (DDIC)
b) No Binding
c) Binding to CDS View: Not to be used
For Option a & c, The required fields (Name, Short Text, Text) will automatically be filled in from the DDIC structure or the CDS View.
However, if we select option b, which is No Binding, we will have to manually fill in every required field.

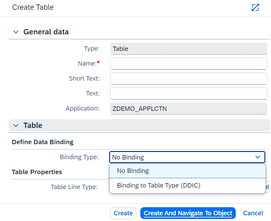
Table Creation: In order to have multiple result rows based on a single condition in our decision table, we can create a table in the same application. Therefore, table creation is necessary in our case.
Select our application, then follow the instructions shown in the figure below.
There are two options for creating tables in Binding Type:
a) No Binding
b) Binding to Table Type (DDIC)

If we select option a "No Binding" then it will have to manually fill out all required fields.
Therefore, choose Table line from the application in order to display Multiple Rows. 
Decision Table Creation :
The next important step is to construct our Decision Table using our application as well. Select the Decision Table and follow the steps outlined in the figure below.
Once Name, Short Text, and Text are entered, click on the Highlighted button.

Select the Result Data Object located in the same application as our recently created Table. Next, include the Condition Column.
Select the Application Data Element's Column:

Thus, the Condition Column's input needs to be required and selected columns comes as result.


Use of Decision Table in ABAP Program: In order to obtain the required output rows, we must now use our Decision Table in an ABAP program and pass the condition column value from the program.
In the same application, a function must be created for that.
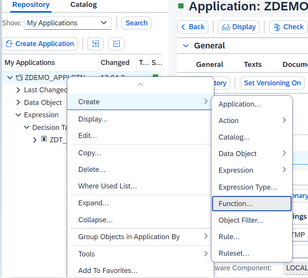
Function Creation: To begin, right-click on the application, then follow the instructions in the figure below.

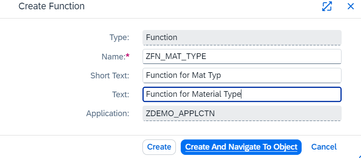
Next, fill in the remaining necessary fields, as indicated in the figure below
After that, we must select Create Code Template, copy the sample code, and utilize it in our ABAP program
Rules and RuleSets : It contains set of rules which can be executed as soon as our BRF+ application Function is getting executed. Rules must be contained in the ruleset, as expressions (IF-THEN-ELSE logic). If-THEN rules are another name for plain rules.
A ruleset is an assemblage of rules. Select Event Mode by default. The Assign Ruleset option is under Event Mode. 

Next, utilize this ruleset in ABAP code from the function using the Code Generation Template.
Decision Tree: A binary tree of expressions can be defined using a decision tree expression. Condition Nodes are non-leaf nodes. The result is a Boolean. Left & Right nodes will move forward in accordance with the outcome. When a leaf node is reached, the designated expression is executed, and the result of the entire expression is returned as the corresponding result. A decision tree has two nodes at all times: left and right. Every node has decisions that are True (Yes) or False (No). Depending on that new branches (nodes) will proceed.
We can define business rules using the BRF+ interface without having to write ABAP code. These generated business rules can be used as substitution/validation rules or integrated into other SAP programs.
Use cases of BRF+ that can be used into S4HANA:
Output management for Billing and Purchasing – Output determination (SAP S/4HANA).
Integration with IMG transaction.
SAP business Workflows.
Cloud based Environment.
Conclusion on BRF+ :
- It enables us to represent rules in an understandable manner and apply them again in various contexts.
- BRF+ eliminates the need to create and maintain custom tables for validation. It also does away with the traditional developer approach of hardcoding values.
- In essence, BRF+ is used to make decisions, and decision input and output values are kept up to date in Decision Tables, which have sophisticated validation features.
Roles that are required
SAP_BC_FDT_ADMINISTRATOR
WD Configuration :
/sap/bc/webdynpro/sap/fdt_wd_workbench
/sap/bc/webdynpro/sap/fdt_wd_object_manager
/sap/bc/webdynpro/sap/fdt_wd_catalog_browser
- SAP Managed Tags:
- NW ABAP Business Rule Framework (BRFplus)
You must be a registered user to add a comment. If you've already registered, sign in. Otherwise, register and sign in.
-
"mm02"
1 -
A_PurchaseOrderItem additional fields
1 -
ABAP
1 -
ABAP Extensibility
1 -
ACCOSTRATE
1 -
ACDOCP
1 -
Adding your country in SPRO - Project Administration
1 -
Advance Return Management
1 -
AI and RPA in SAP Upgrades
1 -
Approval Workflows
1 -
Ariba
1 -
ARM
1 -
ASN
1 -
Asset Management
1 -
Associations in CDS Views
1 -
auditlog
1 -
Authorization
1 -
Availability date
1 -
Azure Center for SAP Solutions
1 -
AzureSentinel
2 -
Bank
1 -
BAPI_SALESORDER_CREATEFROMDAT2
1 -
BRF+
1 -
BRFPLUS
1 -
Bundled Cloud Services
1 -
business participation
1 -
Business Processes
1 -
CAPM
1 -
Carbon
1 -
Cental Finance
1 -
CFIN
1 -
CFIN Document Splitting
1 -
Cloud ALM
1 -
Cloud Integration
1 -
condition contract management
1 -
Connection - The default connection string cannot be used.
1 -
Custom Table Creation
1 -
Customer Screen in Production Order
1 -
Data Quality Management
1 -
Date required
1 -
Decisions
1 -
desafios4hana
1 -
Developing with SAP Integration Suite
1 -
Direct Outbound Delivery
1 -
DMOVE2S4
1 -
EAM
1 -
EDI
3 -
EDI 850
1 -
EDI 856
1 -
edocument
1 -
EHS Product Structure
1 -
Emergency Access Management
1 -
Energy
1 -
EPC
1 -
Financial Operations
1 -
Find
1 -
FINSSKF
1 -
Fiori
1 -
Flexible Workflow
1 -
Gas
1 -
Gen AI enabled SAP Upgrades
1 -
General
1 -
generate_xlsx_file
1 -
Getting Started
1 -
HomogeneousDMO
1 -
How to add new Fields in the Selection Screen Parameter in FBL1H Tcode
1 -
IDOC
2 -
Integration
1 -
Learning Content
2 -
LogicApps
2 -
low touchproject
1 -
Maintenance
1 -
management
1 -
Material creation
1 -
Material Management
1 -
MD04
1 -
MD61
1 -
methodology
1 -
Microsoft
2 -
MicrosoftSentinel
2 -
Migration
1 -
mm purchasing
1 -
MRP
1 -
MS Teams
2 -
MT940
1 -
Newcomer
1 -
Notifications
1 -
Oil
1 -
open connectors
1 -
Order Change Log
1 -
ORDERS
2 -
OSS Note 390635
1 -
outbound delivery
1 -
outsourcing
1 -
PCE
1 -
Permit to Work
1 -
PIR Consumption Mode
1 -
PIR's
1 -
PIRs
1 -
PIRs Consumption
1 -
PIRs Reduction
1 -
Plan Independent Requirement
1 -
Premium Plus
1 -
pricing
1 -
Primavera P6
1 -
Process Excellence
1 -
Process Management
1 -
Process Order Change Log
1 -
Process purchase requisitions
1 -
Product Information
1 -
Production Order Change Log
1 -
purchase order
1 -
Purchase requisition
1 -
Purchasing Lead Time
1 -
Redwood for SAP Job execution Setup
1 -
RISE with SAP
1 -
RisewithSAP
1 -
Rizing
1 -
S4 Cost Center Planning
1 -
S4 HANA
1 -
S4HANA
3 -
Sales and Distribution
1 -
Sales Commission
1 -
sales order
1 -
SAP
2 -
SAP Best Practices
1 -
SAP Build
1 -
SAP Build apps
1 -
SAP Cloud ALM
1 -
SAP Data Quality Management
1 -
SAP Maintenance resource scheduling
2 -
SAP Note 390635
1 -
SAP S4HANA
2 -
SAP S4HANA Cloud private edition
1 -
SAP Upgrade Automation
1 -
SAP WCM
1 -
SAP Work Clearance Management
1 -
Schedule Agreement
1 -
SDM
1 -
security
2 -
Settlement Management
1 -
soar
2 -
Sourcing and Procurement
1 -
SSIS
1 -
SU01
1 -
SUM2.0SP17
1 -
SUMDMO
1 -
Teams
2 -
User Administration
1 -
User Participation
1 -
Utilities
1 -
va01
1 -
vendor
1 -
vl01n
1 -
vl02n
1 -
WCM
1 -
X12 850
1 -
xlsx_file_abap
1 -
YTD|MTD|QTD in CDs views using Date Function
1
- « Previous
- Next »
- Recap of SAP S/4HANA 2023 Highlights Webinar: Service in Enterprise Resource Planning Blogs by SAP
- Recap of SAP S/4HANA 2023 Highlights Webinar: Asset Management in Enterprise Resource Planning Blogs by SAP
- Recap of SAP S/4HANA 2023 Highlights Webinar: Manufacturing in Enterprise Resource Planning Blogs by SAP
- Recap of SAP S/4HANA 2023 Highlights Webinar: Sourcing and Procurement in Enterprise Resource Planning Blogs by SAP
- Recap of SAP S/4HANA 2023 Highlights Webinar: Supply Chain in Enterprise Resource Planning Blogs by SAP
| User | Count |
|---|---|
| 9 | |
| 4 | |
| 2 | |
| 2 | |
| 1 | |
| 1 | |
| 1 | |
| 1 | |
| 1 | |
| 1 |


