
- SAP Community
- Products and Technology
- Human Capital Management
- HCM Blogs by Members
- Enhance Offboarding Experience with SuccessFactors...
Human Capital Management Blogs by Members
Gain valuable knowledge and tips on SAP SuccessFactors HCM suite and human capital management market from member blog posts. Share your insights with a post of your own.
Turn on suggestions
Auto-suggest helps you quickly narrow down your search results by suggesting possible matches as you type.
Showing results for
MaheshWashikar
Participant
Options
- Subscribe to RSS Feed
- Mark as New
- Mark as Read
- Bookmark
- Subscribe
- Printer Friendly Page
- Report Inappropriate Content
09-05-2023
10:27 PM
Hello Everyone,
Currently MDF's are not supported for Offboarding Process hence data collection objects cannot be created to capture exit survey response from Employee prior their termination date.
Customers can always use other platforms such as Qualtrics to send email survey and obtain feedback from employees before they leave the organization.
But this process might not always work for all customer as few customers wants to keep all the data inside single Platform like SuccessFactors.
Today I will be showing process how this can be achieved using Employee Central MDF Objects and Integration Center.
Prerequisites : In order to use below process customer needs to have Employee Central License.
Step 2 - Create Custom UI for this Object
Use Manage Configuration UI tool to create custom UI
Step 3 - Attach Custom UI on Employee's Profile
Use Configure People Profile to attach this UI on Employee's Profile
Step 4 - Grant Permissions to Employee
Step 5 - Most of the times there is requirement that this section should become visible to Employee only few days before their actual last working date and not visible to any active employee. We will see now how we can accommodate this requirement as well
To achieve this you need to create a custom field which will calculate No of days remaining for Exit. This also needs to be calculated on Dynamic basis everyday to make it Realtime.
Step 5.1 - Create a custom field on Employment details "No of Days remaining to Exit"
As an admin you need to grant view permission to this field to check your configuration. No need to grant permission to employees as they don't need this information
Also use onInIt Rule to hide this field on Add New Hire Page. If you don't add this rule then field will become visible on Add New Employee Page.
Step 5.2 - Now use Integration Center to create a scheduled Integration. We can also use ISC to trigger this based on Termination but as we need to run this integration on daily basis use Scheduled Integration
Once Integration is ready it is time to test Integration. To test terminate any employee in future date (Choose a date which will match your criteria of when this section should be visible to employee. e.g I chose Termination date is 6th Sep which is 5 days from now, which matches my criteria). After termination of employee run integration manually to see below result.
Step 6 - We need to add this field to DGFilter so that we can make permission groups based on this. This is required to make this custom portlet available only few days before actual termination. In my case Custom MDF should become visible to employees at least 10 days before termination until actual termination date. In your case this range may vary.
Step 7 - Create Permission Group using Newly added custom Field and assign Permission role to this group which you have created previously and assigned permission to Object and Employee View. You need to make sure this role is separate than regular ESS role so that permissions will be only assigned to employees who fit your custom criteria
As our Integration is running on daily basis this "No of days Remaining for Exit" is calculated on daily basis and people will get added automatically to this group based on this field also they will be automatically excluded when they does not match criteria.
Time to test our solution
Some Benefits:
Additional things you can do on top of this
Hope this article helps you to achieve desired result and enhance your Offboarding Experience in SuccessFactors
Currently MDF's are not supported for Offboarding Process hence data collection objects cannot be created to capture exit survey response from Employee prior their termination date.
Customers can always use other platforms such as Qualtrics to send email survey and obtain feedback from employees before they leave the organization.
But this process might not always work for all customer as few customers wants to keep all the data inside single Platform like SuccessFactors.
Today I will be showing process how this can be achieved using Employee Central MDF Objects and Integration Center.
Prerequisites : In order to use below process customer needs to have Employee Central License.
Step 1 - Create a custom MDF Object in SuccessFactors called as Exit Interview

Details of the Object

Details of the Fields in object. External Code should be always User as this custom object will be tied with Employee's Profile.

You can add as many questions as required depending on your Exit Interview Process. You can add Country field the object as well and make these questions Country specific if required. Default Country from Employees Job Info using Initialize rule and field visible only on UI

Make this Object Permissions secured as this needs to be only visible to Employees and their HR (considering sensitive information)
Step 2 - Create Custom UI for this Object
Use Manage Configuration UI tool to create custom UI
- Make Fields editable or not editable depending on your requirement
- Make field as Single Line Input or Multi Line Input depending on your requirement
- Make questions Mandatory or non mandatory depending on your requirement

Custom UI For Exit Interview
Step 3 - Attach Custom UI on Employee's Profile
Use Configure People Profile to attach this UI on Employee's Profile

Use Life Profile MDF Information Block and select UI created in previous step
Step 4 - Grant Permissions to Employee
- As this is Non Effective dated portlet only permissions you can grant to employee is View and Edit
- Depending on your configuration requirement you can make this section as Effective Dated portlet your employees can be granted access to View Current / View History / Insert / Correct / Edit / Delete
- You don't need to grant Import/Export Permission to employee as this process is completely done on UI. Admin can have this permission to migrate data from Legacy system

Under User Permission > Miscellaneous Permission your will find permissions (This might change depending on permission category you have selected on Object)

Also Grant Employee View Permission under Employee View
Step 5 - Most of the times there is requirement that this section should become visible to Employee only few days before their actual last working date and not visible to any active employee. We will see now how we can accommodate this requirement as well
To achieve this you need to create a custom field which will calculate No of days remaining for Exit. This also needs to be calculated on Dynamic basis everyday to make it Realtime.
Step 5.1 - Create a custom field on Employment details "No of Days remaining to Exit"
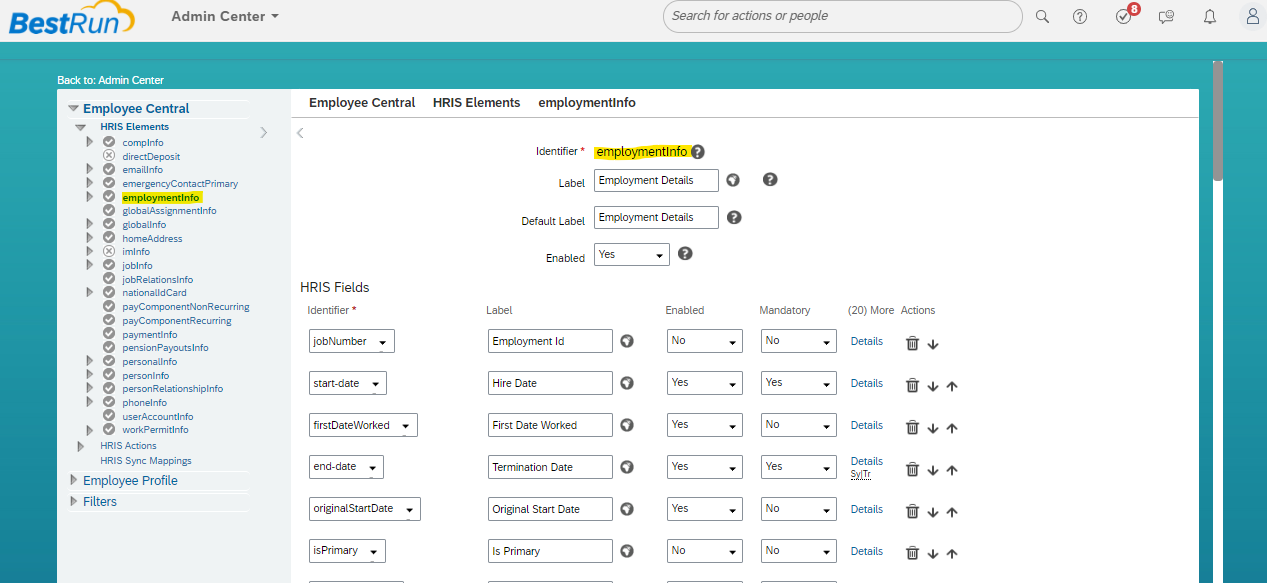
Use Business Configuration and employmentInfo HRIS element to add field

Use any custom-double field to store Number in this field
As an admin you need to grant view permission to this field to check your configuration. No need to grant permission to employees as they don't need this information

You will find this permission under Employee Data. Only Grant View permission as this field is auto calculated
Also use onInIt Rule to hide this field on Add New Hire Page. If you don't add this rule then field will become visible on Add New Employee Page.
Step 5.2 - Now use Integration Center to create a scheduled Integration. We can also use ISC to trigger this based on Termination but as we need to run this integration on daily basis use Scheduled Integration

Use More Integration Type to create Integration
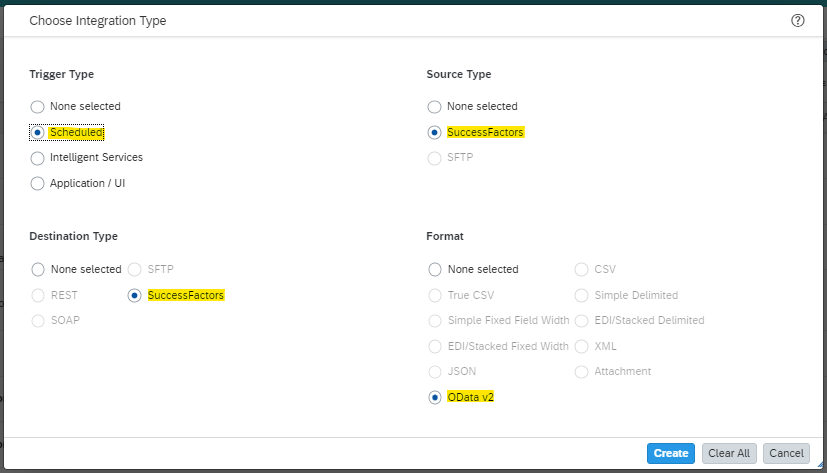
Use above settings as mentioned

Use Employment Details as Starting Entity

Use Field Mapping View and drag all the fields from left to right to the mapping. Do not map No of Days Remaining for exit as we have to calculate this.

Switch to Details view and Select No of Days Remaining for Exit and click on Calculator symbol to write logic behind calculation

Use Logic as mentioned below
If Termination Date is not Blank then calculate difference between Today and Termination Date else put 9999 (Default Value)

For Active Employees it should give you above result

For Terminated Employees you should get above result which will calculate No of Days remaining for Termination from today. If Termination date is already reached then also it calculates the days.

Finally it will give you result like this

Use above filter to exclude employees who are still active

Schedule this Integration to run on daily basis
Once Integration is ready it is time to test Integration. To test terminate any employee in future date (Choose a date which will match your criteria of when this section should be visible to employee. e.g I chose Termination date is 6th Sep which is 5 days from now, which matches my criteria). After termination of employee run integration manually to see below result.

This is the expected result on Employees Employment Details
Step 6 - We need to add this field to DGFilter so that we can make permission groups based on this. This is required to make this custom portlet available only few days before actual termination. In my case Custom MDF should become visible to employees at least 10 days before termination until actual termination date. In your case this range may vary.

Now add this field to DGFilters using Business Configuration
Step 7 - Create Permission Group using Newly added custom Field and assign Permission role to this group which you have created previously and assigned permission to Object and Employee View. You need to make sure this role is separate than regular ESS role so that permissions will be only assigned to employees who fit your custom criteria

I have added Range as 0-10 so that portlet will be visible to employees 10 days before termination until actual termination date is reached
As our Integration is running on daily basis this "No of days Remaining for Exit" is calculated on daily basis and people will get added automatically to this group based on this field also they will be automatically excluded when they does not match criteria.

As this person is between 0-10 days he is coming into this group. While others are not part of this group so they will not this custom MDF Object.

This is how your permission role should look like
Time to test our solution
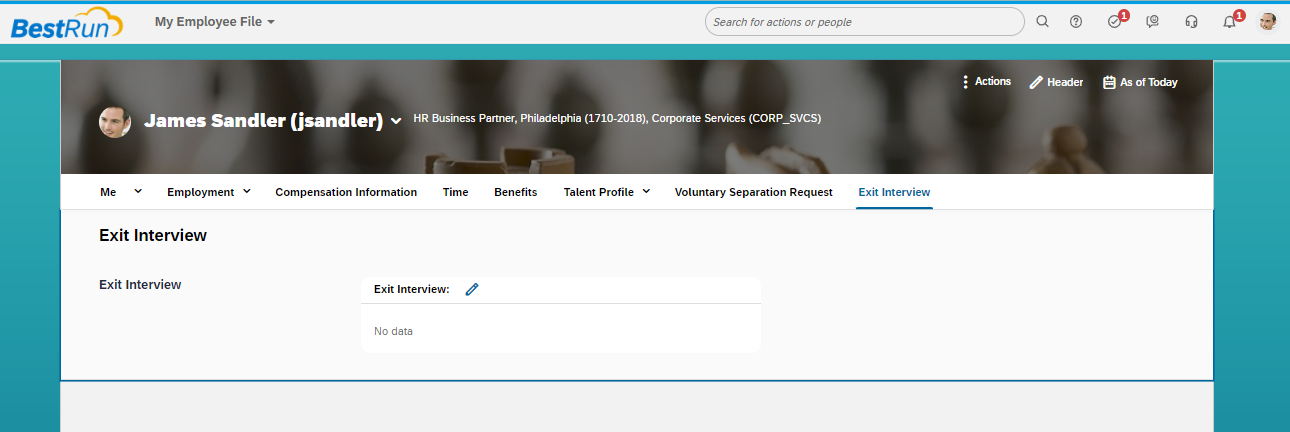
As per permission employee can see Exit Interview

Employee has access to fill the data
Some Benefits:
- As this is MDF object you can crate reports of this which will be useful for you to do further Attrition analysis
- You can add as many as fields required and customize your form based on different criteria
- All your exit related data stays in one system.
Additional things you can do on top of this
- Workflow - if required attach workflow to this MDF Object
- Notifications - If required you can send Alerts and Notifications for this custom MDF objects
Hope this article helps you to achieve desired result and enhance your Offboarding Experience in SuccessFactors
8 Comments
You must be a registered user to add a comment. If you've already registered, sign in. Otherwise, register and sign in.
Labels in this area
-
1H 2024 Product Release
5 -
2H 2023 Product Release
1 -
Absences-Only Time Recording in SAP SuccessFactors
1 -
ACCRUAL TRANSFER
1 -
Advanced Workflow
1 -
AI
1 -
AI & Skills Ontology
1 -
Alerts for National ID Information portlet: Full step-by-step guide
1 -
Alerts for Payment Information: Full step-by-step guide
1 -
Anonymization
1 -
API and Integration
1 -
Auto Delegation on the Leave Request (Time Off) Screen
1 -
BTP
1 -
Business Rules
2 -
Calibrating with Performance Form Data
1 -
Canvas Report
1 -
Career Development
1 -
Certificate-Based Authentication
1 -
Cloud Identity Services
1 -
Cloud Platform Integration
1 -
Common Super Domain
1 -
Compensation
1 -
Compensation Information Management
1 -
Compensation Management
1 -
Compliance
2 -
Content
1 -
Conversational AI
2 -
CSD
1 -
Custom Data Collection
1 -
Custom event
1 -
custom portlet
1 -
Data & Analytics
1 -
Data Integration
1 -
Dayforce
1 -
deep link
1 -
deeplink
1 -
Delimiting Pay Components
1 -
Deprecation
1 -
EC Payroll
1 -
Employee Central
1 -
Employee Central Global Benefits
1 -
Employee Central Integration (Inc. EC APIs)
1 -
Employee Central Payroll
2 -
employee profile
2 -
Employee Rehires
2 -
external terminal
1 -
external time events
1 -
Generative AI
2 -
Getting Started
1 -
Global Benefits
1 -
Goals
1 -
Guidelines
1 -
h12024
1 -
H2 2023
1 -
HCM
1 -
HR
2 -
HR Data Management
1 -
HR Transformation
1 -
ilx
1 -
Incentive Management Setup (Configuration)
1 -
Integration Center
3 -
Integration Monitoring
1 -
Integration Suite
1 -
Intelligent Services
1 -
internal mobility
1 -
Introduction
1 -
Learning
3 -
LMS
2 -
LXP
1 -
Managing Pay Scale Progression based on Age (or) Service Period
1 -
Massively MDF attachments download
1 -
Mentoring
1 -
Metadata Framework
1 -
Middleware Solutions
1 -
OCN
1 -
ODATA
1 -
OData APIs
2 -
ONB USA Compliance
1 -
Onboarding
2 -
Opportunity Marketplace
1 -
Pay Component Management
1 -
PCE
1 -
Performance & Goals
1 -
Performance Form
1 -
Performance Forms
1 -
Platform
1 -
portlet
1 -
POSTMAN
1 -
Predictive AI
2 -
Recruiting
1 -
recurring payments
1 -
RISE PCE
1 -
Role Based Permissions (RBP)
2 -
S4 HANA On-Premise
1 -
SAP Build CodeJam
1 -
SAP Build Marketplace
1 -
SAP CPI (Cloud Platform Integration)
1 -
SAP HCM
1 -
SAP HCM (Human Capital Management)
3 -
SAP HCM ECC
1 -
SAP HR Solutions
2 -
SAP Integrations
1 -
SAP release
1 -
SAP successfactors
6 -
SAP SuccessFactors OData API
2 -
SAP Workzone
1 -
SAP-PAYROLL
1 -
self-service migration
1 -
sftp
1 -
SFTP scenario
1 -
Skills
1 -
Skills Management
1 -
sso deeplink
1 -
Stories in People Analytics
3 -
Story Report
1 -
SuccessFactors
3 -
SuccessFactors Employee central home page customization.
1 -
SuccessFactors Onboarding
1 -
successfactors onboarding i9
1 -
SuccessFactors Platform
1 -
Table Report
1 -
talent
1 -
Talent Intelligence Hub
2 -
talentintelligencehub
1 -
talents
1 -
Tax
1 -
Tax Integration
1 -
TIH
1 -
Time Accounts
1 -
Time Management implementation links
1 -
Workflows
1 -
XML Rules
1
- « Previous
- Next »
Related Content
- First Half 2024 Release: What’s New in SAP SuccessFactors Employee Central? in Human Capital Management Blogs by SAP
- FC Bayern elevates their HR strategy with SAP SuccessFactors and AI-enabled recruiting in Human Capital Management Blogs by SAP
- Should I wait for SAP SuccessFactors Payroll (aka Next-Gen Cloud Payroll)? in Human Capital Management Blogs by Members
- First Half 2024 Release: What's New in SAP SuccessFactors Employee Central Payroll in Human Capital Management Blogs by SAP
- Third Party Cookies deprecation for SuccessFactors in Human Capital Management Blogs by Members
Top kudoed authors
| User | Count |
|---|---|
| 5 | |
| 4 | |
| 3 | |
| 2 | |
| 2 | |
| 2 | |
| 2 | |
| 1 | |
| 1 | |
| 1 |