
- SAP Community
- Products and Technology
- Technology
- Technology Blogs by SAP
- Use-case: Car Dealer Discount Rules with Decision ...
Technology Blogs by SAP
Learn how to extend and personalize SAP applications. Follow the SAP technology blog for insights into SAP BTP, ABAP, SAP Analytics Cloud, SAP HANA, and more.
Turn on suggestions
Auto-suggest helps you quickly narrow down your search results by suggesting possible matches as you type.
Showing results for
former_member22
Explorer
Options
- Subscribe to RSS Feed
- Mark as New
- Mark as Read
- Bookmark
- Subscribe
- Printer Friendly Page
- Report Inappropriate Content
11-13-2013
10:37 AM
This blog is to take you through some key features in ‘Rules on SAP HANA’ by taking ‘Discount Rules’ business scenario in Car sales.
Business Scenario
Car manufacturer has multiple dealer outlets across a country. Discounts drive sales of the cars on different occasions throughout the year like deals on Christmas or New Year etc. Therefore, manufacturers have to design rules to give better discounts, to the dealers, to increase their sales during these occassions. Discounts can be applied to individual customers or to businesses. These discounts are often governed by the quantity sold of any particular car model, on particular occasion e.g. Discount Rules have to be applied across data records of 700 dealer outlets x number of car sales.
Problem
These discount rules are subjected to change very frequently, every month and season or as per the market situation and customer needs - which directly affect the gross sales and revenues of the manufacturer and dealers. Currently these discount rules are managed in Microsoft Excel at the central headquarters of car manufacturer. Central headquarter updates EXCEL sheets and sends them as emails to car dealers. This results in compliance issues, delays and confusion with respect to discounts. Car manufacturer is therefore looking for solution that would help in taking such decisions - in quick succession - to these changing business needs - on such a huge data - to remain competitive in the market and fuel the continous sales.
Solution
Operational decision on Discount rules are automated in SAP HANA using decision tables and exposed in the SAP HANA cloud. Use this blog as a Recipe to model, modify and consume your business rules in the form of Decision Table and get freedom from sending the updated excel sheets in email ever after.
To know more about 'Rules on SAP HANA', follow our introductory blog series Big-Data Decision-Making made better with Business Rules in SAP HANA (By archana.shukla)
Step-to-Step Guide
Upon completion of this blog, you will be able to learn - how to capture and consume your rules in the form of Decision Table using SAP HANA studio and understand why it gives Business User Friendly modeling environment to manage or change your rules without any IT technical knowledge.
Let us begin with the preparations …
Before we start modeling the decision table in SAP HANA Studio, here are some preparations you need to do :
STEP I - Preparation
- Install HANA Studio (Release HANA 1.0 SP06 or further).
- Open HANA Studio and go to ‘SAP HANA Modeler’ perspective.
- Add a SAP HANA System [by choosing ‘Add System…’ option in the context menu of ‘Systems’ View]
- Prepare and populate data in data base tables. These tables will be used later to model Decision Table.
- Open SQL Console and create Schema by executing following command
- createschema RULES;
- To activate and validate the decision table, _SYS_REPO user requires the SELECT, EXECUTE and UPDATE privileges on ‘RULES’ schema. Follow these steps:
- Expand SAP HANA System Node in ‘Systems’ View
- Go to Security>Users>_SYS_REPO as shown below

- Double click on _SYS_REPO node which opens an editor
- In the editor, Choose ‘Object Privileges’ Tab
- Add ‘Rules’ Schema by choosing
 icon.
icon. - Give SELECT, EXECUTE and UPDATE privileges as shown:

- Create CARS, DEALERS and ORDERS Data base table and fill data by executing SQL query mentioned in the following attached files:
- CARS_DEALERS_ORDERS_data.txt
- Open SQL Console and create Schema by executing following command
Once pre-requisite steps are followed, application data is available in HANA on which manufacturer wants to apply discount rules. Now we will capture rules by modeling Decision Table in SAP HANA Studio.
Here begins our main recipe...
STEP II - Decision Table Creation
- Create package with name ‘rules_package’ [by choosing ‘New’ > ‘Package’ option in the context menu of ‘SAP HANA System’ > 'Content' Node]
- Create Decision Table - Choose ‘New’ > ‘Decision Table…’ as shown

- In the ‘New Decision Table’ wizard, Fill ‘DISCOUNT_CALCULATOR’ as ‘Name:*’ and choose ‘Finish’ button.
- You will see node with name ‘DISCOUNT_CALCULATOR’ created under ‘rules_package’>‘Decision Tables’ as shown

- Empty Decision Table editor also gets open with two sections ‘Decision Table’ and ‘Data Foundation’
- Choose ‘Data Foundation’ section
- Add following Database tables in Data Foundation
- CARS
- DEALERS
- ORDERS Note: Rules captured in the form of Decision Table will get executed on the data stored in above mentioned Database Tables.
- Join these tables as shown

- Choose each join and change the Join Type to ‘Inner’ from the properties view as shown below

- Save the Decision Table editor.
- End note - We have completed creating the basic model of the data foundation on which out Decision Table will be modeled.
STEP III - Building Vocabulary :
- Creating Attributes
- Select column which needs to be included in the discount rules and choose ‘Add as Attribute’ option from the context menu as shown

- Similarly we choose ‘MANUFACTURER’, ‘MODEL’, ‘PRICE’, ‘QUANTITY’, ‘NAME’ columns as attributes.– from CARS, ORDERS and DEALERS database tables respectively.
- Selected columns will be added under ‘Vocabulary’ > ‘Attributes’ node in ‘Output’ pane as shown below

- Creating Parameters - Parameters can be added as conditions and actions in the decision table. Parameters used as conditions can determine the set of physical table rows to be updated based on the parameter value (that you provide at runtime). Parameters used as actions can simulate the results based on physical table content without actually updating them.For more on parameters, you can referGetting Started - Model simple decision table (By Archana Shukla). In this section, let us create three parameters defined as:
- TAX – There could be different tax rules in different country on the purchase. The value of this parameter in runtime will be used to calculate the total purchase of cars by a dealer. Discount will be given depending on the total purchase.
- PURCHASE_DATE – Dealer’s purchase date will decide what discount dealer will get. Manufacturer will give different discount if dealer purchases cars ‘before Christmas’ or ‘Between Christmas and New Year’ or ‘After New Year’ etc.
- DISCOUNT – We will use this parameter as Action of Decision Table for simulation. Recipe to create Parameter:
Choose ‘New..’ option in the context menu of ‘Parameter’ node in the Output pane.
It opens a pop up window with name ‘Parameters’
Enter following details:
Name*: TAX
Default Value: 10
Data Type*: DOUBLE
Choose OK button
Parameter named as ‘TAX’ will be created under ‘Parameters’ folder in the output pane
Similarly create Parameter with name ‘PURCHASE_DATE’ having following details:
Name*: PURCHASE_DATE
Default Value: 2013-11-10 (Note: You can give any default date in the format of YYYY-MM-DD. If you leave this empty then system will take current date)
Data Type*: DATE
Create another parameter with name ‘DISCOUNT’ having following details:
Name*: DISCOUNT
Default Value: 0
Data Type*: DOUBLE
Now Output pane should look like this

Creation of Calculated Attributes - You can create a calculated attribute to perform some calculation using the existing attributes, parameters, and SQL functions. For our case we create a calculated attribute named ‘TOTAL_PURCHASE’ which calculates the total amount of purchase by using ‘QUANTITY’, ‘PRICE’ and ‘TAX’. We will use this calculated attribute as one of the Condition of the Decision Table. Recipe to create Calculated Attributes:
- Choose ‘New..’ option in the context menu of ‘Calculated Attributes‘ node in the Output pane.
- This should open up a popup window named ‘Calculated Attribute’
- Enter the following details:
- Name*: TOTAL_PURCHASE
- Description: It calculates the total amount of car purchase including tax
- Data Type*: ‘DOUBLE
- In the ‘Expression Editor’, create the below expression by selecting the following Attributes and Parameters from the ‘Elements’ panel: ‘QUIANTITY’,’PRICE’, ‘TAX’
- Your Expression Editor should have expression "QUANTITY" * "PRICE" * (1 + ("TAX" / 100)). Refer this image

- Click on ‘Add’ button
- Calculated Attribute named as ‘TOTAL_PURCHASE’ will be created under ‘Calculated Attributes’ folder in the output pane.
- End note - We finished creating the vocabulary which will become basis to model the rules in teh form of Decision Table.
STEP IV - Model Decision Table - The discount rules are modeled based on the manufacturer and model of the car, date of sales of the car and total purchase.
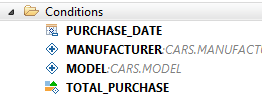
- Adding Conditions
- Select ‘MANUFACTURER’ Attribute from the Output pane and choose ‘Add As Conditions’ option in the context menu as show

- ‘MANUFACTURER’ will be added as Conditions under ‘Conditions’ Folder node in the Output pane.
- Similarly select ‘MODEL’, ‘TOTAL_PURCHASE’, ‘PURCHASE_DATE’ and add them as Conditions.
- Select ‘PURCHASE_DATE’ node under ‘Conditions’ Folder node and choose ‘Mark as Horizontal Condition’ option in the context Menu.
- Your ‘Conditions’ Folder node in Output pane should look like this
- Save the edit
- Adding Actions
- Select ‘DISCOUNT’ Attribute from the Output pane and choose ‘Add As Actions’ option in the context menu as shown below

- ‘DISCOUNT’ will be added as Actions under ‘Actions’ Folder node in the Output pane as shown

- Save the editor.
- Populate Decision Table
Manual
Navigate to Decision Table by selecting ‘Decision Table’ node in the editor.
Decision Table should look similar to this

Add Values to Horizontal Conditions Stub
Double click on the horizontal condition value and give value ‘Before 2013-12-25’. Refere below image

Select above changed horizontal condition value and choose ‘Add Condition Values’ option in the context menu as mentioned below.

This should open up a popup window named ‘Add Condition Values’. Add values mentioned in the below image.

Choose OK Button.
Now your Decision Table should look like this

Similarly you can add values to vertical condition stubs by choosing ‘Add Condition Values’ option in the context menu of the vertical condition value.
- From Microsoft Excel - If you have Rules captured in Microsoft Excel then you can import those rules here by going through blog Use Microsoft Excel to Manage Decision Table in SAP HANA(By Archana Shukla)]
- Sample Excel with the data is available at location http://www.sdn.sap.com/irj/scn/index?rid=/library/uuid/708261cf-f834-3110-f8a8-e43e2f8f6036 . Please save it and import to populate the Decision Table as shown below.
- Populate Decision Table as shown below

- Save decision table editor.
- End Note - Your Decision Table is now ready.
STEP V – Consumption [Final Part]
Consumption in Application
- Activate the Decision Table in HANA Studio Once all rules are captured in Decision Table, You have to activate it. Activation generates SQL procedure in the back ground which can be consumed by any application to apply rules.
- In HANA Studio, right click on ‘DISCOUNT_CALCULATOR’ decision table in the Navigator and click on ‘Activate’ option in the context menu.
- The activation status can be seen in the ‘Job Log’ view. The status should be ‘Completed successfully’.
- Once the decision table is activated, procedure is created under HANA System à Catalog folder à _SYS_BIC à Procedures folder à ‘rules_package/DISCOUNT_CALCULATOR’
- Consume Generated Decision Table in your Application or otherwise - Here, I will show you a generic consumption from HANA Studio itself, the same has to be used while consuming decision table in any application.
- Open ‘SQL Editor’
- Execute following statement in the SQL Editor call "_SYS_BIC"."rules_package/DISCOUNT_CALCULATOR"('11.5','2013-12-25',?)
- You will see result with updated DISCOUNT for each order entry in the Database table.
Data Preview
Additionally If only Parameters are being used as Actions of Decision Table then you can see Data Preview also for simulation or Analysis purpose. Please follow these steps:
- Choose highlighted tool bar button on Decision Table to see the Data Preview

- ‘Variables and Input Parameters’ pop up window gets open where you can specify Input values for ‘TAX’ and ‘PURCHASE_DATE’
- Choose OK button.
- It opens Data Preview editor
- In 'Available Object' section, you will see all the attributes which are added in Decision Table vocabulary. You can drag any attribute from 'Available Objects' to either 'Labels axis' or 'Values axis' section to see the simulation graph. One of such graph look like this

- End note: We completed with the recipe by finally consuming the rules in application. To modify the rules, all that the manufacturer has to do to is to update the Microsoft Excel or the decision table cells in the HANA Studio and Activate. Simple isn’t it ? Nevertheless to mention, as the rules are running on SAP HANA, it leverages the performance benefits and real time capabilities.
Summary
Let us step back and see what the problem statement that was targeted and how decision tables in SAP HANA solved it. A Car Manufacturer who is trying to overcome the discount issues due to changing market condition and everyday changing needs of the modern customers –decides to use decision table in SAP HANA to deal with it. For this, he models his discount rules in form of decision table using HANA Studio with features like Parameters, Calculated Attribute, and Microsoft Excel Import etc. and quickly consumes these rules in its application. What he sees is that – he can not only model the rules without knowing any technical language in SAP HANA but can also can simulate and update the discounts real-time and with significant performance gains.
This is one such use case, you can use Rules in SAP HANA in much more complicated scenarios and see the benefit and turnaround time. Share with us your experience and use cases, and we would support you to solve them in a much better way.
- SAP Managed Tags:
- SAP HANA
6 Comments
You must be a registered user to add a comment. If you've already registered, sign in. Otherwise, register and sign in.
Labels in this area
-
ABAP CDS Views - CDC (Change Data Capture)
2 -
AI
1 -
Analyze Workload Data
1 -
BTP
1 -
Business and IT Integration
2 -
Business application stu
1 -
Business Technology Platform
1 -
Business Trends
1,658 -
Business Trends
91 -
CAP
1 -
cf
1 -
Cloud Foundry
1 -
Confluent
1 -
Customer COE Basics and Fundamentals
1 -
Customer COE Latest and Greatest
3 -
Customer Data Browser app
1 -
Data Analysis Tool
1 -
data migration
1 -
data transfer
1 -
Datasphere
2 -
Event Information
1,400 -
Event Information
66 -
Expert
1 -
Expert Insights
177 -
Expert Insights
293 -
General
1 -
Google cloud
1 -
Google Next'24
1 -
Kafka
1 -
Life at SAP
780 -
Life at SAP
12 -
Migrate your Data App
1 -
MTA
1 -
Network Performance Analysis
1 -
NodeJS
1 -
PDF
1 -
POC
1 -
Product Updates
4,577 -
Product Updates
340 -
Replication Flow
1 -
RisewithSAP
1 -
SAP BTP
1 -
SAP BTP Cloud Foundry
1 -
SAP Cloud ALM
1 -
SAP Cloud Application Programming Model
1 -
SAP Datasphere
2 -
SAP S4HANA Cloud
1 -
SAP S4HANA Migration Cockpit
1 -
Technology Updates
6,873 -
Technology Updates
417 -
Workload Fluctuations
1
Related Content
- SAP CPQ - The learning Series in Technology Q&A
- SAP Inside Track Bangalore 2024: FEDML Reference Architecture for Hyperscalers and SAP Datasphere in Technology Blogs by SAP
- How an MDM Solution can Fuel all Aspects of your Business in Technology Blogs by SAP
- Advanced Customer Return management with Material replacement in SAP S/4HANA on Premise SD fiori in Technology Blogs by Members
- What's New in SAP Build Process Automation: May 2023 in Technology Blogs by SAP
Top kudoed authors
| User | Count |
|---|---|
| 34 | |
| 25 | |
| 12 | |
| 7 | |
| 7 | |
| 6 | |
| 6 | |
| 6 | |
| 5 | |
| 4 |