In my previous blog, you saw that introduction of Decision table in SAP HANA, is a begining of new radical approach to model decision table in database layer and consume in application based on the database. With this foundation, let us start from scratch as I will guide you how to create decision table with simple and easy steps.
Create Decision Table
- Start the HANA Studio
- Open Modeler perspective
- Add HANA system
- Expand HANA System/Content folder
- To create new package, select context menu option New/Package

Figure 9.1 : Create package from context menu
- Give the name of the package as simple-decisiontable
- To create a new decision table,
- Select the package and click New / Decision Table
- Give the name of the decision table as SIMPLE
- Once the decision table is created, an editor opens

Figure 9.2 : Create decision table from context menu
- In the Output panel (on the right), of the editor, select Parameters node
- To create new Parameter, right click and select New…

Figure 9.3 : Create Parameters using context menu in Output panel
- In the Parameters dialog, enter
- Name as QUANTITY
- Data Type as INTEGER

Figure 9.4 : Dialog to create new Parameter
- Repeat the above steps (8,9, and 10) to create two more parameters
- Name as ORDER_AMOUNT, Data type as Decimal (length as 10, Scale as 2)
- Name as DISCOUNT, Data type as Decimal (length as 3, scale as 2)
Model Decision Table
- To do so,
- Add QUANITY and ORDER_AMOUNT as Condition of the decision table
- Select QUANTITY under Parameters node in Output panel
- Right click and select Add as Conditions option
- Repeat the step to add ORDER_AMOUNT as condition

Figure 9.5 : Adding Parameter as Condition of decision table using context menu
- Add DISCOUNT as Action of the decision table
- Select DISCOUNT under Parameters node in Output panel
- Right click and select Add as Actions option
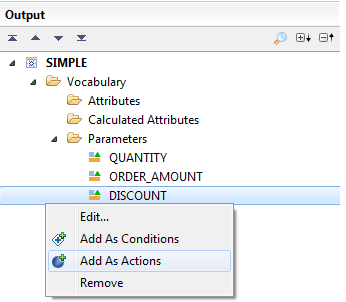
Figure 9.6 : Adding Parameter as Action of decision table using context menu
- Your decision table would finally look like

Figure 9.7 : Decision table overview with Parameters added as Condition and Action
- Manually fill the decision table with values, by using right click options like Add Condition Values etc on the decision table editor

Figure 9.8 : Decision table populated with data
Validate and Activate Decision Table
- Save and Validate the decision table
- To do so, select Save and Validate button on top-right panel of the decision table editor

Figure 9.9 : Validate button to perform validate operation on decision table
- Activate the decision table
- To do so, select Save and Activate button on top right panel of decision table editor

Figure 9.10 : Activate button to perform activate decision table for consumption
Hint: Check Job Log view are success or failure of Validate and Activate operations

Figure 9.11 : Job Log view showing succesful execution of validate and activate action
- Once Activated you can find the decision table runtime object, which is a procedure, at HANA System/Catalog/_SYS_BIC_/Procedures
[ Note: The name of the procedure will be <package-name>/decisiontable-name> i.e. simple-decisiontable/SIMPLE]

Figure 9.12 : Decision table procedure generated after activation
Consume Decision Table
- Open the procedure definition by,
- Option 1 : Double click on the procedure
- Option 2 : Right click on procedure and select Open Definition option
- Note the IN and OUT parameters

Figute 9.13 : Decision table procedure definition
- Open the SQL Editor
- Write the SQL statement to call the decision table procedure
call "_SYS_BIC"."simple-decisiontable/SIMPLE" (40, 300000, ?)
[ Note that 40 is entered as IN parameter value for QUANTITY, similarly 300000 is entered as IN parameter value for ORDER_AMOUNT, ? in entered for OUT parameter ]
- Execute the SQL statement by selecting the Execute button on top right of the SQL Editor

Figure 9.14: Exeucte button in SQL Editor
- The result could be seen as

Figure 9.15 : Result view after execution of decision table procedure
Analyse Decision Table Execution
Here you see how the evaluation of the decision table happened for input value of QUANTITY and ORDER_AMOUNT to return the value of DISCOUNT as 10

Figure 9.16: Decision table exeuction trace
Having seen how to model decision table and consume the results in your application, you can start using this new capability of business rules management in SAP HANA and let us know of your use cases where we can support you. Me and my team would be happy to help you !
Other Related Blogs
