
- SAP Community
- Products and Technology
- Additional Blogs by SAP
- Example – Implementing Dynamic Parallel Processing...
Additional Blogs by SAP
Turn on suggestions
Auto-suggest helps you quickly narrow down your search results by suggesting possible matches as you type.
Showing results for
Former Member
Options
- Subscribe to RSS Feed
- Mark as New
- Mark as Read
- Bookmark
- Subscribe
- Printer Friendly Page
- Report Inappropriate Content
08-13-2013
2:19 PM
Hello Friends,
In this post, we will go through a step-by-step example of using Fork to implement parallel processing in a Workflow. In our example we will have a Multiline Container Element where user can finish a task just by displaying a Material.
Steps for designing your Workflow:
1. Go to the Transaction SWDD – Workflow Builder. You will be presented with a screen as shown in Figure 1 below else you may create a new Workflow using Menu Bar → Workflow → New (Ctrl + Shift + F5).

Figure 1: Creating a new Workflow
2. Double-click on Undefined Step. You will be presented with a pop-up window for Step Selection. Select Activity and click Continue (Enter) as shown in the Figure 2.

Figure 2: Selecting Activity Step Type
3. You will get a screen to enter details for the Activity Step you have just selected as shown in the Figure 3. In this example we will create a new Task by clicking on drop-down Button (on the left of the Task input text field) and choosing Create Task.

Figure 3: Creating a New Task for Activity Step
4. In the next screen shown in Figure 4 enter the following values in the Basic Data Tab:
Abbr. DemoActTask
Name Display the Material
Work item text Hello, %UNAME%, Click me to display the Material &_WI_OBJECT_ID.MATERIAL&
Object Category BO
Object Type BUS1001
Method DISPLAY
Click on Enter. In the Transfer missing elements from the object method? pop-up window click on Yes Button. Press Save Button (Ctrl + S). Select a Local Object in the Create Object Directory Entry pop-up.

Figure 4: Values entered in Basic data Tab for creating Task
5. In the Description Tab, Select Text Type as Completion Text and click on Change Text Button. Enter the text as ‘The Material Task has been completed’ (without quotes) and click on Back Button (F3). Press Save Button (Ctrl + S) as shown in Figure 5.

Figure 5: Completion text for the Task
Use Menu Bar → Additional Data → Agent Assignment →Maintain to Maintain Agent Assignment
In the screen for Maintain Agent Assignment go to Menu Bar → Edit →Attributes (F8). A pop-up windows will appear. Select General Task Radio Button and click on Transfer (Enter) Button. Click Back Button (F3). Press Save Button (Ctrl + S). Again click Back Button (F3). In the pop-up window suggesting Container Elements and Binding click on Continue (Enter) Button.
6. In the Control Tab for Agent choose the Expression: Workflow Initiator. In the Details Tab uncheck Advance with Dialog check-box. In the Notification Tab choose the Expression: Workflow Initiator.
7. In the Control Tab note the Task Number Click on Transfer and to graphic Button as shown in Figure 6.
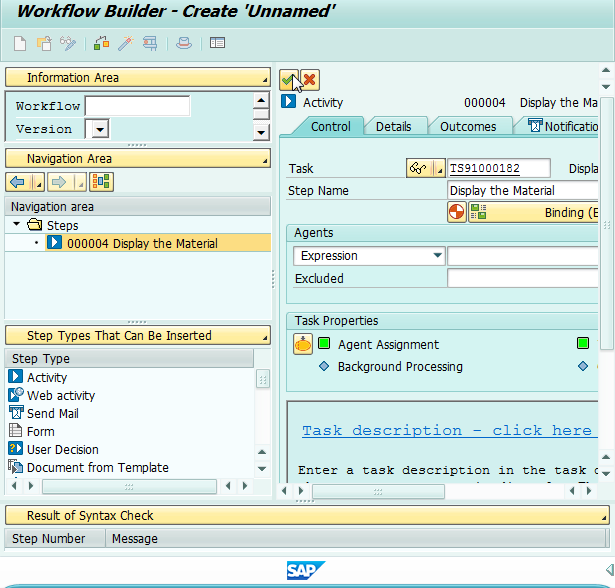
Figure 6: Task Definition completed for Displaying Material
8. On the Left of the Screen, Click on drop-down Step Types That Can Be Inserted and choose Workflow Container. Navigate and double-click on Element BUS1001. In the windows in the Properties Tab, check on the Import check-box and Multiline check-box and press Confirm (Enter).
9. Double-click on the Task – Display the Material which you have just created in the above steps and navigate to Miscellaneous Tab. Go to the Multiline Element field and open Value Help (F4). Select BUS1001 as shown in Figure 7 and click on Continue (Enter) Button.

Figure 7: Selecting Multiline Element
10. Go to the Control Tab of the Task and Click on Binding (Exists) Button. A pop-up window for Change Binding for Step will appear. Change &BUS1001& to &BUS1001[&_WF_PARFOREACH_INDEX&]& by using the Value Help (F4) of &BUS1001& and selecting container as shown in Figure 8.

Figure 8: Change the Binding for Step
11. Press Save Button (Ctrl + S). In the pop-up for naming of new Workflow Template enter the following values :
Abbr. ZDemoActWF
Name Demo Activity Workflow
12. Now your Workflow will look like something similar to Figure 9 and is ready for Testing. Use Menu Bar → Workflow → Test (F8). Do not worry! The Workflow will be automatically activated. :cool:

Figure 9: Look and Feel of Your Workflow Ready for Testing
Testing your Workflow
1. Provide input values for a Valid Material by following the Steps as shown in Figure 10. We should enter more than one material here.

Figure 10: Input Value as Valid Material for Testing Workflow
In this example we will use 2 materials. So enter one more valid Material in the Input Data.
2. Go to Menu Bar → Workflow → Test (F8). You will get a Success Message in the Message Area of your Screen with text similar to Task started under work item ID <xxxx> (current status: In Process)
3. Go to Menu Bar →Environment → Business Workplace (Shift + F6). Check the Workflow Folder in the Inbox Folder. You can see two new items in your Workflow Folder as shown in Figure 11 for 2 Material that you have entered in the Input Data for testing. Clicking on any item will process one parallel branch of the Workflow by showing one Material.

Figure 11: Click on any item to display the Material
4. After you have displayed the material you can see only row item is remaining. If you click this remaining item, it will show the other material that you have entered.
You can also see your Inbox for notification. Note there is only a single notification.
Now you can press the Back (F3) Button to go to the Test Screen of your Workflow.
5. Go to Menu Bar → Goto → Workflow Log (F5). As shown in Figure 14, you can see that the Status of a Workflow Item is Logically Deleted.

Figure 12: Workflow Log
If you like this Post; please do share it and let us know your comments :grin:
1 Comment
Related Content
- Python RAG sample for beginners using SAP HANA Cloud and SAP AI Core in Technology Blogs by SAP
- Hack2Build on Business AI – Highlighted Use Cases in Technology Blogs by SAP
- Transforming Your Supply Chain: Introducing RISE with SAP Advanced Logistics Package in Supply Chain Management Blogs by SAP
- SAP ERP Functionality for EDI Processing: UoMs Determination for Inbound Orders in Enterprise Resource Planning Blogs by Members
- Exploring Integration Options in SAP Datasphere with the focus on using SAP extractors in Technology Blogs by SAP