
- SAP Community
- Products and Technology
- Enterprise Resource Planning
- ERP Blogs by Members
- HCM Processes & Forms: Images/Logos and Reusable C...
Enterprise Resource Planning Blogs by Members
Gain new perspectives and knowledge about enterprise resource planning in blog posts from community members. Share your own comments and ERP insights today!
Turn on suggestions
Auto-suggest helps you quickly narrow down your search results by suggesting possible matches as you type.
Showing results for
ChrisSolomon
Active Contributor
Options
- Subscribe to RSS Feed
- Mark as New
- Mark as Read
- Bookmark
- Subscribe
- Printer Friendly Page
- Report Inappropriate Content
06-27-2013
4:54 PM
If you are familiar with HCM P&F using Adobe Interactive Forms, you know all too well that one of the major pains was keeping all of your forms consistent looking. Most all of your forms shared some similar sections of layout. For instance, you usually had a "boilerplate" area that contained your company logo, the process name, process reference number and other "common" information. Along with this, you most always had a "comments" section at the bottom of the form with the "Previous" and "Your" comment sections. For Adobe forms, keeping these consistent was largely a manual task....hand manipulating layouts on every form or "cut-n-paste" from form to form....to keep everything "in synch". Sure, you could create your own library object to share across workstations, but even then, any changes done late to that "library component" would not auto-magically update all previously create, existing forms. In a nutshell, it was a nightmare with no real reusability in place.
Big news!....with FPM based form (part of the HR Renewal updates to HCM P&F), reusable components are not only VERY possible, but they are also quite easy. In this blog, I will give away a few of my secrets to not only make life easier but also in hopes of spurning other great ideas from the community.
Now, I will also add that when I say "reusable" it is not quite that straightforward. In my opinion, SAP missed the mark on how the implement configurations and assigning feeder classes. More on that later....
So like I said, most forms have some "common" parts they all share. For example,

This form has a "header" and "footer" section that we most likely want to use on all other forms. So how do we do this in HCM P&F?
Comments and Footers
We will take the easy one first....the "comments" section. When we go to the "form" configuration section for our form scenario in the Design Time (HRASR_DT), we see a table of "configurations". (note: I spoke about this in length in my blog HCM Processes & Forms: the Anatomy of a FPM Form and the Secrets of How HR Renewal HCM P&F Delivers... ). We create a new "form" type configuration and give it a description. For example, I created configuration "ZWD_HRASR_COMMENTS_CES" as ....

Once you enter the information, then click the "Create" icon on the tables toolbar. This will launch you into the FPM Designer (FLUID). In FLUID, simply layout your comment fields (drag the fields from the repository on the left panel onto your "Preview" pane and then adjust the attributes of each as needed to suit your design). For example,

Save your work and Viola....just that easy. Now you can add this to any FPM form you need simply by entering it into the FPM Configuration Table in the Design Time. Now keep in mind....you do not have to make just ONE reusable configuration ("like duh, Chris!" haha). You might want to make one like this but also make another one that only has "Your Comments" section for a form for the "initiator" only that never loops back to them (since there will not be any "previous" comments if they are the ones starting it). I am sure you can come up with others.
Boilerplates and Headers
Now let us go back to the beginning....er....I mean back to the top....of the form....the header! Now usually for every process it makes sense to let the user know WHAT they are doing right from the start. Therefore, we usually include the process' name, and it is also nice to include the process reference number (makes it very easy for your support desk people to have this number to use when hunting down issues). So let us build a "common" header in a similar way as our "comments" footer section....but with a slight twist.
First off, we know that we want the "process name" at the top of each form. However, we can not use a static process name on our FPM layout because we want to use this all around for our forms. So how do we do this? Easy!
We define a new form field in our form scenario fields. I called mine "PROCESS_DESCRIPTION" ,and you assign it the data element type of ASR_PROCESS_DESCRIPTION. Now, we simply assign this a manual default value of our process name (in my example, "Request Relocation Benefit").
Back in our form configuration in the Design Time much like we did for our "comments" section, we create a new configuration for our "header" section.
Again, we use the "form" type layout, but I called my configuration "ZWD_HRASR_HEADER" and gave the description. As before, click the "Create" icon in the FPM Configuration Table toolbar to launch us into the FPM design tool (FLUID). 
Here, I dragged my "PROCESS_DESCRIPTION" field onto the Preview pane and adjusted a few things. I removed the label (set as "not visible), changed it to a "textview" field, changed its "Text View Design" to "header 1", and positioned as I wanted. I saved my work and then if I launch my process now, you can see my new "reusable" header as well as our footer/comments too.

Keep in mind, you will have to make sure you add your "process name" field to every form scenario in order to make this work.
Advanced Components (Composites!)
Now that we covered our reusable header and footer, let's step itup a notch. Now I am REALLY going to share the good stuff....FREE of charge! haha
It is very common....especially coming from the Adobe form era of HCM P&F to have a company logo or some other image included in the header area of our forms. Usually, we display an image one corner and then have our other information to the side. But how do we do this with the FPM tools from our HCM P&F Design Time? Well, I will try to make this as simple to follow as possible, and then leave it to you to come up with more complex usages. In a manner of speaking, we first need to build our blocks before we can put them together.
First off, I created a VERY simple WebDynpro ABAP component.

The ONLY thing this WDA component does is to display an image (there are PLENTY of example around the web of how to do this), however, there are some important points to follow.
- Make sure you have added IF_FPM_UI_BUILDING_BLOCK as one of your "Implemented Interfaces" of your WDA component. Once added, make sure you have clicked the "Reimplement" button in the Action column. This sets up our WDA component to be a FPM UIBB.

- From our WDA top node, right click and navigate through the context menu to import a new MIME object. This will allow you to select the image you wish to use as your company logo.

- In your view for your WDA component, simply add a "image" element and assign it the MIME object you imported as its source.

Now comes the FUN part! Back in the HCM P&F Design Time in our form configuration, we are going to add a new configuration in our FPM Configuration Table (just like we did in the example above for a header and footer/comment). First off, make sure that we remove our "header" configuration entry that we created previously. Do not worry, it is still there (ie. created), but just not used in our form now (remember reusability!). This time we are going to add a "Composite" type configuration which I have named ZWD_HRASR_BOILERPLATE.

NOTE: When you add your composite to the configuration, be sure to REMOVE the configuration from this table that you will be using in your composite. Otherwise, you will get an error telling you that it is being used twice. Make note of the name of the configuration you will be using inside your composite because you will need it in the steps to come.
Again, we click "Create" in the table toolbar. This will again launch the FPM design tool (FLUID) for us. The first thing we want to do is change our layout in the "General" pane at the top.

We select a split screen, and we also drag one of our UIBB elements in the "Preview" pane into our new empty side.
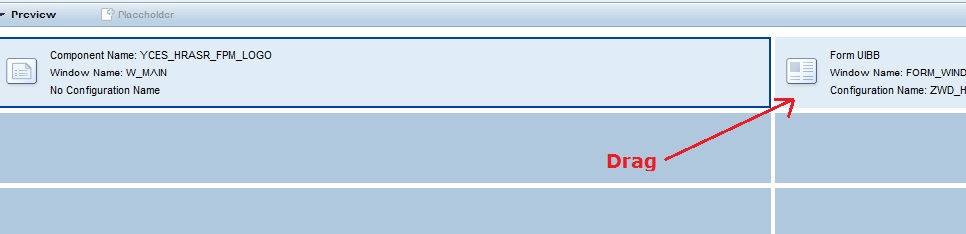
Now this is where the MAGIC happens! We now are going to assign our TWO UIBB elements.
In the "Composite UIBB Schema" table, we enter...

For UIBB (1), the component name is the name of our custom WDA component we made (i.e. YCES_HRASR_FPM_LOGO) and the window name is our window that holds the view for our image (i.e. W_MAIN).
UIBB(2) is the really interesting one. The component name is FPM_FORM_UIBB_GL2. How do we know that? Well if you read my other blog ( HCM Processes & Forms: the Anatomy of a FPM Form and the Secrets of How HR Renewal HCM P&F Delivers...) ,then you know that this is the component used for "form" type configurations in HCM P&F for FPM forms and furthermore, that the window name is FORM_WINDOW. But what configuration do we assign this? Well, guess what....we REUSE the "header" we configured earlier! I put in the configuration name "ZWD_HRASR_HEADER". Yep! IT IS BACK!
NOTE: Again, make sure that you removed the configuration "basic" configuration in your form configuration table since it is now included inside your composite here. Otherwise, you will get an error telling you it has been used twice.
So now, if I execute the process, we can now see our new "composite" boilerplate header with our fancy image displayed.

Now, if you caught all that....and your brain gears are really churning now....you just exclaimed "EUREKA!" in your head because you realized what I actually just gave away. haha
We just went WAYYYYY past talking about simple reusable "chunks" on a form. What we are talking now is that you can easily add ANY custom WDA component you create right into your form. Again....ANY WDA COMPONENT!!!! That means whatever HCM P&F can not do for you in configuration or additional functionality you might need, you can add it in using a composite component (and just look at the interesting ways the FPM framework allows us to communicate between UIBBs....the possibilities are endless) !
Uh oh! Maybe I have said too much....I was going to talk about....uhm......well, I will save that one for later. haha
Aside from the fancy, advanced stuff, you might also think of other "content" this might be applicable too. For instance, if you always have the same bits of employee information (name, ID number, position, org, etc) at the top of every PA form, why not make it a reusable component too?!?! Again, get that brain working, and I am sure you can come up with many use cases.
Reusable in a manner of speaking...but not quite perfect
Now everything above where I mentioned "reusable" and how easy it is, is not exactly the whole truth (and I hope SAP is listening/reading and will fix this). When we create a configuration, you will notice if you go into FLUID to layout your design that our "feeder class" is assigned "feeder class parameters" at that point.
So this is HOW we are able to see what fields are available to do our layout (much like our ISR interface would let Adobe LC Designer know what fields we could bind with). But there is the problem....the configuration is TIGHTLY bound to one form scenario. If you want to use it elsewhere, it might not work (I say "might" because I have seen a bug firsthand where I used one config from a different FSCN in another one and it somehow worked....I am thinking the feeder class looks at the first config in order and sets that parameter as what to use on all....more debugging on that later), but more than likely you need to do a few steps to "reuse" it.
Step 1: Run WDA application CONFIGURE_COMPONENT.(go to SE80 and select WDA component WDR_CFGE_EDITOR)
Step 2: This will launch the FLUID interface in a browser window. The "component name" will depend on your "configuration type" (form, list, composite) and I discussed this in my other blog HCM Processes & Forms: the Anatomy of a FPM Form and the Secrets of How HR Renewal HCM P&F Delivers.... The configuration name will be the one you want to copy.
Step 3: Click the "copy" icon and follow the steps to give your new, copy configuration and name.

Step 4: In our copied configuration, go in and now change the feeder class parameter.

After saving, you should now have all the correct fields from your own form scenario available in the repository.
Now curiously enough, SAP does this with everything BUT our notes fields (I guess they assume those will ALWAYS be part of every form scenario). You can see this in method CONVERT_BACKEND_TO_FPM_DATA of class CL_HRASR00_FPM_UTILITIES.
So I am not one of those to grumble and groan over a problem without offering up a solution. How do I think this should work to make our configurations TRULY reusable? I think the parameter for the feeder class should come dynamically from whatever our current form scenario is. For example, when we go into edit from our "form" section in our form scenario, it should know WHICH form scenario we are in. Now, of course you think "But Chris, when it is used in multiple form scenarios, there will be fields that do not exist!" Correct. So this has a couple of things I think it should handle...It could look at ALL the form scenarios for which we have currently assigned the SAME configuration. From those, it could consolidate the list of ALL fields from all of them down to ONLY the fields that exist in ALL of them for our repository. Secondly, in some way, it should also report to us if we are using a field in our layout that does not exist in one or more of the form scenarios using that configuration and which ones those are. This would be something like our nice process and form scenario "check" tools. If this was done, THEN I think we would really be able to QUICKLY build some nice forms! TRULY reusable components! Ok...rant over. haha
As always, I hope you have enjoyed this and that it helps on your project(s) as well. As for me, I need to get back to work, so....like I always say...Till next time....
- SAP Managed Tags:
- HCM (Human Capital Management),
- User Interface
33 Comments
You must be a registered user to add a comment. If you've already registered, sign in. Otherwise, register and sign in.
Labels in this area
-
"mm02"
1 -
A_PurchaseOrderItem additional fields
1 -
ABAP
1 -
ABAP Extensibility
1 -
ACCOSTRATE
1 -
ACDOCP
1 -
Adding your country in SPRO - Project Administration
1 -
Advance Return Management
1 -
AI and RPA in SAP Upgrades
1 -
Approval Workflows
1 -
ARM
1 -
ASN
1 -
Asset Management
1 -
Associations in CDS Views
1 -
auditlog
1 -
Authorization
1 -
Availability date
1 -
Azure Center for SAP Solutions
1 -
AzureSentinel
2 -
Bank
1 -
BAPI_SALESORDER_CREATEFROMDAT2
1 -
BRF+
1 -
BRFPLUS
1 -
Bundled Cloud Services
1 -
business participation
1 -
Business Processes
1 -
CAPM
1 -
Carbon
1 -
Cental Finance
1 -
CFIN
1 -
CFIN Document Splitting
1 -
Cloud ALM
1 -
Cloud Integration
1 -
condition contract management
1 -
Connection - The default connection string cannot be used.
1 -
Custom Table Creation
1 -
Customer Screen in Production Order
1 -
Data Quality Management
1 -
Date required
1 -
Decisions
1 -
desafios4hana
1 -
Developing with SAP Integration Suite
1 -
Direct Outbound Delivery
1 -
DMOVE2S4
1 -
EAM
1 -
EDI
2 -
EDI 850
1 -
EDI 856
1 -
EHS Product Structure
1 -
Emergency Access Management
1 -
Energy
1 -
EPC
1 -
Find
1 -
FINSSKF
1 -
Fiori
1 -
Flexible Workflow
1 -
Gas
1 -
Gen AI enabled SAP Upgrades
1 -
General
1 -
generate_xlsx_file
1 -
Getting Started
1 -
HomogeneousDMO
1 -
IDOC
2 -
integration
1 -
Learning Content
2 -
LogicApps
2 -
low touchproject
1 -
Maintenance
1 -
management
1 -
Material creation
1 -
Material Management
1 -
MD04
1 -
MD61
1 -
methodology
1 -
Microsoft
2 -
MicrosoftSentinel
2 -
Migration
1 -
MRP
1 -
MS Teams
2 -
MT940
1 -
Newcomer
1 -
Notifications
1 -
Oil
1 -
open connectors
1 -
Order Change Log
1 -
ORDERS
2 -
OSS Note 390635
1 -
outbound delivery
1 -
outsourcing
1 -
PCE
1 -
Permit to Work
1 -
PIR Consumption Mode
1 -
PIR's
1 -
PIRs
1 -
PIRs Consumption
1 -
PIRs Reduction
1 -
Plan Independent Requirement
1 -
Premium Plus
1 -
pricing
1 -
Primavera P6
1 -
Process Excellence
1 -
Process Management
1 -
Process Order Change Log
1 -
Process purchase requisitions
1 -
Product Information
1 -
Production Order Change Log
1 -
Purchase requisition
1 -
Purchasing Lead Time
1 -
Redwood for SAP Job execution Setup
1 -
RISE with SAP
1 -
RisewithSAP
1 -
Rizing
1 -
S4 Cost Center Planning
1 -
S4 HANA
1 -
S4HANA
3 -
Sales and Distribution
1 -
Sales Commission
1 -
sales order
1 -
SAP
2 -
SAP Best Practices
1 -
SAP Build
1 -
SAP Build apps
1 -
SAP Cloud ALM
1 -
SAP Data Quality Management
1 -
SAP Maintenance resource scheduling
2 -
SAP Note 390635
1 -
SAP S4HANA
2 -
SAP S4HANA Cloud private edition
1 -
SAP Upgrade Automation
1 -
SAP WCM
1 -
SAP Work Clearance Management
1 -
Schedule Agreement
1 -
SDM
1 -
security
2 -
Settlement Management
1 -
soar
2 -
SSIS
1 -
SU01
1 -
SUM2.0SP17
1 -
SUMDMO
1 -
Teams
2 -
User Administration
1 -
User Participation
1 -
Utilities
1 -
va01
1 -
vendor
1 -
vl01n
1 -
vl02n
1 -
WCM
1 -
X12 850
1 -
xlsx_file_abap
1 -
YTD|MTD|QTD in CDs views using Date Function
1
- « Previous
- Next »
Related Content
- Add components to production order using FM bapi_alm_order_maintain. in Enterprise Resource Planning Q&A
- Introducing the GROW with SAP, core HR add-on in Enterprise Resource Planning Blogs by SAP
- Business Rule Framework Plus(BRF+) in Enterprise Resource Planning Blogs by Members
- Hiding rows in RDR1 - UDF in Enterprise Resource Planning Q&A
- Introducing the market standard of electronic invoicing for the United States in Enterprise Resource Planning Blogs by SAP
Top kudoed authors
| User | Count |
|---|---|
| 5 | |
| 2 | |
| 2 | |
| 2 | |
| 1 | |
| 1 | |
| 1 | |
| 1 | |
| 1 |