
- SAP Community
- Products and Technology
- Technology
- Technology Blogs by SAP
- Integrating SAP Conversational AI (CAI) with a thi...
Technology Blogs by SAP
Learn how to extend and personalize SAP applications. Follow the SAP technology blog for insights into SAP BTP, ABAP, SAP Analytics Cloud, SAP HANA, and more.
Turn on suggestions
Auto-suggest helps you quickly narrow down your search results by suggesting possible matches as you type.
Showing results for
former_member85
Participant
Options
- Subscribe to RSS Feed
- Mark as New
- Mark as Read
- Bookmark
- Subscribe
- Printer Friendly Page
- Report Inappropriate Content
06-04-2019
3:16 PM
Motive
Having had several conversations with customers, colleagues, and partners about SAP CAI, one thing always stands out: integration. Chat bots offer a new user experience that in many ways is more efficient and effective than a human interaction and there are many statistics that support that statement. However, it’s challenging for a chat bot to be helpful on its own, it needs to be able to retrieve information from other systems and present it to the user.
With many developers and customers not having the resources (skills or licenses) to build a middleware application (Node.js for example) from scratch for their integration purposes, I have decided to demonstrate an integration example using SAP CPI – read more about CPI here
This example is inspired by the tutorial originally developed by the SAP CAI (formerly Recast.AI) team
Disclaimer
This guide is intended for knowledge sharing purposes only. The steps taken including the code’s accuracy and cleanliness, security considerations, and overall steps are not to be considered best practices.
Overview
Here is an over-simplified diagram of how the integration process looks like. The information here will eventually come together to a full circle when you get to the end.

Prerequisites
- You must have a CPI-PI account
- Basic knowledge of CPI
- You have opened a free SAP CAI account
- You have read and understood the part 1 & 2 of the movie bot tutorial
Steps
1.0 Forking and configuring the bot
Forking the bot
- Sign into your account
- Go to the original bot’s page here
- Click the Fork button as shown below

Configuring the bot
- Once the forking process is complete, go to settings by clicking the cog icon

- Select the “Bot webhook base URL” box and type in your CPI runtime node. Your runtime node should look something like this: https://<Account Short Name>-iflmap.<SSL HOST>.<Landscape Host>/http. For example, https://l0001-iflmap.hcisbp.eu1.hana.ondemand.com/http
- Make sure to enter /http at the end of the URL because we will be using an http adapter later

- On the same screen click the “build” tab at the top then select the “discover” skill > actions tab > scroll down to the “_memory.yes” action
- Click the pencil icon to edit the action block

- Make sure “/discover-movies” is added to the URL and POST method is selected
- Under Authentication: select basic authentication and enter your CPI tenant’s username and password
- Under Headers: add the field Content-Type application/json
- Under Body: use the default


2.0 Get your MovieDB API URL and API Key
Go to link below and follow the steps:
- Create a MovieDB account
- Make sure you are logged into your The Movie DB account
- Follow this link The Movie DB API and follow the steps to get your API key
It should look like this:

3.0 Building your integration flow
Go to your CPI tenant:
- Create an integration package (or use a pre-existing one of your liking)
- Create a new integration flow of type “Process Integration”
Building your integration flow
- Start by selecting an HTTPS adapter and dragging the line from “Sender” to “Start”
- Under the connection tab, make sure that you enter/do as shown in the screenshot
- Leave everything else for the adapter untouched


Next, we want to extract the parameters from the incoming message from CAI and save them as properties so that we use them in the MovieDB query
- Open the menu on the left, go to the transformation button, open the “script” dropdown menu and select JavaScript
- Add the code below and save

importClass(com.sap.gateway.ip.core.customdev.util.Message);

importClass(java.util.HashMap);


function processData(message) {

    var body = message.getBody(java.lang.String); //retrieve payload

    var myObj = JSON.parse(body); //parse payload

    //create the needed variables for the query

    var kind = myObj.conversation.memory.recording.type;

    var genreId = myObj.conversation.memory.genre.id;

    var language = myObj.conversation.language;

    var conversationId = myObj.conversation.id;


    //assign variables to properties

    message.setProperty("kind", kind);

    message.setProperty("genreId", genreId);

    message.setProperty("language", language);

    message.setProperty("conversationId", conversationId);


    message.setHeader("Accept","application/json");

    message.setHeader("Content-Type","application/json");


	return message;

}
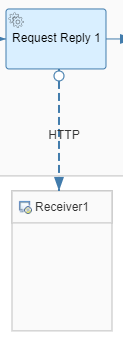
Next, we will query the MovieDB
- Add a request reply box, a receiver box outside the integration bus, and an http adapter connecting the two (as shown)
- Configure the http adapter as shown in the screenshot – replace the “api_key” field with your API key

Now that we will receive the response in the payload (body of the message), we will use the data and store them in properties again so that we use them in our final response back to the bot
- Insert a script box of type JavaScript (look at how the integration flow looks so far)
- Insert the following code in it (very similar to the one above except that we are using an array)

importClass(com.sap.gateway.ip.core.customdev.util.Message);

importClass(java.util.HashMap);


function processData(message) {

    var body = message.getBody(java.lang.String);

    var myObj = JSON.parse(body);


    var i, x = "";


    for (i in myObj.results) {

    x += myObj.results[i];

    }


    var title = [myObj.results[0].title, myObj.results[1].title, myObj.results[2].title, myObj.results[3].title, myObj.results[4].title];

    var subtitle = [myObj.results[0].overview, myObj.results[1].overview, myObj.results[2].overview, myObj.results[3].overview, myObj.results[4].overview];

    var imageUrl = [myObj.results[0].poster_path, myObj.results[1].poster_path, myObj.results[2].poster_path, myObj.results[3].poster_path, myObj.results[4].poster_path];

    var buttonValue = [myObj.results[0].id, myObj.results[1].id, myObj.results[2].id, myObj.results[3].id, myObj.results[4].id];


    message.setProperty("title", title);

    message.setProperty("subtitle", subtitle);

    message.setProperty("imageUrl", imageUrl);

    message.setProperty("buttonValue", buttonValue);


	return message;

}
Finally, we will add a “Content Modifier” which will contain the final payload that goes back to CAI
- Add in a “Content Modifier”
- In the message header, add in the authorization details from CAI, that would be your request token (find it in the settings of your bot’s page under token)
- Add in the code below under the message body tab
- Known issue: if the number characters in the content array exceeds 512, then the bot will show “No Reply”


Here is the JSON you will need to put in the body
{

    "replies": [

        {

            "type": "carousel",

            "content":[

            {

              "title": "${property.title[0]}",

              "subtitle": "${property.subtitle[0]}",

              "imageUrl": "https://image.tmdb.org/t/p/w600_and_h900_bestv2${property.imageUrl[0]}",

              "buttons": [

                {

                  "title": "View More",

                  "type": "web_url",

                  "value": "https://www.themoviedb.org/${property.kind}/${property.id[0]}"

                }

              ]

            },

			{

              "title": "${property.title[1]}",

              "subtitle": "${property.subtitle[1]}",

              "imageUrl": "https://image.tmdb.org/t/p/w600_and_h900_bestv2${property.imageUrl[1]}",

              "buttons": [

                {

                  "title": "View More",

                  "type": "web_url",

                  "value": "https://www.themoviedb.org/${property.kind}/${property.id[1]}"

                }

              ]

            },

            {

              "title": "${property.title[2]}",

              "subtitle": "${property.subtitle[2]}",

              "imageUrl": "https://image.tmdb.org/t/p/w600_and_h900_bestv2${property.imageUrl[2]}",

              "buttons": [

                {

                  "title": "View More",

                  "type": "web_url",

                  "value": "https://www.themoviedb.org/${property.kind}/${property.id[2]}"

                }

              ]

            },

            {

              "title": "${property.title[3]}",

              "subtitle": "${property.subtitle[3]}",

              "imageUrl": "https://image.tmdb.org/t/p/w600_and_h900_bestv2${property.imageUrl[3]}",

              "buttons": [

                {

                  "title": "View More",

                  "type": "web_url",

                  "value": "https://www.themoviedb.org/${property.kind}/${property.id[3]}"

                }

              ]

            },

            {

              "title": "${property.title[4]}",

              "subtitle": "${property.subtitle[4]}",

              "imageUrl": "https://image.tmdb.org/t/p/w600_and_h900_bestv2${property.imageUrl[4]}",

              "buttons": [

                {

                  "title": "View More",

                  "type": "web_url",

                  "value": "https://www.themoviedb.org/${property.kind}/${property.id[4]}"

                }

              ]

            }

          ]

        }

    ]

}
Optional, add the following groovy script if you want to see how your payload looks like at the end of the integration flow
import com.sap.gateway.ip.core.customdev.util.Message;

import java.util.HashMap;

import com.sap.it.api.mapping.*;

import java.text.SimpleDateFormat;

import java.util.Calendar;


def Message processData(Message message) {


	map = message.getProperties();

	property_ENABLE_PAYLOAD_LOGGING = "TRUE";

	if (property_ENABLE_PAYLOAD_LOGGING.toUpperCase().equals("TRUE")) {

		def header = message.getHeaders() as String;

		def body = message.getBody(java.lang.String) as String;


		String timeStamp = new SimpleDateFormat("HH:mm:ss.SSS").format(new Date());

		String logTitle = timeStamp + " JSstep ";


		def messageLog = messageLogFactory.getMessageLog(message);

		if (messageLog != null) {

			messageLog.addAttachmentAsString(logTitle, body, "text/xml");

		}

	}

	return message;

}
Final look at the integration flow

4.0 Deploy and test your bot
You should be good to go now, however, feel free to ask for support in the comments section below. I’d love to hear from the community how this example can be enhanced through better code, instructions, or any other way.

5.0 Take Action
Part of my incentive of writing this blog is not only to support the SAP community members in their development, but also to hear their feedback and work together to continue building better solutions. With that, I'd like to ask you all to try this out and provide your feedback in the comments: authoring tips, improved code snippets, questions, or anything that you believe will help the community.
Mohammad Alhennawi
Technology Consultant, SAP
- SAP Managed Tags:
- SAP Conversational AI,
- Cloud Integration
Labels:
4 Comments
You must be a registered user to add a comment. If you've already registered, sign in. Otherwise, register and sign in.
Labels in this area
-
ABAP CDS Views - CDC (Change Data Capture)
2 -
AI
1 -
Analyze Workload Data
1 -
BTP
1 -
Business and IT Integration
2 -
Business application stu
1 -
Business Technology Platform
1 -
Business Trends
1,661 -
Business Trends
87 -
CAP
1 -
cf
1 -
Cloud Foundry
1 -
Confluent
1 -
Customer COE Basics and Fundamentals
1 -
Customer COE Latest and Greatest
3 -
Customer Data Browser app
1 -
Data Analysis Tool
1 -
data migration
1 -
data transfer
1 -
Datasphere
2 -
Event Information
1,400 -
Event Information
64 -
Expert
1 -
Expert Insights
178 -
Expert Insights
273 -
General
1 -
Google cloud
1 -
Google Next'24
1 -
Kafka
1 -
Life at SAP
784 -
Life at SAP
11 -
Migrate your Data App
1 -
MTA
1 -
Network Performance Analysis
1 -
NodeJS
1 -
PDF
1 -
POC
1 -
Product Updates
4,577 -
Product Updates
326 -
Replication Flow
1 -
RisewithSAP
1 -
SAP BTP
1 -
SAP BTP Cloud Foundry
1 -
SAP Cloud ALM
1 -
SAP Cloud Application Programming Model
1 -
SAP Datasphere
2 -
SAP S4HANA Cloud
1 -
SAP S4HANA Migration Cockpit
1 -
Technology Updates
6,886 -
Technology Updates
403 -
Workload Fluctuations
1
Related Content
- Integration Suite trial - cannot access API proxy in Technology Q&A
- 10+ ways to reshape your SAP landscape with SAP Business Technology Platform – Blog 4 in Technology Blogs by SAP
- Integrate an external task system to Cloud ALM. in Technology Q&A
- Integration object creation with one to one relation with same item type. in Technology Q&A
- What’s New in SAP Analytics Cloud Release 2024.08 in Technology Blogs by SAP
Top kudoed authors
| User | Count |
|---|---|
| 12 | |
| 10 | |
| 9 | |
| 7 | |
| 7 | |
| 7 | |
| 6 | |
| 6 | |
| 5 | |
| 4 |