
- SAP Community
- Products and Technology
- Enterprise Resource Planning
- ERP Blogs by SAP
- SAP IoT – Digital Twin
Enterprise Resource Planning Blogs by SAP
Get insights and updates about cloud ERP and RISE with SAP, SAP S/4HANA and SAP S/4HANA Cloud, and more enterprise management capabilities with SAP blog posts.
Turn on suggestions
Auto-suggest helps you quickly narrow down your search results by suggesting possible matches as you type.
Showing results for
Product and Topic Expert
Options
- Subscribe to RSS Feed
- Mark as New
- Mark as Read
- Bookmark
- Subscribe
- Printer Friendly Page
- Report Inappropriate Content
05-20-2019
10:33 AM
When setting up an IoT scenario, one major step is the so-called onboarding. This term refers to the process of establishing a relationship between a physical entity and its virtual counterpart known as the digital twin. In the previous blog SAP IoT – How to define your Device Model and start persisting measures we modeled our sensors in the SAP Leonardo Internet of Things for the Cloud Foundry, in this blog we will talk about the digital twin of our sensors and how to model it.
But why do we need a Digital Twin? What will be the added value to my IoT project?
With our Device Model we can store the measures of our device and retrieve them with APIs, but what about more capabilities like rules and events, actions and much more services your application might require?
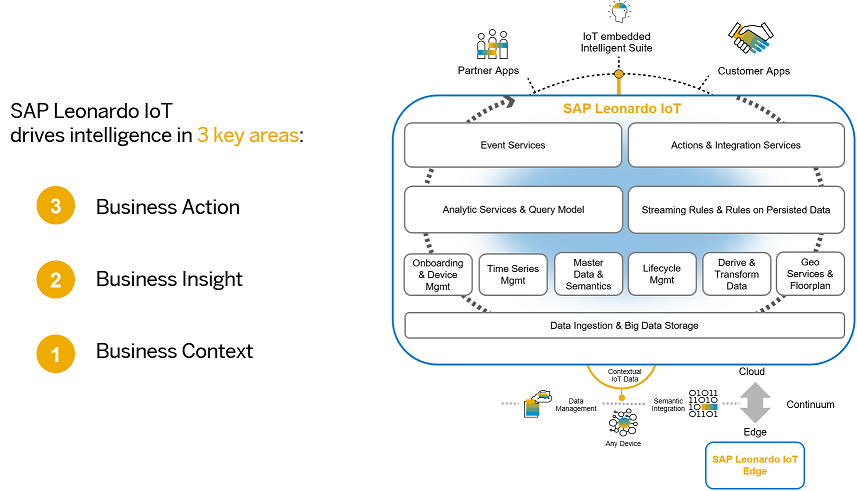
SAP Internet of Things provides a rich set of services that are based on the Digital Twin model representation. The goal of the digital twin is to enrich IoT data within the business context of the asset and operator – all based on a unified semantic model.
Some of the provided capabilities are:
On this blog we will concentrate on the Digital Twin modeling process, as this step is required to be able to implement the available services and capabilities on top of our Thing. Following blogs will cover the remaining capabilities.
You can get much more details about SAP Internet of Things in the official sap.com page and also at the help.sap.com page dedicated to SAP IoT.
In the past blog we talked about the Device Model (represented in the next image in blue color), in this blog we concentrate on the Thing model (represented in grey color) and the relationship between Things and Sensors.

A thing is seen as the digital twin of a real-world asset (such as a building, machine, or vehicle). To foster efficiency gains, you typically do not start with an object called "thing". Rather, the system expects that you think about reusable sets of properties that are typical of a particular type of thing before you start instantiating concrete things. The starting point is then the definition of so-called packages. A package serves as a container for thing types as well as their properties. Then we will define reusable sets of properties, thing types to which the properties can be assigned and the set of things that are derived from the thing types.
The set of applications that will help you model your thing and all related components are grouped in 2 blocks:

The video How do I model my “Things” with SAP? shows an example of a Thing modeled into SAP Leonardo IoT. The tutorial Create a Thing Model and Bind to Device shows step by step the full process. And the official documentation Modeling Things: Overview provides all details on the available components and how to create/update/delete them.
One important topic to notice while defining your thing in the Thing Modeler is the possibility to assign master data and location properties to your thing (the videos and tutorials here below cover it). Master data properties will facilitate the integration between your thing and your business processes, you can for example store the Serial Number of your thing as identified in your ERP.
Important note: In order to be able to use the SAP Leonardo IoT apps some configuration steps need to be acomplished. Please follow the Get Started with Your SAP IoT Account step-by-step guide for more details on how to proceed (don't forget to provide to your user the required Authorizations as well as configure the Object Authorizations).
Things Onboarding does not only set up such a mirror object but also a technical connection between a physical device and its digital twin is established. This connection is then used for transferring sensor data from a device into the SAP Leonardo IoT storage system for monitoring and analytics.
You can use either SAP Cloud Platform Internet of Things for the Cloud Foundry Environment or another device management software of your choice for importing data into SAP Leonardo IoT.

Once a Thing has been created you can map it to a Sensor in SAP IoT Service for Cloud Foundry Environment on the Thing Modeler application.
On the Thing Modeler go to the Connectivity tab and select the “SAP IoT Service for Cloud Foundry Environment”. Automatically all your sensors will be shown (as both your Internet of Things and your SAP IoT tenants are connected), you just need to select the specific sensor you want your thing to be mapped.
Note: the property’s types of your Thing and your Device need to match, check the Things Onboarding documentation for more details.

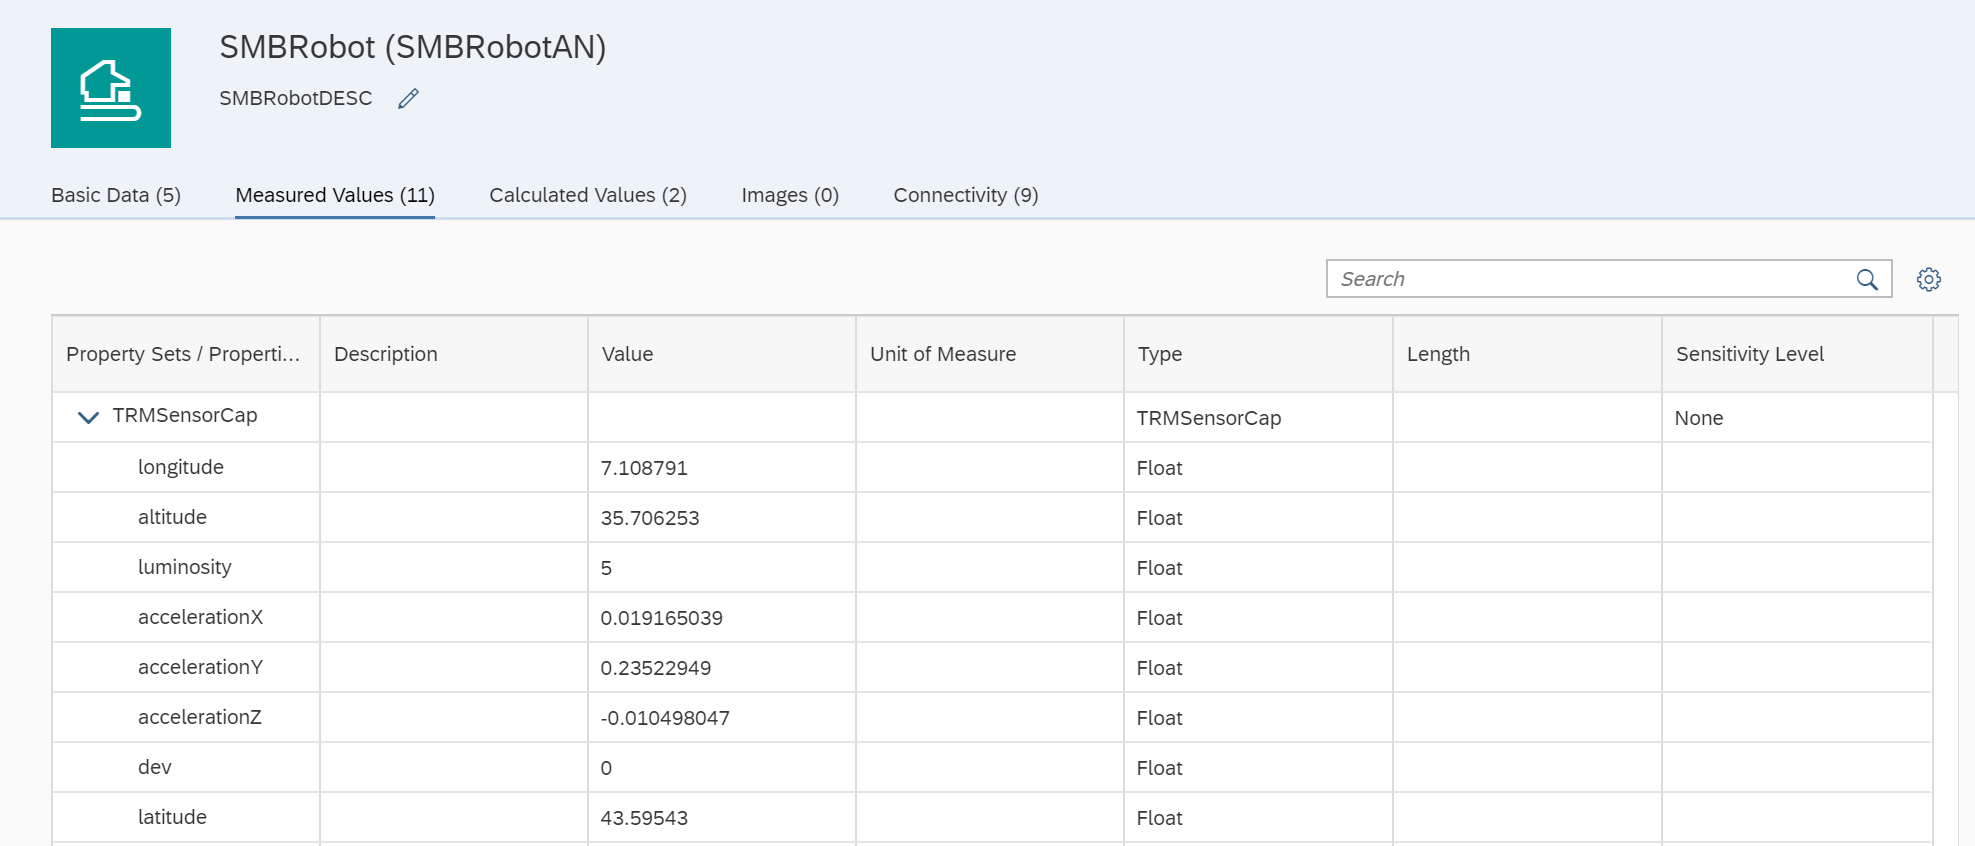
Once the connection is established your last device data is visible in the Measured Values tab of your Thing:
Note: The videos here above are talking about SAP Leonardo IoT Application Enablement and latest naming is simply SAP Leonardo IoT. Also consider the fact that some screens are not the on the latest SAP Leonardo IoT version, but the features shown are equivalent and clearly explained.
If you want to get your hands dirty with a real IoT implementation test/prototype please check the guide Get Started with Your SAP IoT Account providing all details on how to setup your SAP Leonardo IoT account. At the moment I’m writing this blog (05/2019) there are no SAP Leonardo IoT trial accounts.
In this blog we have seen how to define our Thing in SAP Leonardo IoT, next blog will become more interesting as we will start using WebIDE to easily create SAP Fiori applications based on SAP IoT templates, stay tuned!
PS: Along the blog I provided many pointers to already available documents and tutorials covering the different topics I talk about; my goal is to compile all the links together on these blogs and not to repeat the materials already available. Please play the game and click on the different links not to miss any detail!
But why do we need a Digital Twin? What will be the added value to my IoT project?
With our Device Model we can store the measures of our device and retrieve them with APIs, but what about more capabilities like rules and events, actions and much more services your application might require?
SAP Internet of Things provides a rich set of services that are based on the Digital Twin model representation. The goal of the digital twin is to enrich IoT data within the business context of the asset and operator – all based on a unified semantic model.
Some of the provided capabilities are:
- Rules and events management - Apply rules as a stream or batch to contextually enrich IoT data and use events to turn insights into outcomes.
- Action-driven business integration - Trigger event-based actions by creating business tasks – such as purchase requisitions or service tickets – in line-of-business applications.
- IoT-enriched analytics - Define your analytical model and aggregations while accessing IoT data to gain insights with analytics solutions such as SAP Analytics Cloud.
- Control of IoT data access - Grant data access to employees, customers, and partners with a granular authorization concept based on user roles, hierarchies, and properties of an instance.
- IoT application development - Deliver powerful, IoT-ready applications and enhance or modify their code to fit a specific use case. Apply templates available through the SAP Cloud Platform Web IDE service.
On this blog we will concentrate on the Digital Twin modeling process, as this step is required to be able to implement the available services and capabilities on top of our Thing. Following blogs will cover the remaining capabilities.
You can get much more details about SAP Internet of Things in the official sap.com page and also at the help.sap.com page dedicated to SAP IoT.
Modeling Things
In the past blog we talked about the Device Model (represented in the next image in blue color), in this blog we concentrate on the Thing model (represented in grey color) and the relationship between Things and Sensors.
A thing is seen as the digital twin of a real-world asset (such as a building, machine, or vehicle). To foster efficiency gains, you typically do not start with an object called "thing". Rather, the system expects that you think about reusable sets of properties that are typical of a particular type of thing before you start instantiating concrete things. The starting point is then the definition of so-called packages. A package serves as a container for thing types as well as their properties. Then we will define reusable sets of properties, thing types to which the properties can be assigned and the set of things that are derived from the thing types.
The set of applications that will help you model your thing and all related components are grouped in 2 blocks:
- Thing Engineer oData - to model Things, ThingTypes, Properties and Packages.
- Tenant Administrator - to define Object Authorizations, Persons and Companies managing access to the IoT data. Check the next blog in these series for more details on Tenant Administration.
The video How do I model my “Things” with SAP? shows an example of a Thing modeled into SAP Leonardo IoT. The tutorial Create a Thing Model and Bind to Device shows step by step the full process. And the official documentation Modeling Things: Overview provides all details on the available components and how to create/update/delete them.
One important topic to notice while defining your thing in the Thing Modeler is the possibility to assign master data and location properties to your thing (the videos and tutorials here below cover it). Master data properties will facilitate the integration between your thing and your business processes, you can for example store the Serial Number of your thing as identified in your ERP.
Important note: In order to be able to use the SAP Leonardo IoT apps some configuration steps need to be acomplished. Please follow the Get Started with Your SAP IoT Account step-by-step guide for more details on how to proceed (don't forget to provide to your user the required Authorizations as well as configure the Object Authorizations).
Onboarding a Thing
Things Onboarding does not only set up such a mirror object but also a technical connection between a physical device and its digital twin is established. This connection is then used for transferring sensor data from a device into the SAP Leonardo IoT storage system for monitoring and analytics.
You can use either SAP Cloud Platform Internet of Things for the Cloud Foundry Environment or another device management software of your choice for importing data into SAP Leonardo IoT.
- In the case you use SAP Cloud Platform Internet of Things for the Cloud Foundry Environment the connection between your Device data and the Thing can be done automatically after configuring the connection between both tenants.Please follow the SAP IoT Integration help documentation for more details on how to connect both tenants together.
- In the case you use another device management software you can use the data ingestion services provided by the SAP Leonardo IoT APIs (we will talk about those APIs and how to use them in a follow up blog). In that case, you have to make sure that the device management software creates the necessary payloads in a way that can be consumed by the SAP Leonardo IoT services.
Connect a thing to an SAP IoT Service for Cloud Foundry Environment device
Once a Thing has been created you can map it to a Sensor in SAP IoT Service for Cloud Foundry Environment on the Thing Modeler application.
On the Thing Modeler go to the Connectivity tab and select the “SAP IoT Service for Cloud Foundry Environment”. Automatically all your sensors will be shown (as both your Internet of Things and your SAP IoT tenants are connected), you just need to select the specific sensor you want your thing to be mapped.
Note: the property’s types of your Thing and your Device need to match, check the Things Onboarding documentation for more details.
Once the connection is established your last device data is visible in the Measured Values tab of your Thing:
Other resources
- SAP Internet of Things YouTube Play List – I already pointed out to that playlist on a precedent blog. I’ll like now to insists on the following videos giving more details on the points reviewed in this blog:
- SAP HANA Academy - SAP IoT Application Enablement: Overview
- SAP HANA Academy - SAP IoT: IoT App Enablement 1of8: Device Model
- SAP HANA Academy - SAP IoT: IoT App Enablement 2of8: Property Sets
- SAP HANA Academy - SAP IoT: IoT App Enablement 3of8: Things
Note: The videos here above are talking about SAP Leonardo IoT Application Enablement and latest naming is simply SAP Leonardo IoT. Also consider the fact that some screens are not the on the latest SAP Leonardo IoT version, but the features shown are equivalent and clearly explained.
If you want to get your hands dirty with a real IoT implementation test/prototype please check the guide Get Started with Your SAP IoT Account providing all details on how to setup your SAP Leonardo IoT account. At the moment I’m writing this blog (05/2019) there are no SAP Leonardo IoT trial accounts.
- Check the full set SAP Leonardo IoT blog series:
- SAP IoT for SMBs
- SAP IoT – How to define your Device Model and start persisting measures
- SAP IoT – Digital Twin
- SAP IoT – Services
- SAP IoT – WebIDE templates and controls
- SMB.io: IoT mobile app prototype
In this blog we have seen how to define our Thing in SAP Leonardo IoT, next blog will become more interesting as we will start using WebIDE to easily create SAP Fiori applications based on SAP IoT templates, stay tuned!
PS: Along the blog I provided many pointers to already available documents and tutorials covering the different topics I talk about; my goal is to compile all the links together on these blogs and not to repeat the materials already available. Please play the game and click on the different links not to miss any detail!
- SAP Managed Tags:
- SAP Business ByDesign,
- SAP Business One Extensibility,
- Internet of Things
Labels:
2 Comments
You must be a registered user to add a comment. If you've already registered, sign in. Otherwise, register and sign in.
Labels in this area
-
Artificial Intelligence (AI)
1 -
Business Trends
363 -
Business Trends
21 -
Customer COE Basics and Fundamentals
1 -
Digital Transformation with Cloud ERP (DT)
1 -
Event Information
461 -
Event Information
23 -
Expert Insights
114 -
Expert Insights
151 -
General
1 -
Governance and Organization
1 -
Introduction
1 -
Life at SAP
415 -
Life at SAP
2 -
Product Updates
4,685 -
Product Updates
205 -
Roadmap and Strategy
1 -
Technology Updates
1,502 -
Technology Updates
85
Related Content
- Manage Supply Shortage and Excess Supply with MRP Material Coverage Apps in Enterprise Resource Planning Blogs by SAP
- The Role of SAP Business AI in the Chemical Industry. Overview in Enterprise Resource Planning Blogs by SAP
- Introducing the market standard of electronic invoicing for the United States in Enterprise Resource Planning Blogs by SAP
- SAP ERP Functionality for EDI Processing: UoMs Determination for Inbound Orders in Enterprise Resource Planning Blogs by Members
- Learn about Localization with SAP’s Experts at the DSAG-SAP Globalization Symposium 2024 in Enterprise Resource Planning Blogs by SAP
Top kudoed authors
| User | Count |
|---|---|
| 5 | |
| 4 | |
| 4 | |
| 3 | |
| 3 | |
| 3 | |
| 2 | |
| 2 | |
| 2 | |
| 2 |