
- SAP Community
- Products and Technology
- Technology
- Technology Blogs by SAP
- Integration Advisor - Quickly create your individu...
Technology Blogs by SAP
Learn how to extend and personalize SAP applications. Follow the SAP technology blog for insights into SAP BTP, ABAP, SAP Analytics Cloud, SAP HANA, and more.
Turn on suggestions
Auto-suggest helps you quickly narrow down your search results by suggesting possible matches as you type.
Showing results for
Advisor
Options
- Subscribe to RSS Feed
- Mark as New
- Mark as Read
- Bookmark
- Subscribe
- Printer Friendly Page
- Report Inappropriate Content
03-21-2019
9:14 AM
Introduction
The blog Integration content advisor: The importance of customized codelists in message implementation guidel... explains how to assign codelists to leaf nodes and customize them accordingly. Each MIG has its own codelists, many of which must be individually mapped in a mapping guideline (MAG) as shown in Figure 1. In this example, you can see that the units of measure on the source side differ from those on the target side. The source side has more than one code value with the same definition, and a different number of code values than the target side. How can you quickly and correctly create the individual code value mapping for this element as well as for all the other elements in the mapping guideline?

Figure 1: A mapping element with a code value mapping
The integration content advisor includes several nice features that let you create mappings quickly. This blog explains how to create a code value manually or via a copy or proposal service. The example mapping guideline has a source MIG that’s based on an SAP IDoc ORDERS05 message and a target MIG that’s based on an ASC X12 850 (Purchase Order) message.
Manually create a code value mapping
Let's assume you're creating a new mapping guideline and most elements have already been mapped. You’re still in edit mode and only a few mapping elements still need to be manually created, because the proposal service didn't provide suggestions that were suitable for your requirements. Create these elements by dragging (see (1) in Figure 2) and dropping (2) a mapping element line between the corresponding source and target nodes.

Figure 2: Manually create a mapping element
Display of code value mapping details
If both the source node and the target node are leaf nodes with codelist assignments, the lower details panel automatically displays a "Code Value Mapping" tab (see (2) in Figure 3).
Click the tab to see a list of code values on the source side (3) and a column that shows "none" values on the target side (4).

Figure 3: Set mapping element with code value mapping view
 Remark: "none" means that this code value isn’t mapped to the target side.
Create mappings between source and target code values
Click the value button (see (1) in Figure 4) on the row of the code value that has been mapped. This displays a list of the available target code values. From here, you can select an appropriate target value (2), which is mapped to the source code value you selected.

Figure 4: Assign target code value to source code value
Figure 5 shows a finalized code value mapping. As you can see, it’s possible for two different source code values (1) to be mapped to the same target code value (2).

Figure 5: Finalized code value mapping
Change code value mapping
You can change code value mappings at any time. Simply click the value button (see (1) in Figure 6 in the "Code Value Mapping" tab. Select a different value from the list of target code values.

Figure 6: Change target code value to "none"
You can also select "none" (2), which means the selected source code value won’t be mapped to a target value.
Delete a code value mapping
You can delete an entire mapping (see (1) in Figure 7). Select a mapping element and right-click the blue mapping element line to open a context menu that includes “Delete” button (1).

Figure 7: Delete a mapping element
Confirm the deletion to remove the entire mapping element, including the line that indicates the mapping, and the mapping itself.
If you re-create the same mapping element (1), the target code values are now mapped "none" (see (2) in Figure 8).

Figure 8: Unmapped target code values after re-creating a deleted mapping element
Copy a code value mapping
Creating code value mappings manually can be tiring, time-consuming, , especially if they’re very long or if you have to create the same mapping multiple times. If you need multiple copies of mappings, you can simply copy from an existing one. The example below requires the same leaf nodes with the same code list assignments on both the source and target sides.
Let’s assume you already did a code value mapping for the following mapping element in the header section:
| /ORDERS05/ E1EDK05[ALCKZ = -]/MEAUN | Unit of measurement | --> | /850/CTP[236 = DPR]/C001/355 | Unit or Basis for Measurement Code |
The same mapping element with the same source/target nodes and the same codelists also exists in the line item section. However, you also need a code value mapping for this element:
| /ORDERS05/E1EDP01/ E1EDP05[ALCKZ = -]/E1EDP05/MEAUN | Unit of measurement | --> | /850/PO1/CTP[236 = DPR]/ CTP/C001/355 | Unit or Basis for Measurement Code |
Select the mapping element you want to copy (see (1) in Figure 9) and click the "Copy" button (3).
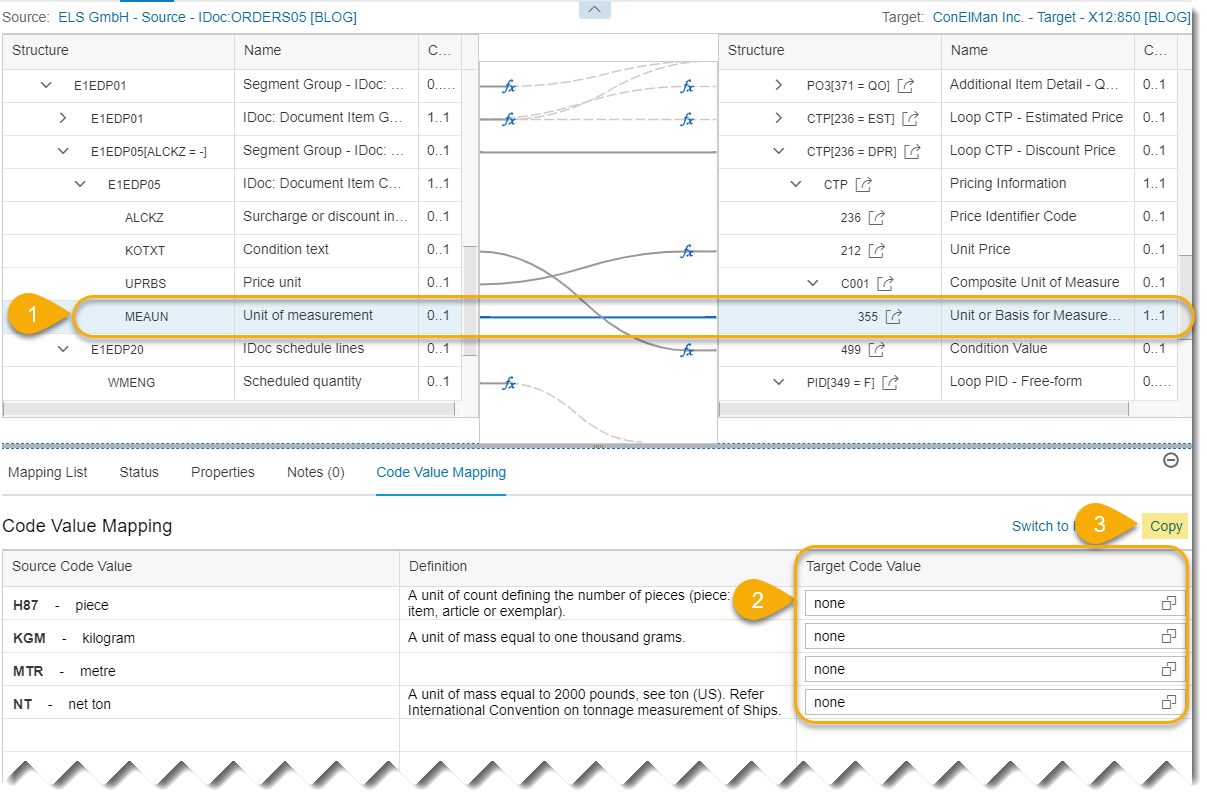
Figure 9: Select mapping element with unmapped code values
You see a window with appropriate mapping elements between the same source and target leaf nodes and the same assigned code lists. Our example shows how to copy a single element (see (1) in Figure 10). You can select an element for which you know the code value mapping is correct. You can repeat this copy with other mapping elements as many times as necessary.
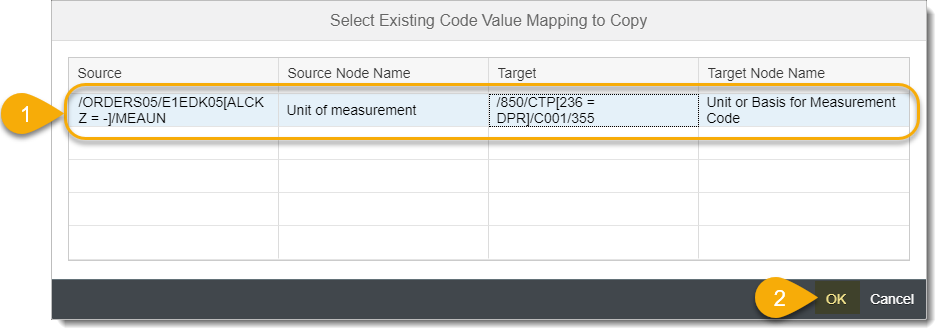
Figure 10: Select appropriate mapping element with code value mapping
 Remark: This window doesn’t show if the code value mappings are already created. Therefore, you should know which elements you've already mapped to code values.
When you click "OK" (see (2) in Figure 10) you see the copied code value mappings in the "target code value" column (see (1) in Figure 11).

Figure 11: Copied code value mapping
 Remark: All matching code value mappings are copied, even if the codelists at the source and target side are different.
Switch to function
A code value mapping is usually made at the semantic level and generated into a transformation (XSLT) function once the runtime artifacts are generated. But you might need a code value mapping as a transformation function in some cases. If so, click "Switch to Function" in the code value mapping you want to transform (see (1) in Figure 12).

Figure 12: “Switch to Function” button
This automatically generates the corresponding XSLT function (see (2) in Figure 13) for the code value mapping, which you can then see in the "Function" tab (2). You cannot reverse a generated function; therefore, the "Code Value Mapping" tab no longer appears, because the code value mapping has been deleted.

Figure 13: Generated function
As shown in Figure 13, the generated default XSLT function is based on <xsl:choose>, wherein the source code values are compared against a range of possible values. Each selected source code value is expressed by a <xsl:when> clause that also has the mapped target code value in <xsl:sequence>. All source code values that aren’t mapped are simply written into the output, which is expressed by <xsd:otherwise>. You can change the function according to your requirements.
 Remark: To change a function back to a code value mapping, you must delete the complete mapping element, then create a new one and redefine the code value mapping.
Proposal for code value mapping
The integration content advisor's proposal service suggests mapping elements with code value mappings. The following example shows how to add some proposals into your already created mapping guideline. You can select "Get Proposal" (see (1) in Figure 14) at any time.
You'll find the proposed but not selected mapping elements at the end of the mapping list (2). Each proposed mapping element also includes a bar indicating the element’s confidence level.

Figure 14: Proposal for additional mapping elements
You can now select these new proposed mapping elements (see (1) in Figure 15). This selection leads to new mapping elements in your mapping guideline. This is also expressed by new mapping lines between the corresponding mapping elements (2).

Figure 15: Selected proposed mapping elements
The second mapping element is between the source and target leaf nodes (see (1) in Figure (16)):
| /ORDERS05/E1EDK17[QUALF = VER]/LKOND | IDOC delivery condition code | --> | /850/N1[98 = ST]/FOB[146 = BP]/335[334 = 01] | Transportation Terms Code - Incoterms |
These leaf nodes also have customized code lists. For this mapping element, the "Code Value Mapping" tab (2) may show, along with its proposals, an already defined code value mapping as shown in (3) of Figure 16.

Figure 16: Proposed code value mappings
Proposal of single code value mappings
If you already selected "Get Proposal" and you’re still in mode, you can also see which target code values returns the highest confidence for a code value mapping. Select a source code value and click its value button (see (1) in Figure 17). The list shows not only possible target code values, but also a confidence bar representing the probability of a suitable mapping to the selected source code value.

Figure 17: Proposal per code value mapping
You can select any available code value mapping, regardless of confidence level.
Summary
This blog explains how to create and maintain code value mappings in your mapping guidelines. The content advisor focuses on your customized codelists and therefore the definition of the individual code value mappings. The copy option and proposal service help you create individual code value mappings much faster. Both features support customizations on both the source and target sides, so you can be confident that your individual requirements are mapped accordingly.
An upcoming blog will explain how all defined code values are automatically considered in the generated runtime artifacts or covered in the generated PDF files of the mapping documentation. Stay tuned.
Further reading
For a complete overview of all ICA related blogs and videos, see integration content advisor: Overview of components and further reading
Labels:
6 Comments
You must be a registered user to add a comment. If you've already registered, sign in. Otherwise, register and sign in.
Labels in this area
-
ABAP CDS Views - CDC (Change Data Capture)
2 -
AI
1 -
Analyze Workload Data
1 -
BTP
1 -
Business and IT Integration
2 -
Business application stu
1 -
Business Technology Platform
1 -
Business Trends
1,661 -
Business Trends
88 -
CAP
1 -
cf
1 -
Cloud Foundry
1 -
Confluent
1 -
Customer COE Basics and Fundamentals
1 -
Customer COE Latest and Greatest
3 -
Customer Data Browser app
1 -
Data Analysis Tool
1 -
data migration
1 -
data transfer
1 -
Datasphere
2 -
Event Information
1,400 -
Event Information
65 -
Expert
1 -
Expert Insights
178 -
Expert Insights
280 -
General
1 -
Google cloud
1 -
Google Next'24
1 -
Kafka
1 -
Life at SAP
784 -
Life at SAP
11 -
Migrate your Data App
1 -
MTA
1 -
Network Performance Analysis
1 -
NodeJS
1 -
PDF
1 -
POC
1 -
Product Updates
4,577 -
Product Updates
330 -
Replication Flow
1 -
RisewithSAP
1 -
SAP BTP
1 -
SAP BTP Cloud Foundry
1 -
SAP Cloud ALM
1 -
SAP Cloud Application Programming Model
1 -
SAP Datasphere
2 -
SAP S4HANA Cloud
1 -
SAP S4HANA Migration Cockpit
1 -
Technology Updates
6,886 -
Technology Updates
408 -
Workload Fluctuations
1
Related Content
- Introducing Blog Series of SAP Signavio Process Insights, discovery edition – An in-depth exploratio in Technology Blogs by SAP
- Harnessing the Power of SAP HANA Cloud Vector Engine for Context-Aware LLM Architecture in Technology Blogs by SAP
- Nested JSON to SAP HANA Tables with SAP Integration Suite in Technology Blogs by Members
- SAP Sustainability Footprint Management: Q1-24 Updates & Highlights in Technology Blogs by SAP
- Same Mapping Different WSDL in Technology Q&A
Top kudoed authors
| User | Count |
|---|---|
| 13 | |
| 10 | |
| 10 | |
| 9 | |
| 8 | |
| 7 | |
| 6 | |
| 5 | |
| 5 | |
| 5 |