Welcome back to this new Q&D (quick and dirty) post. My last Q&D post showed how the BCV could be enriched with TM Conditions (http://scn.sap.com/community/scm/transportation-management/blog/2013/01/26/quick-and-dirty-qad--01-b...).
Introduction
This post features a quick and dirty implementation of a custom TM Condition. The purpose of the implementation is to display context dependent UI messages using this custom TM Condition. The post consists of three parts (admittedly, three parts is not "quick", although they will still be somewhat dirty :smile: ).
Part 1: Validation: Creating a Validation for the TOR object
Part 2: Process Controller: creating a strategy that is executed by the Validation
Part 3: TM Condition: Configuring and calling a TM Condition
Part 1 and 2 are about the creation of the Validation that will execute the strategy, and the Process Controller strategy that is called from within the Validation. The Validation will be triggered for the TOR object. We will create a service and strategy from scratch. Part 3 creates and implements the TM Condition, where our flexible UI messages can be configured. Hopefully after this post, you have a better understanding of how to implement Validations and TM Conditions, and how to use the power and flexibility of the Process Controller.
Part 1 and 2 are mostly based on the excellent SAP TM Enhancement Guide (https://scn.sap.com/docs/DOC-32985) by Holger Polch, which I followed step by step. You can skip these two parts and go straight to Part 3, if you are just interested in the implementation of TM Conditions.
Admittedly, this will mean an initial development effort, but once that is in place, the combined flexibility of the strategy and the TM Condition (BRFplus) will give you powerful tools to implement business rule logic without the need of further development.
Use case and demo
As usual, first we will see what the use case and solution is all about. Let us assume that you need a way to show simple, contextual messages on the UI. This means that the messages should depend on the context of the specific BO that is being displayed. Furthermore, the text of these BO should be somewhat self-explanatory, and changeable in a user-friendly and flexible manner. The use case and solution for this looks like this:
1. Let's assume that we have a Freight Order BO. Based on the contents of the Gross Weight and Means of transport fields of the BO (these are arbitrarily chosen), we want to display specific UI messages. Some sample rules can be displayed in a decision table:
| Gross Weight | Means of transport | Message |
|---|
| > 900 KG | 0005 (Ship) | <Message A> |
| > 500 KG | 0003 (Airplane) | <Message A> |
| ... | 0005 (Ship) | <Message B> |
For example, the first row states that if the Gross Weight of the Order exceeds 900 KG, and the Means of transport is 0005 (Ship), Message A has to be displayed to the user.
2. In our solution, these rules are implemented using a TM Condition. The same decision table would look like this (you will note that the messages have more complicated parameters, but this is no cause for concern. More about this and the TM Condition in Part 2):

3. Now, let's see how the UI Messages look on the Freight Order. First, the relevant fields for our TM Condition:

4. And then, the UI Messages after Save (Here we see 2 warning messages. We can also return red error messages, they would prevent the saving of the document):

5. Changing the Means of transport to Air and saving gives us a different message, as determined by our TM Condition:

This is basically it. Now the TM Condition can be used to maintain a variety of messages, that will be shown based on a myriad of field values or comparisons. For the resulting text, you can use the flexibility of BRFplus to include formula results and conditional texts.
The Validation
The reason for me to create a Validation was twofold: 1. to get a grasp on the process by following the TM Enhancement Guide and 2. to have something where I can execute my strategy and TM condition, and update the UI messages. Creating the Validation was fairly straightforward. The Validation will allow us to execute our logic every time that a TOR object is saved. It will also allow us to prevent the saving of the Document, if some error message is present.
The creation steps are the following (starting on page 42 of the enhancement guide. In case of doubts or if you need additional information about the steps, please refer to the guide):
1. First, we have to create the BO Enhancement. Access the BOPF BO Builder to enhance the TOR object (transaction /n/BOBF/CUST_UI):

2. Click on "Business Object Enhancement" to open the wizard, and press continue:

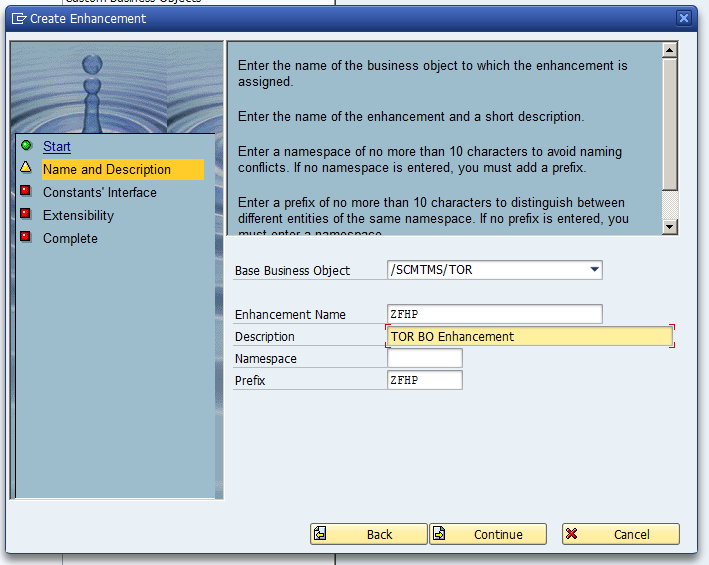
3. Fill out the relevant fields, and click on continue:
4. Click on continue to accept the proposed interface name:

5. We don't need the Enhancement to be extensible, so we can leave the check box blank. Click on continue:

6. Click on Complete to finish the steps and create the enhancement:

7. Assign a package. In my case I created this as a local object:

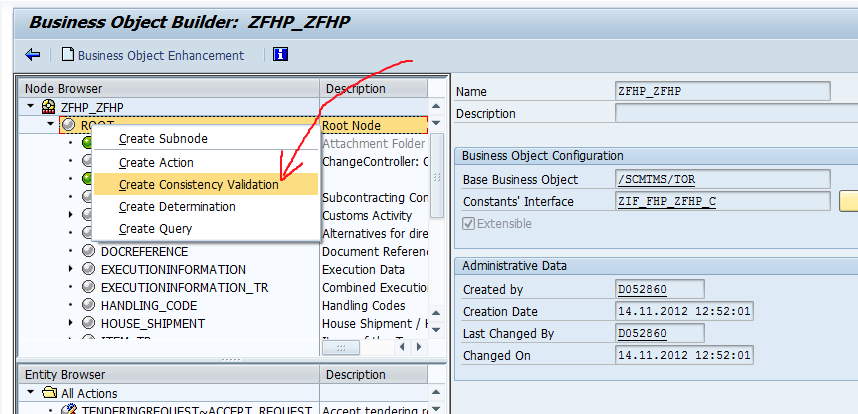
The wizard generates the needed objects. Afterwards we are presented with a tree structure of the BO nodes. Now we can create a Validation for our BO Enhancement.
1. We will create a Validation for the ROOT node by right-clicking on the ROOT node and selecting Create Consistency Validation:
2. We are introduced to another wizard. Click on Continue to start the steps:

3. Enter a name and description for your Validation and click on Continue:

4. Enter the name for a Validation class. We will use this class later to implement the logic that is triggered by the Validation:

5. In this step we have to indicate which nodes will trigger our Validation. We check the Create and Update box of the ROOT node and press on Continue:

6. Here we choose how the Validation behaves. Select "Return messages and prevent saving", to make it possible to prevent saving in case of error messages:

7. You can now complete the wizard and assign a package. The system shows the screen with the created Validation. Double-click on the Validation to see the details:


The Validation is now created. We can access the implementing class to see where our logic will go:
1. Open the implementing class (in our example ZCL_FHP_V_VAL) in the Class Builder (SE24):

2. You can double-click on the EXECUTE method to access the logic that gets executed by the validation:

Currently it is empty. We will implement the logic in the next part, where we will call a strategy to execute the TM condition.
Until next time!
