
- SAP Community
- Products and Technology
- Technology
- Technology Blogs by SAP
- How to Write Testable SAPUI5 Applications
Technology Blogs by SAP
Learn how to extend and personalize SAP applications. Follow the SAP technology blog for insights into SAP BTP, ABAP, SAP Analytics Cloud, SAP HANA, and more.
Turn on suggestions
Auto-suggest helps you quickly narrow down your search results by suggesting possible matches as you type.
Showing results for
Advisor
Options
- Subscribe to RSS Feed
- Mark as New
- Mark as Read
- Bookmark
- Subscribe
- Printer Friendly Page
- Report Inappropriate Content
03-19-2013
5:03 PM
SAPUI5 is SAP's latest, HTML5-based UI technology that allows you to build rich, interactive Web applications. Not only does it come with an extensive, themable widget library containing everything you need ranging from simple buttons to complex table controls, date pickers and charts, but it is also a fully-fledged MVC framework featuring state-of-the-art concepts like data binding, OData support and view templates.
In this blog post, I want to focus on the MVC aspects of SAPUI5, showing you how to best design a UI5 application and how to do so in manner that the application is well structured, easily maintainable, and - most importantly - testable. To this end, we will develop a simple task management application, unit test it, and theme it:

Introduction
Traditionally, Web applications have followed a synchronous request/response model where a user issues a request through a browser, the server receives and processes the request, produces an HTML response, and finally hands back the response to the browser for it to render HTML on the screen. This approach was heavily server-centric in that not only business but also presentation logic would typically be handled by the Web / application server. Typically, server-side Web frameworks would greatly simplify the development of such applications by offering extensive support for MVC-style application design, view template languages, O/R mapping tools, and more. More recent frameworks of that kind are Ruby on Rails and Python-based Django.
With the advent of Web 2.0 and AJAX-enabled applications, more and more functionality these days is being implemented on the client side - the browser. This usually means heavy JavaScript development. Traditional MVC frameworks are not particularly suited to support this style of Web development. As a consequence, new client-side Web frameworks have emerged, for example Backbone.js, AngularJS, and Ember.js. SAPUI5 belongs to the same group of frameworks with the additional advantage that it also serves as a widget library.
The rest of this article is structured as follows: first, we will take a brief look at the application we are going to build. We will then take a short detour and revisit the MVC design pattern. After that, we will look into how MVC works with SAPUI5 and how we can use the structure it enforces to our advantage in order to properly test the application. I'll close with a summary.
TodoMVC
TodoMVC is a Github-hosted project that implements one and the same JavaScript Web application in a variety of different client-side Web frameworks. The goal is to show the nature of each framework and give people means to compare them and chose the one which best suits their needs:

TodoMVC is a simple application which let's you do manage todos. You can create new todos, mark them as done, filter, and delete them. We will implement most but not all of its features. You can find the source code of the SAPUI5 version on CodeExchange.
MVC
The most common design pattern to separate concerns when building user interfaces is MVC - Model View Controller. It is also one of the most controversial patterns. There are probably as many definitions of MVC as there are variations. In the following, we will go with a classic interpretation of the pattern to have a common understanding. You might find other definitions on the Web. Don't let this bother you - what in the end counts is the content, not the label.
Basic MVC knows the following components:
- Model. Manages the behavior and data of the application domain, responds to requests for information about its state (usually from the view), and responds to instructions to change state (usually from the controller).
- View. Manages the display of information.
- Controller. Interprets mouse and keyboard events from the user, informing the model and/or the view to change as appropriate.

This pattern works well with classic request/response Web applications: the controller (e.g. a Servlet) receives an HTTP request, retrieves data from the model (e.g. a database table), passes the data to and invokes the view (e.g. an HTML template), and finally passes the response back to the client.
While conceptually separating responsibilities, classic MVC has the drawback that (a) the controller is coupled to the view and (b) the view has direct access to the model. With client-side Web applications written in plain JavaScript, this can easily lead to code smells where the controller directly manipulates the DOM and presentation logic sneaks into the view, respectively. This is particularly often the case if the view uses free-style coding instead of being written in some sort of templating language, for example.
MVC in SAPUI5
SAPUI5 employs a slight variation of MVC. When used appropriately, the resulting code exhibits a vastly improved structure, is better maintainable, and allows for proper unit testing. The most important differences to classic MVC are:
- Data binding. Allows you to declaratively bind a UI control attribute (e.g. the value of a text field) to a property in the model. This minimizes the amount of boilerplate code needed to keep view and model in sync and greatly simplifies the controller. It also removes the direct dependency of the view onto the model. The view just knows the controller (see below) and the controller knows how to wire view and model together via data binding.
- View types. SAPUI5 offers three different ways to write views: views scripted in JavaScript, XML-based view templates, and view templates expressed in JSON. Each view type has its pros and cons and depending on your use case and personal preference, one or the other might better suit your needs. For the purpose of this blog post, I will only be using scripted views but I would strongly recommend looking into the template-based alternatives for simpler use cases. Consult the reference documentation for details. The table below offers a small (probably biased) comparison:
Scripted Views (JSViews) XML Views (XMLViews) JSON Views (JSONViews) Flexibility High
Medium Low Syntax Compact (if done properly) Verbose Compact Recommendation For advanced views with dynamic nature
(e.g. content added on-the-fly)For mostly static forms
with custom HTML/CSSFor mostly static forms
without custom HTML/CSS - Dependency reversal. A minor point but still relevant: SAPUI5 reverses the dependency between view and controller (the controller now only interacts with the view through a very slim interface - if at all needed) which makes it easier to stub the view when testing the controller.
The following picture shows SAPUI5-style MVC. For the design-pattern-savvy people among you, you will notice similarities to the MVP/SC pattern (Model View Presenter/Supervising Controller). I won't cover it here but Martin Fowler has a nice summary.
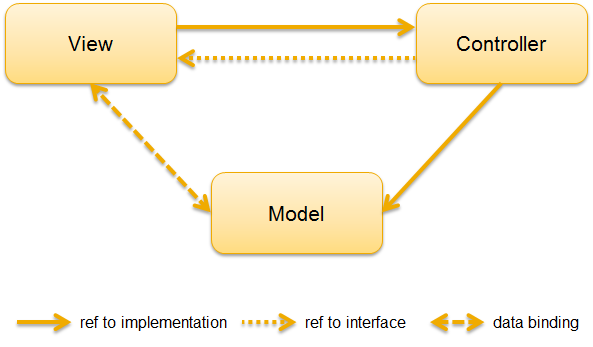
The pattern works as follows: the view (including any of the UI controls it holds) directly handles user input and either relies on data binding to update the model or invokes appropriate handler methods on the controller (for more advanced use cases). In the latter case, the controller might for example fetch some data from the backend, update the model with it and have the data binding in turn update the view. In exceptional cases, the controller might even call the view to for example add or remove a UI control, change the page layout, etc.
Getting your Hands Dirty
Now that we have conceptually understood what MVC is and how SAPUI5 uses it, let's go ahead and apply what we learnt by implementing the todo application. It might be best for you to just download the code from CodeExchange and open it in your text editor of choice as this will give you the possibility to digest the code at your own pace and in the order you prefer. In this post, I will highlight the most relevant parts only.
Application Structure
I have organized the code as follows:
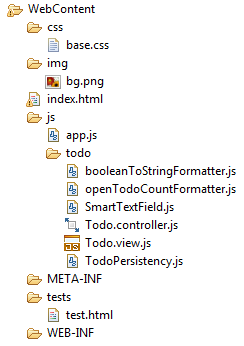
You could organize it differently and SAPUI5 is pretty flexible in that respect. I personally like to have the HTML files in the main folder and place all other content in sub-folders below (img/, css/, js/, ...). Below the js/ folder, you will find a single todo folder containing all of the modules used in the todo application - be it UI controls, formatters, models, or MVC components. In a productive scenario, you will probably have more elaborate namespaces for better structuring. In this sample project, I wanted to keep things simple.
Bootstrapping
Like with any good Web application, the starting point of our application is an index.html file. It's really nothing more than what you would expect so I'll omit it here. The only interesting thing is that it loads and executes the js/app.js JavaScript module below:
jQuery.sap.registerModulePath("todo", "js/todo");

// build the application root view and place on page

var oRootView = sap.ui.view({

    type : sap.ui.core.mvc.ViewType.JS,

    id : "todoView",

    viewName : "todo.Todo"

});

oRootView.placeAt("main");
Here, we basically instantiate the main view of our application and place it on the page inside a DOM element with ID 'main'. The arguments we pass to the sap.ui.view(...) function specify the name of the view ('todo.Todo') and that it is a scripted view we are dealing with. Together with any module paths we registered, this will allow SAPUI5 to calculate the URL of the JavaScript module it has to load ('js/todo/Todo.view.js' in this case). Note it is not the controller name we specify here - the view knows the controller (not the other way around).
The View
I implemented the view in plain JavaScript as this gave me the highest degree of flexibility. A JSView has two methods that have to be implemented: getControllerName() and createContent(). The first one is used by the framework to instantiate the right controller and the second one is invoked to essentially create the UI control hierarchy.
Here is how it looks:
sap.ui.jsview("todo.Todo", {

     getControllerName : function() {

          return "todo.Todo";

     },

     controls : [],

     //...

     createContent : function(oController) {

          // ...

          // Row repeater that will hold our todos

          var todosRepeater = sap.ui.commons.RowRepeater("todo-list", {

               design : sap.ui.commons.RowRepeaterDesign.Transparent,

               numberOfRows : 100

          });

          // ...

          // A template used by the row repeater to render a todo

          var todoTemplate = new sap.ui.commons.layout.HorizontalLayout({

               content : [ new sap.ui.commons.CheckBox({

                    checked : "{done}"

               }).attachChange(function() {

                    oController.todoToggled(this.getBindingContext());

               }), new sap.ui.commons.TextField({

                    value : "{text}",

                    editable : false

               }).attachBrowserEvent("dblclick", function(e) {

                    this.setEditable(true);

               }).attachChange(function() {

                    this.setEditable(false);

                    oController.todoRenamed(this.getBindingContext());

               }).addStyleClass("todo").addCustomData(completedDataTemplate) ]

          });

          // Helper function to rebind the aggregation with different filters

          todosRepeater.rebindAggregation = function(filters) {

               this.unbindRows();

               this.bindRows("/todos/", todoTemplate, null, filters);

          };

          // Initially, we don't filter any todos

          todosRepeater.rebindAggregation([]);

          this.controls.push(todosRepeater);

          // ...

     },

     // This is an example for how the controller interacts with

     // the view only via a specific (mockable) interface.

     postMessage : function(message) {

          // ...

     },

     // ...

});
The code shown takes care of creating a check box and a text field for each todo in the model. All we have to do is define a UI template for a todo and set up an aggregation binding between the row repeater and the path in the model ('/todos') which holds (and this is important for this to work) an array of todos. Then, each todo will in turn be bound to an instance of the template as defined by the data binding declarations. We can also provide filters to consider in the binding (this is used when showing all, active, and completed todos, respectively).
As you see, the code is pretty straightforward. It contains no conditionals, no loops, just plain sequential logic. I employed a functional programming style and method chaining to keep the code concise and I recommend you follow the same practice. The curly brackets in the strings define the data binding to the model. Note that the model does not know about the model's details: there is not a single place where the model is retrieved or even instantiated. This will be taken care of by the controller.
The Controller
The controller is responsible for retrieving / storing the model from / in the backend. For demo purposes, we use HTML5 localStorage. Access to it is encapsulated in a separate module ('TodoPersistence') and the controller keeps an instance of it around to do the actual work. The controller also provides handler methods the view can call in return to a user action. For example, when the user enters a new todo and hits the Enter key, the createTodo(...) method is called. Note that because of a current limitation in SAPUI5 data binding on arrays, I have to forcefully update the bindings in this particular case. This will be addressed in a future SAPUI5 release.
jQuery.sap.require("todo.TodoPersistency");

sap.ui.controller("todo.Todo", {

     // Stores todos permanently via HTML5 localStorage

     store : new todo.TodoPersistency("todos"),

     // Stores todos for the duration of the session

     model : null,

     // Retrieve todos from store and initialize model

     onInit : function() {

          this.model = new sap.ui.model.json.JSONModel(

               this.store.isEmpty() ? this.store.set({

                    todos : []

               }).get() : this.store.get());

          this.getView().setModel(this.model);

     },

     // Create a new todo

     createTodo : function(todo) {

          this.model.setProperty("/todos/", this.model.getProperty("/todos/")

               .push({

                    "id" : Date.now(),

                    "done" : false,

                    "text" : todo

               }));

          this.store.set(this.model.getData());

          this.model.updateBindings(true);

     },

     // ...

});
Other Modules
I have factored out those parts of the view and controller that I could isolate and which could potentially be reused at other places. I for example created a slightly improved version of the standard text field UI control which supports HTML5 placeholder values and offers an autofocus property. I also created a bunch of formatters that I use for converting from one data type to another during a data binding. Finally, I created the already mentioned thin wrapper around HTML5 localStorage.
Theming
For those of you who already know SAPUI5 it will be clear that the UI shown above is not part of the standard themes that come with the framework. It requires considerable styling effort. The goal of this blog post rather was to show you can make SAPUI5 look however you want and that's why I wanted to get as close to the original theme as possible. The core of the original TodoMVC application is the base.css file. I was forced to make some changes to adapt to some of the pecularities of how UI5 controls are built but large portions could be taken over.
I will not outline each and every change but overall, the following was needed:
- Use the base SAPUI5 theme instead of, say sap_goldreflection; this will reduce the amount of chrome SAPUI5 adds by default to the minimum
- Employ the same HTML structure in the index.html file
- Assign the right CSS classes to your UI5 controls
- For everything else, adapt the CSS selectors as needed; keep the CSS specificity rules in mind when changing selectors to keep them clean
Unit Testing the Application
Brilliant. So now I made you write a todo application following a nifty structure I have deemed to be best. But what's the benefit? After all, you want this to be worth at least something and not just about code style, right? Well, you'll see shortly.
To begin with, I'd like to again point you to the fact that we split our code into well-defined, self-contained modules each of which can now be tested in isolation. If we for example wanted to test the todo persistency, here is how we could do it (I am using QUnit as a test framework but you might have other preferences):
jQuery.sap.registerModulePath("todo", "../js/todo");

jQuery.sap.require("sap.ui.thirdparty.qunit");

jQuery.sap.require("todo.TodoPersistency");

// Example test showing a simple module test

test("Set, get, and delete via todo persistency", function() {

     // Setup

     var sut = new todo.TodoPersistency("foo");

     var dummy = {

          val : "val"

     };

     // Exercise

     sut.set(dummy);

     var result = sut.get();

     sut.remove();

     // Assert

     equal(result.val, "val");

     equal(sut.isEmpty(), true);

});
That was the easy part. Testing the main (MVC) part of our application requires some further thoughts, though: what part of MVC exactly is worth testing? To me, the view is something I can hardly unit test. Thanks to data binding, the view is purely about visualization and contains hardly any logic (we moved all presentation logic into the controller) and I'd rather have a bunch of Selenium smoke / scenario tests rather than trying to drive a UI with a unit test (which would also be against the philosophy of unit tests). So model and controller it is. Testing the model should not work differently than testing any other non-UI-related module such as the todo persistency so I won't repeat myself here. The controller is really what we are interested in.
As we saw, the controller does not do any DOM manipulation (and if there was the need to manipulate the DOM as a response to some user input, it would be in the view's responsibility to do so - the controller would just call the view). All the controller does is react to calls from the view and update the model. And this is what we are going to test. There is only one problem: the controller has a getView() method it invokes to get hold of the view. At this point, you will probably raise your eyebrows and point me to my initial claim that the controller doesn't interface with the view directly but only through a very narrow interface. I won't deny this is not exactly the case here: there is no interface. The reason why is simple: JavaScript doesn't support the notion of interfaces. Due to its dynamic nature, the best I can do in JavaScript is remember what methods and properties the controller accesses and refer to this as the interface. As we don't want to instantiate the actual view, we will provide a stub for it. To this end, we will overwrite the getView() method of the controller - something that is particularly easy in JavaScript. We could do this manually but I want you to have a look at a wonderful stubbing/mocking framework available to the JavaScript community: Sinon.JS.
jQuery.sap.registerModulePath("todo", "../js/todo");

jQuery.sap.require("sap.ui.thirdparty.qunit");

jQuery.sap.require("sap.ui.thirdparty.sinon");

jQuery.sap.require({

     modName : "todo.Todo",

     type : "controller"

});

// Example test showing how a controller can be tested

test("Create a single todo", function() {

     // Setup

     var sut = sap.ui.controller("todo.Todo");

     sinon.stub(sut, "getView").returns({

          // This is where we stub the view interface

          setModel : function() {

          },

          postMessage : function() {

          }

     });

     // Follow UI5 controller life cycle by calling onInit()

     sut.onInit();

     // Exercise

     sut.createTodo("foo");

     // Assert

     var todos = sut.model.getProperty("/todos/");

     equal(todos.length, 1);

     equal(todos[0].done, false);

     equal(todos[0].text, "foo");

});
As you can see, with a little bit of extra effort we could instantiate the controller and provide it with a fake view that implements the interface to the extent needed for the test (thanks to the absence of real interfaces, you don't have to stub what you don't access). We could then simulate user input and verify the functional correctness of the controller by introspecting the model. Sinon.JS also provides sophisticated stubbing functionality so if you wanted to check that the controller called the view back in a certain way, you would have the handrails needed to do so.
Summary
In this blog post, I have outlined a blueprint for how to implement SAPUI5 user interfaces in a sustainable way that ensures proper maintainability and allows unit testing of not only the model but also the controller of an MVC application.
I am looking forward to your feedback!
Update (07/04/2013)
We now have a feature-complete, pixel-perfect version of TodoMVC built with SAPUI5 live on Github! This version is based on the CDN version of SAPUI5. Unfortunately, IE doesn't support loading SAPUI5 from there (the reasons are documented here). Please make sure to use Chrome, Opera, or Firefox when visiting this site.
You can download the sources on http://todomvc.com/

- SAP Managed Tags:
- SAPUI5,
- SAP Enterprise Portal
44 Comments
You must be a registered user to add a comment. If you've already registered, sign in. Otherwise, register and sign in.
Labels in this area
-
ABAP CDS Views - CDC (Change Data Capture)
2 -
AI
1 -
Analyze Workload Data
1 -
BTP
1 -
Business and IT Integration
2 -
Business application stu
1 -
Business Technology Platform
1 -
Business Trends
1,658 -
Business Trends
91 -
CAP
1 -
cf
1 -
Cloud Foundry
1 -
Confluent
1 -
Customer COE Basics and Fundamentals
1 -
Customer COE Latest and Greatest
3 -
Customer Data Browser app
1 -
Data Analysis Tool
1 -
data migration
1 -
data transfer
1 -
Datasphere
2 -
Event Information
1,400 -
Event Information
66 -
Expert
1 -
Expert Insights
177 -
Expert Insights
296 -
General
1 -
Google cloud
1 -
Google Next'24
1 -
Kafka
1 -
Life at SAP
780 -
Life at SAP
13 -
Migrate your Data App
1 -
MTA
1 -
Network Performance Analysis
1 -
NodeJS
1 -
PDF
1 -
POC
1 -
Product Updates
4,577 -
Product Updates
342 -
Replication Flow
1 -
RisewithSAP
1 -
SAP BTP
1 -
SAP BTP Cloud Foundry
1 -
SAP Cloud ALM
1 -
SAP Cloud Application Programming Model
1 -
SAP Datasphere
2 -
SAP S4HANA Cloud
1 -
SAP S4HANA Migration Cockpit
1 -
Technology Updates
6,873 -
Technology Updates
420 -
Workload Fluctuations
1
Related Content
- How to use AI services to translate Picklists in SAP SuccessFactors - An example in Technology Blogs by SAP
- Embracing TypeScript in SAPUI5 Development in Technology Blogs by Members
- Developing & Deploying the UI5 App to Cloud Foundry and Accessing from App-router End-to-End Steps in Technology Blogs by Members
- Accelerate Business Process Development with SAP Build Process Automation Pre-Built Content in Technology Blogs by SAP
- Unlocking Full-Stack Potential using SAP build code - Part 1 in Technology Blogs by Members
Top kudoed authors
| User | Count |
|---|---|
| 36 | |
| 25 | |
| 17 | |
| 13 | |
| 8 | |
| 7 | |
| 7 | |
| 6 | |
| 6 | |
| 6 |