Forms are documents, that contain business relevant data stored in the system that can be previewed and send out based on the output channel configuration (email, printer, etc.) in the system.
Form templates are used to define the content and layout of documents that can be output from the system. Form templates can be one of the following:
- Print forms are read-only portable document format (PDF) documents that are generated from data stored in the system. Print forms can be printed, sent as an e-mail attachment, or faxed to business partners.
- Interactive forms are interactive PDF files that can be generated from the system and sent as e-mail attachments to business partners. The business partners then enter data directly into the form and send it back. This data can then be uploaded into the system. Interactive forms are based on Interactive Forms by Adobe (IFbA) technology.
This blog outlines various ways to include extension fields to standard forms and to build custom forms.
Forms can be extended by two means:
- Key User extension
- Extension via Cloud application studio
We can also create a custom print form based on a custom business object via SDK.
Key User extension
[Throughout the blog, let’s use the example of a Sales Order]
Login to the Business ByDesign system and create a New Sales Order.

On the New Sales Order UI, enter the adaptation mode to create a new extension field in the General section of this screen.

Save and check the UI for the newly added extension field. Go to
Show further usage to add the extension field to the form.
 In the further usage, one could add the extension field to form templates, data sources, services, etc. Here, lets add the extension field to the Sales Order confirmation form template (appropriate country and language to be chosen).
 Once the field is added to the form, the checkbox ‘Field available’ should be checked. Save and publish the changes so that the newly added field is now available for all the business users who are assigned with Sales Order WoC.

This completes the changes in adaptation mode and now you can exit from the adaptation mode.
Go to
Form template maintenance in Application and User management WoC and download the form template
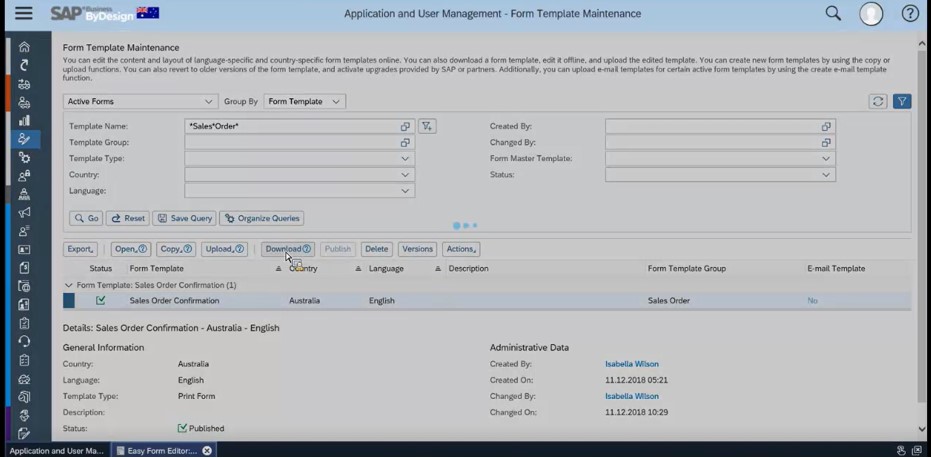
This will give the complete schema in a zip file. Open the file with .
xdp extension in Adobe LiveCycle Designer(ALD) to modify the content.
Note: As the extension field is already added to the form template, through the further usage on UI, the schema is updated with the extension field.
Once the form is opened in ALD, you could select any field in the form and go to the data binding section and select the use ‘Data Connection’, to see the extension field is already added.

Use binding -> Data Connection -> Form Name -> Extension field.
Place the extension field in the desired page layout. SAVE the .xdp file.
Login back to the UI and navigate to Application and User management. Here, upload back the modified/enhanced .xdp file in the Form template maintenance.
Please note while upload, you can replace an existing variant of the form template or add as a new variant. In this case, use the option – ‘Add as a New variant’.
Once the new file is uploaded, select ‘Publish’ for the new version of the template to be available.
[You can always go back to the previous version of the template by using ‘Revert To’ in the option Versions].
Open the updated form template and you could see the extension field as part of the form template.
Create an extension field to a standard BO and enable it on standard form via Cloud Applications studio
Login to Cloud Application Studio.
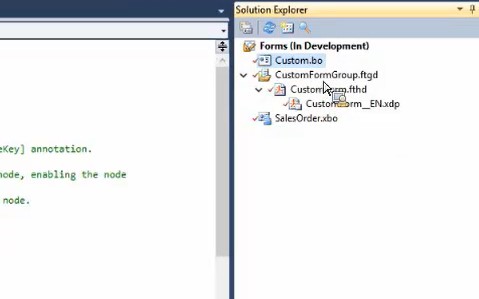
As a prerequisite, create a one-off solution in SDK and a business object extension (.xbo) for Sales Order. For the ease of explanation, add a single extension field at the root node of the sales order that will be made available on the sales order form template.
Right click on the created BO extension and select
Enhance form.

From the
Enhance Form pop up, select the extension field from the BO that you wish to add to the form.
 After the field selection, login with relevant business user credentials. After logging in, you are directly taken to the further usage of extension field that lets you to add the extension field to the corresponding form template, with the option ‘Add field to Form’ on the UI.
 Close the UI after the field is added.
Go back to the UI session to navigate to form template maintenance and download the latest template version.
The remaining steps to add a field via ALD remains the same, as explained in key user extension.
Close the UI after the field is added.
Go back to the UI session to navigate to form template maintenance and download the latest template version.
The remaining steps to add a field via ALD remains the same, as explained in key user extension.
Create a custom form for a custom business object
Create a custom BO, with 2 elements. Select the option ‘Create Print Forms’.
 In the first step of the form wizard pop up, provide a name and description to the form. Additionally, create a new template group and assign the form to this template group.

As a second step, choose the fields from the custom BO that you would need as part of the form. Last and final step would be to choose a description of the form and the language in which the form should be created.
You will now see a new object type of extension .xdp created as part of your solution.
Save and Activate the created form.
For the created form to appear as part of the form template in Application and User Management, ensure that the BC is deployed.
Right click on the solution level and choose the option ‘Deploy Business Configuration’.
 Login to the UI and navigate to Form Template maintenance in Application and User management. Search for the form template group you created in SDK and download the zip file.

Once the file is downloaded, open the .xdp file in ALD and enhance the form and upload it back.
(Please refer to the
Key user extension section of this blog for the detailed steps).
This concludes the blog about working with forms in ByDesign. Hope you find the information useful.
