
- SAP Community
- Products and Technology
- Technology
- Technology Blogs by SAP
- S/4HANA Cloud Integration with SAP CP IPS and SAP ...
Technology Blogs by SAP
Learn how to extend and personalize SAP applications. Follow the SAP technology blog for insights into SAP BTP, ABAP, SAP Analytics Cloud, SAP HANA, and more.
Turn on suggestions
Auto-suggest helps you quickly narrow down your search results by suggesting possible matches as you type.
Showing results for
former_member20
Explorer
Options
- Subscribe to RSS Feed
- Mark as New
- Mark as Read
- Bookmark
- Subscribe
- Printer Friendly Page
- Report Inappropriate Content
02-03-2019
5:27 AM
If you have not read the 1st part of this blog yet. Please follow find the 1st part here:
https://blogs.sap.com/2019/01/31/s4hana-cloud-integration-with-sap-cp-ips-and-sap-idm-part-i/
Here begins the 2nd part mainly talking about the configuration steps.
The configuration steps need to be mainly performed in 3 places:
- S/4HANA Cloud
- IPS
- IDM
1. Configuration steps in S/4HANA Cloud:
There are some prerequisites for S/4HANA Cloud mentioned in the official IPS document. We need to first perform some steps in S/4HANA Cloud system to fulfill those requirements.
1.1 Create Communication Users
Once log on to S/4HANA Cloud, you can see an APP group called “Communication Management” in the drop down list of the APPs. If you cannot see this group, please contact the system administrator to assign your user additional Business Role in S/4HANA Cloud.

In the group “Communication Management”, you will see 4 APPs. We will use the first 3 APPs for our purpose.

First of all, we need to create a Communication User for IPS in order to communicate with S/4HANA Cloud. In ABAP, this step is called “creating a service user”.
Click on the tile “Maintain Communication Users”. You will see a list of existing communication users. To create a new one, click on the “New” button.

Fill in the “User Name”, “Description” and “Password” section and click on “Create” button to finish the user creation. Make a note of the user name and password. You will need them later.
Please note that the password for the Communication User is at least 20 characters long and must have numbers, letters (upper case and lower case) and special characters combination.

1.2 Create Communication System
The next step is to create a Communication System for IPS in the tile “Communication Systems”. This step is called “creating a destination” in the ABAP world. But the difference is in the old ABAP world, it is normally only necessary to create a destination for outbound communications. For inbound communications, it is normally not needed to create the destination for the external application. But in S/4HANA Cloud, we have to create Communication Systems for both inbound and outbound communication.
Click on the tile “Communication Systems”. You will see a list of existing communication systems. To create a new one, click on the “New” button on the bottom right corner.
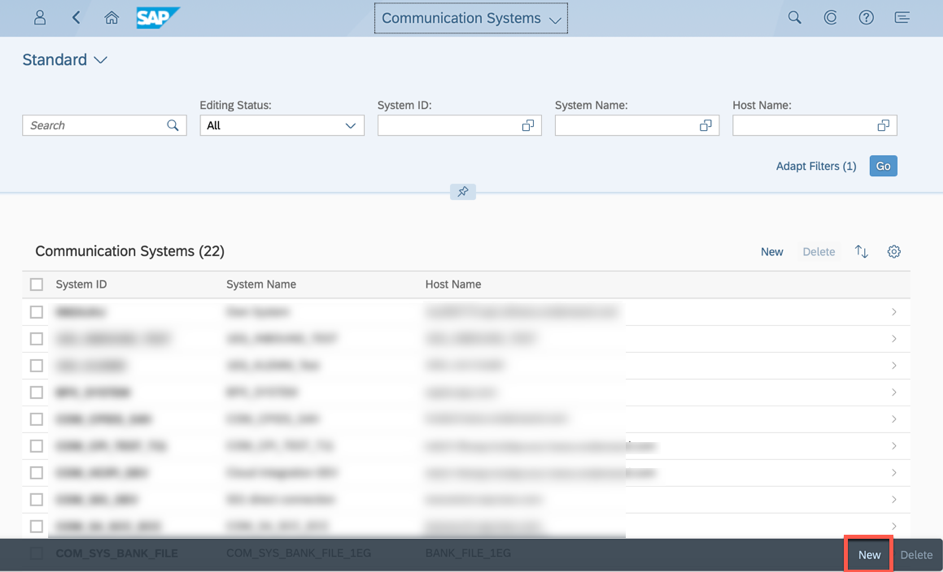
Enter the “System ID” and “System Name” in the pop-up window.

Fill in the other necessary fields.
In our integration scenario there is only inbound communication from IPS to S/4HANA Cloud, meaning IPS will always be the master system initiating the communication to S/4HANA Cloud. Therefore, it is only necessary to maintain the fields, which are related to the inbound communication.
- Host Name: it is a mandatory field. You can fill in the real host name of the IPS or just put a dummy text there. It will not be used in the integration.

- User for Inbound Communication:
Click on the plus button to add a new user here.

we need to choose the Communication User, which has been created in the previous step. Or alternatively you can also create a new communication user directly here without performing the previous steps in tile “Maintain Communication Users”. Choose “User Name and Password” as the authentication method.


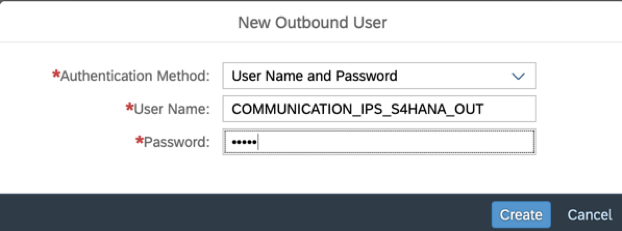
- User for Outbound Communication
As explained before there is actually no outbound communication from S/4HANA Cloud to IPS. But it is still required to add an outbound communication user here. Therefore, we will just enter a dummy communication user. This user will not be used in the integration.

The rest of the fields you can leave them blank.
Click on “Save” to finish creation of the Communication System.
1.3 Create Communication Arrangement
Now the Communication System is created and the Communication User has also been added to the Communication System. The next step is to create the Communication Arrangement.
The communication arrangement in a new concept in S/4HANA Cloud. The main usage of the communication arrangement is to manage the service users and destinations in a more structured way to avoid making mistake while creating those stuffs.
Before creating the Communication Arrangement, there is another new term we need to learn, which is called “Scenario ID”. A Scenario ID is always 1 to 1 mapped to an API available in S/4HANA Cloud. Technically, a Scenario ID points to a set of authorizations, which are needed for a certain communication scenario. Once the Scenario ID is set on a Communication Arrangement, the corresponding authorization will automatically assigned to the Communication User which is used in the Communication Arrangement.
If you have an official integration guide available for your integration scenario, it should be already mentioned in the guide which Scenario ID for the Communication Arrangement should be used. For example, in the IPS document, it is mentioned that the Scenario ID “SAP_COM_0093” should be used for user lifecycle management and Scenario ID “SAP_COM_0066” should be used for role assignments for the S/4HANA Cloud system. Since the Scenario ID and the Communication Arrangement is also a 1 to 1 mapping, you need to create one Communication Arrangement for each of the Scenario ID you need.
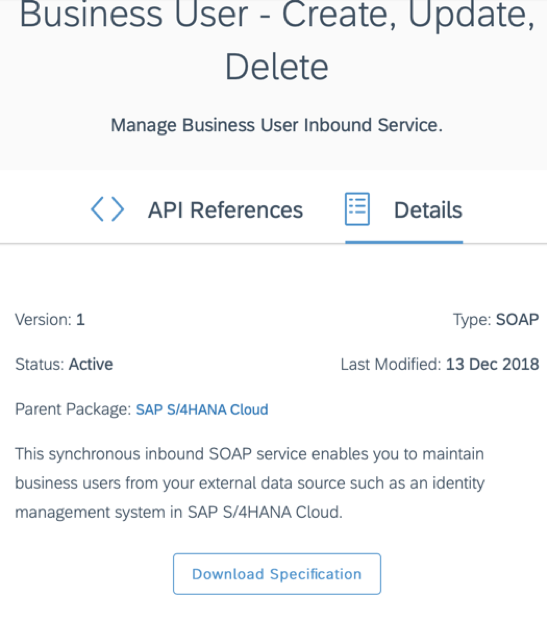
Additional Info: if you are not sure which Scenario ID should be used for your integration, we could explorer the below web page (https://api.sap.com/package/SAPS4HANACloud?section=Artifacts), which gives us an overview and description of all the APIs available in S/4HANA Cloud. There we could find the correct API we may need for our integration and pick up the Scenario ID there. For example for IPS integration the API “Business User – Create, Update, Delete” is used. In the API description you could find the Scenario ID “SAP_COM_0093”.

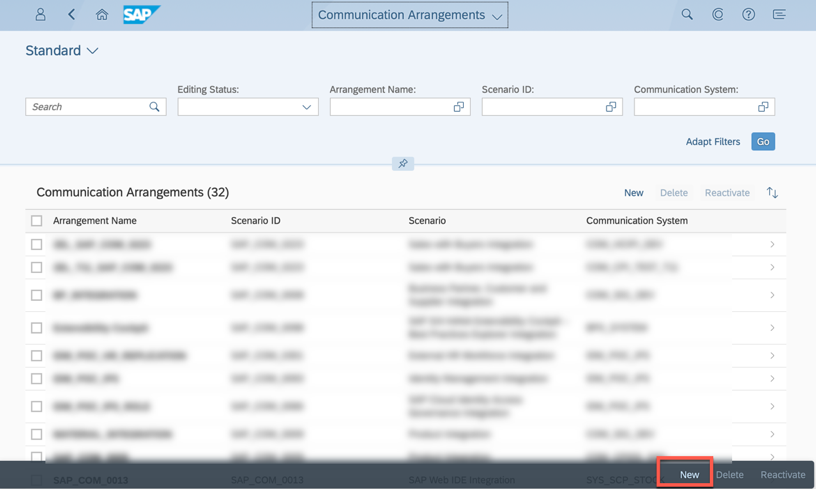
To create a new communication arrangement, click on the tile “Communication Arrangements”. The existing communication arrangements will be listed in the table. Klick on “New” to create a new one.

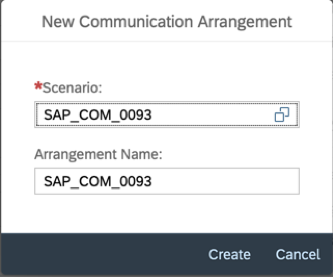
We are going to create 2 Communication Arrangements for the IPS integration in order to cover all the IDM scenarios. Choose the Scenario ID “SAP_COM_0093” in the drop-down list. The “Arrangement Name” will automatically be filled with the Scenario ID. You could also give a different name if necessary. Otherwise just leave it as it is.
Click on “Create” to create the Communication Arrangement.
In the follow-up page, choose the Communication System we’ve created previously for IPS. The “User Name” field will be filled up automatically upon choosing of the Communication System.
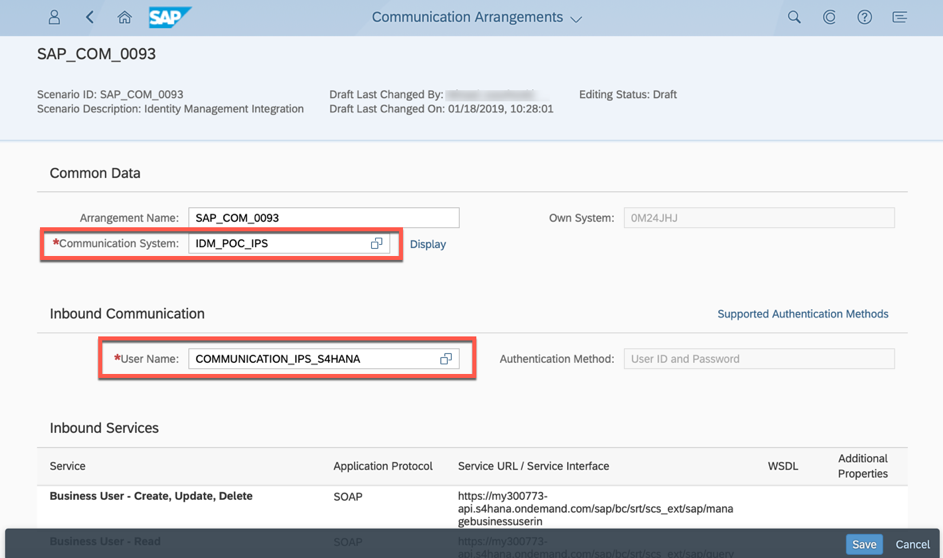
Click on “Save” to finish the creation of the Communication Arrangement for Scenario ID “SAP_COM_0093”
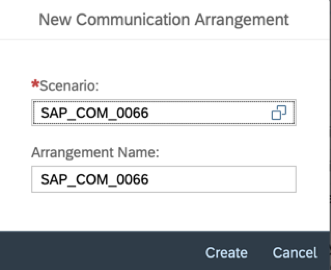
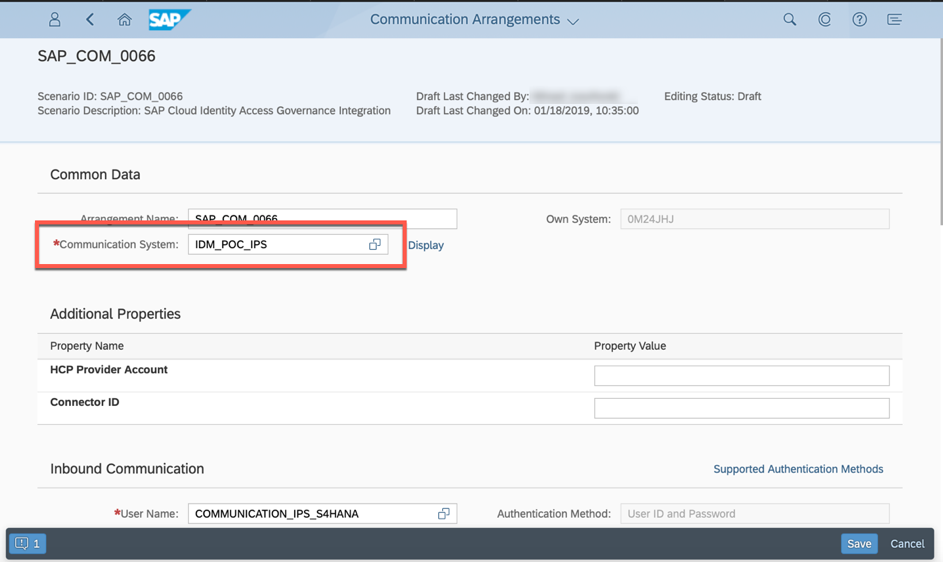
Now we need to create another Communication Arrangement for Scenario ID “SAP_COM_0066”. Follow the same steps for creating a new Communication Arrangement and this time choose the Scenario ID “SAP_COM_0066”.
Choose the Communication System from the drop-down list. The Communication Users will be filled automatically. Leave all other fields as defaults.
Till now, we’ve finished the configuration on the S/4HANA Cloud side. We will now switch to the IPS system and continue the configuration there.
2. Configuration steps in IPS
The configuration in IPS is actually quite straight forward. The official IPS document is already quite good. I will just try to follow the guide and comment at some places if necessary.
2.1 Register a new OAuth Client for the ipsproxy application
The OAuth Client is used for communication between IDM and IPS. If an OAuth Client has already been created for IDM, there is no need to perform this step again. Otherwise, please follow the below steps to register a new OAuth Client for IDM.
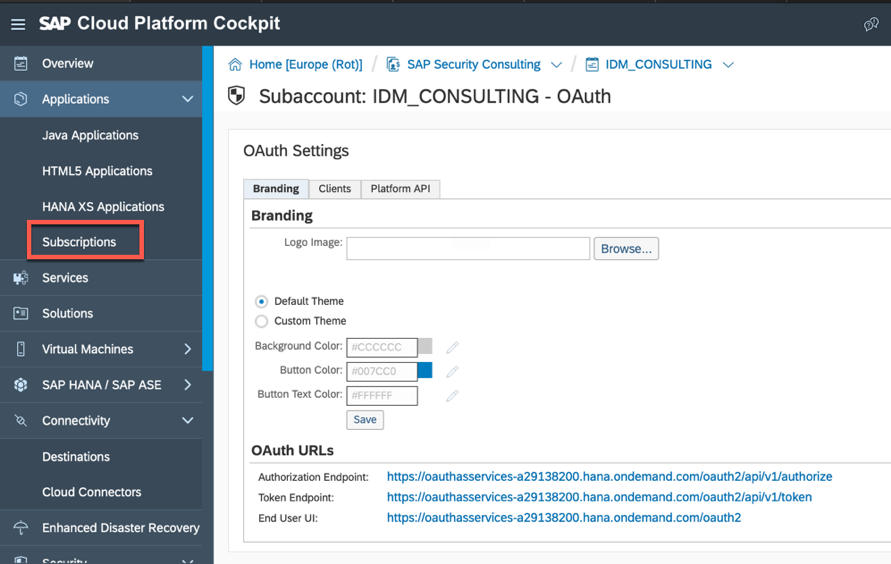
To create a new OAuth Client, log in to SAP Cloud Platform Cockpit first. Navigate to the “OAuth” configuration page in the section “Security”.

Click on tab “Client” and then click on “Register New Client”

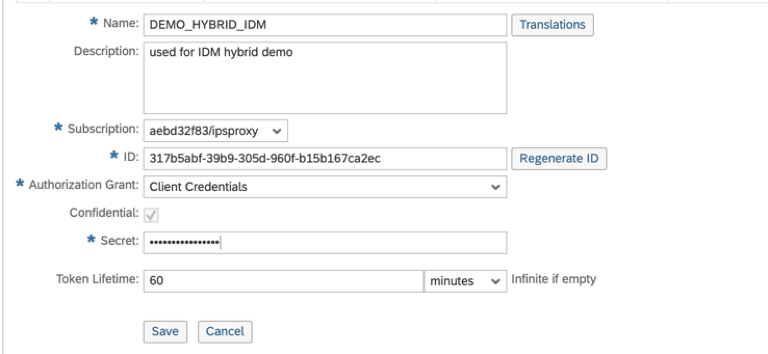
From the “Subscription” drop-down list, select /ipsproxy. From the Authorization Grant drop-down list, select Client Credentials. In the Secret field, enter a password (client secret) and remember it. We will need it later for the repository configuration in SAP Identity Management. Copy/paste and save (in a notepad) the generated Client ID. We will need it later too.
As next step we need to assign role IPS_PROXY_USER to the newly created OAuth client.
To do that please perform the following steps as suggested by the official IPS document.
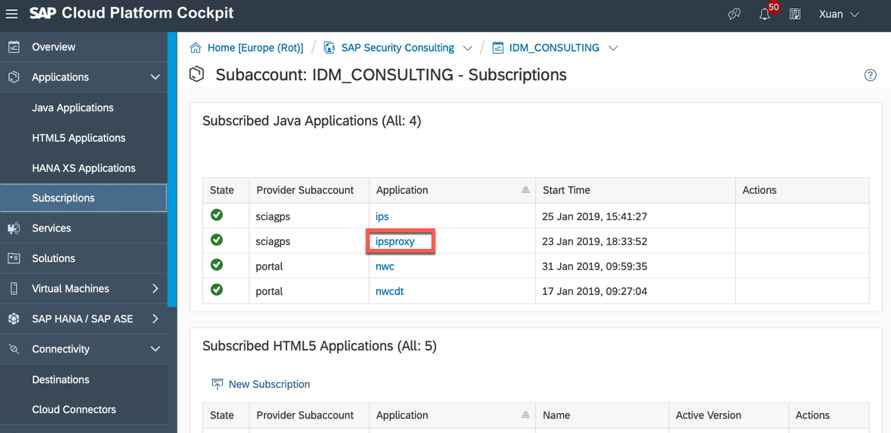
In the SAP Cloud Platform Cockpit, from the left-side navigation, choose “Subscriptions”.
Under the “Java Applications” section, choose “ipsproxy”.
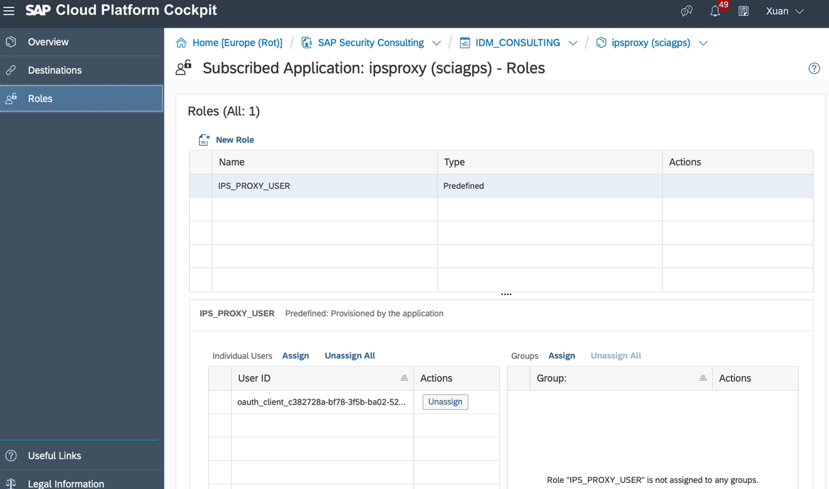
From the left-side navigation, choose “Roles”. Assign role “IPS_PROXY_USER” to the newly created OAuth client. Choose “Assign” and enter oauth_client_, where is the one from the previously created OAuth client.
Now we need to add the S/4HANA Cloud system as a proxy system in IPS.
Open the SCP Cockpit. From the left-side navigation, choose Connectivity Destinations. Click on “New Destination” to add a new destination to SCP.

Fill in the fields in the next window. Please note the below fields.
- Type: HTTP
- URL: https://-api.s4hana.ondemand.com/sap/bc/srt/scs_ext/sap/
- Proxy Type: Internet
- Authentication: BasicAuthentication
- User: the communication user ID created in S/4HANA Cloud system
- Password: the communication user password created in S/4HANA Cloud system
Click on Save to finish creating of the destination
As next we are going to continue creating the proxy system in IPS. To do that, navigate to the IPS service console.
Click on the “Go to Service” link to launch the IPS service page.

Click on the “Proxy Systems” tile.

Click on the “Add” button to add a new proxy system to IPS.
Maintain the fields for the new proxy system and click on “Save” to save the new proxy system.
- Type: please choose “SAP S/4HANA Cloud (Beta)” as system type.
- System Name: give a system name for the S/4HANA Cloud system
- Destination Name: choose the destination previously created in SCP from the drop down list.
- Description: enter a description

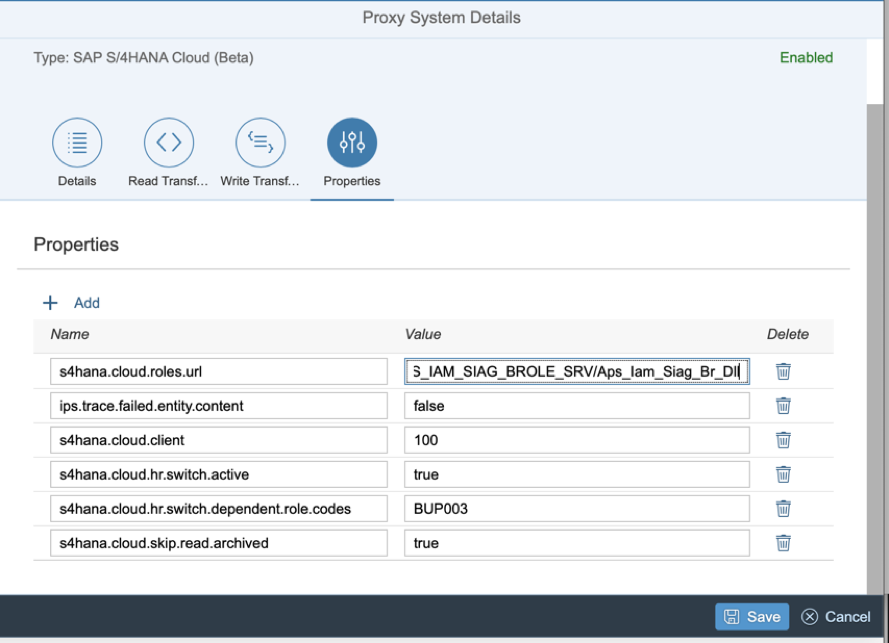
After successful creation of the proxy system, click on “Properties” tab and click on “Edit”.
We need to maintain the properties of the S/4HANA Cloud system to fit our scenario:
- s4hana.cloud.roles.url
add the URL in following format: https://<s4hana_system>-api.s4hana.ondemand.com/sap/opu/odata/sap/APS_IAM_SIAG_BROLE_SRV/Aps_Iam_Sia...
This url will be used for the roles related operation on S/4HANA Cloud
- ips.trace.failed.entity.content
If you are doing a debug session with SAP development team, you may need to set this property to “true”. Otherwise leave it as “false”. Please note that only the development team has access to the trace data.
- s4hana.cloud.client
enter a fixed value “100” here. At the time of my implementation, I’ve been adviced to add this property because there were some internal logic which might need this client number. I think this will be improved later in the later version of the connector. You may or may not need this property in your implementation.
- s4hana.cloud.hr.switch.active
if the HR integration for your S/4HANA Cloud system is switched on, enter “true” here. Otherwise leave it as “false”.
Optionally you can maintain the read and write transformation of the proxy system in order to adjust the attribute mapping between S/4HANA Cloud and IDM and perform some advanced transformation of the data. We will not go deeper into this part and will just leave it as standard in this guide.
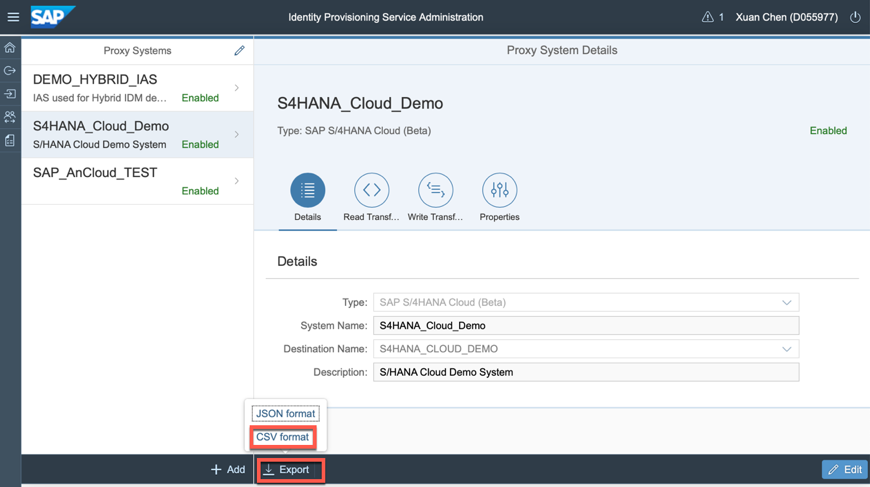
Now the proxy system is successfully created in IPS. As the next step we need to export the proxy system configuration to a csv file and import it into IDM.
Click on the “Export” button and choose “CSV format” to export the proxy system to a csv file.
3. Configuration steps in IDM
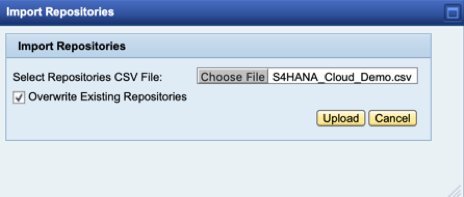
Login to IDM admin UI and click on the “import” button in the “System configuraiton” tab.

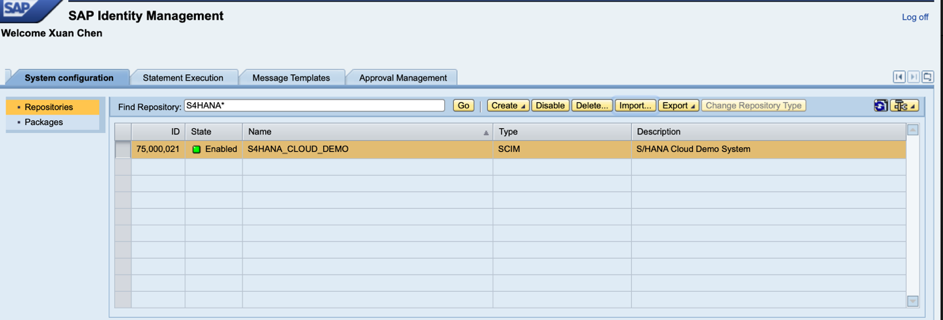
Choose the csv file exported from IPS and click on “Upload”.
Now the repository for S/4HANA Cloud is successfully created in IDM.
We still need to maintain some repository constants to make the repository working.
- AUTH_USER: enter the OAuth client ID created in SCP
- AUTH_PASSWORD: enter the OAuth client password created in SCP
- PROXY_HOST, PROXY_PORT, PROXY_USER, PROXY_PASSWORD: maintain the proxy setting if necessary.

Till now the configuration steps for S/4HANA Cloud and IPS/IDM integration is finished. We can start the initial load job and perform user management in IDM, just in the same way as we do it for other types of backend applications in IDM.
One thing to notice is that as we’ve mentioned before, the existence of a Business Partner is the prerequisite of creation of a Business User in S/4HANA Cloud. We need to pay attention to the timing here to make sure that a Business Partner is always created prior to the Business User creation by IDM. If SAP HCM is used as source system for Business Partners in S/4HANA Cloud, we need to make sure that HCM always syncs the master data record to S/4HANA before HCM exports the records to IDM and creating Business Users in S/4HANA Cloud.
Some Userful links
- Overview of APIs in S/4HANA Cloud:
https://api.sap.com/package/SAPS4HANACloud?section=Artifacts
- SAP S/4HANA Cloud Integration with SAP SuccessFactors Employee Central:
https://blogs.sap.com/2018/05/02/sap-s4hana-cloud-integration-sap-successfactors-employee-central/
- HR Connectivity in SAP S/4HANA Cloud:
https://blogs.sap.com/2018/05/31/hr-connectivity-in-sap-s4hana-cloud/
- How to import Employee Master Data to S/4HANA Cloud:
https://blogs.sap.com/2018/08/08/how-to-import-employee-master-data-to-s4hana-cloud-part-i/
- SAP Help Doc for Identity Provisioning Service:
https://help.sap.com/viewer/f48e822d6d484fa5ade7dda78b64d9f5/Cloud/en-US/2d2685d469a54a56b886105a06c...
https://blogs.sap.com/2019/01/31/s4hana-cloud-integration-with-sap-cp-ips-and-sap-idm-part-i/
Here begins the 2nd part mainly talking about the configuration steps.
The configuration steps need to be mainly performed in 3 places:
- S/4HANA Cloud
- IPS
- IDM
1. Configuration steps in S/4HANA Cloud:
There are some prerequisites for S/4HANA Cloud mentioned in the official IPS document. We need to first perform some steps in S/4HANA Cloud system to fulfill those requirements.
1.1 Create Communication Users
Once log on to S/4HANA Cloud, you can see an APP group called “Communication Management” in the drop down list of the APPs. If you cannot see this group, please contact the system administrator to assign your user additional Business Role in S/4HANA Cloud.
In the group “Communication Management”, you will see 4 APPs. We will use the first 3 APPs for our purpose.
First of all, we need to create a Communication User for IPS in order to communicate with S/4HANA Cloud. In ABAP, this step is called “creating a service user”.
Click on the tile “Maintain Communication Users”. You will see a list of existing communication users. To create a new one, click on the “New” button.
Fill in the “User Name”, “Description” and “Password” section and click on “Create” button to finish the user creation. Make a note of the user name and password. You will need them later.
Please note that the password for the Communication User is at least 20 characters long and must have numbers, letters (upper case and lower case) and special characters combination.
1.2 Create Communication System
The next step is to create a Communication System for IPS in the tile “Communication Systems”. This step is called “creating a destination” in the ABAP world. But the difference is in the old ABAP world, it is normally only necessary to create a destination for outbound communications. For inbound communications, it is normally not needed to create the destination for the external application. But in S/4HANA Cloud, we have to create Communication Systems for both inbound and outbound communication.
Click on the tile “Communication Systems”. You will see a list of existing communication systems. To create a new one, click on the “New” button on the bottom right corner.
Enter the “System ID” and “System Name” in the pop-up window.
Fill in the other necessary fields.
In our integration scenario there is only inbound communication from IPS to S/4HANA Cloud, meaning IPS will always be the master system initiating the communication to S/4HANA Cloud. Therefore, it is only necessary to maintain the fields, which are related to the inbound communication.
- Host Name: it is a mandatory field. You can fill in the real host name of the IPS or just put a dummy text there. It will not be used in the integration.
- User for Inbound Communication:
Click on the plus button to add a new user here.
we need to choose the Communication User, which has been created in the previous step. Or alternatively you can also create a new communication user directly here without performing the previous steps in tile “Maintain Communication Users”. Choose “User Name and Password” as the authentication method.
- User for Outbound Communication
As explained before there is actually no outbound communication from S/4HANA Cloud to IPS. But it is still required to add an outbound communication user here. Therefore, we will just enter a dummy communication user. This user will not be used in the integration.
The rest of the fields you can leave them blank.
Click on “Save” to finish creation of the Communication System.
1.3 Create Communication Arrangement
Now the Communication System is created and the Communication User has also been added to the Communication System. The next step is to create the Communication Arrangement.
The communication arrangement in a new concept in S/4HANA Cloud. The main usage of the communication arrangement is to manage the service users and destinations in a more structured way to avoid making mistake while creating those stuffs.
Before creating the Communication Arrangement, there is another new term we need to learn, which is called “Scenario ID”. A Scenario ID is always 1 to 1 mapped to an API available in S/4HANA Cloud. Technically, a Scenario ID points to a set of authorizations, which are needed for a certain communication scenario. Once the Scenario ID is set on a Communication Arrangement, the corresponding authorization will automatically assigned to the Communication User which is used in the Communication Arrangement.
If you have an official integration guide available for your integration scenario, it should be already mentioned in the guide which Scenario ID for the Communication Arrangement should be used. For example, in the IPS document, it is mentioned that the Scenario ID “SAP_COM_0093” should be used for user lifecycle management and Scenario ID “SAP_COM_0066” should be used for role assignments for the S/4HANA Cloud system. Since the Scenario ID and the Communication Arrangement is also a 1 to 1 mapping, you need to create one Communication Arrangement for each of the Scenario ID you need.
Additional Info: if you are not sure which Scenario ID should be used for your integration, we could explorer the below web page (https://api.sap.com/package/SAPS4HANACloud?section=Artifacts), which gives us an overview and description of all the APIs available in S/4HANA Cloud. There we could find the correct API we may need for our integration and pick up the Scenario ID there. For example for IPS integration the API “Business User – Create, Update, Delete” is used. In the API description you could find the Scenario ID “SAP_COM_0093”.
To create a new communication arrangement, click on the tile “Communication Arrangements”. The existing communication arrangements will be listed in the table. Klick on “New” to create a new one.
We are going to create 2 Communication Arrangements for the IPS integration in order to cover all the IDM scenarios. Choose the Scenario ID “SAP_COM_0093” in the drop-down list. The “Arrangement Name” will automatically be filled with the Scenario ID. You could also give a different name if necessary. Otherwise just leave it as it is.
Click on “Create” to create the Communication Arrangement.
In the follow-up page, choose the Communication System we’ve created previously for IPS. The “User Name” field will be filled up automatically upon choosing of the Communication System.
Click on “Save” to finish the creation of the Communication Arrangement for Scenario ID “SAP_COM_0093”
Now we need to create another Communication Arrangement for Scenario ID “SAP_COM_0066”. Follow the same steps for creating a new Communication Arrangement and this time choose the Scenario ID “SAP_COM_0066”.
Choose the Communication System from the drop-down list. The Communication Users will be filled automatically. Leave all other fields as defaults.
Till now, we’ve finished the configuration on the S/4HANA Cloud side. We will now switch to the IPS system and continue the configuration there.
2. Configuration steps in IPS
The configuration in IPS is actually quite straight forward. The official IPS document is already quite good. I will just try to follow the guide and comment at some places if necessary.
2.1 Register a new OAuth Client for the ipsproxy application
The OAuth Client is used for communication between IDM and IPS. If an OAuth Client has already been created for IDM, there is no need to perform this step again. Otherwise, please follow the below steps to register a new OAuth Client for IDM.
To create a new OAuth Client, log in to SAP Cloud Platform Cockpit first. Navigate to the “OAuth” configuration page in the section “Security”.
Click on tab “Client” and then click on “Register New Client”
From the “Subscription” drop-down list, select /ipsproxy. From the Authorization Grant drop-down list, select Client Credentials. In the Secret field, enter a password (client secret) and remember it. We will need it later for the repository configuration in SAP Identity Management. Copy/paste and save (in a notepad) the generated Client ID. We will need it later too.
As next step we need to assign role IPS_PROXY_USER to the newly created OAuth client.
To do that please perform the following steps as suggested by the official IPS document.
In the SAP Cloud Platform Cockpit, from the left-side navigation, choose “Subscriptions”.
Under the “Java Applications” section, choose “ipsproxy”.
From the left-side navigation, choose “Roles”. Assign role “IPS_PROXY_USER” to the newly created OAuth client. Choose “Assign” and enter oauth_client_, where is the one from the previously created OAuth client.
Now we need to add the S/4HANA Cloud system as a proxy system in IPS.
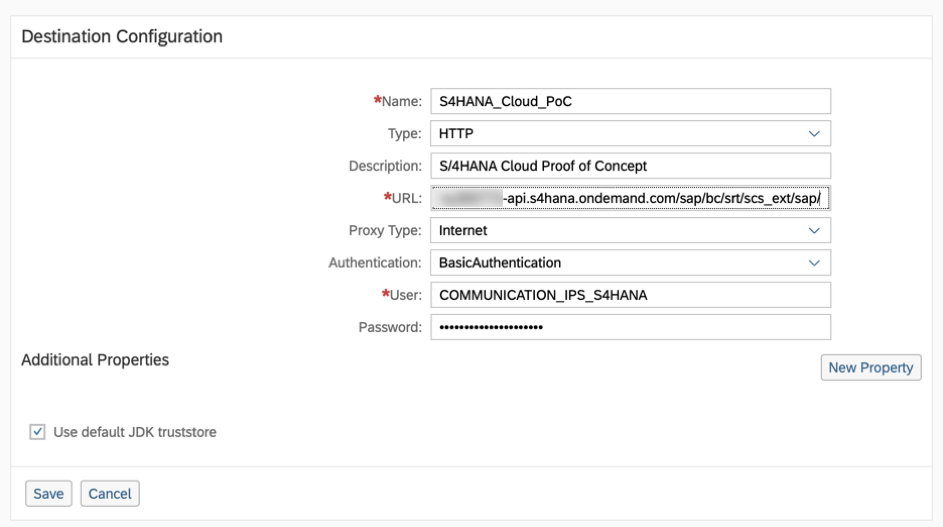
Open the SCP Cockpit. From the left-side navigation, choose Connectivity Destinations. Click on “New Destination” to add a new destination to SCP.
Fill in the fields in the next window. Please note the below fields.
- Type: HTTP
- URL: https://-api.s4hana.ondemand.com/sap/bc/srt/scs_ext/sap/
- Proxy Type: Internet
- Authentication: BasicAuthentication
- User: the communication user ID created in S/4HANA Cloud system
- Password: the communication user password created in S/4HANA Cloud system
Click on Save to finish creating of the destination
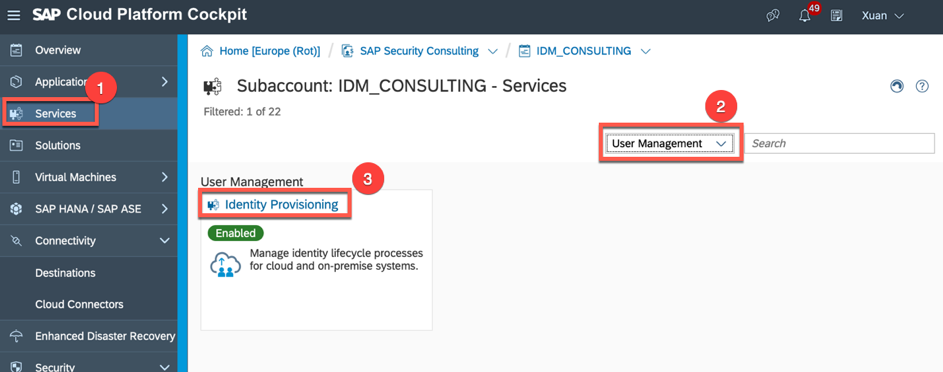
As next we are going to continue creating the proxy system in IPS. To do that, navigate to the IPS service console.
Click on the “Go to Service” link to launch the IPS service page.
Click on the “Proxy Systems” tile.
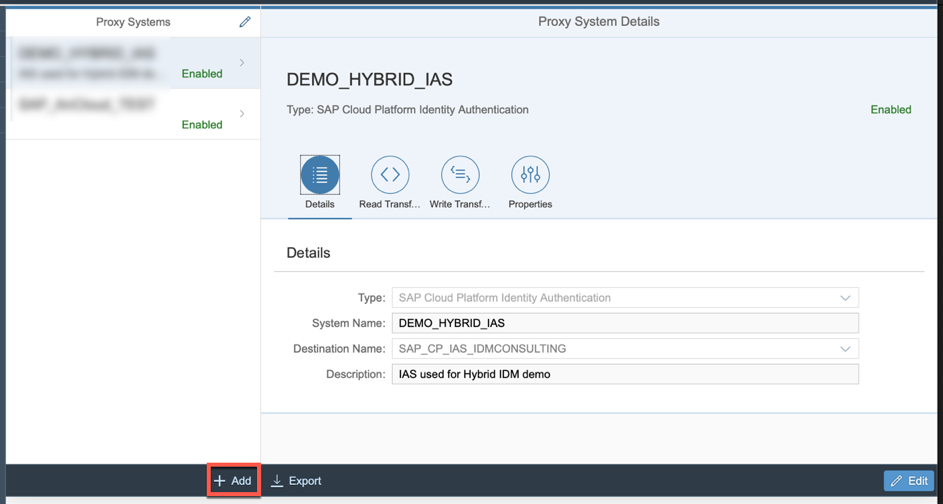
Click on the “Add” button to add a new proxy system to IPS.
Maintain the fields for the new proxy system and click on “Save” to save the new proxy system.
- Type: please choose “SAP S/4HANA Cloud (Beta)” as system type.
- System Name: give a system name for the S/4HANA Cloud system
- Destination Name: choose the destination previously created in SCP from the drop down list.
- Description: enter a description
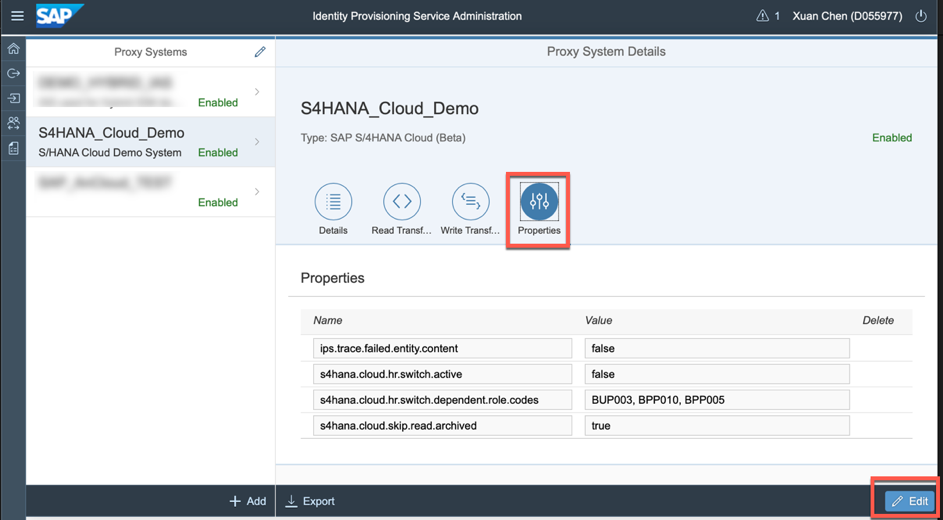
After successful creation of the proxy system, click on “Properties” tab and click on “Edit”.
We need to maintain the properties of the S/4HANA Cloud system to fit our scenario:
- s4hana.cloud.roles.url
add the URL in following format: https://<s4hana_system>-api.s4hana.ondemand.com/sap/opu/odata/sap/APS_IAM_SIAG_BROLE_SRV/Aps_Iam_Sia...
This url will be used for the roles related operation on S/4HANA Cloud
- ips.trace.failed.entity.content
If you are doing a debug session with SAP development team, you may need to set this property to “true”. Otherwise leave it as “false”. Please note that only the development team has access to the trace data.
- s4hana.cloud.client
enter a fixed value “100” here. At the time of my implementation, I’ve been adviced to add this property because there were some internal logic which might need this client number. I think this will be improved later in the later version of the connector. You may or may not need this property in your implementation.
- s4hana.cloud.hr.switch.active
if the HR integration for your S/4HANA Cloud system is switched on, enter “true” here. Otherwise leave it as “false”.
Optionally you can maintain the read and write transformation of the proxy system in order to adjust the attribute mapping between S/4HANA Cloud and IDM and perform some advanced transformation of the data. We will not go deeper into this part and will just leave it as standard in this guide.
Now the proxy system is successfully created in IPS. As the next step we need to export the proxy system configuration to a csv file and import it into IDM.
Click on the “Export” button and choose “CSV format” to export the proxy system to a csv file.
3. Configuration steps in IDM
Login to IDM admin UI and click on the “import” button in the “System configuraiton” tab.
Choose the csv file exported from IPS and click on “Upload”.
Now the repository for S/4HANA Cloud is successfully created in IDM.
We still need to maintain some repository constants to make the repository working.
- AUTH_USER: enter the OAuth client ID created in SCP
- AUTH_PASSWORD: enter the OAuth client password created in SCP
- PROXY_HOST, PROXY_PORT, PROXY_USER, PROXY_PASSWORD: maintain the proxy setting if necessary.
Till now the configuration steps for S/4HANA Cloud and IPS/IDM integration is finished. We can start the initial load job and perform user management in IDM, just in the same way as we do it for other types of backend applications in IDM.
One thing to notice is that as we’ve mentioned before, the existence of a Business Partner is the prerequisite of creation of a Business User in S/4HANA Cloud. We need to pay attention to the timing here to make sure that a Business Partner is always created prior to the Business User creation by IDM. If SAP HCM is used as source system for Business Partners in S/4HANA Cloud, we need to make sure that HCM always syncs the master data record to S/4HANA before HCM exports the records to IDM and creating Business Users in S/4HANA Cloud.
Some Userful links
- Overview of APIs in S/4HANA Cloud:
https://api.sap.com/package/SAPS4HANACloud?section=Artifacts
- SAP S/4HANA Cloud Integration with SAP SuccessFactors Employee Central:
https://blogs.sap.com/2018/05/02/sap-s4hana-cloud-integration-sap-successfactors-employee-central/
- HR Connectivity in SAP S/4HANA Cloud:
https://blogs.sap.com/2018/05/31/hr-connectivity-in-sap-s4hana-cloud/
- How to import Employee Master Data to S/4HANA Cloud:
https://blogs.sap.com/2018/08/08/how-to-import-employee-master-data-to-s4hana-cloud-part-i/
- SAP Help Doc for Identity Provisioning Service:
https://help.sap.com/viewer/f48e822d6d484fa5ade7dda78b64d9f5/Cloud/en-US/2d2685d469a54a56b886105a06c...
- SAP Managed Tags:
- Identity Provisioning,
- SAP Identity Management,
- SAP S/4HANA Public Cloud
Labels:
1 Comment
You must be a registered user to add a comment. If you've already registered, sign in. Otherwise, register and sign in.
Labels in this area
-
ABAP CDS Views - CDC (Change Data Capture)
2 -
AI
1 -
Analyze Workload Data
1 -
BTP
1 -
Business and IT Integration
2 -
Business application stu
1 -
Business Technology Platform
1 -
Business Trends
1,658 -
Business Trends
93 -
CAP
1 -
cf
1 -
Cloud Foundry
1 -
Confluent
1 -
Customer COE Basics and Fundamentals
1 -
Customer COE Latest and Greatest
3 -
Customer Data Browser app
1 -
Data Analysis Tool
1 -
data migration
1 -
data transfer
1 -
Datasphere
2 -
Event Information
1,400 -
Event Information
66 -
Expert
1 -
Expert Insights
177 -
Expert Insights
299 -
General
1 -
Google cloud
1 -
Google Next'24
1 -
Kafka
1 -
Life at SAP
780 -
Life at SAP
13 -
Migrate your Data App
1 -
MTA
1 -
Network Performance Analysis
1 -
NodeJS
1 -
PDF
1 -
POC
1 -
Product Updates
4,577 -
Product Updates
344 -
Replication Flow
1 -
RisewithSAP
1 -
SAP BTP
1 -
SAP BTP Cloud Foundry
1 -
SAP Cloud ALM
1 -
SAP Cloud Application Programming Model
1 -
SAP Datasphere
2 -
SAP S4HANA Cloud
1 -
SAP S4HANA Migration Cockpit
1 -
Technology Updates
6,873 -
Technology Updates
422 -
Workload Fluctuations
1
Related Content
- SAP Build Process Automation Pre-built content for Finance Use cases in Technology Blogs by SAP
- Consuming SAP with SAP Build Apps - Mobile Apps for iOS and Android in Technology Blogs by SAP
- Demystifying the Common Super Domain for SAP Mobile Start in Technology Blogs by SAP
- FAQ for C4C Certificate Renewal in Technology Blogs by SAP
- Lowest SAP ECC version that can be integrated with SAP BTP through Cloud Connector in Technology Q&A
Top kudoed authors
| User | Count |
|---|---|
| 39 | |
| 25 | |
| 17 | |
| 13 | |
| 7 | |
| 7 | |
| 7 | |
| 7 | |
| 6 | |
| 6 |