
- SAP Community
- Products and Technology
- Enterprise Resource Planning
- ERP Blogs by SAP
- SAP Business ByDesign Side-by-Side Extensions on S...
Enterprise Resource Planning Blogs by SAP
Get insights and updates about cloud ERP and RISE with SAP, SAP S/4HANA and SAP S/4HANA Cloud, and more enterprise management capabilities with SAP blog posts.
Turn on suggestions
Auto-suggest helps you quickly narrow down your search results by suggesting possible matches as you type.
Showing results for
Advisor
Options
- Subscribe to RSS Feed
- Mark as New
- Mark as Read
- Bookmark
- Subscribe
- Printer Friendly Page
- Report Inappropriate Content
02-03-2019
5:37 AM
If your extension application needs to do read and write operations from/to an SAP ByD tenant, you must configure the connectivity to enable the use of ByD OData APIs.
The connectivity configuration, which is common to all the extension applications that are deployed in an SAP CP Cloud Foundry subaccount, is defined at SAP CP subaccount level. This ensures consistency in the integration configuration between the extension applications deployed in an SAP CP subaccount and SAP ByD tenant.
If the ByD extension application is used by multiple users with different roles, or the extension application UIs are to be embedded in the ByD UIs, basic authentication will not be sufficient. Consequently, a connectivity with Single Sign-On and principal propagation should be configured between the SAP CP Cloud Foundry subaccount and the SAP ByD tenant using SAML identity provider. For a Single Sign-On to work between the SAP ByD tenant and the SAP CP Cloud Foundry subaccount, both SAP ByD and SAP CP Cloud Foundry subaccount must be configured as trusted service providers for the IdP, which in this blog post will be the SAP CP IAS. On the other hand, SAP CP IAS must be configured as trusted IdP in both SAP ByD tenant and SAP CP Cloud Foundry subaccount.
Once the Single Sign-On configuration is done, the identity of the user, who try to access an extension application in SAP CP, is verified by the SAP CP IAS according to SAML 2.0 specification. SAP CP IAS stores a list of the users that are authorized to access the extension application and related SAP ByD tenant. The SAP CP IAS verifies the identity of a user (also known as principal in this context) and passes (propagates) the information to the service providers. The trust set up between SAP ByD tenant and SAP CP Cloud Foundry subaccount also ensures the principal propagation from SAP CP to SAP ByD. As a result the service providers will then not request the user to enter his credentials again as long as the session is active.
A single sign-on (SSO) configuration between SAP ByD and SAP CP, and the principal propagation enablement, ensure secure and consistent access for the extension solutions. As already mentioned, if a solution requires system-to-system data access, with no user propagation, you can implement it using a user with basic authentication and no principal propagation. However, it is advisable to use SSO and OData access with principal propagation, to ensure that the data is accessed on behalf of the properly authorized user.
The configuration of connectivity with SSO and principal propagation between SAP ByD and SAP CP using SAP CP IAS is composed of the following procedures:
In this section we will establish trust between SAP CP IAS as identity provider (IdP) and SAP ByD as service provider (SP). This will be achieved by exchanging metadata files between SAP CP IAS and SAP ByD. The configuration in the IdP and SP will be discussed in the following sections:
The SAP ByD users that are supposed to work with the extension application deployed in SAP CP Cloud Foundry environment, also need to have an identity record in SAP CP IAS. In this section we will discuss how to maintain such identity records in Sap CP IAS. The main building blocks of this section are the following:
In this section we will see how to establish trust between SAP CP IAS as an IdP and SAP CP Cloud Foundry subaccount as SP.
In this section we will discuss the procedures required to configure the connectivity, that enable extension applications to execute create, read, update and delete operations on SAP ByD data using OData APIs. The connectivity will be secured using OAuth, which is a token-based authentication and authorization. As opposed to the connectivity protected by basic authentication, OAuth required common identity provider. That is why, we need to configure the SAP CP IAS as common identity provider between SAP CP Cloud Foundry subaccount and SAP ByD tenant.
In this section we will see how to configure SAP CP Cloud Foundry subaccount as a trusted OAuth identity provider for SAP ByD tenant.
In this section we will go through the steps needed to configure OAuth Client in SAP ByD tenant for OData access
Creation of HTTP destination that uses the authentication method OAuthSAMLBearerAssertion will be illustrated in this section.
The sections below contain step-by-step configuration to use SAP CP Identity Authentication Service (IAS) as a common identity provider between the SAP CP Cloud Foundry environment and SAP ByD.


The following steps illustrate the configuration of the Single Sign-On (SSO) to SAP CP Identity Authentication in the SAP ByD tenant.

If the SAP CP IAS is configured as the SAML identity provider for an SAP ByD tenant, at least the SAP ByD users that are required to work with the extension App must have an identity record in SAP CP IAS. For this purpose, you need to export user details from the SAP ByD tenant in CSV file format and then use this CSV file to import these users into your SAP CP IAS tenant that will be used as the identity provider.
Use this procedure to export ByD users and save the user data in CSV format.

As a tenant administrator of the SAP CP Identity Authentication, you can import new users or update existing ones for a specific application with a CSV file and send activation e-mails to the users that have not received activation e-mails for that application so far. To be able to do this, the following prerequisites must be fulfilled:
To import users for an application into Identity Authentication, and to send activation e-mails, proceed as follows:

Use this procedure to configure the SAP CP, Cloud Foundry environment trust settings and to add the tenant of SAP CP Identity Authentication registered for your current SAP user as an identity provider.
Proceed as follows to configure trust between Identity Authentication and SAP CP:
This will result in the automatic establishment of trust upon registration on both the SAP CP and the Identity Authentication tenant side.
To set up the connectivity from an SAP CP subaccount to an SAP ByD tenant, you need to create HTTP destinations in the SAP CP cockpit. These destinations provide data communication via HTTP protocol.
You can use the SAML Bearer assertion flow for consuming OAuth-protected resources. Users are authenticated by using SAML against the configured trusted identity providers. The SAML assertion is then used to request an access token from an OAuth authorization server. This access token must be added as an Authorization header with value Bearer <access token> in all HTTP requests to the OAuth-protected resources.
These are the steps that you need to follow:
You need to add the SAP CP service provider as a trusted OAuth identity provider. This can be achieved by executing the following steps:


In ByD, use this procedure to configure the OAuth client for OData access to ByD OData APIs. Follow the steps listed below to carry out the configuration:
This sub-topic illustrates the steps that are required to configure an HTTP destination for a Cloud Foundry subaccount in SAP CP.

Follow the link below to go to the next blog post in the blog post series:
Follow the link below to go the overview blog post of the blog post series:
The connectivity configuration, which is common to all the extension applications that are deployed in an SAP CP Cloud Foundry subaccount, is defined at SAP CP subaccount level. This ensures consistency in the integration configuration between the extension applications deployed in an SAP CP subaccount and SAP ByD tenant.
If the ByD extension application is used by multiple users with different roles, or the extension application UIs are to be embedded in the ByD UIs, basic authentication will not be sufficient. Consequently, a connectivity with Single Sign-On and principal propagation should be configured between the SAP CP Cloud Foundry subaccount and the SAP ByD tenant using SAML identity provider. For a Single Sign-On to work between the SAP ByD tenant and the SAP CP Cloud Foundry subaccount, both SAP ByD and SAP CP Cloud Foundry subaccount must be configured as trusted service providers for the IdP, which in this blog post will be the SAP CP IAS. On the other hand, SAP CP IAS must be configured as trusted IdP in both SAP ByD tenant and SAP CP Cloud Foundry subaccount.
Once the Single Sign-On configuration is done, the identity of the user, who try to access an extension application in SAP CP, is verified by the SAP CP IAS according to SAML 2.0 specification. SAP CP IAS stores a list of the users that are authorized to access the extension application and related SAP ByD tenant. The SAP CP IAS verifies the identity of a user (also known as principal in this context) and passes (propagates) the information to the service providers. The trust set up between SAP ByD tenant and SAP CP Cloud Foundry subaccount also ensures the principal propagation from SAP CP to SAP ByD. As a result the service providers will then not request the user to enter his credentials again as long as the session is active.
Configuring Connectivity with Single Sign-On and Principal Propagation
A single sign-on (SSO) configuration between SAP ByD and SAP CP, and the principal propagation enablement, ensure secure and consistent access for the extension solutions. As already mentioned, if a solution requires system-to-system data access, with no user propagation, you can implement it using a user with basic authentication and no principal propagation. However, it is advisable to use SSO and OData access with principal propagation, to ensure that the data is accessed on behalf of the properly authorized user.
The configuration of connectivity with SSO and principal propagation between SAP ByD and SAP CP using SAP CP IAS is composed of the following procedures:
- Setup Trust Between SAP CP IAS and SAP ByD
In this section we will establish trust between SAP CP IAS as identity provider (IdP) and SAP ByD as service provider (SP). This will be achieved by exchanging metadata files between SAP CP IAS and SAP ByD. The configuration in the IdP and SP will be discussed in the following sections:
- Configure SAP CP IAS
- Configure SAP ByD
- Maintain Users
The SAP ByD users that are supposed to work with the extension application deployed in SAP CP Cloud Foundry environment, also need to have an identity record in SAP CP IAS. In this section we will discuss how to maintain such identity records in Sap CP IAS. The main building blocks of this section are the following:
- Export SAP ByD Users
- Import Users in SAP CP Users
- Setup Trust Between IAS and SAP CP
In this section we will see how to establish trust between SAP CP IAS as an IdP and SAP CP Cloud Foundry subaccount as SP.
- Configure SAP CP Application Connectivity to SAP ByD APIs
In this section we will discuss the procedures required to configure the connectivity, that enable extension applications to execute create, read, update and delete operations on SAP ByD data using OData APIs. The connectivity will be secured using OAuth, which is a token-based authentication and authorization. As opposed to the connectivity protected by basic authentication, OAuth required common identity provider. That is why, we need to configure the SAP CP IAS as common identity provider between SAP CP Cloud Foundry subaccount and SAP ByD tenant.
- Configure OAuth Identity Provider in SAP ByD
In this section we will see how to configure SAP CP Cloud Foundry subaccount as a trusted OAuth identity provider for SAP ByD tenant.
- Configure the OAuth Client for OData Access
In this section we will go through the steps needed to configure OAuth Client in SAP ByD tenant for OData access
- Create and Configure the HTTP Destination
Creation of HTTP destination that uses the authentication method OAuthSAMLBearerAssertion will be illustrated in this section.
Setup Trust Between SAP CP IAS and SAP ByD
The sections below contain step-by-step configuration to use SAP CP Identity Authentication Service (IAS) as a common identity provider between the SAP CP Cloud Foundry environment and SAP ByD.
Configure SAP CP IAS
- Get the service provider metadata XML file. To do so, you download the metadata XML file of your SAP ByD tenant:
- Log on to the SAP ByD tenant as an administrator.
- Select Application and User Management → Common Tasks and then choose Configure Single Sign-On.
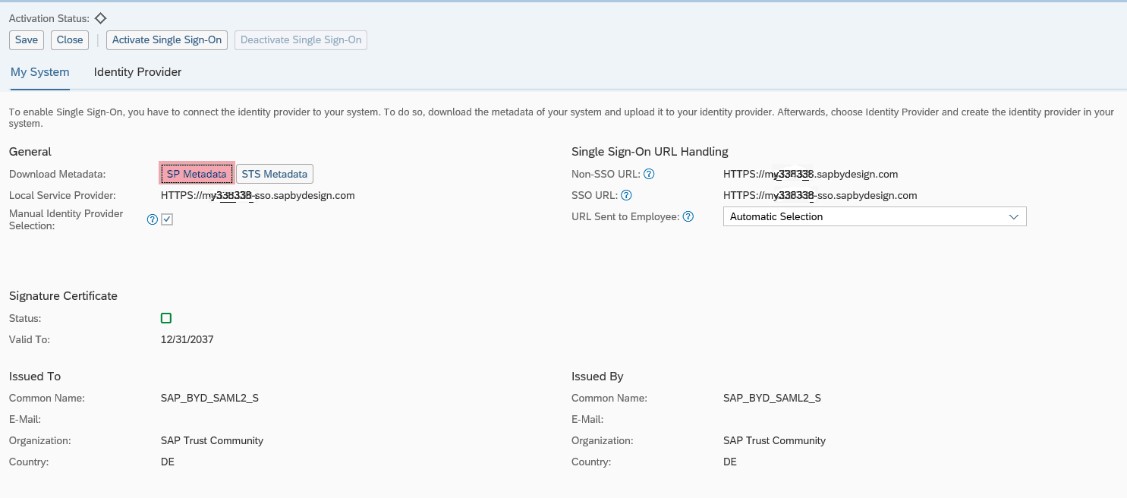
- On the Configure Single Sign-On screen, go to My System → General → Download Metadata.
- Choose the SP Metadata link to download the ByD metadata XML file. Save it locally on your file system to import later in to the Identity Authentication service (SAP CP IAS).
- Create a custom application to use it as a SAML2.0 service provider. Access the tenant's administration console for Identity Authentication by using the console's URL.
The URL has the following pattern:
https://<tenant ID>.accounts.ondemand.com/admin/
The URL is also contained in the Identity Authentication tenant registration e-mail.
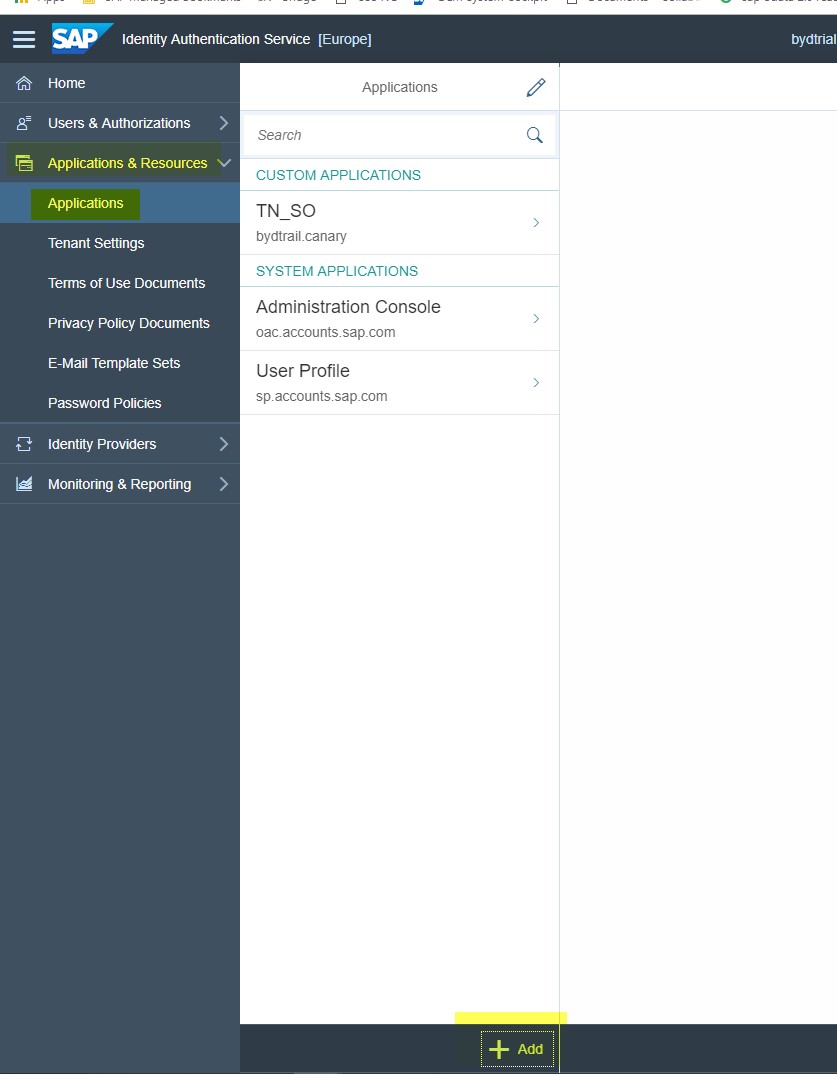
- Choose Applications & Resources → Applications from the menu on the left.
- Choose the +Add button on the left-hand panel and enter the name of your ByD extension application name. The name of the application will be displayed on the login and registration pages.
- Press save, and the system will create an application and add it to the list of applications.
- Configure the SAML 2.0 trust with SAP ByD as a service provider. In the tenant's administration console for Identity Authentication, execute the following steps:
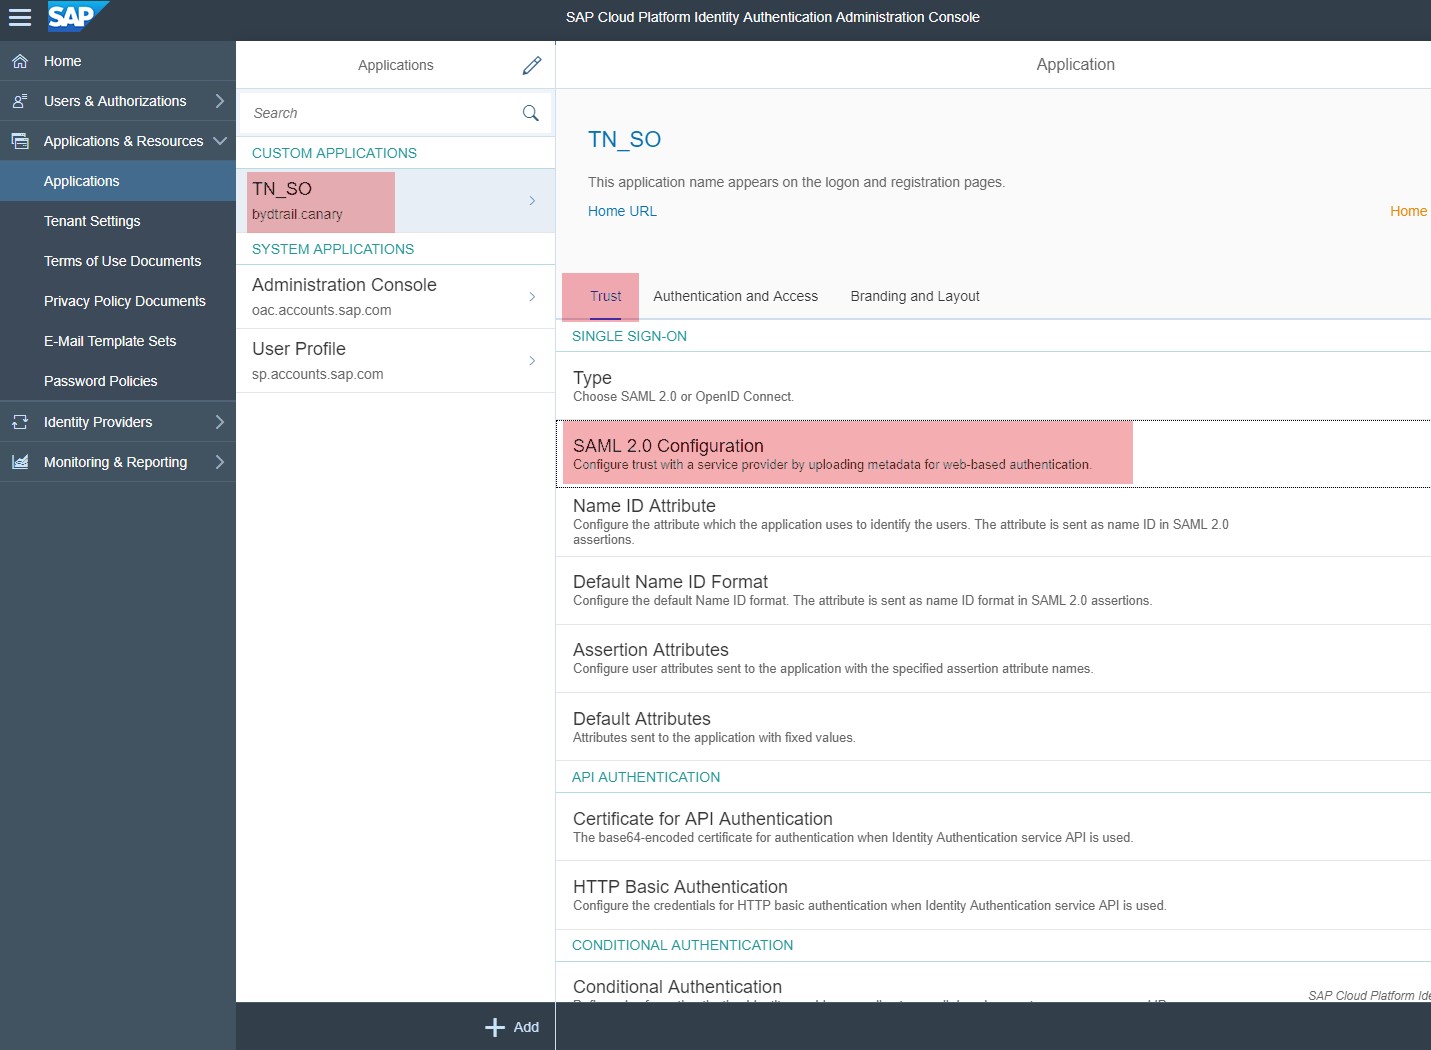
- On the left-hand side, choose the newly-created application, and then choose Trust.
- Choose SAML 2.0 Configuration.
- Upload the metadata XML file of your SAP ByD tenant that you have downloaded in Step 1.
- On service provider metadata upload, the fields are populated with the parsed data from the XML file.
- Save the configuration settings.
- Configure the identity federation in Identity Authentication. To do so, proceed as follows:
- In the tenant's administration console for Identity Authentication, choose your SAP ByD extension application, and navigate to Trust → Name ID Attribute, and then select Login Name.
This is the profile attribute that Identity Authentication sends to the application as a name ID. The application then uses this attribute to identify the user. You should select the attribute expected by your SAP ByD tenant as a valid user.
- Save your selection.
Configure SAP ByD
The following steps illustrate the configuration of the Single Sign-On (SSO) to SAP CP Identity Authentication in the SAP ByD tenant.
- Get the identity provider metadata XML file. To do so:
- Use the following URL to access the metadata for the Identity Authentication tenant:
https://<tenant ID>.accounts.ondemand.com/saml2/metadata
<tenant ID>is the IAS tenant ID.
- Save the content of the page locally on your file system as an XML file.
- Log on to your SAP ByD tenant as an administrator.
- Select Application and User Management → Common Tasks and then choose Configure Single Sign-On.
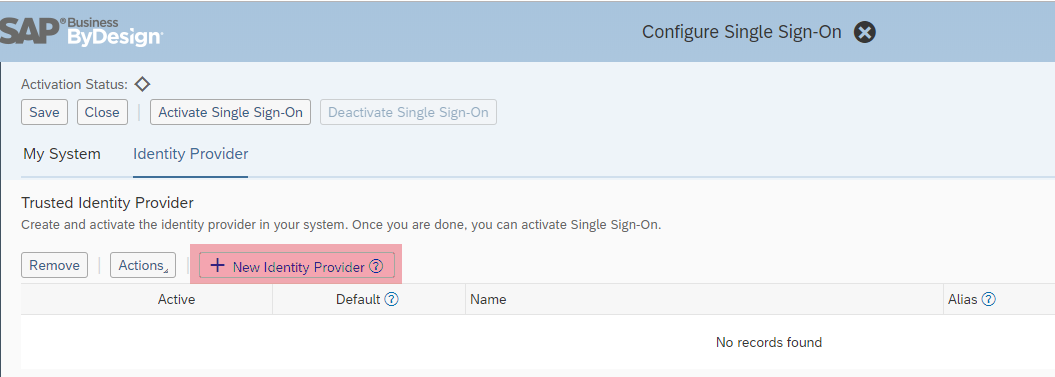
- On the Configure Single Sign-On screen, choose the Identity Provider tab.
- Choose New Identity Provider.
- Browse and open the metadata XML file that you have downloaded in Step 1. By importing the metadata, the system automatically uploads the required signature certificate and encryption certificate.
- The new identity provider is activated and displayed in the Trusted Identity Provider list.
- Once you have configured your identity provider, activate SSO in your SAP ByD tenant. To do so, choose Activate Single Sign-On, and then choose OK.
- To save your settings, choose Save in the upper left-hand corner.
Maintain Users
If the SAP CP IAS is configured as the SAML identity provider for an SAP ByD tenant, at least the SAP ByD users that are required to work with the extension App must have an identity record in SAP CP IAS. For this purpose, you need to export user details from the SAP ByD tenant in CSV file format and then use this CSV file to import these users into your SAP CP IAS tenant that will be used as the identity provider.
Export SAP ByD Users
Use this procedure to export ByD users and save the user data in CSV format.
- Log on to your SAP ByD tenant as an administrator.
- Select Application and User Management → User and Access Management and then choose Business Users.
- To export the users, choose Export → To Microsoft Excel®
- Modify the downloaded Microsoft Excel® data as follows:
- Remove all columns except UserID and Name.
- Rename the userID to loginName and split the Name into firstName and lastName.
- Insert a new column before loginName and name it status. The status can be active or inactive.
- Insert a new column between loginName and firstName and name it mail. To get the e-mail address of a user, select the user in the Business User UI in the SAP ByD tenant and then click on Edit → Attributes. The e-mail address is in the Employee Data section.
Note that the value of the mail and loginName should be unique. The length of all columns but the lastName is restricted to 32 characters. The value of the column lastName can be up to 64 characters.
- Save the file as CSV format.
The file should have the following format after the above modifications:
| status | loginName | firstName | lastName | |
|---|---|---|---|---|
| active | P0001 | john.smith@acron.com | John | Smith |
Import Users in SAP CP IAS
As a tenant administrator of the SAP CP Identity Authentication, you can import new users or update existing ones for a specific application with a CSV file and send activation e-mails to the users that have not received activation e-mails for that application so far. To be able to do this, the following prerequisites must be fulfilled:
- You are assigned the Manage Applications and Manage Users roles. For more information about how to assign administrator roles, see Edit Administrator Authorizations.
- You have configured the trust between the Identity Authentication tenant and the SAP ByD tenant. For more information, see Setup Trust Between SAP CP IAS and SAP ByD.
To import users for an application into Identity Authentication, and to send activation e-mails, proceed as follows:
- Access the tenant's administration console for Identity Authentication by using the console's URL.
The URL has the following pattern:
https://<tenant ID>.accounts.ondemand.com/admin
- Choose Users & Authorizations → Import Users.
- Choose the application that you want to edit.
- Choose the Browse... button and specify the location of the CSV file.
- Choose the Import button.
If the operation is successful, the system displays the message “Users imported or updated”.
- Choose Send E-Mail → Send (see screen shot above) to send to activation e-mails to all users that are imported for a selected application.
Setup Trust Between IAS and SAP CP
Use this procedure to configure the SAP CP, Cloud Foundry environment trust settings and to add the tenant of SAP CP Identity Authentication registered for your current SAP user as an identity provider.
Proceed as follows to configure trust between Identity Authentication and SAP CP:
- In the Identity Authentication tenant, access the administration console by using the console's URL.
The URL has the following pattern:
https://<tenant ID>.accounts.ondemand.com/admin
<tenant ID> is the IAS tenant ID.
- Use the following URL to access the metadata for the Identity Authentication tenant:
https://<tenant ID>.accounts.ondemand.com/saml2/metadata
Alternatively, you can access the metadata by selecting Applications & Resources → Tenant Settings → SAML 2.0 Configuration. Then choose the Download Metadata File link. Save the metadata of your Identity Authentication tenant on your local file system as an XML file.
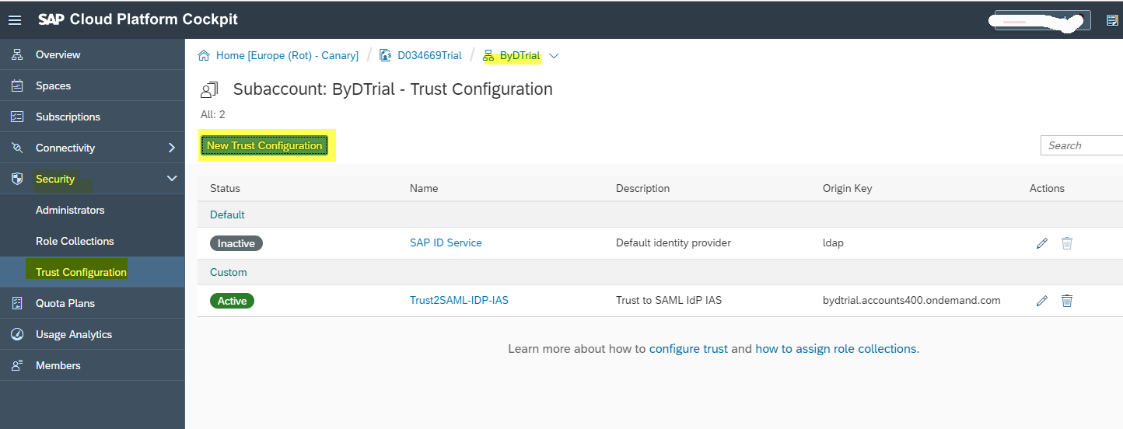
- Open the SAP CP cockpit and select the region in which your subaccount is hosted. Select the global account that contains your subaccount, and then choose the tile of your subaccount. For more information about regions, see Regions and Hosts.
- Choose Security → Trust Configuration.
- Choose New Trust Configuration and fill in the required fields:
- In the Metadata field, upload the metadata file you have downloaded from the Identity Authentication tenant in step 2. All the required fields are automatically filled in.
- In the Name field, enter a meaningful name of your choice.
- Choose Save.
- In the SAP CP cockpit, download the service provider SAML metadata file. Open the link https://<subaccount_subdomain>.authentication.<region_host>/saml/medatada, where:
- <subdomain> is part of the SAP CP subaccount details in the cockpit.
- <region_host> is the API endpoint without api.cf.. See Regions and Hosts.
Example for cloud foundry in canary landscape:
https://XXXtrail.authentication.sap.hana.ondemand.com/saml/metadata
When you are prompted, save the XML file on your local file system. This file contains the SAML 2.0 metadata describing SAP CP as a service provider.
- In the Identity Authentication tenant, access the administration console by using the console's URL.
The URL has the following pattern:
https://<tenant ID>.accounts.ondemand.com/admin
- Choose Applications & Resources → Application.
- Choose the +Add button on the left-hand panel and enter the name of your SAP CP subaccount.
- Choose Save.
- Configure the SAML 2.0 trust with the SAP CP subaccount as a service provider. To do so, proceed as follows:
- On the left-hand side, choose the newly created application, and then choose Trust.
- Choose SAML 2.0 Configuration.
- Upload the metadata XML file of your SAP CP subaccount that you have downloaded in Step 6.
- On service provider metadata upload, the fields are populated with the parsed data from the XML file.
- Save the configuration settings.
This will result in the automatic establishment of trust upon registration on both the SAP CP and the Identity Authentication tenant side.
Configure SAP CP Application Connectivity to SAP ByD APIs
To set up the connectivity from an SAP CP subaccount to an SAP ByD tenant, you need to create HTTP destinations in the SAP CP cockpit. These destinations provide data communication via HTTP protocol.
You can use the SAML Bearer assertion flow for consuming OAuth-protected resources. Users are authenticated by using SAML against the configured trusted identity providers. The SAML assertion is then used to request an access token from an OAuth authorization server. This access token must be added as an Authorization header with value Bearer <access token> in all HTTP requests to the OAuth-protected resources.
These are the steps that you need to follow:
- Configure OAuth Identity Provider in SAP ByD
- Configure the OAuth Client for OData Access
- Create and Configure the HTTP Destination
Configure OAuth Identity Provider in SAP ByD
You need to add the SAP CP service provider as a trusted OAuth identity provider. This can be achieved by executing the following steps:
- Log on to the SAP CP cockpit, and configure the settings as follows:
- Navigate to your extension subaccount in the Cloud Foundry environment.
- Choose Connectivity → Destination.
- Choose Download Trust to get the certificate for this subaccount and save it on your local file system.
- Open the certificate in a text editor, copy the content between -----BEGIN CERTIFICATE----- and -----END CERTIFICATE-----, and save it in a file with the following format <subaccount>_signing.cer, where <subaccount> is the subaccount Name from the subaccount Information of your SAP CP subaccount.
- Log on to your SAP ByD tenant as an administrator. Select Application and User Management → Common Tasks and then choose Configure OAuth 2.0 Identity Provider → New OAuth2.0 Provider, and configure the settings as follows:
- In the Issuing Entity Name field, enter cfapps.<region_host>/<subaccountID>. You go to the SAP CP cockpit, navigate to the subaccount, go to Overview and:
- For the <region_host>, copy the API endpoint from the Cloud Foundry section, and remove the https://api.cf.
- For the <subaccountID>, copy the ID from the Subaccount Details section.
- For example, cfapps.eu10.hana.ondemand.com/12345678-1234-1234-1234-1234578.
- From the Primary Signing Certificate field, browse to the <subaccount>_signing.cer file that you saved on the previous steps.
- Select the E-Mail Address checkbox.
- In the Issuing Entity Name field, enter cfapps.<region_host>/<subaccountID>. You go to the SAP CP cockpit, navigate to the subaccount, go to Overview and:
- Choose Submit.
Configure the OAuth Client for OData Access
In ByD, use this procedure to configure the OAuth client for OData access to ByD OData APIs. Follow the steps listed below to carry out the configuration:
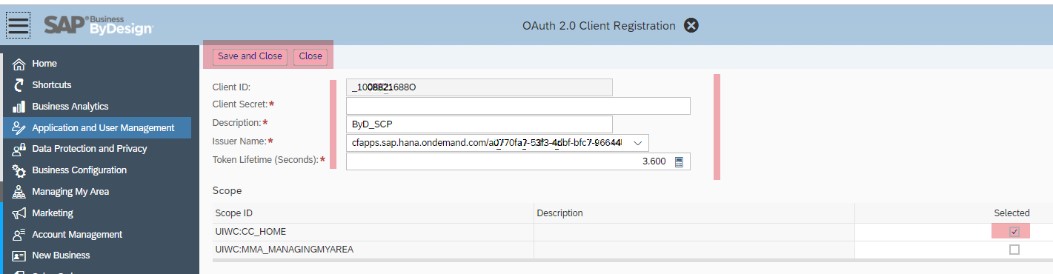
- Log on to your ByD system as an administrator. Then select Application and User Management → OAUTH2.0 CLIENT REGISTRATION.
- Choose New.
- Specify a client secret, description, and token lifetime (in seconds). For example, 3600 seconds.
- In the Issuer Name field, use the drop-down list to specify the identity provider that you created in the chapter Configure OAuth Identity Provider in ByD.
- Copy the entry in the Client ID field. You will need it later when creating the HTTP destination with OAuth authentication required for the connectivity to the SAP Cloud for Customer OData APIs.
- In the Scope list, select the UIWC:CC_HOME scope.
- Choose Save and Close.
Create and Configure the HTTP Destination
This sub-topic illustrates the steps that are required to configure an HTTP destination for a Cloud Foundry subaccount in SAP CP.
- In the cockpit, go to the Subaccounts drop-down menu and choose your subaccount.
- Choose Connectivity → Destinations in the navigation panel.
- Create an HTTP destination.
To enable principal propagation, create an OAuth2SAMLBearerAssertion HTTP destination and configure its settings as follows:
- Configure the basic settings:
| Parameter | Value |
|---|---|
| Name | Enter meaningful name |
| Type | HTTP |
| Description | Enter meaningful description (Optional) |
| URL | https://<my_ByD_tenant_name>.sapbydesign.com |
| Proxy Type | Internet |
| Authentication | OAuth2SAMLBearerAssertion |
| Audience | Go to ByD Application and User Management view, then navigate to Configure Single Sign-On under General Settings and copy the value from the Local Service Provider field. |
| Client Key | Client ID Paste the entry you have copied from the Client ID field when configuring the OAuth client. For more information, see the topic Configure the OAuth Client for OData Access. |
| Token Service URL | https://<my_ByD_tenant_name>.sapbydesign.com/sap/bc/sec/oauth2/token |
| Token Service User | Client ID Paste the entry you have copied from the Client ID field when configuring the OAuth client. For more information, see the topic Configure the OAuth Client for OData Access. |
| Token Service Password | Client secret Paste the entry you have copied from the Client secret field when configuring the OAuth client. For more information, see the topic Configure the OAuth Client for OData Access. |
- Configure the required additional property. To do so, in the Additional Properties panel, choose New Property, and enter the following property:
| Parameter | Value |
|---|---|
| authnContextClassRef | urn:none |
| nameIdFormat | urn:oasis:names:tc:SAML:1.1:nameid-format:emailAddress |
| Scope | Scope ID entries separated by space Paste the entry you have copied from the Scope ID field when configuring the OAuth client. For more information, see the topic Configure the OAuth Client for OData Access. Example: UIWC:CC_HOME |
| userIdSource |
- Select the Use default JDK truststore checkbox.
- Save the entries
Follow the link below to go to the next blog post in the blog post series:
Follow the link below to go the overview blog post of the blog post series:
SAP Business ByDesign Side-by-Side Extensions on SAP Cloud Platform
Labels:
5 Comments
You must be a registered user to add a comment. If you've already registered, sign in. Otherwise, register and sign in.
Labels in this area
-
Artificial Intelligence (AI)
1 -
Business Trends
363 -
Business Trends
20 -
Customer COE Basics and Fundamentals
1 -
Digital Transformation with Cloud ERP (DT)
1 -
Event Information
461 -
Event Information
22 -
Expert Insights
114 -
Expert Insights
148 -
General
1 -
Governance and Organization
1 -
Introduction
1 -
Life at SAP
415 -
Life at SAP
2 -
Product Updates
4,687 -
Product Updates
200 -
Roadmap and Strategy
1 -
Technology Updates
1,502 -
Technology Updates
85
Related Content
- SAP Enterprise Support Academy Newsletter March 2024 in Enterprise Resource Planning Blogs by SAP
- Simple and flexible OAuth 2.0 REST API Call from an ABAP Program (S/4HANA on prem or ECC) in Enterprise Resource Planning Blogs by Members
- SAP CAL configuration issue (B1IF test connection fails) in Enterprise Resource Planning Q&A
- SMTP setup in S/4HANA public cloud in Enterprise Resource Planning Q&A
- Deciphering Seamless SAML Single Sign-On: A Comprehensive Guide to Multi-Identity Provider Integration with SAP IAS as Your Proxy for S/4 HANA and Beyond (Part 1) in Enterprise Resource Planning Blogs by Members
Top kudoed authors
| User | Count |
|---|---|
| 5 | |
| 5 | |
| 4 | |
| 4 | |
| 4 | |
| 4 | |
| 4 | |
| 4 | |
| 3 | |
| 3 |