In the previous blog I've discussed how action profiles can be set up and how it is possible to reuse actions and be more flexible in determining profiles through common profiles and action profile determination.
Now, let's turn to action conditions. Especially if you plan to use a lot of actions in your processes, setting up conditions the right way will prevent performance problems and allow for future reuse.
Action conditions
So, actions have been created and correctly linked (or determined) via the profile. Time to focus when to execute them. This is done with action conditions. You can base them on attributes from the transaction or item at hand. Probably most often used are attributes like user or system status, priority, or a milestone.
There's a few tips and tricks here that I'd like to share, but let's start with the difference between the two types of conditions that are available in SAP CRM.
Schedule vs start conditions
Schedule conditions define when an action is put on the list of executable actions within the object. Once it is put there, it will be executed as soon as the start condition is met.
- By not assigning a schedule condition, the action will be added to the list of executable actions automatically or manually.
- By not assigning a start condition, it is possible to execute the action automatically or manually.
This seems quite straightforward, but there's more to it:
- Once an action is scheduled, it will be considered during a (background) run of the action selection report. This impacts performance of the jobs you plan to use.
- If you want to tirgger actions based on a milestone (e.g., contract end date has passed), you should use a Start Condition: schedule conditions are only checked if there is a change in the transaction and this means that the contract end date has long passed before the transaction is 'touched' again and the action is finally executed.
- You can assign both a schedule and a start condition to one action. In such cases, the start condition is only considered if the action's schedule condition was fulfilled.
As these points show, there is a conflict here: using too many schedule conditions may impact performance, but only using start conditions disallows you to plan actions based on milestones. Later, we will look into the solution that SAP provides for this, and milestone-based actions in general. Let's first discuss setting up conditions in general, and running a background job.
Setting up action conditions
When you click on Define Conditions in the customizing, you will see the following screen:
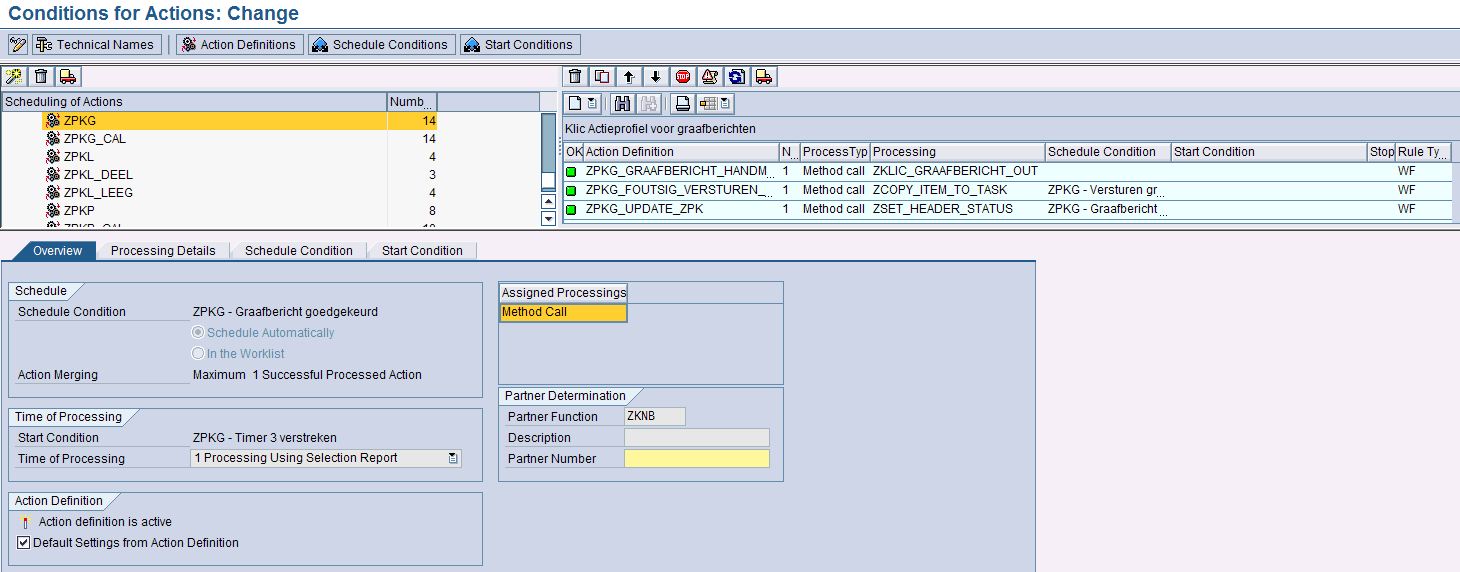
Action Condition Maintenance
I won't go into all the details of this screen, but I would like to highlight a few elements:
- with the Technical Names-button you can switch between the description of the action and action profile to the technical names. This can be very handy if you have non-unique descriptions
- setting up conditions is done with an editor in which you link attributes to values with help of expressions.
- you can reuse conditions after you created them (you can get an overview of all conditions by cllicking on the Schedule Conditions or Start Conditions-buttons).
- Reusing conditions is particularly useful if you are using common profiles. As highlighted in my blog on action profiles, common profiles can be used to reuse actions in various action profiles without having to configure them again and again. These embedded actions' conditions need to be set up per action profile that uses them. By reusing these conditions, you can easily do this.
- Please note that reusing conditions is only possible within:
- the same type of condition (schedule / start)
- the same item category
- As a general rule of thumb you should consider a naming convention for your conditions (e.g.: [item category] [description of condition]). Too often you see condition names that tell more about the action that they are linked to, than what they actually check. Reusing them will then be quite hard!
- If you want to setup an action without any conditions, you should still add it in this screen (right top corner). If you forget this, the action will not work.
Executing actions
Now that the action profiles, its actions and conditions are set up, it is time to see how actions are executed. As you recall, there are three moments on which actions are executed:
- Immediate processing:as soon as the action should be executed (either by an automatic or a manual trigger), it will be executed. Typically, an end user is working in the transaction when this occurs.
- This option will lead to wait time for the end user. Therefore, I would only advise it if user feedback is required or if the action is highly time critical.
- Processing when saving the document:when the user or a background process saves the order, the action is executed.
- This option may also impact the end user's experience.
- Processing using selection report: during order processing, the action(s) will only be scheduled. Execution will be done by running the action processing program (transaction code: CRMC_ACTION_JOB).
- Within action customizing you can allow end users to execute the action directly, so they don't need to wait for the program to run.
- Let's look into the action selection report with some more detail.
Action selection report
The selection report can be run once or periodically, both in the foreground and the background. If you plan to run it periodically in the background, you should use set the Processing Settings accordingly
- 'Processing without dialog': if set, the selected actions are executed directly. This should be set in case of a background job.
- 'Restricted Log': will prevent a spool to be created. The action processing logs (that can also be found in SLG1) will still be filled.
You then save these entries as a variant and create a new job via SM36 (program = RSPPFPROCESS). Basically, this sums up how to set up actions. Now I'll focus on some more specific topics: milestone-based actions and the optimization rule.
Milestone-based actions
Setting up an action that should be executed after a period of time can seem quite tricky at first. This is because a number of elements should be correctly setup before the action is actually scheduled at the right moment. These are the things you should get straight:
- Set up a date profile to calculate your milestone
- Hint: give different names to the date types and date rules, even though this is not required
- Be sure to include the standard date rule TODAYTIME in your profile (this will always give the current date+time when executed; we will need it in the next step)
- In action condition maintenance, create a start condition that checks whether TODAYTIME is greater than or equal to the date type
Start condition with milestone
The picture shows an example of a start condition in which a milestone is checked. Please note that TODAYTIME is shown as &Current Date + Time& when you do not show technical names.
Now let's assume we want to run a hourly background job that executes actions. This would have to check all start conditions with milestones again and again, even if the milestone will not be reached within another 6 months! That's why optimization rules were introduced.
Optimization rules
With help of optimization rules, you can have the background job calculate when the start condition will be met. In the example above, in six months time. The system will write this in a table and, the next time the job is executed, simply skip the start condition because it already found that this condition is not yet met. This functionality improves performance and requires two configuration activities:
- In the action condition maintenance, select the date type that you want to use as an Optimization Rule. If you look at the previous picture, you can already see that an Optimization Rule was linked.
- In the action job, be sure to flag the Use Optimization Rules option.
- Note: typically you run this report in a background job. Make sure to set up the variant attributes like in the picture below. it ensures that each time the job is run, the current date and time are considered.
Using Optimization Rules in action processing
This was the second and last blog on actions. I hope it will help you in setting up actions, and please let me know if you have any questions!


