- SAP Community
- Products and Technology
- Technology
- Technology Blogs by Members
- Installing Trial SAP NetWeaver Gateway 2.0 SP04 wi...
- Subscribe to RSS Feed
- Mark as New
- Mark as Read
- Bookmark
- Subscribe
- Printer Friendly Page
- Report Inappropriate Content
Recently, SAP released a clean (non-virtualized) installation of a Trial SAP NetWeaver Gateway 2.0 with ABAP 7.02 SP11 for Windows 64-bit on SCN. This is basically a classic trial ABAP (NSP) system, with the addition of NetWeaver Gateway components pre-installed. I thought it would be a good opportunity to install this on Amazon's AWS EC2 (Amazon Web Services Elastic Compute) infrastructure-as-a-service in the cloud. After all, a Gateway instance in the cloud brings with it opportunities to test out any number of client consumption approaches, including mobile and non-mobile use cases, outside the confines of one's own home network.
A short note - It is well known that last year SAP made available a Trial Version of SAP NetWeaver Gateway in pre-packaged virtualized containers (both in VMware for Linux and Hyper-V for Microsoft Windows). However to my understanding you cannot run these directly on an AWS EC2 instance unless you do some sophisticated extractions which are beyond my abilities.
I've never been comfortable in the area of SAP installations, even though I've installed my fair share of trial ABAP and Java servers on local machines in the past decade. But as a developer you need to cross this bridge every so often in order to get up and running to try new things. I was personally interested in having a NetWeaver Gateway instance in the cloud which I could connect my iPhone to. Interestingly, another SAP developer jason.scott2 who works in Western Australia by coincidence attempted the same installation on the same weekend. Via Twitter, we found that we both hit the same hurdles with the installation. Therefore I resolved that the community might benefit from our shared experiences so as to make it as painless as possible for those who follow the steps in this blog.
Also I should acknowledge some key resources which I leveraged as part of the installation. People have been writing blogs about AWS installations for many years (including in-depth ones by the real experts such as martin.english and chris.kernaghan), but for this exercise the ones I referenced most often were these ...
Installing the 7.02 ABAP Trial System (NSP) in an Amazon AWS instance - Part 1 by steve.rumsby
(This is an excellent resource - in some ways this blog here is an update to the steps posted in Steve's original blog for setting up the instance)
Step by Step Installation Guide for SAP NetWeaver AS ABAP 7.02 SP6 32-bit Trial Version by faisal.altaf2
(This blog basically covers off the steps from where Steve's blog ends)
Implementing SAP Solutions on Amazon Web Services
(An 'official' document which is essential pre-reading, although this document pertains to proper SAP instances, not the trial ABAP version which we install here)
Charges
Before commencing, familiarise yourself with the Amazon charges for this service. Basically you need to pay for your Windows Usage on the Elastic Compute (EC2) service only for the hours that your instance is running. Additionally, you will need to pay ongoing costs for your persistent storage using the Elastic Blog Store (EBS) service.
Here is an approximate cost (based on pricing as at 1 July 2012 - see website for updates)
| Service | Pricing |
|---|---|
| 1 x Standard On-Demand Instance - Medium | Window Usage - $0.23 - $0.25 per Hour (depending upon selected Region) |
| 1 x Amazon Elastic Block Store - 90GB (30GB + 60GB) | $0.10 - $0.19 per GB-month of provisioned storage (depending upon selected Region) + charges per 1 million I/O requests (unlikely to be an issue for a Trial ABAP) |
There are additional charges for internet data transfer, elastic IP addresses etc. Check the website. Given that we are dealing with a Trial instance it is unlikely that these additional charges will be significant.
When looking at these charges, the most significant is for the on-demand instance itself. If you leave it running permanently the costs will add up. However if you simply start the instance when you are working on it, then stop it when it is not being used, you can keep the costs reasonable.
Steps
| Step | Screenshot |
|---|---|
| 1. Create a new AWS account via http://aws.amazon.com/ | |
| 2. In the AWS Management Console, select the EC2 (Elastic Compute) tab |  |
| 3. Select the most appropriate Region to create your instance (in my case I chose Asia Pacific Singapore because it has the lowest latency to where I reside). |  |
| 4. Select the Launch Instance button |  |
| 5. From the Request Instances Wizard, select Microsoft Windows Server 2008 R2 Base (64 bit) |  |
6. Select the Instance Type as 'Large (m1.large, 7.5GB)'. For the 'Launch Instances' section select an Availability Zone (any choice should suffice - but note down which you choose). Leave all other options as defaulted. ** Note that during the installation we will use a large instance to expedite the process, however after the installation we can downgrade to a medium instance, hence keeping ongoing charges low ** Press 'Continue'. |  |
7. In the 'Advanced Instance Options' window Select the 'Termination Protection' flag. This prevents you from accidentally terminating (destroying) your instance. You can still terminate it (when you have finished working with the Trial), but you will be forced to uncheck this flag first. I learned the hard way that this should always be selected to prevent accidental deletions of instances. Leave all other options as per their default values. Press 'Continue'. | 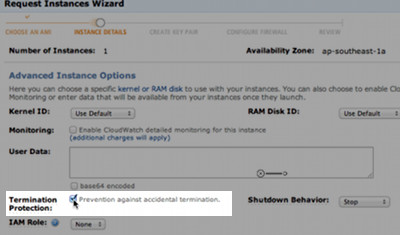 |
8. For the tags section, simply add the value 'SAP ABAP7.02 + Gateway 2.0 SP04' for the tag 'Name'. This simply gives your instance a visible name - you can change this later if you wish. Press 'Continue' |  |
9. At the 'Create Key Pair' step, enter any name for your key pair (eg. mykeypair) and press the 'Create & Download Your Key Pair' link. This will download a file which you will need later to connect to your AWS system via your local machine. Press 'Continue' | 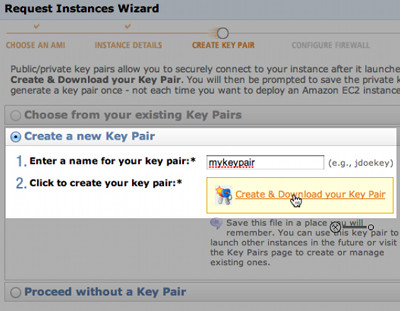 |
10. At the 'Configure Firewall' step, you can accept the suggested new Security Group name of 'quick-start-1', or alternatively change it to whatever name you wish. What is important is to add the TCP ports 3200 and 8000 by typing them in and pressing the 'Add Rule' button in turn. Opening port 3200 enables communication via a SAPGUI on your local machine, and opening port 8000 enables web communication with the SAP Internet Communication Manager (ICM) to invoke Gateway services from outside your instance. If you leave the Source as 0.0.0.0/0 it means ANY external IP address can access this system via those ports. Also ensure that TCP port 3389 is included as you need that open to connect later via Remote Desktop. Press 'Continue' IMPORTANT NOTE: The setup here results in quite an open system which will allow you to later connect devices such as smartphones to your Trial instance. However, from a security perspective you would presumably apply more stringent controls for a Productive system. |  |
11. At the 'Review' step, press the 'Launch' button. You will see a window with the text 'Your instances are now launching'. Select the option 'View your instances on the Instances page' | 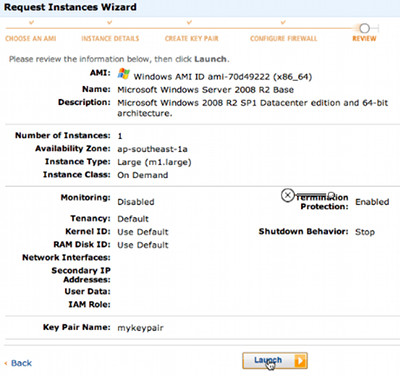 |
12. You should see your instance in the Instances page. Within 30 seconds the instance should appear as 'Running'. |  |
13. Next we need to allocate additional disk storage to this instance to accommodate the ABAP system. Select the option 'Volumes' under ELASTIC BLOCK STORE |  |
14. Here we create a volume (D drive) for our instance. First, press the 'Create Volume' button at the top of the 'EBS Volumes' canvas. For the window that appears, select the size as 60GB, and the availability zone which you selected in step 6. Press the 'Yes, Create' button. |  |
15. You will now see two rows in the EBS Volumes area. One which is 30GB was originally provisioned as part of your new instance - this is effectively the 'C:' drive. The other which is 60GB appears with state 'available' - we want this to become the 'D:' drive for our instance. Right click on the available 60GB volume and select 'Attach Volume'. |  |
16. In the popup window 'Attach Volume', select the instance you created. Leave other fields defaulted. Press the 'Yes, Attach' button. |  |
17. At this stage it may take a few minutes for the new volume to register as attached to the new instance. To see that the volume is attached, navigate back to the Instances page, click on the instance you created and you should see two entries (sda1 and xvdf) in the details pane against the field 'Block Devices'. NOTE: I have on occasions found that I needed to stop and start my instance to get the new volume to 'attach'. Be patient and cross your fingers. | 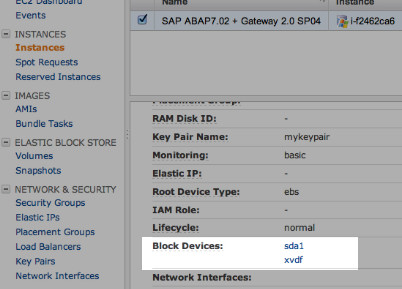 |
18. Next we need to retrieve the initial Windows password for the new system. It takes a while (sometimes as long as 15 - 30 minutes) for this to be generated for you. Right click on your instance in the instance page, and select the option 'Get Windows Password'. If you receive a popup saying that it is 'not available yet', wait a while longer and try again. |  |
19. You will see a popup window 'Retrieve Default Windows Administrator Password' Using a text editor (eg. Notepad), open the key pair file you downloaded in step 9. Copy the ENTIRE contents of this file, and paste it into the 'Private Key' field as shown in the image shown here. Press the 'Decrypt Password' button. | 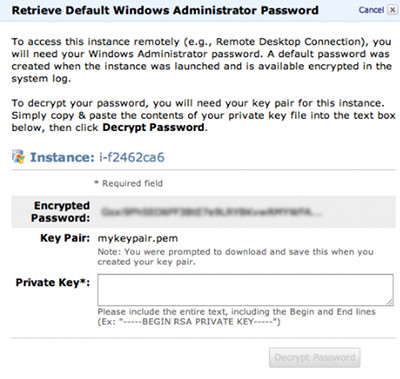 |
20. You will be presented with the initial Windows password for your new instance. Note down both the computer address, and the password. | 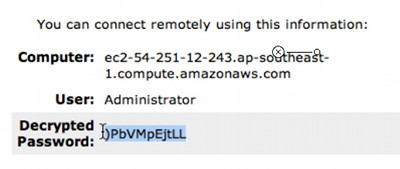 |
21. Launch a windows remote desktop client from your local machine. Windows machines should have it available in the Accessories folder of your start menu. If you have a Mac (as I do), you can download a free Windows remote desktop client here. Insert the computer name you retrieved from step 20, then for user Administrator enter the password from step 20. Enter 'OK' in the remote desktop client to login. |  |
22. If you have made it to this step, you should now be logged into your newly provisioned Windows Server. At this stage, you SHOULD change your password. From the Windows start menu, select Start -> Windows Security. Then select the option Change Password, and enter an appropriate new password. |  |
| 23. Congratulations. You now have provisioned a new Windows Server in the cloud for your ABAP Trial installation. | |
24. If at this stage you wish to take a break, you can stop your instance by right-clicking your instance in the AWS instance page and selecting the 'Stop' option. This will ensure you will not incur any unnecessary charges for the running instance (note however that you will incur ongoing charges for the disk storage which you have provisioned). You will be automatically disconnected from your Remote Desktop session when you stop the instance. Note that when subsequently starting your instance at a later stage (right-clicking on the instance and selecting the 'Start' option, you will need to look in the details pane for the instance and copy the generated computer address to use in your remote desktop session. This address may differ from the one you had used earlier (you can avoid this problem by subsequently assigning an elastic IP address - Part 4 of this blog series, by fellow SAP Mentor sufw outlines how to accomplish this). | 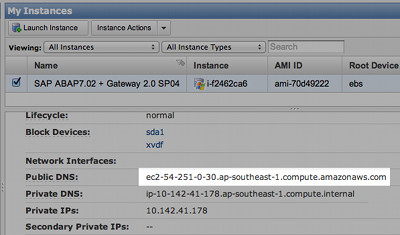 |
In Part 2 of this blog series I outline the steps necessary to prepare your running Windows Server for the ABAP Trial installation, downloading the necessary installation files, and in Part 3 I cover the actual SAP installation itself.
- SAP Managed Tags:
- SAP Gateway
You must be a registered user to add a comment. If you've already registered, sign in. Otherwise, register and sign in.
-
"automatische backups"
1 -
"regelmäßige sicherung"
1 -
"TypeScript" "Development" "FeedBack"
1 -
505 Technology Updates 53
1 -
ABAP
14 -
ABAP API
1 -
ABAP CDS Views
2 -
ABAP CDS Views - BW Extraction
1 -
ABAP CDS Views - CDC (Change Data Capture)
1 -
ABAP class
2 -
ABAP Cloud
2 -
ABAP Development
5 -
ABAP in Eclipse
1 -
ABAP Platform Trial
1 -
ABAP Programming
2 -
abap technical
1 -
absl
1 -
access data from SAP Datasphere directly from Snowflake
1 -
Access data from SAP datasphere to Qliksense
1 -
Accrual
1 -
action
1 -
adapter modules
1 -
Addon
1 -
Adobe Document Services
1 -
ADS
1 -
ADS Config
1 -
ADS with ABAP
1 -
ADS with Java
1 -
ADT
2 -
Advance Shipping and Receiving
1 -
Advanced Event Mesh
3 -
AEM
1 -
AI
7 -
AI Launchpad
1 -
AI Projects
1 -
AIML
9 -
Alert in Sap analytical cloud
1 -
Amazon S3
1 -
Analytical Dataset
1 -
Analytical Model
1 -
Analytics
1 -
Analyze Workload Data
1 -
annotations
1 -
API
1 -
API and Integration
3 -
API Call
2 -
Application Architecture
1 -
Application Development
5 -
Application Development for SAP HANA Cloud
3 -
Applications and Business Processes (AP)
1 -
Artificial Intelligence
1 -
Artificial Intelligence (AI)
4 -
Artificial Intelligence (AI) 1 Business Trends 363 Business Trends 8 Digital Transformation with Cloud ERP (DT) 1 Event Information 462 Event Information 15 Expert Insights 114 Expert Insights 76 Life at SAP 418 Life at SAP 1 Product Updates 4
1 -
Artificial Intelligence (AI) blockchain Data & Analytics
1 -
Artificial Intelligence (AI) blockchain Data & Analytics Intelligent Enterprise
1 -
Artificial Intelligence (AI) blockchain Data & Analytics Intelligent Enterprise Oil Gas IoT Exploration Production
1 -
Artificial Intelligence (AI) blockchain Data & Analytics Intelligent Enterprise sustainability responsibility esg social compliance cybersecurity risk
1 -
ASE
1 -
ASR
2 -
ASUG
1 -
Attachments
1 -
Authorisations
1 -
Automating Processes
1 -
Automation
1 -
aws
2 -
Azure
1 -
Azure AI Studio
1 -
B2B Integration
1 -
Backorder Processing
1 -
Backup
1 -
Backup and Recovery
1 -
Backup schedule
1 -
BADI_MATERIAL_CHECK error message
1 -
Bank
1 -
BAS
1 -
basis
2 -
Basis Monitoring & Tcodes with Key notes
2 -
Batch Management
1 -
BDC
1 -
Best Practice
1 -
bitcoin
1 -
Blockchain
3 -
BOP in aATP
1 -
BOP Segments
1 -
BOP Strategies
1 -
BOP Variant
1 -
BPC
1 -
BPC LIVE
1 -
BTP
11 -
BTP Destination
2 -
Business AI
1 -
Business and IT Integration
1 -
Business application stu
1 -
Business Application Studio
1 -
Business Architecture
1 -
Business Communication Services
1 -
Business Continuity
1 -
Business Data Fabric
3 -
Business Partner
12 -
Business Partner Master Data
10 -
Business Technology Platform
2 -
Business Trends
1 -
CA
1 -
calculation view
1 -
CAP
3 -
Capgemini
1 -
CAPM
1 -
Catalyst for Efficiency: Revolutionizing SAP Integration Suite with Artificial Intelligence (AI) and
1 -
CCMS
2 -
CDQ
12 -
CDS
2 -
Cental Finance
1 -
Certificates
1 -
CFL
1 -
Change Management
1 -
chatbot
1 -
chatgpt
3 -
CL_SALV_TABLE
2 -
Class Runner
1 -
Classrunner
1 -
Cloud ALM Monitoring
1 -
Cloud ALM Operations
1 -
cloud connector
1 -
Cloud Extensibility
1 -
Cloud Foundry
4 -
Cloud Integration
6 -
Cloud Platform Integration
2 -
cloudalm
1 -
communication
1 -
Compensation Information Management
1 -
Compensation Management
1 -
Compliance
1 -
Compound Employee API
1 -
Configuration
1 -
Connectors
1 -
Consolidation Extension for SAP Analytics Cloud
1 -
Controller-Service-Repository pattern
1 -
Conversion
1 -
Cosine similarity
1 -
cryptocurrency
1 -
CSI
1 -
ctms
1 -
Custom chatbot
3 -
Custom Destination Service
1 -
custom fields
1 -
Customer Experience
1 -
Customer Journey
1 -
Customizing
1 -
cyber security
2 -
Data
1 -
Data & Analytics
1 -
Data Aging
1 -
Data Analytics
2 -
Data and Analytics (DA)
1 -
Data Archiving
1 -
Data Back-up
1 -
Data Governance
5 -
Data Integration
2 -
Data Quality
12 -
Data Quality Management
12 -
Data Synchronization
1 -
data transfer
1 -
Data Unleashed
1 -
Data Value
8 -
database tables
1 -
Datasphere
2 -
datenbanksicherung
1 -
dba cockpit
1 -
dbacockpit
1 -
Debugging
2 -
Delimiting Pay Components
1 -
Delta Integrations
1 -
Destination
3 -
Destination Service
1 -
Developer extensibility
1 -
Developing with SAP Integration Suite
1 -
Devops
1 -
digital transformation
1 -
Documentation
1 -
Dot Product
1 -
DQM
1 -
dump database
1 -
dump transaction
1 -
e-Invoice
1 -
E4H Conversion
1 -
Eclipse ADT ABAP Development Tools
2 -
edoc
1 -
edocument
1 -
ELA
1 -
Embedded Consolidation
1 -
Embedding
1 -
Embeddings
1 -
Employee Central
1 -
Employee Central Payroll
1 -
Employee Central Time Off
1 -
Employee Information
1 -
Employee Rehires
1 -
Enable Now
1 -
Enable now manager
1 -
endpoint
1 -
Enhancement Request
1 -
Enterprise Architecture
1 -
ETL Business Analytics with SAP Signavio
1 -
Euclidean distance
1 -
Event Dates
1 -
Event Driven Architecture
1 -
Event Mesh
2 -
Event Reason
1 -
EventBasedIntegration
1 -
EWM
1 -
EWM Outbound configuration
1 -
EWM-TM-Integration
1 -
Existing Event Changes
1 -
Expand
1 -
Expert
2 -
Expert Insights
1 -
Fiori
14 -
Fiori Elements
2 -
Fiori SAPUI5
12 -
Flask
1 -
Full Stack
8 -
Funds Management
1 -
General
1 -
Generative AI
1 -
Getting Started
1 -
GitHub
8 -
Grants Management
1 -
groovy
1 -
GTP
1 -
HANA
5 -
HANA Cloud
2 -
Hana Cloud Database Integration
2 -
HANA DB
1 -
HANA XS Advanced
1 -
Historical Events
1 -
home labs
1 -
HowTo
1 -
HR Data Management
1 -
html5
8 -
HTML5 Application
1 -
Identity cards validation
1 -
idm
1 -
Implementation
1 -
input parameter
1 -
instant payments
1 -
Integration
3 -
Integration Advisor
1 -
Integration Architecture
1 -
Integration Center
1 -
Integration Suite
1 -
intelligent enterprise
1 -
Java
1 -
job
1 -
Job Information Changes
1 -
Job-Related Events
1 -
Job_Event_Information
1 -
joule
4 -
Journal Entries
1 -
Just Ask
1 -
Kerberos for ABAP
8 -
Kerberos for JAVA
8 -
Launch Wizard
1 -
Learning Content
2 -
Life at SAP
1 -
lightning
1 -
Linear Regression SAP HANA Cloud
1 -
local tax regulations
1 -
LP
1 -
Machine Learning
2 -
Marketing
1 -
Master Data
3 -
Master Data Management
14 -
Maxdb
2 -
MDG
1 -
MDGM
1 -
MDM
1 -
Message box.
1 -
Messages on RF Device
1 -
Microservices Architecture
1 -
Microsoft Universal Print
1 -
Middleware Solutions
1 -
Migration
5 -
ML Model Development
1 -
Modeling in SAP HANA Cloud
8 -
Monitoring
3 -
MTA
1 -
Multi-Record Scenarios
1 -
Multiple Event Triggers
1 -
Neo
1 -
New Event Creation
1 -
New Feature
1 -
Newcomer
1 -
NodeJS
2 -
ODATA
2 -
OData APIs
1 -
odatav2
1 -
ODATAV4
1 -
ODBC
1 -
ODBC Connection
1 -
Onpremise
1 -
open source
2 -
OpenAI API
1 -
Oracle
1 -
PaPM
1 -
PaPM Dynamic Data Copy through Writer function
1 -
PaPM Remote Call
1 -
PAS-C01
1 -
Pay Component Management
1 -
PGP
1 -
Pickle
1 -
PLANNING ARCHITECTURE
1 -
Popup in Sap analytical cloud
1 -
PostgrSQL
1 -
POSTMAN
1 -
Process Automation
2 -
Product Updates
4 -
PSM
1 -
Public Cloud
1 -
Python
4 -
Qlik
1 -
Qualtrics
1 -
RAP
3 -
RAP BO
2 -
Record Deletion
1 -
Recovery
1 -
recurring payments
1 -
redeply
1 -
Release
1 -
Remote Consumption Model
1 -
Replication Flows
1 -
Research
1 -
Resilience
1 -
REST
1 -
REST API
1 -
Retagging Required
1 -
Risk
1 -
Rolling Kernel Switch
1 -
route
1 -
rules
1 -
S4 HANA
1 -
S4 HANA Cloud
1 -
S4 HANA On-Premise
1 -
S4HANA
3 -
S4HANA_OP_2023
2 -
SAC
10 -
SAC PLANNING
9 -
SAP
4 -
SAP ABAP
1 -
SAP Advanced Event Mesh
1 -
SAP AI Core
8 -
SAP AI Launchpad
8 -
SAP Analytic Cloud Compass
1 -
Sap Analytical Cloud
1 -
SAP Analytics Cloud
4 -
SAP Analytics Cloud for Consolidation
2 -
SAP Analytics Cloud Story
1 -
SAP analytics clouds
1 -
SAP BAS
1 -
SAP Basis
6 -
SAP BODS
1 -
SAP BODS certification.
1 -
SAP BTP
20 -
SAP BTP Build Work Zone
2 -
SAP BTP Cloud Foundry
5 -
SAP BTP Costing
1 -
SAP BTP CTMS
1 -
SAP BTP Innovation
1 -
SAP BTP Migration Tool
1 -
SAP BTP SDK IOS
1 -
SAP Build
11 -
SAP Build App
1 -
SAP Build apps
1 -
SAP Build CodeJam
1 -
SAP Build Process Automation
3 -
SAP Build work zone
10 -
SAP Business Objects Platform
1 -
SAP Business Technology
2 -
SAP Business Technology Platform (XP)
1 -
sap bw
1 -
SAP CAP
2 -
SAP CDC
1 -
SAP CDP
1 -
SAP CDS VIEW
1 -
SAP Certification
1 -
SAP Cloud ALM
4 -
SAP Cloud Application Programming Model
1 -
SAP Cloud Integration for Data Services
1 -
SAP cloud platform
8 -
SAP Companion
1 -
SAP CPI
3 -
SAP CPI (Cloud Platform Integration)
2 -
SAP CPI Discover tab
1 -
sap credential store
1 -
SAP Customer Data Cloud
1 -
SAP Customer Data Platform
1 -
SAP Data Intelligence
1 -
SAP Data Migration in Retail Industry
1 -
SAP Data Services
1 -
SAP DATABASE
1 -
SAP Dataspher to Non SAP BI tools
1 -
SAP Datasphere
9 -
SAP DRC
1 -
SAP EWM
1 -
SAP Fiori
2 -
SAP Fiori App Embedding
1 -
Sap Fiori Extension Project Using BAS
1 -
SAP GRC
1 -
SAP HANA
1 -
SAP HCM (Human Capital Management)
1 -
SAP HR Solutions
1 -
SAP IDM
1 -
SAP Integration Suite
9 -
SAP Integrations
4 -
SAP iRPA
2 -
SAP Learning Class
1 -
SAP Learning Hub
1 -
SAP Odata
2 -
SAP on Azure
1 -
SAP PartnerEdge
1 -
sap partners
1 -
SAP Password Reset
1 -
SAP PO Migration
1 -
SAP Prepackaged Content
1 -
SAP Process Automation
2 -
SAP Process Integration
2 -
SAP Process Orchestration
1 -
SAP S4HANA
2 -
SAP S4HANA Cloud
1 -
SAP S4HANA Cloud for Finance
1 -
SAP S4HANA Cloud private edition
1 -
SAP Sandbox
1 -
SAP STMS
1 -
SAP SuccessFactors
3 -
SAP SuccessFactors HXM Core
1 -
SAP Time
1 -
SAP TM
2 -
SAP Trading Partner Management
1 -
SAP UI5
1 -
SAP Upgrade
1 -
SAP Utilities
1 -
SAP-GUI
8 -
SAP_COM_0276
1 -
SAPBTP
1 -
SAPCPI
1 -
SAPEWM
1 -
sapmentors
1 -
saponaws
2 -
SAPS4HANA
1 -
SAPUI5
4 -
schedule
1 -
Secure Login Client Setup
8 -
security
9 -
Selenium Testing
1 -
SEN
1 -
SEN Manager
1 -
service
1 -
SET_CELL_TYPE
1 -
SET_CELL_TYPE_COLUMN
1 -
SFTP scenario
2 -
Simplex
1 -
Single Sign On
8 -
Singlesource
1 -
SKLearn
1 -
soap
1 -
Software Development
1 -
SOLMAN
1 -
solman 7.2
2 -
Solution Manager
3 -
sp_dumpdb
1 -
sp_dumptrans
1 -
SQL
1 -
sql script
1 -
SSL
8 -
SSO
8 -
Substring function
1 -
SuccessFactors
1 -
SuccessFactors Platform
1 -
SuccessFactors Time Tracking
1 -
Sybase
1 -
system copy method
1 -
System owner
1 -
Table splitting
1 -
Tax Integration
1 -
Technical article
1 -
Technical articles
1 -
Technology Updates
1 -
Technology Updates
1 -
Technology_Updates
1 -
Threats
1 -
Time Collectors
1 -
Time Off
2 -
Time Sheet
1 -
Time Sheet SAP SuccessFactors Time Tracking
1 -
Tips and tricks
2 -
Tools
1 -
Trainings & Certifications
1 -
Transport in SAP BODS
1 -
Transport Management
1 -
TypeScript
2 -
unbind
1 -
Unified Customer Profile
1 -
UPB
1 -
Use of Parameters for Data Copy in PaPM
1 -
User Unlock
1 -
VA02
1 -
Validations
1 -
Vector Database
1 -
Vector Engine
1 -
Visual Studio Code
1 -
VSCode
1 -
Web SDK
1 -
work zone
1 -
workload
1 -
xsa
1 -
XSA Refresh
1
- « Previous
- Next »
- MYINBOX is connected to HUB system and workflow exists in ECC system in Technology Q&A
- Installation of Sales cube (0SD_C03) in BW 7.5 version in Technology Blogs by Members
- SAP Datasphere Connectivity With S/4 HANA System & SAP Analytics Cloud : Technical Configuration in Technology Blogs by Members
- Exploring Datasphere & BW Bridge : Technical Insights in Technology Blogs by Members
- Customer Course GW100 (SAP Gateway – Building OData Services) Available for SAP S/4HANA 2021 in Technology Blogs by SAP
| Subject | Kudos |
|---|---|
|
|
|
|
|
|
|
|
|
|
|
|
|
|
|
|
|
|
|
| User | Count |
|---|---|
| 11 | |
| 10 | |
| 7 | |
| 6 | |
| 4 | |
| 4 | |
| 3 | |
| 3 | |
| 3 | |
| 3 |