
- SAP Community
- Products and Technology
- Additional Blogs by Members
- Setting up a SAP BI/BW System based on the SAP ABA...
Additional Blogs by Members
Turn on suggestions
Auto-suggest helps you quickly narrow down your search results by suggesting possible matches as you type.
Showing results for
Former Member
Options
- Subscribe to RSS Feed
- Mark as New
- Mark as Read
- Bookmark
- Subscribe
- Printer Friendly Page
- Report Inappropriate Content
04-15-2010
10:40 AM
This guide will help you to get started quickly with installing an SAP BI Server - based on the free SAP ABAP Demo Version as starting point. The primary tools from the BEx Suite (i.e. BEx Analyzer and Query Designer) are working without any hassle, but be aware that since the SAP Portal is an essential necessity for the BEx WEB tools, there is of course a certain lack of functionality for extended operations (Integrated Planning, Web Application Designer a.s.o.). But hey, as a private playground @home it runs fine.
Content:
1. Preparation2. Install the SAP Server
3. Connect to the SAP Server
4. Setting up the BI System
5. Starting the SAP BI Data Warehousing Workbench
6. Starting the SAP Business Explorer Suite
1. PREPARATION
1a:
Download the free ABAP Trial from sdn.sap.com > Downloads > Software Downloads > SAP NetWeaver Main Releases > SAP NetWeaver 7.01. At this time, there are three versions available (ABAP Dev. Edit, ABAP Trail SR1, ABAP Trail) - I've tested the newest and the oldest version but couldn't find relevant differences regarding our purpose, except that the installation of the old version took less than one hour compared to nearly four hours with the newest version, so for this article I picked the smallest (and oldest) download (SAP NetWeaver 7.01 ABAP Trial, 2.8GB, 15.Aug.2008), because I'm going to install it in a virtual machine on an old notebook with very limited RAM.
1b:
The SAP GUI - this could be the hardest part! Although the NetWeaver demo comes with the SAP GUI, that edition isn't as feature-rich as it could be.
And since you probably maybe are a beginner, I'm afraid you don't have access to the SAP Service Marketplace. So please ask the SAP Basis Gurus from your company if they can -corresponding to the license agreements- hand over a GUI version including the BI/BW setup files (it should include SapBiSetup.exe, SetupAll.exe plus folder BI and BW), or if you are a student ask your sysadmin. Also sometimes universities or consulting companies do offer an appropriate download somewhere on their ftp-server.
This Screenshot shows the SAPGUI Setup-Folder including the BI/BW-Files:

If you start the SAPGUI-Setup from the Trial-Edition (without BI/BW Files), it gives you just limited options:
If you have the complete version at your disposal, it should look like this:
1c:
Download Sun/Oracle VirtualBox from www.virtualbox.org. It's free.
1d:
Get a WinXPPro-CD or ISO-Image.
Try to avoid a version which must be activated, take for example a Windows XP Corporate Version - in a virtual environment, the activating obligation really can be annoying.
1e:
Install VirtualBox and set up a WinXP-Pro virtual machine with these specs:- 1GB RAM (at least)
- 40GB HDD
- Bridged Network-adapter
- shared folder

(Sorry for this German screenshot - of course VirtualBox is also available in English)
Avoid any unnecessary services - this guest is our SAP BI Server, so you don't need fancy sounds, wallpapers, media player, outlook, themes and so on.
Suggestion: Create an own stripped-off XP ISO with nLite (www.nliteos.com).
Install the Virtual Box Guest Additions.
Set up the LAN Connection according to this screenshot:
Leave GATEWAY and DNS empty. This virtual machine (Guest) is our server, but the SAPGUI will be installed on the Host or on another computer (i.e. a netbook) within the local area network. Benefits: You can easily back up and restore the server without loosing your SAPGUI settings.
Try to ping the server from the host or from the separate computer to check if network connection is working: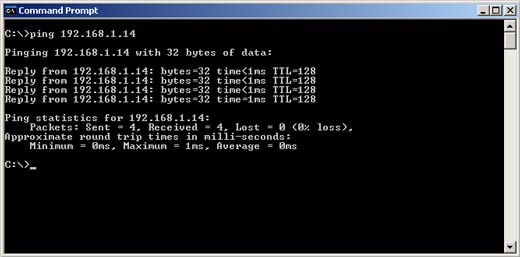
1f:
Install the SAPGUI. Do not install it onto your virtual machine, but on the host or on another computer (i.e. a netbook) within your local area network.
Before installing the SAPGUI, make sure that you already have a MS-Office Version on your Computer. I use Office 2003, but I guess it's also working with this all-new hypermodern latest-fashion Ribbon-Interface-Office-Version.
Start the Installer (SetupAll.exe), select the three options "SAP GUI", "BW 3.5" and "Business Explorer" (see screenshot STEP 1b), and click several times on the "Next"-Button until setup is starting to copy the files. Finally this screen should appear:
Start "SAP Logon" (remember, we are not yet on the server but on the Host or another Computer within you network) and click the tab "Systems", then the button "New Item....":

A new window opens which shows you the available systems (of course it's blank), click on "Next" and enter the values according to this screenshot:
- Connection Type: Select "Custom Application Server".
- Description: Name it like you want to.
- Application Server: The IP of your SAP Server (your virtual machine), here "192.168.1.14".
- System Number: This is the unique system number, for the SAP trial it is "00".
- System ID: The so called SID, for the SAP trial the SID is "NSP".
- SAProuter String: Leave empty.
2. INSTALL THE SAP SERVER
2a:
Copy the downloaded SAP NetWeaver Trial - files onto the C:-Drive of your virtual machine. Hint: Since I've had trouble in the past while using a too long folder name, to avoid this kind of problem I now always use a short folder name direct under the root dir (i.e. "C:\SAPSETUP\).
Start the Setup by clicking on START.HTM.
2b:
Carefully read the SAP instructions (start.htm). Don't skip them, please, or you will run into deep trouble - promised!
Especially pay attention to these topics:
- Hostname must not exceed 13 characters
- Install the Loopback-Adapter!!!
- Edit the hosts file
- Restart the virtual machine after these changes!
2c:
After rebooting, start "start.htm" again and follow the instructions. Probably you have to install the Management Console before starting the Installer (not compulsory; depends on your ABAP Trial Version).
Just follow the SAP instructions and everything will be fine...
Hint: During the setup, you have to enter a database master password. Since I tend to forget this key (you'll probably never need it again, but...), I create a text file with the password on the desktop of this virtual machine.
It takes nearly an hour until finally this screen should appear:
Or, if you downloaded and installed the newest ABAP Trial, it takes a few more hours and finally looks like this:
To avoid problems, do not start the Application Server before rebooting!
RESTART you machine.
2d:
Start the server via the management console:

You have to enter your (Windows-) Admin password.
It takes one minute, first the server icon turns yellow and finally when the server is up the color of the icon changes to green.

Close the management console.
Your server is running, further work on this virtual machine is not necessary, you're done. Congrats!
3. CONNECT TO THE SAP-SERVER
3a:
Start SAP-Logon on your separate computer within the LAN (or from the Host-PC of your virtual machine). The already created entry (see STEP 1f) should be marked automatically, so just click onto the button "Log On".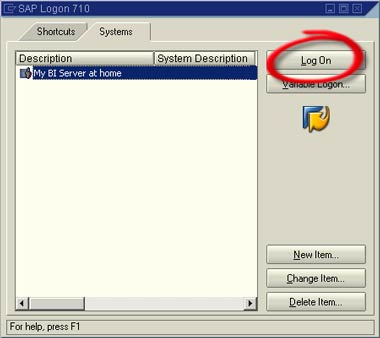
I am connecting to the virtual machine (SAP Server) from a netbook (Asus 1001p), runs fine! Log in with the user "DDIC".
- Just in case you wonder 'bout the icons in the task bar of my netbook:
Network, SAP Logon, 3G-Connection, Remove Hardware, Power, Volume Control, Asus HybridEngine, BFilter, MoveMe, MS-AntiVirus (deactivated), PureText, Touchpad, Time.
3b:
You can personalize the GUI, go to Extras > Settings and mark "Do not display picture" and "Display technical names".
3c:
All ABAP programs are stored as ABAP source code in the database. If you start a program for the first time, the byte code must first be generated once - this takes of course some time. In a productive scenario, the SAP Basis Guru would pre-generate this byte code (transaction SGEN), but on this home scenario it's not really necessary (it takes two days plus approx. 80GB disk space....). So just get used to it, you are working with altogether maybe 30 programs, so the generating-sound plus the short generating-second should be resolve itself after a few days.
Let's take a first look onto the systems initial consistency. Do you see the command field in the upper left corner? Type in "/nSICK" (without the quotes) and press enter to start the Initial Consistency Check:![]()
"/n" means that you want to start a transaction (program) in the same window, while "SICK" is the transaction code for this program. Instead of "/n", you can for example also type "/o" to start a program in a new window.
You can go back with "F3" or by pressing the green bubble with the arrow inside.
Now try another transaction code: SM04. (type "/nSM04"). This transaction opens the user list:
Hint: The tcode in capital letters is for emphasis; it does not need to be written with. Also there are some situations (i.e. in the SAP Easy Access Screen) where you can avoid the "/n", but hey, this is a quick guide and not a doctoral thesis.
By the way: I've created a list of typical SAP System Administration Transaction Codes, you can download the PDF file at this URL:
4. SETTING UP THE BI SYSTEM
4a
Since the Client 000 is reserved for special purposes (it's the SAP reference client), we set up the BI System in Client 001 (which is the production preparation client).
So log out from the Client 000 (close the SAP GUI) and log in again to Client 001 as User DDIC.
But the User DDIC does not have the rights for changes in the client system, so you need a new user for Client 001. Therefore start transaction SU01.
In the field "User", type in a name (here: "KLAUS", since this is my real name :-). Click on the icon for creating a new user.
Normally now the "Address maintenance for User Company Addresses" should pop up, because in Client 001 there is notyet a User company assigned. Just fill in the Company Name, Country Code, Time Zone and close the popup.
In tab "Address" specify a Last name, in tab "Logon data" you have to type in a initial password (will be changed during the first logon), in tab "Profiles" assign the profiles "SAP_ALL" und "SAP_NEW":
Click the "Save"-Icon and then logout from the GUI.
Log on again (Client 001!), but this time use you new account (Your new User plus the initial Password). You have to assign a new password.
Repeat Step 3b (personalize the GUI) for this new User.
4b
You are logged in to Client 001, aren't you? Check it by clicking the icon on the right lower corner.
Client 001 is not yet assigned to a logical system. The logical system is required as a unique identifier, the BI system is not working without it.
Start transaction BD54 and click on "New Entries".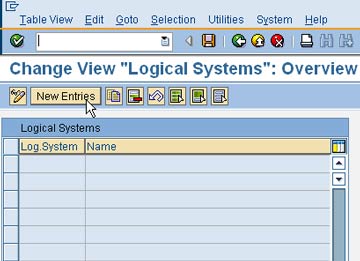
Now create a new logical system and save it with the SAVE-icon. Use capital letters! SAP recommends the name convention (System ID)CLNT(Client) - our SID is NSP, our Client is 001, so we take "NSPCLNT001"
A prompt for Workbench request opens, click the "Create Request" button.
Enter a description, press SAVE.
Press continue:
In the next view (New Entries: Overview), in the left lower corner the status message "Data was saved" should be visible.
Now after we successfully created a logical system, we must assign this logical system with our client 001. Therefore, start transaction SCC4, click on the "Display > Change" button and double-click on the line for Client 001.
The change view "Clients: Details" opens. Do you see the field "Logical system" - it's empty, isn't it? Click on it and press F4, select the newly created logical system and press enter. Save by clicking the SAVE-Icon.
Hint: The German term "Auslieferungsmandant" in field Client stands for "delivery/delivered client" (but do it like MC-Hammer: don't touch this...).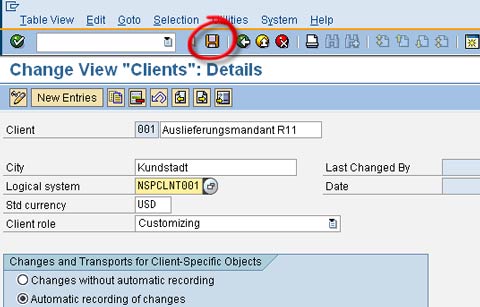
5. STARTING THE SAP BI DATA WAREHOUSING WORKBENCH
The Data Warehousing Workbench (DWWB), in former versions also called AWB (Administrator Workbench), is the main tool for tasks in the data warehousing.
The transaction code for the DWWB is RSA1.
You also can start the DWWB from the SAP Easy Access menu by selecting SAP menu > Information Systems > Business Information Warehouse > Modeling > Data Warehousing Workbench: Modeling.
On a slow system with limited RAM, the generation of the byte code takes a while.
After a few minutes, a prompt asks you if you want to replicate metadata or only activate. Since there shouldn't be any entries in the source system tree, you can click on "Only Activate". But wait, I was wrong, there is a source system: The BI Server itself. So click either "Replicate As Well" or click "Only Activate" and later open the Source Systems tree under Modeling, than mark the Source System and select "Replicate Datasources".
Remember: The ABAP source code must once be compiled for every function that is started for the first time. Be a little patient.
6. STARTING THE SAP BUSINESS EXPLORER SUITE
Open the Windows Program Menu and click on Programs > Business Explorer. The entries are part of the SAP BEx Suite; you can learn more about these tools under this URL:

6a
We are starting with the Query Designer.
Quote from the SAP help: "You analyze the dataset of the BI system by defining queries for InfoProviders using the BEx Query Designer. By selecting and combining InfoObjects (characteristics and key figures) or reusable query elements (such as structures) in a query, you determine the way in which you navigate through and evaluate the data in the selected InfoProvider".
The Query Designer fetches the logon data automatically from your entries in the SAP Logon, mark "Use Selected System as Default" to suppress this logon screen.
Enter your User Data. Remember: Client 001.
After clicking "OK", it seems like it is crashed, because nothing is happening. Again, be patient - for the first start, it can take up to three minutes until finally the program appears:
I have created a first query and could save, open and use the query, even in the Analyzer.
6b
Another important tool is the Analyzer, an Excel AddOn.
With the Analyzer, you can "analyze selected InfoProvider data and use it for planning by navigating in queries that were created in the BEx Query Designer" (quote SAP help).
Start the Analyzer and click the Connect icon. Enter your password, it should connect. You can verify the connection by clicking the Connect-icon again.
6c
The Web Application Designer is starting. Wow, I haven't expected this.
But wait, does the WAD really work in this Portal-free environment? Yes, it does. You can't publish or execute, but you can create, play and get used to the handling and workflow of this fine tool. Even the wizards are working. While saving, you'll receive an error message, but the file is stored - incredible!
8 Comments
Related Content
- First Half 2024 Release: What’s New in SAP SuccessFactors HCM in Human Capital Management Blogs by SAP
- I can't login to my ABAP system as an administrator in Technology Q&A
- Adverse Media Monitoring: How to improve overall Supply Chain Management in Supply Chain Management Blogs by Members
- Mode of Transport at the Border without GTS in Financial Management Q&A
- Easy way to automate and configure the setup of a BTP account and Cloud Foundry using Terraform. in Technology Blogs by Members
Top kudoed authors
| User | Count |
|---|---|
| 1 | |
| 1 | |
| 1 | |
| 1 |