- SAP Community
- Products and Technology
- CRM and Customer Experience
- CRM and CX Blogs by SAP
- SAP Hybris Marketing Cloud - Verifying E-Mail addr...
CRM and CX Blogs by SAP
Stay up-to-date on the latest developments and product news about intelligent customer experience and CRM technologies through blog posts from SAP experts.
Turn on suggestions
Auto-suggest helps you quickly narrow down your search results by suggesting possible matches as you type.
Showing results for
former_member24
Active Participant
Options
- Subscribe to RSS Feed
- Mark as New
- Mark as Read
- Bookmark
- Subscribe
- Printer Friendly Page
- Report Inappropriate Content
08-03-2017
1:12 PM
This blog series is separated into 3 separate blog posts.

Welcome to the blog posts of the SAP CX Services Marketing Practice.
We are happy to share with you our experience around Marketing Business, Technology and Analytics.
You want to see more blogs from us? Click here.
In this Blog Post,
We will create a new Iflow on SAP Cloud Platform Integration and configure the Iflow to communicate with SAP Hybris marketing Cloud and Neverbounce to verify E-Mail addresses.

1. Receive message from SAP Hybris marketing Cloud
Configure a HTTP Sender with the same address and authentication setting, defined in the Outbound Communication Arrangement in Marketing Cloud.
When releasing a campaign, Hybris Marketing Cloud first sends a HTTP HEAD to the Service URL before sending the actual message. In our scenario, we respond with a success message in order for the campaign to be released.
This can be solved on SAP Cloud Platform Integration with a simple routing condition. In the Router, Integration Patterns use Camel Simple Expression to access the header value for CamelHttpMethod, and define the condition to end the process successfully for the call from SAP Hybris Marketing Cloud.
When this is successful, SAP Hybris Marketing Cloud will send out the campaign data.
2. Extract E-Mail Addresses
Neverbounce expects the list of E-Mail addresses is a specified format.
Here, we use list verification with URL encoded String.
The received Message is converted to XML and transformed to an URL Encoded String using XSLT Mapping on SAP Cloud Platform Integration.
Using XSLT is only one approach how a specific value can be extracted from an inbound message.
Comparing SAP Cloud Platform Inbound and Outbound Message.
We have pulled one entry for example.
3. Get the Neverbounce Access Token
For authentication against the API, Neverbounces utilizes OAuth 2.0.
This requires to request an access token before sending a request to one of the provided verification APIs provided by Neverbounce.
In the IFlow, the mandatory values in the message header and body is defined using a Content Modifier.
With the correct request, Neverbounce responses with an access token to be used for the following requests.
This token is extracted from the response with a Groovy Script.
Getting started with the Neverbounce APIs: https://neverbounce.com/help/api/getting-started-with-the-api/
4. Validate List of E-Mail addresses with Neverbounce
Once we saved the access token in the Message Header, we can prepare the request to verify the collected E-Mail addresses with the Neverbounce API.
In the next step, the request message to be sent to Neverbounce is prepared. Again, we can use a Content Modifier to prepare the request message.
Refer, to the official documentation to review the expected format of the request message.
With the response, Neverbounce provides information if the request was received successfully and the Job-ID.
To avoid processing unsuccessful requests, we have defined a Router that routes messages based on the success value from the Neverbounce response.
To be able to use the Router with Xpath expressions in the Iflow, the message must be converted to XML format.
In order for the JSON to XML converter to work properly, there must be only one element on root level in the message body. This can be done using Groovy script or a Content Modifier.
With the message converted to XML, we can set a routing condition, such as //success = 'true'.
API documentation: https://neverbounce.com/help/api/verifying-a-list/
5. Check the status of the list verification
When the request to validate the E-Mail addresses was successful, we need to wait until the job is done.
Depending on the number of E-Mail addresses to be validated this can take a couple minutes.
With this example, we have built the logic in one single Iflow. It would be also possible to split the logic between different Iflows.
From the Local Integration Process, we check the status every 30 seconds and check the response if the list verification is completed or not.
In the Local Process Call you can define an exit condition for looping process calls and a maximum number of iterations to avoid infinite loops.
As long the Condition Expression of the Local Process Call is true, the called local process will be iterated.
In our case, we exit the loop process when the List verification is completed or has failed.
Adding more than one exit expression is only allowed when using the Camel Simple Expressions.
Condition expression: ${property.status} != '4' or ${property.status} = '5' or ${property.success} = 'false'

Again, capture any failed messages with the Router and end the process when the validation failed.
Neverbounce Dashboard

Status Codes
6. Download verified E-Mail addresses
Now, the verification of the E-Mail addresses is completed, the results are ready for download.
Providing the Access Token, Job-ID, and further parameters on what E-Mail addresses to retrieve, prepare another request to send to Neverbounce.
With the download list call, you can define that only E-Mail addresses with a specific status are downloaded. This is recommended when validating large lists.
Sending the request, Neverbounce will send you the following response in CSV format.
John.Doe@sap.com,valid
Max.Mustermann@abc123.com,invalid
Congratulations! You have successfully verified your list of E-Mail addresses.
With this information, you need to update the E-Mail addresses on SAP Hybris Marketing Cloud.
7. Map the results to SAP Hybris marketing Cloud interactions
Before creating an interaction with the E-Mail validity update, we need to convert the CSV structured payload to an XML formatted payload. This can be done using the CSV to XML Converter Integration pattern. To do so, you need to create a simple XML Schema file that represents the needed structure used in the Message Mapping.
To get the target structure for the Message mapping, create a XML Schema file with the expected message structure on the receiver site.
The XML Schema file can be created from the OData Receiver Channel in the Iflow.
Simply connect to the OData service or use the OData metadata file from the adapter specific tab. Select the entities, Method, and Field from the menu. This creates the XML Schema file to be used for the Message Mapping.
For every row entry with an invalid E-Mail address create a new interaction.
With this Mapping, we only consider invalid E-Mail addresses. But because we download all E-Mail verifications from Neverbounce, we need to have some mapping logic to only submit invalid E-Mail addresses to SP Hybris Marketing Cloud.
You could also just download all invalid E-Mail addresses from Neverbounce, what would make the mapping procedure even more simple.

8. Import the interactions to SAP Hybris marketing Cloud
Finalize the Iflow with configuring the SAP Hybris Marketing Cloud Receiver.
This should be at least already partly done when you did step 7.
The Authentication method is dependent from what is configured for the Inbound Communication Arrangement in SAP Hybris marketing Cloud.

9. Review the data on SAP Hybris Marketing Cloud
Before we started the exercise, we replicated some data to SAP Hybris marketing Cloud, including some dummy data with invalid E-Mail addresses.
When creating the target group we made sure that Mr. Max Mustermann and Mr. John Doe and members of the defined target group.
When releasing the campaign, all contacts including to two we created are validated by Neverbounce.
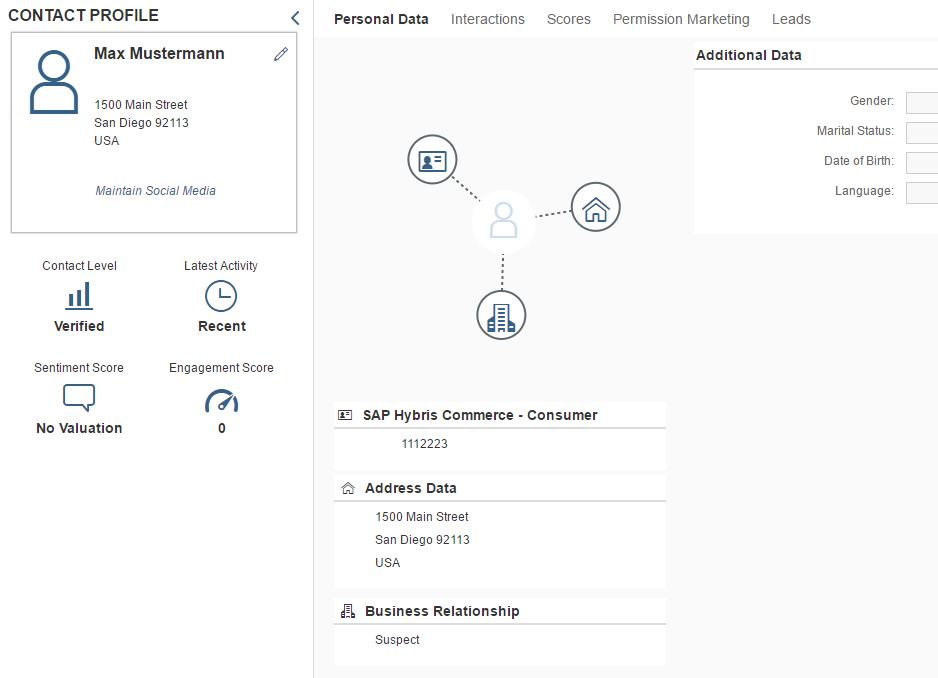
Contact Profile before the E-Mail address was send to Neverbounce for verification.

After importing the hard bounce interaction the E-Mail is not available anymore in the Contact profile.
You want to see more articles from SAP Services? Click on the banner below.
Your SAP CX Services – Marketing Practice team.

- Introduction and general setup
- Configure E-Mail List verification with Neverbounce
- Set up E-Mail List Analysis and Single E-Mail validation with Neverbounce
Introduction
Welcome to the blog posts of the SAP CX Services Marketing Practice.
We are happy to share with you our experience around Marketing Business, Technology and Analytics.
You want to see more blogs from us? Click here.
In this Blog Post,
We will create a new Iflow on SAP Cloud Platform Integration and configure the Iflow to communicate with SAP Hybris marketing Cloud and Neverbounce to verify E-Mail addresses.
Configure the Iflow on SAP Cloud Platform integration
1. Receive message from SAP Hybris marketing Cloud
Configure a HTTP Sender with the same address and authentication setting, defined in the Outbound Communication Arrangement in Marketing Cloud.
When releasing a campaign, Hybris Marketing Cloud first sends a HTTP HEAD to the Service URL before sending the actual message. In our scenario, we respond with a success message in order for the campaign to be released.
This can be solved on SAP Cloud Platform Integration with a simple routing condition. In the Router, Integration Patterns use Camel Simple Expression to access the header value for CamelHttpMethod, and define the condition to end the process successfully for the call from SAP Hybris Marketing Cloud.
When this is successful, SAP Hybris Marketing Cloud will send out the campaign data.
2. Extract E-Mail Addresses
Neverbounce expects the list of E-Mail addresses is a specified format.
- Public URL to the CSV file
- URL encoded String
Here, we use list verification with URL encoded String.
The received Message is converted to XML and transformed to an URL Encoded String using XSLT Mapping on SAP Cloud Platform Integration.
Using XSLT is only one approach how a specific value can be extracted from an inbound message.
Comparing SAP Cloud Platform Inbound and Outbound Message.
We have pulled one entry for example.
From the Cloud Integration Inbound Message (Marketing Cloud Outbound), the E-Mail address needs to be extracted from the Value field. Received Message from SAP Hybris marketing Cloud (converted to XML) | When the message is received, the E-Mail addresses are extracted and transformed to URL encoded String. This is send to Neverbounce for validation. |
<?xml version='1.0' encoding='UTF-8'?> <d> <Campaign> <CampaignId>0000000300</CampaignId> <Name>OC_Neverbounce</Name> <MarketingAreaId>CXXGLOBAL</MarketingAreaId> <SegmentationObject>SAP_CE_CONTACT_ENGAGEMENT</SegmentationObject> <ImplementationId>ZOC_NEVERBOUNCE_EXPO</ImplementationId> </Campaign> <PackageId>1</PackageId> <ExecutionStartDateTime>2017-06-16T13:42:28Z</ExecutionStartDateTime> <ExecutionRunKey>02000A1BABB81EE794D333D60ADCBDB3</ExecutionRunKey> <CampaignTargetGroupMembers> <OutboundId>B8DE1F6EAC2C09B92F16A99555E690F4D2B15BFE</OutboundId> <PackageId>1</PackageId> <ExecutionRunKey>02000A1BABB81EE794D333D60ADCBDB3</ExecutionRunKey> <TargetGroupMemberAttributeData> <AttributeId>DA-SAP_CE_IC_CONTACT-IC_ID_ORIGIN</AttributeId> <Value>EMAIL</Value> <EdmTypeId>Edm.String</EdmTypeId> <OutboundId>B8DE1F6EAC2C09B92F16A99555E690F4D2B15BFE</OutboundId> </TargetGroupMemberAttributeData> <TargetGroupMemberAttributeData> <AttributeId>DA-SAP_CE_IC_CONTACT-IC_ID</AttributeId> <Value>John.Doe@sap.com</Value> <EdmTypeId>Edm.String</EdmTypeId> <OutboundId>B8DE1F6EAC2C09B92F16A99555E690F4D2B15BFE</OutboundId> </TargetGroupMemberAttributeData> </CampaignTargetGroupMembers> <CampaignTargetGroupMembers> <OutboundId>F5C7E84C030D03ADB4E2DD963D52F2C224E7EE0E</OutboundId> <PackageId>1</PackageId> <ExecutionRunKey>02000A1BABB81EE794D333D60ADCBDB3</ExecutionRunKey> <TargetGroupMemberAttributeData> <AttributeId>DA-SAP_CE_IC_CONTACT-IC_ID_ORIGIN</AttributeId> <Value>EMAIL</Value> <EdmTypeId>Edm.String</EdmTypeId> <OutboundId>F5C7E84C030D03ADB4E2DD963D52F2C224E7EE0E</OutboundId> </TargetGroupMemberAttributeData> <TargetGroupMemberAttributeData> <AttributeId>DA-SAP_CE_IC_CONTACT-IC_ID</AttributeId> <Value>Max.Mustermann@abc123.com</Value> <EdmTypeId>Edm.String</EdmTypeId> <OutboundId>F5C7E84C030D03ADB4E2DD963D52F2C224E7EE0E</OutboundId> </TargetGroupMemberAttributeData> </CampaignTargetGroupMembers> </d> | As URL encoded String for E-Mail verification: John.Doe%40sap.com%0AMax.Mustermann%40abc123.com Message, send back to SAP Hybris Marketing Cloud: <?xml version="1.0" encoding="UTF-8"?> <ImportHeaders> <ImportHeader> <Id/> <Interactions> <Interaction> <Timestamp>2017-7-06T11:32:08</Timestamp> <Reason>EMAIL_INVALID</Reason> <InteractionType>EMAIL_BOUNCE_HARD</InteractionType> <ContactIdOrigin>EMAIL</ContactIdOrigin> <ContactId>Max.Mustermann@abc123.com</ContactId> <CommunicationMedium>EMAIL</CommunicationMedium> <Key/> </Interaction> </Interactions> </ImportHeader> </ImportHeaders> |
3. Get the Neverbounce Access Token
For authentication against the API, Neverbounces utilizes OAuth 2.0.
This requires to request an access token before sending a request to one of the provided verification APIs provided by Neverbounce.
In the IFlow, the mandatory values in the message header and body is defined using a Content Modifier.
With the correct request, Neverbounce responses with an access token to be used for the following requests.
This token is extracted from the response with a Groovy Script.
{

    "access_token": "e8d91ea95de5be42cf1f71324f7fcbc33741851a",

    "expires_in": 3600,

    "token_type": "Bearer",

    "scope": "basic user"

}
Getting started with the Neverbounce APIs: https://neverbounce.com/help/api/getting-started-with-the-api/
4. Validate List of E-Mail addresses with Neverbounce
Once we saved the access token in the Message Header, we can prepare the request to verify the collected E-Mail addresses with the Neverbounce API.
In the next step, the request message to be sent to Neverbounce is prepared. Again, we can use a Content Modifier to prepare the request message.
Refer, to the official documentation to review the expected format of the request message.
With the response, Neverbounce provides information if the request was received successfully and the Job-ID.
To avoid processing unsuccessful requests, we have defined a Router that routes messages based on the success value from the Neverbounce response.
To be able to use the Router with Xpath expressions in the Iflow, the message must be converted to XML format.
In order for the JSON to XML converter to work properly, there must be only one element on root level in the message body. This can be done using Groovy script or a Content Modifier.
With the message converted to XML, we can set a routing condition, such as //success = 'true'.
{

    "success": true,

    "job_status": 0,

    "job_id": 12345,

    "execution_time": 0.16023087501526

}
API documentation: https://neverbounce.com/help/api/verifying-a-list/
5. Check the status of the list verification
When the request to validate the E-Mail addresses was successful, we need to wait until the job is done.
Depending on the number of E-Mail addresses to be validated this can take a couple minutes.
With this example, we have built the logic in one single Iflow. It would be also possible to split the logic between different Iflows.
From the Local Integration Process, we check the status every 30 seconds and check the response if the list verification is completed or not.
In the Local Process Call you can define an exit condition for looping process calls and a maximum number of iterations to avoid infinite loops.
As long the Condition Expression of the Local Process Call is true, the called local process will be iterated.
In our case, we exit the loop process when the List verification is completed or has failed.
Adding more than one exit expression is only allowed when using the Camel Simple Expressions.
Condition expression: ${property.status} != '4' or ${property.status} = '5' or ${property.success} = 'false'
Again, capture any failed messages with the Router and end the process when the validation failed.
Neverbounce Dashboard
Status Codes
| Value | Description |
| 0 | Request has been received but has not started indexing |
| 1 | List is indexing and deduping |
| 2 | List is awaiting user input (Typically skipped for lists submitted via API) |
| 3 | List is being processed |
| 4 | List has completed verification |
| 5 | List has failed (Click here to learn how to fix a failed list) |
6. Download verified E-Mail addresses
Now, the verification of the E-Mail addresses is completed, the results are ready for download.
Providing the Access Token, Job-ID, and further parameters on what E-Mail addresses to retrieve, prepare another request to send to Neverbounce.
With the download list call, you can define that only E-Mail addresses with a specific status are downloaded. This is recommended when validating large lists.
Sending the request, Neverbounce will send you the following response in CSV format.
John.Doe@sap.com,valid
Max.Mustermann@abc123.com,invalid
Congratulations! You have successfully verified your list of E-Mail addresses.
With this information, you need to update the E-Mail addresses on SAP Hybris Marketing Cloud.
| Parameter | Description |
| valids | Include valid emails |
| invalids | Include invalid emails |
| catchall | Include catchall emails |
| disposable | Include disposable emails |
| unknown | Include unknown emails |
| duplicates | Include duplicated emails (duplicates will have the same verification result) |
| textcodes | Result codes will be returned as english words instead of numbers |
7. Map the results to SAP Hybris marketing Cloud interactions
Before creating an interaction with the E-Mail validity update, we need to convert the CSV structured payload to an XML formatted payload. This can be done using the CSV to XML Converter Integration pattern. To do so, you need to create a simple XML Schema file that represents the needed structure used in the Message Mapping.
To get the target structure for the Message mapping, create a XML Schema file with the expected message structure on the receiver site.
The XML Schema file can be created from the OData Receiver Channel in the Iflow.
Simply connect to the OData service or use the OData metadata file from the adapter specific tab. Select the entities, Method, and Field from the menu. This creates the XML Schema file to be used for the Message Mapping.
For every row entry with an invalid E-Mail address create a new interaction.
With this Mapping, we only consider invalid E-Mail addresses. But because we download all E-Mail verifications from Neverbounce, we need to have some mapping logic to only submit invalid E-Mail addresses to SP Hybris Marketing Cloud.
You could also just download all invalid E-Mail addresses from Neverbounce, what would make the mapping procedure even more simple.
| Field | Mapping | Mandatory |
| Timestamp | currentDate("yyyy-M-dd'T'HH:mm:ss","Sunday","1","true") | x |
| InteractionType | const( "EMAIL_BOUNCE_HARD") | x |
| ContactIdOrigin | const(""EMAIL"") | x |
| ContactId | ifWithoutElse(stringEquals(/root/row/status,const(""invalid"")),/root/row/email,""true"") | x |
| CommunicationMedium | const(""EMAIL"") | x |
| Key | const("""") | x |
8. Import the interactions to SAP Hybris marketing Cloud
Finalize the Iflow with configuring the SAP Hybris Marketing Cloud Receiver.
This should be at least already partly done when you did step 7.
The Authentication method is dependent from what is configured for the Inbound Communication Arrangement in SAP Hybris marketing Cloud.
9. Review the data on SAP Hybris Marketing Cloud
Before we started the exercise, we replicated some data to SAP Hybris marketing Cloud, including some dummy data with invalid E-Mail addresses.
When creating the target group we made sure that Mr. Max Mustermann and Mr. John Doe and members of the defined target group.
When releasing the campaign, all contacts including to two we created are validated by Neverbounce.
Contact Profile before the E-Mail address was send to Neverbounce for verification.
After importing the hard bounce interaction the E-Mail is not available anymore in the Contact profile.
- Introduction and general setup
- Configure E-Mail List verification with Neverbounce
- Set up E-Mail List Analysis and Single E-Mail validation with Neverbounce
You want to see more articles from SAP Services? Click on the banner below.
Your SAP CX Services – Marketing Practice team.
- SAP Managed Tags:
- SAP Integration Suite,
- Cloud Integration,
- SAP Marketing
Labels:
1 Comment
You must be a registered user to add a comment. If you've already registered, sign in. Otherwise, register and sign in.
Labels in this area
-
Business Trends
270 -
Business Trends
11 -
chitchat
1 -
customerexperience
1 -
Event Information
256 -
Event Information
18 -
Expert Insights
30 -
Expert Insights
50 -
Life at SAP
133 -
Life at SAP
1 -
Product Updates
666 -
Product Updates
24 -
SAP HANA Service
1 -
SAPHANACloud
1 -
SAPHANAService
1 -
Technology Updates
453 -
Technology Updates
15
Related Content
- How to build custom logic (BADI) for WhatsApp Export Definition? in CRM and CX Questions
- Which (email) address validation tool are you using with SAP Marketing Cloud? in CRM and CX Questions
- Sinch sends Hard Bounces for valid email addresses in CRM and CX Questions
- C4C Is there more background info on Verify E-Mail Address For E-Mail Channels in CRM and CX Questions
- How to create interaction EMAIL_BOUNCE_HARD for shareable emails? in CRM and CX Questions
Popular Blog Posts
| Subject | Kudos |
|---|---|
|
|
|
|
|
|
|
|
|
|
|
|
|
|
|
|
|
|
|
Top kudoed authors
| User | Count |
|---|---|
| 4 | |
| 2 | |
| 2 | |
| 1 | |
| 1 | |
| 1 | |
| 1 | |
| 1 | |
| 1 | |
| 1 |