
- SAP Community
- Products and Technology
- Additional Blogs by Members
- OrgPublisher Interface to SAP - Part 4 (Additional...
Additional Blogs by Members
Turn on suggestions
Auto-suggest helps you quickly narrow down your search results by suggesting possible matches as you type.
Showing results for
Former Member
Options
- Subscribe to RSS Feed
- Mark as New
- Mark as Read
- Bookmark
- Subscribe
- Printer Friendly Page
- Report Inappropriate Content
03-25-2009
9:06 PM
Hi all,
This is the final and part 4 of the OrgPublisher series blogs. In this blog I shall demonstrate how to add additional fields in the output format if they are not available in the standard output format /EHR/MAX, remove fields from the output and carry out What-if scenarios.
In case you have missed out on the previous blogs, they are available here:
1. OrgPublisher Interface to SAP - Part 1
2. OrgPublisher Interface to SAP - Part 2 (Data Extraction)
3. OrgPublisher Interface to SAP - Part 3 (Create output format)
Let's say in the part 3, we extracted data from SAP and displayed in OrgPublisher, presented to end user and hey... it's great...
Then, here comes a request from one of our end user or higher management that:
"yeah... this is a great tool but I would like to see the amount data available in infotype 0008 and 0014.... and I don't see this infotype on the selection screen displayed in your IMG config. Can you add this for Costing and What-if Planning scenarios, please!"
Yes of course, we can... And here is how we do this.
Go to OrgPublisher IMG by using T-code /N/EHR/SOL71_IMG, expand Wizard for Simple generation of Output formats and click on Wizard for Additional Fields.
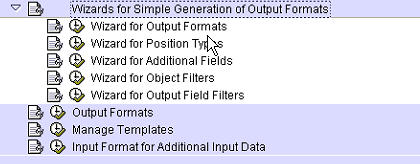
Fig. 1
Wizard for additional fields will present us with available output formats to select and modify one with required data from IT0008 and IT0014. From the previous blog (Part 3), where we create Z_MIN ouput format we shall continue building over and will modify it in this new scenario.

Fig. 2
After selecting required Z_MIN from the drop down list, continue to next screen.

Fig. 3
Since this is the first Additional field to be created, therefore the list of "Existing" field is currently empty. Continue with "New" selection.
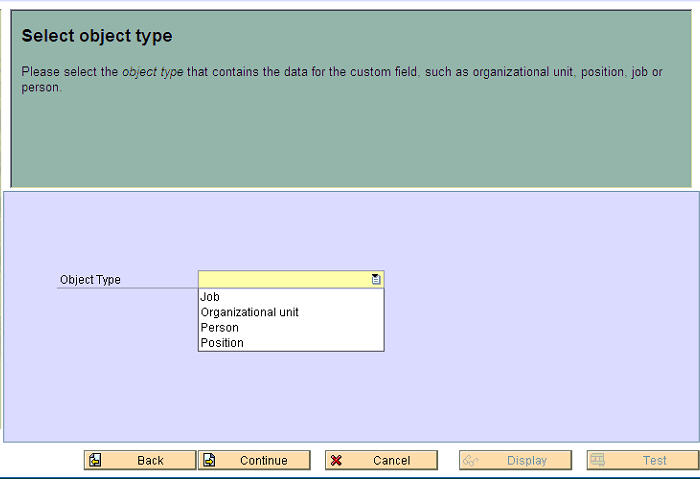
Fig. 4
Here OrqPublisher will present object types that are associated with this output format (recall the evaluation path SBESCX used for Z_MIN in part 3 with above object). Since infotype 0008 (Basic Pay) and infotype 0014 (Recurring Payments/Deductions) are linked with object type Person, therefore, select Person from the list and continue.

Fig. 5
We can restrict basic pay infotype by a subtype if required. Select the required screen field from infotype 8 using the F4 search help in SrceFld field. Enter the text that you would like to appear in the output for this Additional field... here I use "Basic Pay" instead of what appears in the SrceFld (which is the text from SAP table). Continue to next screen.

Fig. 6
Since we yet have to add another additional field of amount from infotype 0014, therefore check the "Define More Custom Fields" box and click on Complete. This will restart wizard bypassing the output format screen (Fig. 2).

Fig. 7
Here in the above figure, we can see our first additional field now displayed in the "Existing" field. Continue with "New" option to create IT0014 amount field in the output. In SAP, we have maintained following data for IT0014 for IDES AG employee Anja Mullar. We would expect this amount to be displayed in the output.

Fig. 8
It is the Amount field that we are required to extract in our output format. Continuing from Fig. 7 we reach the following screen.

Fig. 9
Here we shall restrict the Subtype to wagetype M110 (Vacation Bonus) as shown in fig. 8. Again use the F4 search help in SrceFld to select the wage type amount field and click on "Test" to check your config.
OrgPublisher will extract the data and following output is presented:

Fig. 10
Both of the required fields are extracted successfully. We can now proceed and create a new template by following the steps in the previous blog (part 3). In the above fig. there is an large empty block over "Anja Muller" name, which is the field reserved by orgpublisher interface for SAP to insert the photo of the employee. If we double click this field we get:
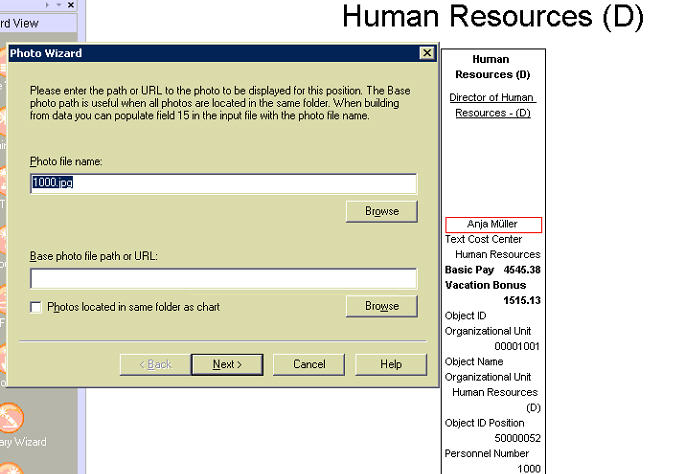
Fig. 11
Now in the "Base photo file path or URL:" field we can browse to a folder that contains all employee photos in 60x75 pixal named after their Personnel Number and OrgPublisher application will automatically search for all the Personnel Numbers that are in the output of org chart to display their photo. In my case, over a 1000 photos were loaded from a local server into the output of org chart within seconds.
Now that the fields are added, we need to configure OrgpPublisher application to enable it carry out "What-if" scenarios. For this we run the "Custom Field Wizard", define the numaric fields of both Basic Pay and Vocation bonus and later we shall run the "Summary Wizard" to enable OrgPublisher carry out our What-if scenarios.
Let's start by running the "Custom Field Wizard" in OrgPublisher.

Fig. 12
Continue and click on Next.

Fig. 13
Since we have already defined our required fields for Basic Pay and Vocation Bonus in output, therefore, we shall select "Existing Custom field" and from the drop down list select Basic Pay and click on Next.

Fig. 14
In the type of Custom field select Numeric, because both Basic Pay and Vocation Bonus fields hold numeric values, from the drop down list, by default Text will appear in this field. In the next field select the label or name for this field... this is if you wish to rename the Basic Pay label, continue and apply to all position types. Position type is a concept whereby we can group employee. Position types can be defined in IMG using Wizard for Position Types (See Fig. 1).

Fig. 15
Applying the custom field to all position types we continue, click next and this will complete the wizard step.

Fig. 16
Now we are required to run the "Summary Wizard" in order to execute our What-if scenarios. Before going into Summary Wizard, we remove few fields in order to make the output look more tidy.

Fig. 17
Using Show/Hide Chart Component option under View menu, we get the above Fig. 17, here we can cross out the fields that we wish to hide. The fields will still exist but will not appear in the display. After making above changes we continue "Summary Wizard". Select Summary Wizard from left panel of the screen under Wizard View.

Fig. 18
Select the population that should be included in the summary of selected Basic Pay and Vacation Bonus. OrgPublisher offers population based on available Position types... since position types can be created in IMG, therefore the list can be extended and is not limited to the one in Fig. 18. Continue with "Total Head Count".

Fig. 19
Continue with the introduction screen above. Click Next and select the type of Summary from available functions.

Fig. 20
Continue to next screen and select a name for the Summary label.

Fig. 21
Continue to select the position types that should display the Summary field.

Fig. 22
For now, I shall select "All Position Types". When you exclude, or do not count, a position type in the Summary View in OrgPublisher Premier, the summary amounts for these types are not displayed in the view, and are subtracted from any totals, except for group totals. Take extra care as the use of conditional formatting can affect position type summary totals.

Fig. 23
Click Finish to complete the Summary Wizard.
Now we are ready to run a simple What-if scenario... by transferring an employee from one department to another would influence the costs of both departments... here we select an employee and before transfer the cost towards basic pay and vocation bonus is shown in the red boxes.

Fig. 24
By a simple drag and drop action, we can transfer the highlighed (Functional Specialist) employee from "Social and Legal" dept to "Personnel Development and Controlling" dept. This will instantly update the sum in the red boxes for both depts.

Fig. 25
This is just a simple scenario and more complicated scenarios can be created based on management requirement.
Additionally, OrgPublisher now offers SAP Writeback feature using it's OrgPublisher Modelling Module. Therefore, any org changes approved by management can instantly be carried out using this amazing feature.
OrgPublisher offers great security features that extensively and flexibly control the org chart access.
This is all, that is only the tip of the iceburg about the OrgPublisher. I shall continue in the indivdual blogs on other part of OrgPublisher Interface for SAP.
Thanks for your interest in this blog series.
6 Comments
Related Content
- Start page of SAP Signavio Process Insights, discovery edition, the 4 pillars and documentation in Technology Blogs by SAP
- Explore the Enhanced New Hire Experience in SAP SuccessFactors Onboarding in Human Capital Management Blogs by SAP
- SAP CAP: Controller - Service - Repository architecture in Technology Blogs by Members
- Behind the compatibility - What are the compatibility means between GRC and the plugins in Technology Blogs by SAP
- Standard integration templates in Talent Intelligence Hub in Human Capital Management Blogs by SAP