
- SAP Community
- Products and Technology
- Additional Blogs by Members
- OrgPublisher Interface to SAP - Part 3 (Create out...
Additional Blogs by Members
Turn on suggestions
Auto-suggest helps you quickly narrow down your search results by suggesting possible matches as you type.
Showing results for
Former Member
Options
- Subscribe to RSS Feed
- Mark as New
- Mark as Read
- Bookmark
- Subscribe
- Printer Friendly Page
- Report Inappropriate Content
03-20-2009
7:50 PM
Hi all,
This is the third blog in the series of OrgPublisher interface to SAP. In case you have missed out on the previous two blogs the link is given below.
1. OrgPublisher Interface to SAP - Part 1
2. OrgPublisher Interface to SAP - Part 2 (Data Extraction)
In this blog I will demonstrate how to utilize the customizing option for OrgPublisher. Based on customer requirement over the amount of data to be displayed, we would use customizing only if the requirement is not met within standard OrgPublisher interface to SAP.
However, please note that in most cases the standard OrgPublisher output format /EHR/MAX is good enough to provide output of maximum number of commonly used data. Since, not all the data extracted in /EHR/MAX is required or used, therefore, the simple solution is to hide or remove the unnecessary data from /EHR/MAX output format during the copy output format process in IMG.
For those, who are not sure about what an "Output Format" is...! An output format is basically a list of instructions (Output format definitions)used to extract and display required data in OrgPublisher windows application.
The customizing of OrgPublisher is available under /N/EHR/SOL71_IMG T-code or by executing /EHR/SOL71_IMG report in SE38.
Please note that the above T-code will be executable only after the successful import of Transport Files into the SAP system. The export files are delivered in the free 30 days demo version of OrgPublisher and are located (using default installation option in MS Windows) in the following directory:
C:Program FilesOrgPub9sap6.0
Here, in the above directory, you will find both Customizing and Workbench folders that contain the K and R Transport files. Since the discussion of exporting transport files is within Basis domain, I have to skip it and stay focused on the customizing.
1. Creating a new output format by copying the standard output format:
Run T-code /N/EHR/SOL71_IMG in the command field.
![]()
Fig. 1
This will bring up IMG screen for OrgPublisher SAP interface with following options.

Expand the "Wizards for Simple Generation of Output Formats".

Fig. 3
Click the "Wizard for Output Formats". The Wizard will now run us through a simple procedure to Create, Copy and Change options. As a beginer it is recommended to copy an existing Output format and modify it.
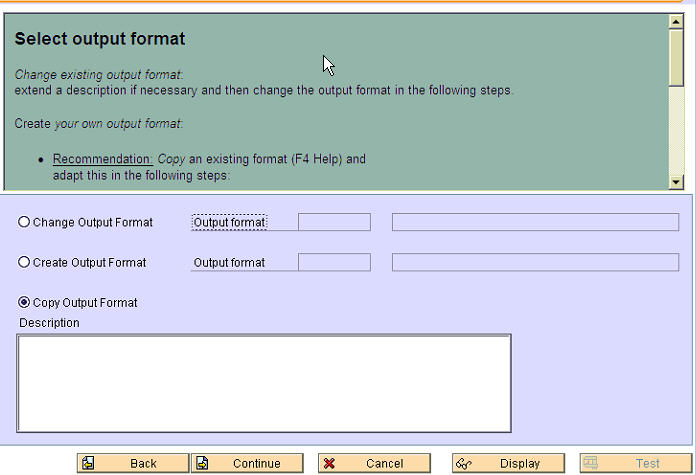
Fig. 4
Select the copy radio button and click on Continue.
Before we proceed, let's see what output a standard /EHR/MIN output format, when used in IDES environment, for IDES AG--> Exec Director Germany--> Human Resources dept would generate in OrgPublisher Windows application:

Fig. 5
We shall now copy the /EHR/MIN format and modify it by adding some new fields such as Personnel Area, Personnel Sub Area, Employee Group, Employee Subgroup and generate a new template so that next time, when the extraction is carried out based on the template would display the addtional fields without adding new fields all over again.
The copy option, continued above from Fig 4, presents the following screen.

Fig.6
Here, in the above fig. 6 first we select an Output format for the "From" field from the available list of standard formats, in the fig above, I selected /EHR/MIN. Now we rename this output format to a custom output format starting with "Z".
In this case, I copy /EHR/MIN to Z_MIN. The "Text" box in Fig. 7 contains the text that would appear for the output format description.

Fig.7
Press Enter and continue and the next screen that offers us the default objects as well as the evaluation path.
It is here in Fig. 8 that we can decide, at a higher level, on what evaluation path to use and which object of selected evaluation path to appear in the output format.

Fig. 8
Since the Evaluation path SBESCX reads all objects typically required in an org chart. Choose all the objects by ticking the check box that we wish to appear in the org chart select the level at which they should appear and continue.
The next screen will offer the option to use the Standard or Special Format for the output. At this stage we choose Standard and continue. Special Format is used if we do not wish to follow the wizard generated hierarchy structure and would like to group objects manually.
 Fig. 9
The next screen allows select infotype fields (data) to appear in the org chart. It is here that we can add/remove data that appears in the org chart boxes. The standard selection are given in the screen below and is grouped by objects selected in Fig 8.

Fig. 10
The fig. 10 is divided into two parts with "Add" and "Remove" buttons placed in the middle. Each time we add a new field in the right panel, it is placed in the last place, therefore, we can adjust the placing of data as required.
If we require fields that are not listed here, then we have to use "Wizard for Additional Fields". In the next blog I shall cover this.
In the above fig. 10 under Person--> Default Fields, OrgPublisher offers "Filename Photo" field. OrgPublisher supports 60x75 pixal photo size.If we select and add this field, OrgPublisher will create space for employee photo in the output.
After extraction, we can see a blank field in the output. If we double click this blank field in the output it will request for directory path where the employee photo lies with required 60x75 pixal named with employee Personnel number.
If we point the locatoin of employee photo location on the server for any employee it will automatically read the remaining employee photo files named after their employee Personnel number and update the whole org chart with employee photos.
However, note that OrgPublisher recommends to imports employee photos not from SAP but from a local server in order to avoid putting heavy load on the SAP server resulting from the download of the huge amount of graphic data resulting in reduced system resources available and hence poor system performance for all other users.
Loading employee photos outside SAP significantly improves the system response and in my case over 1000 photos were loaded in just few seconds. This was achieved by putting photos in external non SAP server and pointing to folder that contained all employee photos in 60x75 pixal size.
After adding and removing the required fields in the output format the modified output format now looks like:

Fig. 11
The highlighted fields are additional fields added from the left panel.
Now let's do a Test extraction, to confirm our selected fields successfully appear in the output. Click on TEST button and enter the org unit (in this case Human Resource (D) from IDES AG->Exec Dir Germany).

Fig. 12
The output is:
 Fig. 13
The above fig. 13 is displayed in the windows based application of OrgPublisher. Once satisfied with the output, save the file. Saving will generate two files in the selected directory location (My Documents, for example) one of the generated file is in *.ocb and the other one in *.otm format. We shall discuss this later in this blog.
Now something about the windows based application... In windows based application, the above output can be manipulated to display the chart with various options, thus flexibility of selection. The same chart above can be displayed as:

Fig. 14
There are numerous tool availble for quick on the fly reporting such as search from List View and the chart will jump to the employee box referred.

Fig. 15
In the above screen we ran a search for Martin Beck and clicked on his name as it appeared in the list. The chart above automatically recognize this selection and jumps to the box where Martin Beck lies.
There is a tree and profile view available as below:

Fig. 16
Finally, last but not least there is a summary view also available. This option is great if costing is required to be carried out based on payroll results. We can see how departmental cost may vary if employee is transferred among departments... we can easily generate and visulize several "WHAT IF" scenarios just by drag and drop.
Besides Summaries and graphs, there are other options on hiding rows and columns and viewing open positions. OrgPublisher version 9 is capable of calculating the age of open positions along with other options.

Fig. 17
The above are just a few of OrgPublisher windows application's views. Besides this some other tools are web publishing, modifying the views to requirement i.e. chart formating, authorization to users along with both View and Build options etc. etc. available. If payroll cost is included from infotype 0008 it's results can be viewed in Summary results of each department that will change each time a "What IF" scenario is run. All of this is carried out by simple drag and drop functionality.
The list is extensive to state here. I would encourage the reader to download a free trial version and check its cool features.
After successful Test extraction we return to Fig. 11 and click on "Continue". On the next screen click "Complete" to generate output format and template by wizard.

Fig. 18
Okay, now that we are pleased with the data that we selected is successfully displayed in the output, we shall create an output format template to use for each next extraction.
2. Create Output format Template:
Based on different requirement from different users and reporting levels of management we can generate more than one output formats along with output format templates. Here is how we setup a new template in OrgPublisher interface for SAP.
If we are happy with our ouput (See fig. 13) we can click on Save button or use Microsoft Windows File menu to select Save option. Just like any other Windows application it will also prompt for file name and location where to save this file. Saving this chart will generate two files with our desired name and at specified location, one of the files will hold extension *.ocb (that opens org chart builder in windows) and the other with extension *.otm (that is used as Orgpublisher template in SAP).
![]()
Fig. 19
Return to Fig. 3 using /N/EHR/SOL71_IMG T-code and click on "Manage Template". Click on Load Template button.
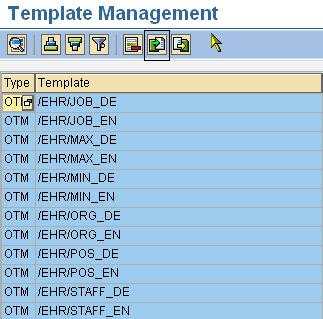
Fig. 20
Enter required path where we saved the orgpublisher.otm file and enter a new name for the template. Click the green tick or press Enter to continue.

Fig. 21
Now return to /N/EHR/SOL71_ORGPUB T-code to check if the new template is successfully loaded. We can also check it in the Template Managment screen.

Fig. 21
Our template is successfully loaded. We can now use it for extraction without having to manually add fields each time via IMG.
Related Content
- Standard integration templates in Talent Intelligence Hub in Human Capital Management Blogs by SAP
- Magic Numbers : A Solution to Foreign Characters in SAP CPI in Technology Blogs by Members
- Top Picks: Innovations Highlights from SAP Business Technology Platform (Q1/2024) in Technology Blogs by SAP
- Error submitting iOS App to AppStore in Technology Q&A
- Consuming SAP with SAP Build Apps - Connectivity options for low-code development - part 2 in Technology Blogs by SAP