
- SAP Community
- Products and Technology
- Additional Blogs by SAP
- Your 1st DF project in less than 15min (install in...
Additional Blogs by SAP
Turn on suggestions
Auto-suggest helps you quickly narrow down your search results by suggesting possible matches as you type.
Showing results for
Employee
Options
- Subscribe to RSS Feed
- Mark as New
- Mark as Read
- Bookmark
- Subscribe
- Printer Friendly Page
- Report Inappropriate Content
03-05-2009
6:49 PM
Data Federator is a multi-source query engine and its optimizer and SQL engine can be used in 2 different scenarios
- Delegate computations to sources (avoid data transfer)
- Execute operations not supported by the sources (compensate sources deficiencies)
It’s a good time to familiarize with Data Federator as it provides already the solution of choice for:
- Multi-source Universes
- SAP BW
- SAS data access
- Real-time access to On-demand information via parameterized Web Services
So let's install and get familiar with Data Federator XI 3.0, Universes and WebI.
This post will guide you step by step from the installation to the WebI report design.
Install database vendors JDBC drivers
Launch the Data Federator Designer
Create a project
Create a datasource
Create a target table
Update the target table schema (data model)
Update the default mapping rule
Deploy the DF project
0.1. Create a Universe connection
0.2. Create a business layer
0.3. Export the Universe to the repository
0.1. Create a WebI Document
Install the last version of DF
Install Data Federator XI 3.0 or higher. Ask your account manager an evaluation key then download Data Federator from the market place here:
In the left tree view click on:
Download > Support packages and Patches > Entry by application group
In the right pane
BusinessObjects packages and products > BOBJ DATA FEDERATOR > BOBJ DATA FEDERATOR XI 3.0 > ** > BusinessObjects Data Federator XI 3.0 SP1
Start with the 32 or 64 bits architectures depending on your server machine, then launch the Drivers install if you want to install the ODBC bridge.
Enter the evaluation key.
Install database vendors JDBC drivers
For legal reason, we are not allowed to ship the database vendors JDBC drivers with Data Federator.
This means that before to connect to sources, you have to copy the DB vendors JDBC drivers in the following folder:
C:\Program Files\Business Objects\BusinessObjects Data Federator 12\LeSelect\drivers
You can find these drivers on the DB vendor’s websites.

At this stage, Data Federator Designer and Query Server have been installed and you are ready to create a federation project.
Launch the Data Federator Designer
On windows, go to:
Start Menu > All Programs > BusinessObjects XI 3.0 > BusinessObjects Data Federator > Data Federator Designer
Login using: sysadmin/sysadmin<br />

Create a project
Click on “Add project”

Enter the name of the project (Post in our case) and click on Save

Now, we have a new DF project and we are ready to define the sources we want to federate.
Create a datasource
Click on “Add” then “Add datasource”

Define the name of the datasource (CRM in our case); select the type of source (SQL Server in our case) and click Save

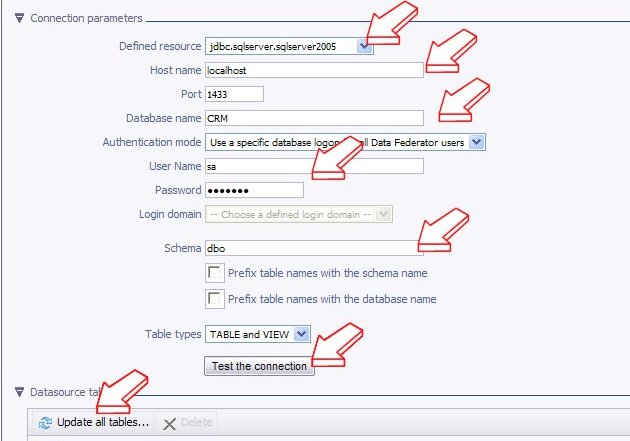
Here, you have to enter the datasource parameters
The resource (SQL Server 2000 or 2005)
The hostname running the database
The name of the database
The credentials
A schema (optional)
Then you can click on “Test the connection” to test if everything is fine.
If the test is successful, you can click on “Update all tables…” to import the tables you want to federate in your project.
Select the tables you are interested in (customers in our case) and click “Update”

If you are satisfied with your source definition, you have to click on “CRM” in the treeview, and then click “Final” to finalize the datasource connection and use it for the mappings.

I repeat this process to create a 2nd
source called “Support”.
At this stage, our project contains 2 sources (CRM & Support) containing customer information.

This project is already ready to use and you can decide to deploy this data foundation (customers and CUSTOMERS_VIEW tables).
However, we want to go a step further and leverage the target tables and mapping rules mechanisms provided by Data Federator.
Create a target table
In our case, we want to leverage the data modeling capabilities of DF and create a mapping rule to federate (join) our 2 sources.
Let’s create a Customers target table based on the CRM customers schema.
Click on “Add” and select “Add target table from existing table”
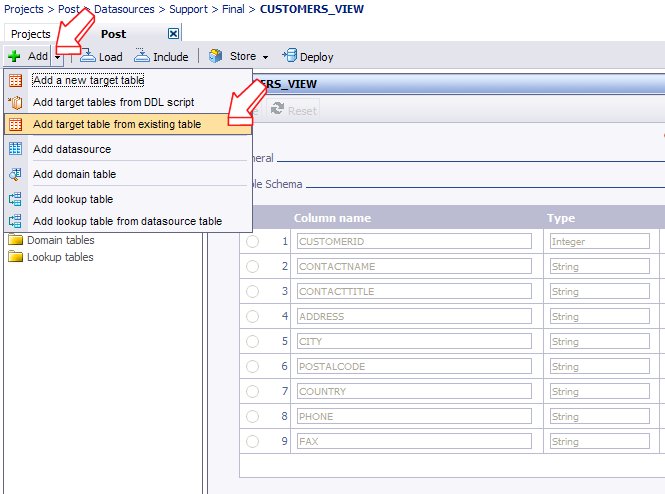
Select the schema of the source table (customers) you want to copy.
Change the target table’s name and check “Create default mapping rule”, then click on “Save”

Now, we have a Customers target table which is the exact copy of the customers table coming from the CRM.

Let’s modify the schema of this table to add the customer’s name coming from the Support source.
Update the target table schema (data model)
Click on the “Customers” target table in the treeview, select the column position where you want to insert the new columns.
Click “Add Columns” and select “1 column”

Enter the new column name (NAME in our case) and click “Save”

Update the default mapping rule
Click on the “Default mapping” in the treeview to edit the mapping rule. The mapping rule is the mechanism used by Data Federator to map the sources information to the target table.
You can see that the new NAME column doesn’t have any mapping formula.
Let’s fix this problem by adding a new source and use this source to map the customer’s name.

Click on “Add table” and select the “CUSTOMERS_VIEW” table coming from the Support source.

The 2 tables (S1:customers and S2:CUSTOMERS_VIEW) are visible in the treeview but also represented as vertical bar in the relationships pane.
The table is red as a relationship between the 2 tables has to be created to indicate to DF how to join the table sources.

Let’s click on “Add relationship” to define a relationship (join) between these 2 tables.
Double click on “CUSTOMEID” from the Support, click on “=”, double click on “CUSTOMERID” from the CRM.
Note: You can click on “Edit” if you want to define more advanced relationships (joins) between the sources.

The relationship between the tables has been updated and we are ready to enter the mapping formula for the NAME column.
You can click on “Edit” to use the wizard or simply click on “<Control> + <Space>” to activate the code completion.
Select the source column you want to map to the NAME target table column (CONTACTNAME in our case)
Click “Save”

Now the Customers target table federates the CRM & Support sources transparently for the end user.
Deploy the DF project
At this stage, we have to deploy the data model to the DF Query Server.
The DF Query Server is the component which optimizes and processes the queries at runtime.
Click on “Deploy” then enter the deployment options.
In this case, Post is used for the deployment name, sysadmin as the Password and /PP as a catalog name.
Note: Don’t forget the catalog name (PP) as it will be used later to define the connection between the Universes and Data Federator.
12 Comments
Related Content
- Enabling Support for Existing CAP Projects in SAP Build Code in Technology Blogs by Members
- Cloud Integration: Manually Sign / Verify XML payload based on XML Signature Standard in Technology Blogs by SAP
- Consume Ariba APIs using Postman in Technology Blogs by SAP
- Leased assets in Enterprise Resource Planning Q&A
- Recap - SAP ALM at SAP Insider Las Vegas 2024 in Technology Blogs by SAP