
- SAP Community
- Products and Technology
- Technology
- Technology Blogs by SAP
- Anki Cozmo meets SAP Cloud Platform – Part 1: IoT
Technology Blogs by SAP
Learn how to extend and personalize SAP applications. Follow the SAP technology blog for insights into SAP BTP, ABAP, SAP Analytics Cloud, SAP HANA, and more.
Turn on suggestions
Auto-suggest helps you quickly narrow down your search results by suggesting possible matches as you type.
Showing results for
Employee
Options
- Subscribe to RSS Feed
- Mark as New
- Mark as Read
- Bookmark
- Subscribe
- Printer Friendly Page
- Report Inappropriate Content
05-07-2017
7:18 AM
This blog is for you if you are looking for a tutorial of an end-to-end example illustrating how to connect robots into the Internet of Things. Here we provide a walk-through of a literal toy example – making use of the Cozmo toy robot by Anki. If you follow through this tutorial you will have a basic understanding and a simple implementation of the following:
Besides having some fun with the robot and getting jump-started with IoT you will also be collecting some experience using SAP Cloud Platform Services.
This tutorial provides a very simplified implementation of a real-life process as applicable for example in warehouse operations.
We think of the Cozmo robot as an autonomous vehicle, for example a forklift. The robot might be assigned a sequence of goods movements tasks and performs them autonomously. We monitor the robot’s location to identify hotspots of its activity. Based on the hotspot information we can readjust the robots’ activities: For example, we can redistribute tasks among robots to achieve shorter paths and reduced collision potential.
Notebook, smart phone, Anki Cozmo
Implementing an end-to-end example obviously involves many steps and components. We will walk through these steps one by one – for the more visual people I sketched the steps and their dependencies below. Note that every step marked with a star indicates a stage where you have implemented a feature that can be tried out. So, hang in there!

As a prerequisite for this step you need to install the Cozmo SDK along with Python on your notebook (see Anki’s website for detailed instructions). Also install the Cozmo app on your smart phone.
In this step, we create a Python program which represents the robot being assigned a sequence of tasks for autonomous execution. For sake of simplicity we just make the robot drive in endless squares -- and consider every single lap a very simplified abstraction of an actually meaningful task like a goods movement.
The Cozmo SDK comes with a set of example programs illustrating how to trigger basic movements via the Cozmo API. Based on these examples you can develop your own Cozmo controller program for making the Cozmo drive squares – or you can copy mine from below.
Note that I already introduce a global variable
Save the file as
Note that for executing the test you need to connect your smart phone to Cozmo’s Wi-Fi and start the Cozmo app in SDK mode.
In this step, we prepare the SAP Cloud Platform (SCP) Services which we need later for collecting and analysing the data from the robot. This step involves getting a SAP Cloud Platform account, setting up the IoT service and installing a database.
Regarding instructions for creating a trial instance developer account and enabling the IoT service in your account please refer to Michael’s blog.
Next, we need to set up a multi-tenant database container (HANA MDC) and hook it up with the IoT Service. Setting up such a database container enables us to make use of the Predictive Analytics Library later. Follow the instructions from the starterkit to set up the database and adapt the IoT Service message management (MMS) binding so that it connects with your new database.
Make sure to take note of the password you assign for the SYSTEM user. You will need this again later.
In this step, we finally configure the robot as a device in the IoT services as well as the types of message we plan to exchange with the robot. For all following steps involving the handling of the IoT service refer to the starterkit in case you require more details.
Entry point for the configurations is the Internet of Things cockpit. To get there access your SCP trial account and go to Services --> Internet of Things.

Then choose “Go to Service”.
Once there create two message types: COZMO_POSITION representing the data structure of the robot location and TO_COZMO representing the data structure for the commands we will be sending to the robot.


Next, create a device type and assign the two message types. Note the different directions of the message types.

Finally, create a device and assign the device type as just created. Make sure to take a note of the OAuth access token you are presented with upon saving the device. We will need this token for sending the robot’s location to the SCP.

Now the IoT services are ready to receive and store the robot’s location!
In this step, we are setting up a websocket communication between the robot controller on the notebook and the IoT services in order to collect the robot’s location in the cloud database. In fact, every time the robot has completed driving a lap we make it send its location to the cloud.
Before getting started you need to install the Python websocket client on your notebook: https://pypi.python.org/pypi/websocket-client
As you follow the installation instructions note that you will need to use pip3 (rather than pip) for installation due to the Python version required for the Cozmo SDK.
The approach for the websocket communication is to let the Cozmo controller open a long-lived connection. In contrast to the example on the websocket client download page we not only open a connection, but we introduce separate threads for sending messages to the cloud and for listening to messages coming from the cloud. Adding the listening capability is not required for the plain feature of posting the location data. We introduce the listening thread here anyway to save one iteration on editing the websocket handling - after all this blog does not want to go into the details of websocket handling itself. In case you like to dig deeper: The exact specification how to connect to the IoT services via websocket is given in the corresponding section of the documentation.
Given these instructions you can now either code your own websocket connection – or you copy my code.
For my approach, you now need to create two new Python files in the same directory where you created
File
File
Finally, you need to include the new
Below you find my updated
Once you have your cozmo_controller updated you are ready to test the next working feature!
Note: Depending on your system and firewall environment you might need to set your proxy variables before you can access the websocket.
Execute the cozmo_controller again – the robot should still be moving in squares.
Let’s now check that the location information is being sent to the cloud:
Go to the Internet of Things cockpit once more. For viewing your messages, you need to access the MMS cockpit. Choose “Display Stored Messages” – and you are presented with a list of tables with separate tables per message type. Find the table related to your COZMO_POSITION message type. Hint: It has the technical ID of the message type in its name. As you access the table you now see the latest locations of your robot. For reference, you should now be seeing something like this:

Congratulations for making it up to here!
We are now collecting sensor data from the robot in the database. As a next step let’s look at the opposite direction of communication and send messages to the robot.
In this step we are setting up a little SAP UI5 app. The app is used for remote controlling the robot. Since the app can run on any mobile device this step not only illustrates technically how data can be pushed via IoT service to the robot but it also intends to stimulate some ideas about use cases involving remote access to robots.
If you have never worked with UI5 before you might want to take a quick look at some basic tutorials like HelloWorld to get a rough understanding of the basic concepts.
The following steps are necessary to make the UI5 app happen and we will look into them one by one:
To start with creating the destination, go to the SAP Cloud Platform Cockpit, then choose “Connectivity” and “Destinations”. Create a new destination with the name “iotmms” and assign the properties as per the following screenshot.
To save you some typing: the URL to use is
Regarding the authentication data, you need to specify the email address and password used to create your SCP trial account.
Having created the destination, we now have
For creating the actual UI5 app we will be working with the Web IDE. In the SAP Cloud Platform cockpit, go to “Applications”, then “HTML5 Applications” and create a new application. Assign a name and save, then choose the edit button among the action symbols:

This will take you to the Web IDE. Confirm the Github cloning if prompted for it. Once in the Web IDE, in the navigation tree, open the context menu (right mouse button) of your new project folder and create a “project from template”.

For the template selection choose “SAPUI5 Application”.

When prompted for the project name you can use the name of your application. For the initial view details replace the default name
Checkpoint: After saving, when you run your project via the corresponding icon in the Web IDE you should see an empty page.
Next we go about connecting this app with the IoT service. There are two parts to this: Configuring the use of the
For the destination, in the navigation tree of your UI5 app find the file called
For coding the call of the IoT service, in this example we will be focussing on the push service only. This is because in this example we only want to send command messages to the robot, but we need not access the location messages from the robot in the app.
For making use of the push service we need to POST a request to the IoT push service of our IoT device (i.e., Cozmo). To understand more details about how to consume the push service refer to the documentation.
Before triggering the actual push, we create a utility function for doing an http request via Ajax. After adding the utility function to
Now we can finally add a button to the UI5 app and make it trigger a push message to the robot.
First, let’s add the button with text “Move fork” in
Then implement
The following dependencies are important to understand for the implementation – even if you copy my code below:
To have an action command sent to the robot via IoT service you send a POST request to the push API of the IoT service – you specify the target device by including its ID in the push service URL. If you copy the code below make sure to replace the suffix of the push service URL with your robot’s ID.
Note that for the push service URL you can use the path
For the message to be transmitted with the push service note the semantics of the parameters:
For the
The action code value “1” is chosen arbitrarily – we will need this value in a moment when we code the corresponding action handler on Python side.
Checkpoint: When you now run the UI5 application you should see the “Move fork” button on your page

When you push the button you will probably see one of the following messages:


In case of 503 it might help to restart the app or the deploy your app to the SAP Cloud Platform (via context menu in the navigation tree of the Web IDE).
In case of 410 you need to start your Python
In case of “Success” you are ready for the final implementation step!
The last piece we need to implement is the
Enhance your
Testing time!
When you now restart your Python Cozmo controller and push the button in your UI5 app you should now see some fork movement going on.
Congratulations for making it all the way up to here!
You now have a basic setup running allowing you to control the robot locally, collect its data and trigger robot actions remotely.
Now it’s time for your own creativity and to transform this plain robot story into something more meaningful. Having all tools available now let the little robot do more interesting things than driving in squares and lifting its fork. To get you inspired part 3 of the blog series shows how to implement remote inspection as a more sophisticated example.
Feel free to share your ideas and outcomes with us in the comments!
- A robot controller
- Sensor data from the robot being sent to the cloud
- Remote control of the robot
- Data science techniques being applied to the data to generate insights (for example to remotely trigger appropriate robot actions) – see part 2 of the blog
Besides having some fun with the robot and getting jump-started with IoT you will also be collecting some experience using SAP Cloud Platform Services.
Scenario
This tutorial provides a very simplified implementation of a real-life process as applicable for example in warehouse operations.
We think of the Cozmo robot as an autonomous vehicle, for example a forklift. The robot might be assigned a sequence of goods movements tasks and performs them autonomously. We monitor the robot’s location to identify hotspots of its activity. Based on the hotspot information we can readjust the robots’ activities: For example, we can redistribute tasks among robots to achieve shorter paths and reduced collision potential.
Required material
Notebook, smart phone, Anki Cozmo
Outline
Implementing an end-to-end example obviously involves many steps and components. We will walk through these steps one by one – for the more visual people I sketched the steps and their dependencies below. Note that every step marked with a star indicates a stage where you have implemented a feature that can be tried out. So, hang in there!
Basic robot controller
As a prerequisite for this step you need to install the Cozmo SDK along with Python on your notebook (see Anki’s website for detailed instructions). Also install the Cozmo app on your smart phone.
In this step, we create a Python program which represents the robot being assigned a sequence of tasks for autonomous execution. For sake of simplicity we just make the robot drive in endless squares -- and consider every single lap a very simplified abstraction of an actually meaningful task like a goods movement.
The Cozmo SDK comes with a set of example programs illustrating how to trigger basic movements via the Cozmo API. Based on these examples you can develop your own Cozmo controller program for making the Cozmo drive squares – or you can copy mine from below.
Note that I already introduce a global variable
cozmo_instance for the actual robot instance – we will need this later for a callback during the remote-control command handling.#!/usr/bin/env python3
import cozmo
from cozmo.util import degrees, distance_mm, speed_mmps
keep_running = None
cozmo_instance = None
def cozmo_program(robot: cozmo.robot.Robot):
global cozmo_instance, keep_running
cozmo_instance = robot
keep_running = True
while True:
run_cozmo()
def run_cozmo():
global keep_running
while (keep_running):
cozmo_instance.drive_straight(distance_mm(200),
speed_mmps(50),
in_parallel=True).wait_for_completed()
cozmo_instance.turn_in_place(degrees(90), in_parallel=True).wait_for_completed()
if __name__ == "__main__":
cozmo.run_program(cozmo_program)
Save the file as
cozmo_controller.py and execute it. You should see the robot driving in squares.Note that for executing the test you need to connect your smart phone to Cozmo’s Wi-Fi and start the Cozmo app in SDK mode.
SAP Cloud Platform: Setting up Services
In this step, we prepare the SAP Cloud Platform (SCP) Services which we need later for collecting and analysing the data from the robot. This step involves getting a SAP Cloud Platform account, setting up the IoT service and installing a database.
Regarding instructions for creating a trial instance developer account and enabling the IoT service in your account please refer to Michael’s blog.
Next, we need to set up a multi-tenant database container (HANA MDC) and hook it up with the IoT Service. Setting up such a database container enables us to make use of the Predictive Analytics Library later. Follow the instructions from the starterkit to set up the database and adapt the IoT Service message management (MMS) binding so that it connects with your new database.
Make sure to take note of the password you assign for the SYSTEM user. You will need this again later.
SAP Cloud Platform: Configure messages & devices
In this step, we finally configure the robot as a device in the IoT services as well as the types of message we plan to exchange with the robot. For all following steps involving the handling of the IoT service refer to the starterkit in case you require more details.
Entry point for the configurations is the Internet of Things cockpit. To get there access your SCP trial account and go to Services --> Internet of Things.
Then choose “Go to Service”.
Once there create two message types: COZMO_POSITION representing the data structure of the robot location and TO_COZMO representing the data structure for the commands we will be sending to the robot.
Next, create a device type and assign the two message types. Note the different directions of the message types.
Finally, create a device and assign the device type as just created. Make sure to take a note of the OAuth access token you are presented with upon saving the device. We will need this token for sending the robot’s location to the SCP.
Now the IoT services are ready to receive and store the robot’s location!
Adapt the robot controller to post location data
In this step, we are setting up a websocket communication between the robot controller on the notebook and the IoT services in order to collect the robot’s location in the cloud database. In fact, every time the robot has completed driving a lap we make it send its location to the cloud.
Before getting started you need to install the Python websocket client on your notebook: https://pypi.python.org/pypi/websocket-client
As you follow the installation instructions note that you will need to use pip3 (rather than pip) for installation due to the Python version required for the Cozmo SDK.
The approach for the websocket communication is to let the Cozmo controller open a long-lived connection. In contrast to the example on the websocket client download page we not only open a connection, but we introduce separate threads for sending messages to the cloud and for listening to messages coming from the cloud. Adding the listening capability is not required for the plain feature of posting the location data. We introduce the listening thread here anyway to save one iteration on editing the websocket handling - after all this blog does not want to go into the details of websocket handling itself. In case you like to dig deeper: The exact specification how to connect to the IoT services via websocket is given in the corresponding section of the documentation.
Given these instructions you can now either code your own websocket connection – or you copy my code.
For my approach, you now need to create two new Python files in the same directory where you created
cozmo_controller.py in one of the previous steps: cozmo_websocket.py with the actual websocket handling and config.py for separating out parameters related to the specific devices and message types to be used. In the config.py given below replace the placeholders according to your account and configurations. To make the replacement clearer, in the example given in the screenshots above the technical ID of the position message is 95302f6c6d8f4954bf8b, the technical ID of the device is 6db11743-b4bb-42a4-8dfd-33029f9da3c6.File
config.py:my_account = "iotmms<your_accountID>trial"
my_token = "<your_OAuth_token_for_the_Cozmo_device>"
my_msg_type = "<technical_ID_of_your_COZMO_POSITION_message>"
my_device = "<technical_ID_of_your_COZMO_device>"
File
cozmo_websocket.py:#!/usr/bin/env python3
import websocket
from websocket import create_connection
import json
from threading import Thread
from config import *
class websocket_scp:
ws = None
url = None
auth = None
def __init__(self):
pass
def on_error(self, ws, error):
print(error)
def on_close(self, ws):
lambda ws: self.on_on_open(self, ws)
def on_open(self, ws):
def run(*args):
pass
thread = Thread(target=run)
thread.start()
def start_listener(self, on_message):
websocket.enableTrace(True)
global url, auth, ws
url = "wss://%s.hanatrial.ondemand.com/com.sap.iotservices.mms/v1/api/ws/data/%s" %(my_account,my_device)
auth = "Bearer %s" %(my_token)
ws = websocket.WebSocketApp(url,
on_message = on_message,
on_error = lambda ws, error: self.on_error(ws, error),
on_close = lambda ws: self.on_close(ws),
header = {"Authorization":auth})
ws.on_open = lambda ws: self.on_open(ws)
listenerthread = Thread(target=ws.run_forever)
listenerthread.start()
def send_position(self, messages):
global ws, url, auth
ws = create_connection(url, header = {"Authorization":auth})
message = {"mode":"async","messageType":my_msg_type,"messages":messages}
ws.send(json.dumps(message))
Finally, you need to include the new
cozmo_websocket into the cozmo_controller. Also, let’s transmit the robot’s location (in terms of x/y/z coordinates relative to the robot’s starting point) every time before it sets off to a new lap. Consult the Cozmo API by Anki to understand where to retrieve the robot’s sensor values.Below you find my updated
cozmo_controller.py for reference of how this feature can be implemented.#!/usr/bin/env python3
import cozmo
from cozmo.util import degrees, distance_mm, speed_mmps
from cozmo_websocket import websocket_scp
import websocket
keep_running = None
cozmo_instance = None
ws_communicator = None
def on_message(ws, message):
pass
def cozmo_program(robot: cozmo.robot.Robot):
global cozmo_instance, ws_communicator, keep_running
cozmo_instance = robot
ws_communicator = websocket_scp()
ws_communicator.start_listener(on_message)
keep_running = True
while True:
run_cozmo()
def run_cozmo():
global ws_communicator, keep_running
while (keep_running):
posX = cozmo_instance.pose.position.x
posY = cozmo_instance.pose.position.y
posZ = cozmo_instance.pose.position.z
# message structure according to the IoT service message type
messages = [{
'POSX': posX,
'POSY': posY,
'POSZ': posZ
}]
ws_communicator.send_position(messages)
cozmo_instance.drive_straight(distance_mm(200), speed_mmps(50), in_parallel=True).wait_for_completed()
cozmo_instance.turn_in_place(degrees(90), in_parallel=True).wait_for_completed()
if __name__ == "__main__":
cozmo.run_program(cozmo_program)
Once you have your cozmo_controller updated you are ready to test the next working feature!
Note: Depending on your system and firewall environment you might need to set your proxy variables before you can access the websocket.
Execute the cozmo_controller again – the robot should still be moving in squares.
Let’s now check that the location information is being sent to the cloud:
Go to the Internet of Things cockpit once more. For viewing your messages, you need to access the MMS cockpit. Choose “Display Stored Messages” – and you are presented with a list of tables with separate tables per message type. Find the table related to your COZMO_POSITION message type. Hint: It has the technical ID of the message type in its name. As you access the table you now see the latest locations of your robot. For reference, you should now be seeing something like this:
Congratulations for making it up to here!
We are now collecting sensor data from the robot in the database. As a next step let’s look at the opposite direction of communication and send messages to the robot.
Create UI5 app to control the robot
In this step we are setting up a little SAP UI5 app. The app is used for remote controlling the robot. Since the app can run on any mobile device this step not only illustrates technically how data can be pushed via IoT service to the robot but it also intends to stimulate some ideas about use cases involving remote access to robots.
If you have never worked with UI5 before you might want to take a quick look at some basic tutorials like HelloWorld to get a rough understanding of the basic concepts.
The following steps are necessary to make the UI5 app happen and we will look into them one by one:
- In the SAP Cloud Platform configure a “destination” to allow accessing the IoT services from within UI5
- Set up a simple UI5 app from a template
- Connect the UI5 app with the IoT service
- Add a button in the UI5 app to send a message to the robot
- Finally, adapt the
cozmo_controllerto react to such a message
Configure destination
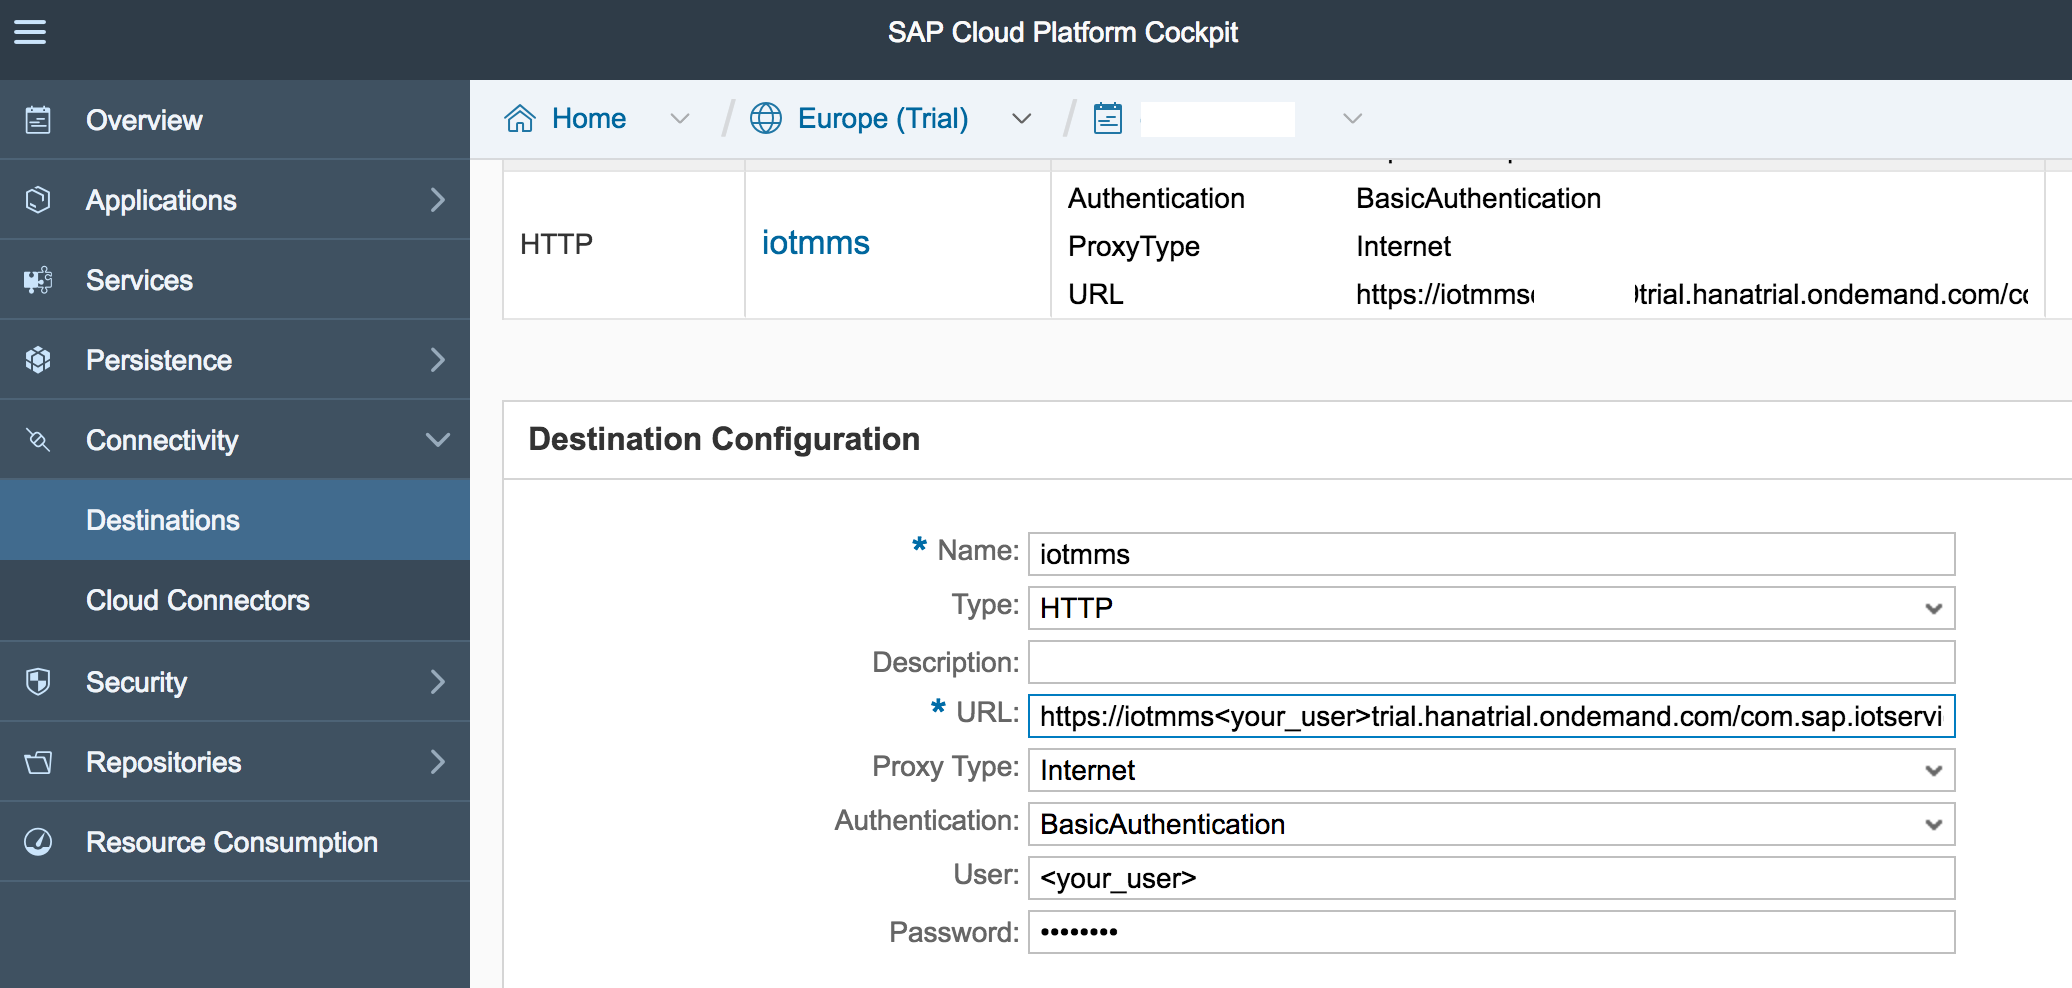
To start with creating the destination, go to the SAP Cloud Platform Cockpit, then choose “Connectivity” and “Destinations”. Create a new destination with the name “iotmms” and assign the properties as per the following screenshot.
To save you some typing: the URL to use is
https://iotmms<your_account>trial.hanatrial.ondemand.com/com.sap.iotservices.mms/Regarding the authentication data, you need to specify the email address and password used to create your SCP trial account.
Having created the destination, we now have
iotmms as an alias to use in our UI5 app.Create app from template
For creating the actual UI5 app we will be working with the Web IDE. In the SAP Cloud Platform cockpit, go to “Applications”, then “HTML5 Applications” and create a new application. Assign a name and save, then choose the edit button among the action symbols:
This will take you to the Web IDE. Confirm the Github cloning if prompted for it. Once in the Web IDE, in the navigation tree, open the context menu (right mouse button) of your new project folder and create a “project from template”.
For the template selection choose “SAPUI5 Application”.
When prompted for the project name you can use the name of your application. For the initial view details replace the default name
View1 by Cozmo.Checkpoint: After saving, when you run your project via the corresponding icon in the Web IDE you should see an empty page.
Connecting the app with the IoT service
Next we go about connecting this app with the IoT service. There are two parts to this: Configuring the use of the
iotmms destination and coding the actual call of the IoT service.For the destination, in the navigation tree of your UI5 app find the file called
neo-app.json, open the file and simply add the following snippet to the “routes” section. After saving you can access the IoT services directly via the path /iotmms. {
"path": "/iotmms",
"target": {
"type": "destination",
"name": "iotmms"
},
"description": ""
}
For coding the call of the IoT service, in this example we will be focussing on the push service only. This is because in this example we only want to send command messages to the robot, but we need not access the location messages from the robot in the app.
For making use of the push service we need to POST a request to the IoT push service of our IoT device (i.e., Cozmo). To understand more details about how to consume the push service refer to the documentation.
Before triggering the actual push, we create a utility function for doing an http request via Ajax. After adding the utility function to
Cozmo.controller.js, the controller of the Cozmo view then looks as follows:sap.ui.define([
"sap/ui/core/mvc/Controller",
"sap/m/MessageToast"
],
function(Controller, MessageToast) {
"use strict";
return Controller.extend("<your_project_name>.controller.Cozmo", {
doHttp: function(sType, sUrl, oData, successHandler, errorHandler) {
var jsonData;
if (errorHandler === undefined) {
errorHandler = function(jqXHR, textStatus, errorThrown) {};
}
if (oData !== undefined) {
jsonData = JSON.stringify(oData);
}
jQuery.ajax({
type: sType,
dataType: "json",
contentType: "application/json",
data: jsonData,
url: sUrl,
error: function(jqXHR, textStatus, errorThrown) {
if (jqXHR.status !== 0) {
sap.m.MessageToast.show("[".concat(jqXHR.status, "] ",
jqXHR.statusText, " ", jqXHR.responseText));
}
errorHandler.apply(this, [jqXHR, textStatus, errorThrown]);
},
statusCode: {
0: function(jqXHR, textStatus, errorThrown) {
sap.m.MessageToast.show("Connection refused");
}
},
success: function(oData, textStatus, jqXHR) {
if (oData === null || oData === undefined) {
sap.m.MessageToast.show(
"[WARNING] Received a null or undefined" +
" response object");
return;
}
successHandler.apply(this, [oData, textStatus, jqXHR]);
}
});
}
});
});New button for triggering robot actions
Now we can finally add a button to the UI5 app and make it trigger a push message to the robot.
First, let’s add the button with text “Move fork” in
Cozmo.view.xml and declare onMoveFork its handling function:<mvc:View controllerName="<your_project_name>.controller.Cozmo" xmlns="sap.m" xmlns:mvc="sap.ui.core.mvc" displayBlock="true">
<App>
<Page title="Cozmo in the Internet of Things">
<Panel class="sapUiResponsiveMargin" width="auto">
<Button text="Move fork" press="onMoveFork" class="sapUiSmallMarginEnd"/>
</Panel>
</Page>
</App>
</mvc:View>Then implement
onMoveFork in the Cozmo.controller.js and let it post to the IoT push service.The following dependencies are important to understand for the implementation – even if you copy my code below:
To have an action command sent to the robot via IoT service you send a POST request to the push API of the IoT service – you specify the target device by including its ID in the push service URL. If you copy the code below make sure to replace the suffix of the push service URL with your robot’s ID.
Note that for the push service URL you can use the path
/iotmms to refer to the route entry in the neo-app.json which then makes use of the access data as configured in the SCP destination.For the message to be transmitted with the push service note the semantics of the parameters:
"method": "ws" stands for websocket and causes the push service to pass on the actual message to the device via websocket.For the
messageType you need to specify the ID of your TO_COZMO message.The action code value “1” is chosen arbitrarily – we will need this value in a moment when we code the corresponding action handler on Python side.
Cozmo.controller.js enhancements:onMoveFork: function() {
var pushServiceUrl = "/iotmms/v1/api/http/push/<technical_ID_of_your_COZMO_device>";
var messageObject = {
"sender": "IoT application",
"method": "ws",
"messageType": "<technical_ID_of_your_TO_COZMO_message>",
"messages": [{
"ACTION": "1"
}]
};
var successHandler = function(oData, textStatus, jqXHR) {
sap.m.MessageToast.show("Success");
};
this.doHttp("POST", pushServiceUrl, messageObject, successHandler);
}Checkpoint: When you now run the UI5 application you should see the “Move fork” button on your page
When you push the button you will probably see one of the following messages:
In case of 503 it might help to restart the app or the deploy your app to the SAP Cloud Platform (via context menu in the navigation tree of the Web IDE).
In case of 410 you need to start your Python
cozmo_controller – otherwise there is no one to receive your pushed message.In case of “Success” you are ready for the final implementation step!
Adapting the robot controller to react
The last piece we need to implement is the
on_message method of the Python cozmo_controller. This is where the pushed messages are supplied via the websocket. To handle the action message of the fork button we parse the incoming message and trigger the robot fork movement which is neatly encapsulated by the Cozmo API.Enhance your
cozmo_controller.py with some coding like the following:import json
def on_message(ws, message):
data = json.loads(message)
action = data["messages"][0]["ACTION"]
if action == "1":
cozmo_instance.set_lift_height(1.0, in_parallel=True)
cozmo_instance.set_lift_height(0.0, in_parallel=True)
Testing time!
When you now restart your Python Cozmo controller and push the button in your UI5 app you should now see some fork movement going on.
Congratulations for making it all the way up to here!
You now have a basic setup running allowing you to control the robot locally, collect its data and trigger robot actions remotely.
Now it’s time for your own creativity and to transform this plain robot story into something more meaningful. Having all tools available now let the little robot do more interesting things than driving in squares and lifting its fork. To get you inspired part 3 of the blog series shows how to implement remote inspection as a more sophisticated example.
Feel free to share your ideas and outcomes with us in the comments!
- SAP Managed Tags:
- Internet of Things,
- SAP Business Technology Platform
4 Comments
You must be a registered user to add a comment. If you've already registered, sign in. Otherwise, register and sign in.
Labels in this area
-
ABAP CDS Views - CDC (Change Data Capture)
2 -
AI
1 -
Analyze Workload Data
1 -
BTP
1 -
Business and IT Integration
2 -
Business application stu
1 -
Business Technology Platform
1 -
Business Trends
1,658 -
Business Trends
91 -
CAP
1 -
cf
1 -
Cloud Foundry
1 -
Confluent
1 -
Customer COE Basics and Fundamentals
1 -
Customer COE Latest and Greatest
3 -
Customer Data Browser app
1 -
Data Analysis Tool
1 -
data migration
1 -
data transfer
1 -
Datasphere
2 -
Event Information
1,400 -
Event Information
66 -
Expert
1 -
Expert Insights
177 -
Expert Insights
296 -
General
1 -
Google cloud
1 -
Google Next'24
1 -
Kafka
1 -
Life at SAP
780 -
Life at SAP
13 -
Migrate your Data App
1 -
MTA
1 -
Network Performance Analysis
1 -
NodeJS
1 -
PDF
1 -
POC
1 -
Product Updates
4,577 -
Product Updates
342 -
Replication Flow
1 -
RisewithSAP
1 -
SAP BTP
1 -
SAP BTP Cloud Foundry
1 -
SAP Cloud ALM
1 -
SAP Cloud Application Programming Model
1 -
SAP Datasphere
2 -
SAP S4HANA Cloud
1 -
SAP S4HANA Migration Cockpit
1 -
Technology Updates
6,873 -
Technology Updates
420 -
Workload Fluctuations
1
Related Content
- Consuming SAP with SAP Build Apps - Mobile Apps for iOS and Android in Technology Blogs by SAP
- Now available: starter kit for genAI on SAP BTP in Technology Blogs by SAP
- How to use AI services to translate Picklists in SAP SuccessFactors - An example in Technology Blogs by SAP
- IoT - Ultimate Data Cyber Security - with Enterprise Blockchain and SAP BTP 🚀 in Technology Blogs by Members
- Configure Custom SAP IAS tenant with SAP BTP Kyma runtime environment in Technology Blogs by SAP
Top kudoed authors
| User | Count |
|---|---|
| 36 | |
| 25 | |
| 17 | |
| 13 | |
| 8 | |
| 7 | |
| 7 | |
| 6 | |
| 6 | |
| 6 |