![]() As you know to create document template we must create web-service in the Web Service Tool and then create document template in template designer. But in Web Service Tool not all attributes are there.
As you know to create document template we must create web-service in the Web Service Tool and then create document template in template designer. But in Web Service Tool not all attributes are there.
In this blog I'll tell you how to add custom attributes to web-service.
Business Scenario: We need to create document template for business transaction with these attributes:
- Name and last name of business partner
- Birth date of business partner Birth
- Current date
Some of these attributes we cannot add with Web Service Tool: birth date and current date.
Solution: First of all we'll create web-service with business partner's name.
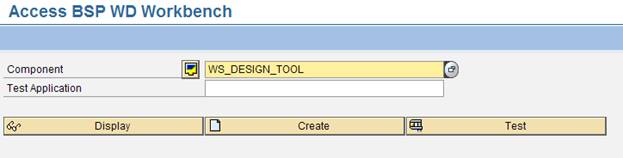
- Go to transaction BSP_WD_CMPWB, enter Component WS_DESIGN_TOOL and press Test button.

- You are in Web Service Tool page, press New button to create new web-service

- Input data like in print screen and press Next button

- You are in Select Attributes page, to add attributes you must select node, in right side select attributes then press Confirm button. We need these attributes:
- Business Transaction - GUID of a CRM Order Object
- Administrative Header of Order - GUID of a CRM Order Object
- Parties Involved of Header - GUID of a CRM Order Object
- Main Activity Partner - Partner number
- BTPartnerAddress - First name, Last name
After this go to step 4 (Settings), save and activate your web-service. We created web-service and now we'll enhance its output structure.
- Go to SE80 and open $WS_BOL_GEN package. Then we can open created web-service and see what function group is used.

- Open this function group and its function module. In Export tab we'll see its output structure:

- Open this structure and press Append Structure button, press Continue in dialog, then input new structure's name, for example ZBPATTRIBUTES and input components.

- Save and activate your structure, activate output structure
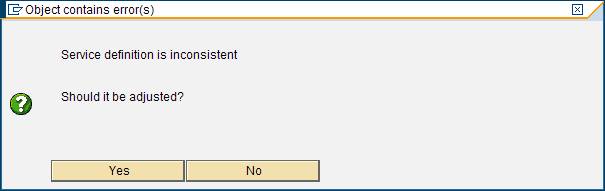
- Go to web-service (change mode), press Check button and press Yes in appeared dialog
- Now additional attributes are added to web-service (you can see it in WSDL). Save and activate web-service.
In last step we'll fill these attributes with values.
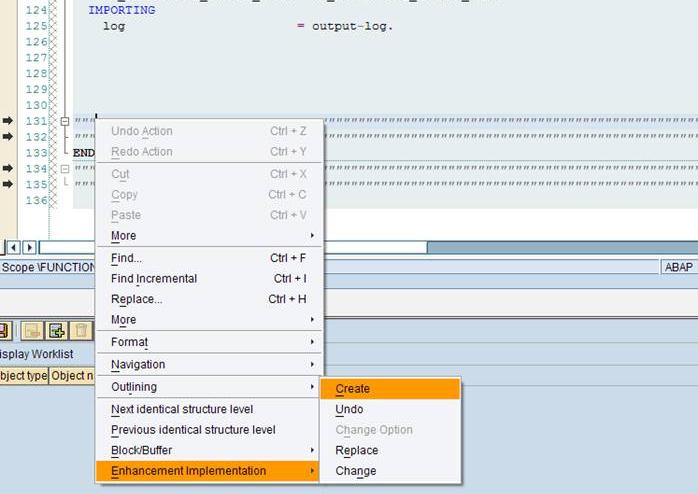
- Go to functional module, press Enhance Source Code button (or press Shift+F4), then in menu Edit - Enhancement Operations - Show Implicit Enhancement Options. Now you can see where we can create enhancements in source code.
- Create declaration enhancement, input name and description.
- Input code and activate func. module:
ENHANCEMENT 2 Z_BP_ATTRIBUTES. "active version
* Current Date
CALL FUNCTION 'CONVERT_DATE_TO_EXTERNAL'
EXPORTING
DATE_INTERNAL = sy-datum
IMPORTING
DATE_EXTERNAL = output-Z_CURRENT_DATE.
*Date of birth
data: ls_person_data TYPE BAPIBUS1006_CENTRAL_PERSON.
data: lv_bupa_no type BAPIBUS1006_HEAD-BPARTNER.
lv_bupa_no = output-Z_BP_DATA_FOR_BTX-ADMINISTRATIVEHEADEROFORDER-PARTIESINVOLVEDOFHEADER-MAINACTIVITYPARTNER-REF_PARTNER_NO.
CALL FUNCTION 'CONVERSION_EXIT_ALPHA_INPUT'
EXPORTING
input = lv_bupa_no
IMPORTING
output = lv_bupa_no.
CALL FUNCTION 'BAPI_BUPA_CENTRAL_GETDETAIL'
EXPORTING
BUSINESSPARTNER = lv_bupa_no
VALID_DATE = SY-datum
IMPORTING
CENTRALDATAPERSON = ls_person_data.
IF ls_person_data-BIRTHDATE IS NOT INITIAL.
CALL FUNCTION 'CONVERT_DATE_TO_EXTERNAL'
EXPORTING
DATE_INTERNAL = ls_person_data-BIRTHDATE
IMPORTING
DATE_EXTERNAL = output-Z_BIRTH_DATE.
ENDIF.
ENDENHANCEMENT.
Now everything is ready to use this web-service. Go to Web Service Tool and set Productive flag to your service in Settings page. You can test your service before it.
Now enter CRM WebClient with SALESPRO business role. Go to Sales Operations - Document Templates. Press new button, input parameters like in screen shot and press Start Designer.

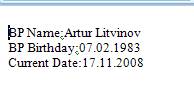
Create test template like this:

Now create Appointment and test created template. As you can see our web-service works fine.

I hope this blog will help you.
