
- SAP Community
- Products and Technology
- Additional Blogs by SAP
- Single Sign On to BSP pages from Duet's Action Pan...
Additional Blogs by SAP
Turn on suggestions
Auto-suggest helps you quickly narrow down your search results by suggesting possible matches as you type.
Showing results for
Former Member
Options
- Subscribe to RSS Feed
- Mark as New
- Mark as Read
- Bookmark
- Subscribe
- Printer Friendly Page
- Report Inappropriate Content
10-06-2008
9:49 PM
Introduction
Not only in Duet, but also in other scenarios you will often want to access (SAP-) backend systems where you do not want to have the user to authenticate himself / herself again.
One example for that are the “You Can Also” links in the Duet action pane. With these links you can easily provide the users context related additional information. For example if you create a leave request via Duet one “You Can Also” link could point to the homepage of your HR department.
But you could also provide the user with more user-specific data coming from your HR backend. For example you could create a BSP page that shows all of your previously created leave requests, or an overview of the leave request taken by the members of your team, or …
Right now, if you implement such a link in the Action pane the user will get prompted for a username and password when he tries to access the BSP on the ABAP system. But there is a very simple workaround that you can use.
Instead of accessing the BSP pages on the ABAP system directly we will first contact the Duet J2EE Engine (which is already configured to accept SPNego tickets, see https://www.sdn.sap.com/irj/sdn/weblogs?blog=/pub/wlg/8235 on how to setup SPNego). From the J2EE Engine we will get an SAPLogonTicket which we will then send to the BSP page on the ABAP system. Since the ABAP system already trusts the J2EE Engine the username contained in the SAPLogonTicket will be used and the user can access the BSP without having to enter his credentials again.

[Of course similar scenarios are possible in other NetWeaver installations where you have at least one J2EE engine that is already configured to work with SPNego. For example you could think of one “proxy” J2EE server that is configured to run with SPNego. All initial requests would go to this J2EE which then would redirect to some other J2EE Engine that trusts the proxy-J2EE.]
Let’s get started
As a first step we will have to create the redirect application that we deploy on the J2EE engine. Instead of providing the finished ear file out of the box I want to show you how easy it is to create this file by yourself -- there is no magic behind it!
Create a Web Module Project
So install a NetWeaver Developer studio and create a Web Module Project, by clicking on File -> New -> Project. Select Web Module Project and enter a Project name.

This name will be part of the URL that you call each time you do a redirect. For this simple test I call the project SSORedirect.

Add a JSP
Now that a folder structure is created, we have to add a JSP file. Right click on webContent -> New -> JSP.
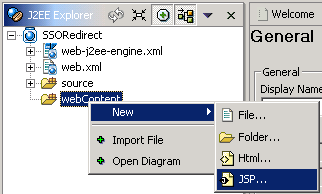
I will use the name redirect. Open the JSP and enter the following lines
<%@ page language="java" %>
<%
String redirectURL = request.getParameter ("to");
response.sendRedirect ("http://" + redirectURL);
%>

So all we are doing here is take the GET parameter “to” from the URL and do a redirect to this URL. If the URL is http://myserver:50000/redirect.jsp?to=www.duet.com the GET parameter for “to” would be www.duet.com, so the redirection would go to http://www.duet.com/.
Of course this is a very simply example. You could include any kind of logic, for example to check for http/https, to check for different GET parameter, to dynamically add different URL, ...
Add Security constraints
Now we have to assign a Default Security Role to the Web Modul, so that we can configure the J2EE Engine to ask for authentication when users access the URL. Just open the Security Roles tabs of the web.xml file and click on Add.

Select the Security Tab, add a Security Constraint and select NONE on the Transport Guarantee.
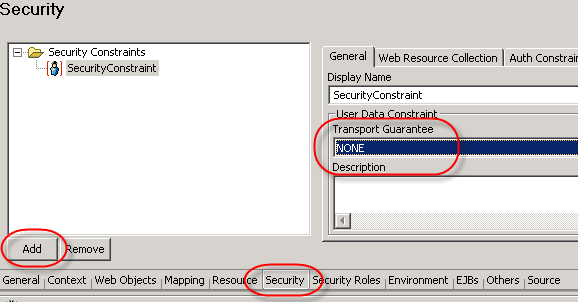
On the next tab, Web Resource Collection, select URL patterns and click on Add. On the Auth Constraint tab click Add again and add the DefaultSecurity Role.

Resulting web.xml
As a result the web.xml should look something like this:
<?xml version="1.0" encoding="UTF-8"?>
<!DOCTYPE web-app PUBLIC "-//Sun Microsystems, Inc.//DTD Web Application 2.3//EN" "http://java.sun.com/dtd/web-app_2_3.dtd">
<web-app>
<display-name>WEB APP</display-name>
<description>WEB APP description</description>
<servlet>
<servlet-name>redirect.jsp</servlet-name>
<jsp-file>/redirect.jsp</jsp-file>
</servlet>
<security-constraint>
<display-name>SecurityConstraint</display-name>
<web-resource-collection>
<web-resource-name>WebResource</web-resource-name>
<url-pattern>*</url-pattern>
</web-resource-collection>
<auth-constraint>
<role-name>DefaultSecurityRole</role-name>
</auth-constraint>
<user-data-constraint>
<transport-guarantee>NONE</transport-guarantee>
</user-data-constraint>
</security-constraint>
<security-role>
<role-name>DefaultSecurityRole</role-name>
</security-role>
</web-app>
Create Enterprise Application Project
As a last step we have to create an Enterprise Application Project to which we can assign the Web Modul we just created.

The name we use here will just appear in the Visual Admin. I will simply call it SSORedirectEA

Now we have to Add the module by right clicking on SSORedirectEA -> Add Modules

Select the SSORedirect Module

Compile and deploy
and click on Build Application Archive.

Finally we have an EAR file that we can deploy (directly from the Developer Studio or via SDM) to the J2EE Engine.
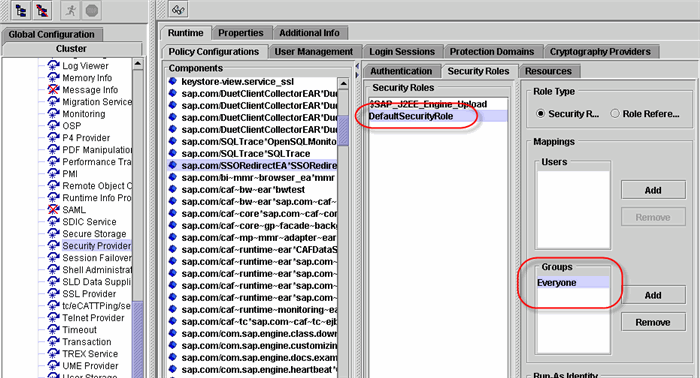
Add SPNego authentication to component
Once that is done open the Visual Administrator and from Server -> Services -> Security Provider assign the spnego authentication template to the EAR file we just created (I assume that you have already configured SPNego and used “Create template” when running the wizard; if not check the blog here😞

Make sure to go to the Security Roles tab and for the DefaultSecurityRole add the Group Everyone to the Groups Mappings.
First try
That’s it. You can easily verify that the redirection of the JSP is working by accessing the URL
http://servername:50000/SSORedirect/redirect.jsp?to=www.duet.com
Here the first request is fired to the J2EE Engine. The J2EE Engine checks whether a SAPLogonTicket is already part of the HTTP request. This is probably not the case and it will use the SPNegoLoginModul to authenticate you. If that worked fine, then a SAPLogonTicket will be created and you can access the JSP page redirect.jsp. Since we used the GET value www.duet.com the JSP will redirect us to http://www.duet.com/.
(if you get a 401 Error then there is something wrong with the authentication. Make sure that SPNego is working and also check if you did all the Security related steps while creating the EAR file. Compare the web.xml with the one mentioned above. Did you assign the Everyone Group to the DefaultSecurityRole in Visual Admin like mentioned above?)
And now the scenario in Duet
Now that we know that the application is working, we can use that to access any trusted backend.
A simple "You Can Also" link
For Duet you would probably want to adjust the You Can Also Region from http://duetserver:50000/duet. Here you can see how easy it is to add a new link to the Action Pane that points to the Duet homepage on http://www.duet.com/.
Enter the data in the Business Environment – User Interface Configuration section and add your URL.

As a result you will see your link in the Duet Action pane (either refresh your clients cache manually or wait until it gets refreshed automatically):

Link to a BSP page
This is all Duet standard. In the next example I want to modify the You Can Also link for the leave management scenario to access a very simple BSP page I have created on the backend system: http://backendserver:8000/sap/bc/bsp/sap/z_sdn/hello.htm.
One problem we have with our very basic JSP page is that there are problems with special characters like :, /, ?, &, …. If you want / have to use these characters then you have to encode the URL you submit to the redirect application (to encode just search on the net for “urlencode online” and you will get links like, http://www.functions-online.com/de/urlencode.html where you can encode your URL online).
So instead of calling the URL http://servername:50000/SSORedirect/redirect.jsp?to=backendserver:8000/sap/bc/bsp/sap/z_sdn/hello.ht...
you would submit the URL
http://servername:50000/SSORedirect/redirect.jsp?to=backendserver%3A8000%2Fsap%2Fbc%2Fbsp%2Fsap%2Fz_...
(e.g. ":" is replaced by %3A, "/" by %2F, “`?” by %3F). Just enter this URL in your browser and you should be redirected to the BSP – without having to enter your credentials again.

After the data is committed on the server and fetched by client you will see the additional link in the Action Pane

and clicking on this link will result in the BSP page being displayed without the user having to authenticate again!

This BSP just shows you that the authenticated user really is the one I am currently using in Duet and it shows some more detailed leave request information. I could also extend this BSP with nicer looking tables, charts, …
Your turn
I hope you got a first impression how easy it is to provide Single Sign On access to backend applications.
Please feel free to raise questions, concerns or to extend / modify the JSP or BSP here and post your results.
33 Comments
Related Content
- SAP Analytics Cloud - Performance statistics in Technology Blogs by SAP
- The 1H 2024 Release of SAP SuccessFactors Learning – Release Highlights in Human Capital Management Blogs by Members
- Table refresh after bound RAP action execution on multiple items is not working in Enterprise Resource Planning Q&A
- SAP Successfactors Implementation and Maintenance in Projects in 2024 in Technology Blogs by Members
- SAP Commerce Cloud Q1 ‘24 Release Highlights in CRM and CX Blogs by SAP