
- SAP Community
- Products and Technology
- Enterprise Resource Planning
- ERP Blogs by SAP
- Intercompany integration solution for SAP Business...
Enterprise Resource Planning Blogs by SAP
Get insights and updates about cloud ERP and RISE with SAP, SAP S/4HANA and SAP S/4HANA Cloud, and more enterprise management capabilities with SAP blog posts.
Turn on suggestions
Auto-suggest helps you quickly narrow down your search results by suggesting possible matches as you type.
Showing results for
former_member18
Active Contributor
Options
- Subscribe to RSS Feed
- Mark as New
- Mark as Read
- Bookmark
- Subscribe
- Printer Friendly Page
- Report Inappropriate Content
03-23-2017
8:38 AM
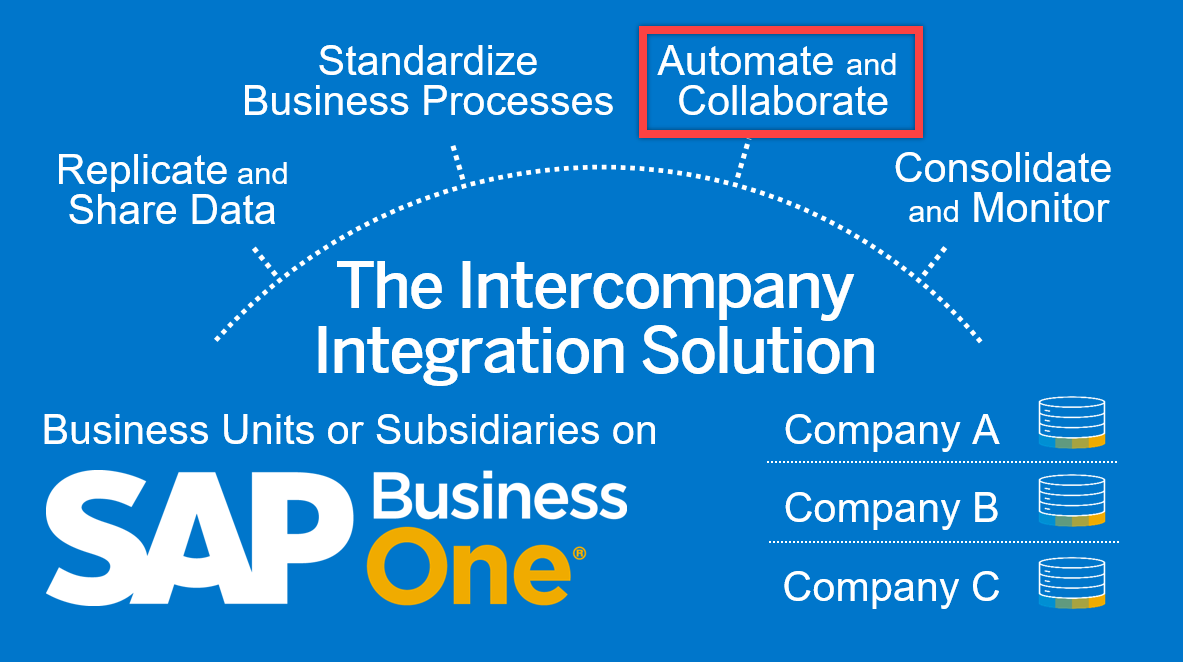
Growing organizations that control more than one legal business entity are sometimes faced with the challenge of how to share data between partner companies.
The Intercompany integration solution for SAP Business One enables businesses running SAP Business One to manage Intercompany transactions for multiple companies by automatically replicating corresponding transactions across multiple company databases. Automating the replication of such transactions significantly reduces the amount of end-user effort needed to maintain Intercompany financial statements.
Intercompany Solutions allows user to allocate income and expenses such as travel, payroll, and audit fees across branch companies.
In this blog, we are covering following broad sections on allocations:
- G/L Branch Allocation
- G/L Allocation Posting Templates
- Recurring GL Allocation Postings
- A/P Service Invoice Allocations
G/L Branch Allocation
User can use the G/L Branch Allocation feature to allocate income and expenses to other branch companies. For example, you can allocate income and expenses from the head office company to sales or distribution subsidiaries, or vice versa. The G/L branch allocation allows interbranch transactions to be posted automatically.
At the end of the month, an accountant can allocate a portion of any centrally incurred expenses across all organization units that contribute to, or benefit from, that expenditure/income, based upon a calculation that represents a reasonable allocation of how that expense/income should be split.
For example, marketing expense incurred in head office (ACME NY) company ledger is allocated to subsidiary 1 (ACME CA) and subsidiary 2(ACME TX).


Steps to create the G/L Allocation Transactions:
- To create a G/L allocation transaction,Choose Financials-> G/L Branch Allocation to display the G/L Allocation window.

- Specify header information i.e Due Date, Posting Date and Document Date etc.
- In the top matrix,specify an amount in either the Debit (Income Allocation) or Credit (Expense Allocation) field depending on the nature of the allocation.
- If required,you can add additional allocation lines in the top matrix.
Please note Each row in the top matrix can correspond to multiple rows in the bottom matrix. Highlight the individual rows in the top matrix to populate corresponding allocation information in the bottom matrix. - In the bottom matrix,Specify the branch codes of the companies to which the allocation is to be made. You can use the Load All Branches button to automatically populate the branch codes of all branch companies.
- If you specify the target company allocation account for a branch code in the Allocation Account Code field, then this allocation account will be used instead of the receiver company´s default expense account or default income account.
- Choose add.

- A journal voucher / journal entry is automatically created in the receiver systems – companies to which allocation is made.

- In the journal voucher/journal entry, user can click the Intercompany detail button to see the sender company details and G/L allocation information.

- Before posting the journal voucher, you can change the default expense account or the default income account to any other specific G/L account.
- Change the Status field to Accept or Reject depending on your decision.
- If you choose the status as Accept and update the journal voucher, the system sends an alert message to the Alert User of the sender system, indicating an update of the journal voucher.
- Post the voucher.
- The journal voucher is saved as a journal entry.
- The status of the journal voucher is updated in the bottom matrix of the Allocation window in the sender system.

GL Allocation Posting Templates
Commercial organizations may have allocation transactions presented in a template format where only the recorded amounts vary from transaction to transaction. This feature enables the user to create pre-defined templates for expenses or profit allocation that can be used to record recurring transactions. For example, overall marketing expenditure to be allocated in a pre-defined percentage amongst the subsidiaries can be setup as a template.
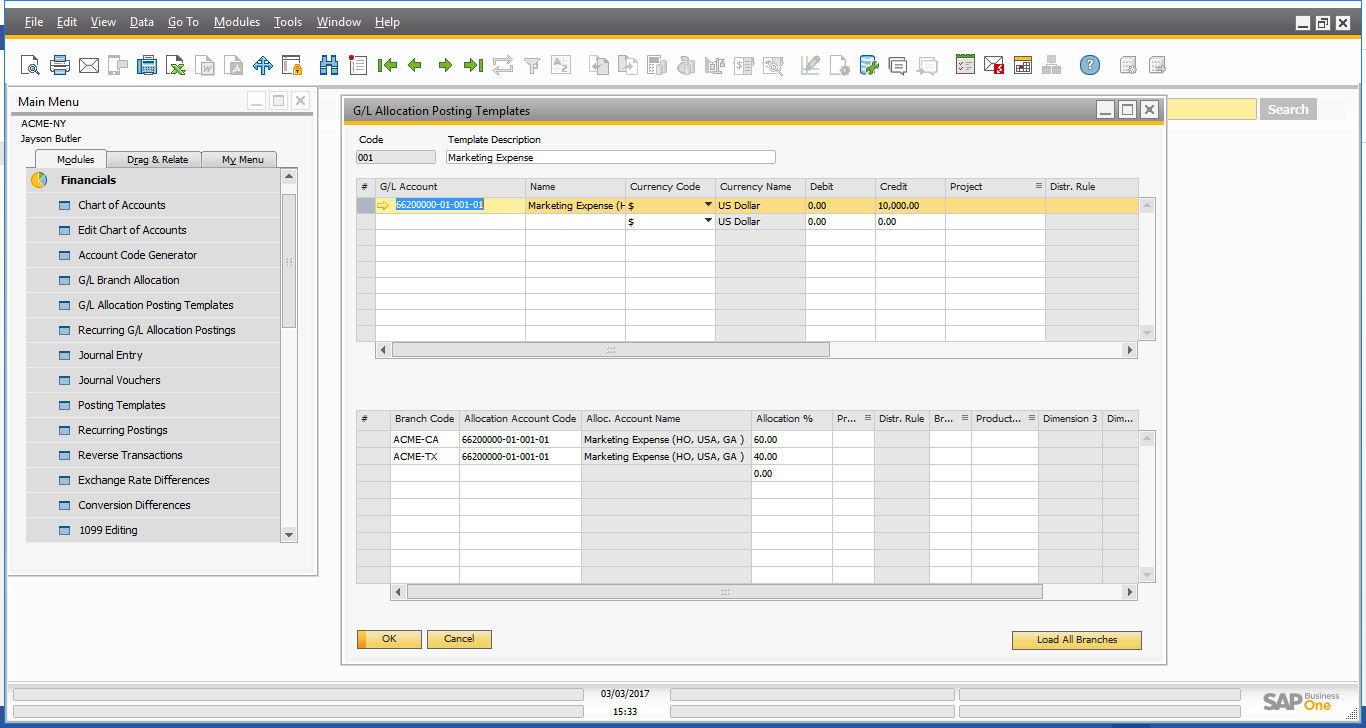
Steps to create the G/L Allocation Posting Templates:
- To create the G/L Allocation Posting Templates window, choose Financials->G/L Allocation Posting Templates.

- Specify header information i.e Code and Description.
- In the top matrix, Specify an amount in either the Debit (Income Allocation) or Credit (Expense Allocation) field depending on the nature of the allocation.
- In the bottom matrix, Specify the branch codes of the companies to which the allocation is to be made. You can use the Load All Branches button to automatically populate the branch codes of all branch companies.
- If you specify the target company allocation account for a branch code in the Allocation Account Code field, then this allocation account will be used instead of the receiver company´s default expense account or default income account.
- Choose add.
Recurring GL Allocation Postings
Every business may have recurring transactions, say on daily, weekly, monthly or annual basis. This feature enables to create templates for recurring allocation postings, which can be executed based on the recurring frequency. Such recurring transactions can be configured in the Recurring G/L Allocation Postings screen. If the recurring transactions have been configured, the application prompts the user at application startup to post the scheduled recurring transactions.
Steps to create and execute the Recurring G/L Allocation Postings:
- To create the Recurring G/L Allocation Postings, choose Financials->Recurring G/L Allocation Postings.

- Specify header information i.e Code and Description and set the frequency according to which you want system to create instances for the transaction
- In the top matrix, Specify an amount in either the Debit (Income Allocation) or Credit (Expense Allocation) field depending on the nature of the allocation.
- In the bottom matrix, Specify the branch codes of the companies to which the allocation is to be made. You can use the Load All Branches button to automatically populate the branch codes of all branch companies.
- If you specify the target company allocation account for a branch code in the Allocation Account Code field, then this allocation account will be used instead of the receiver company´s default expense account or default income account.
- Choose add.

- To execute the created instances,Go to Financials->Recurring G/L Allocation Postings->Confirmation List. The Confirmation of Recurring G/L Allocation Postings window appears, where each row represents one instance of a recurring G/L Allocation posting template.
 Please note to set the automatic display of this window, choose Administration->System Initialization -> General Settings -> Services. Select Display Recurring Postings on Execution checkbox.
A/P Service Invoice Allocations
Another way to allocate expense amounts to other branch companies is by using the allocation feature on the A/P Service Invoice document.
The application allows for allocation of expenses booked through AP service invoices across branch companies.
The Intercompany integration solution support following two methods of allocating expenses from an A/P service invoice.
- Allocation by Invoice – In this method of allocation, system creates draft A/R invoice as a result of allocation in the sender company. On adding these draft A/R service invoices, the system will automatically create draft A/P service invoices in the receiver companies.
- Allocation by G/L – This method of allocation is similar to G/L allocations. System creates the journal voucher in the receiving company as a result of allocation in the sender company.

Steps to create the Invoice Type Allocation:
- Navigate to an open A/P Service Invoice and choose the Open Allocation button.
- In the top matrix, select allocation type as Invoice. All other fields in the top matrix are drawn automatically from the A/P service invoice.
- In the bottom matrix, specify the branch codes of the companies in bottom matrix to which the allocation is to be made. You can use the Load All Branches button to automatically populate the branch codes of all branch companies.

- Choose Allocate button.
- The system creates a separate interbranch draft A/R invoice for each branch company to which the allocation is to be made.
- In the Documents Drafts Reports – Selection Criteria window,From the User dropdown list, choose the user and choose OK to display the interbranch draft A/R invoice

- Open the draft and specify any additional information, if required, and choose Add.

- The solution create the draft A/P invoice in the receiver system.
- Open the draft A/P invoice document.

- Before adding the document,you can change the default expense account to any other specific G/L account.
- Choose the status as Accept and add the draft A/P invoice.

- The system sends an Alert message to the Alert user of the sender system, indicating an update of the A/P invoice.
- The A/P Invoice information is updated in the sender A/R invoice document on Intercompany Tab.
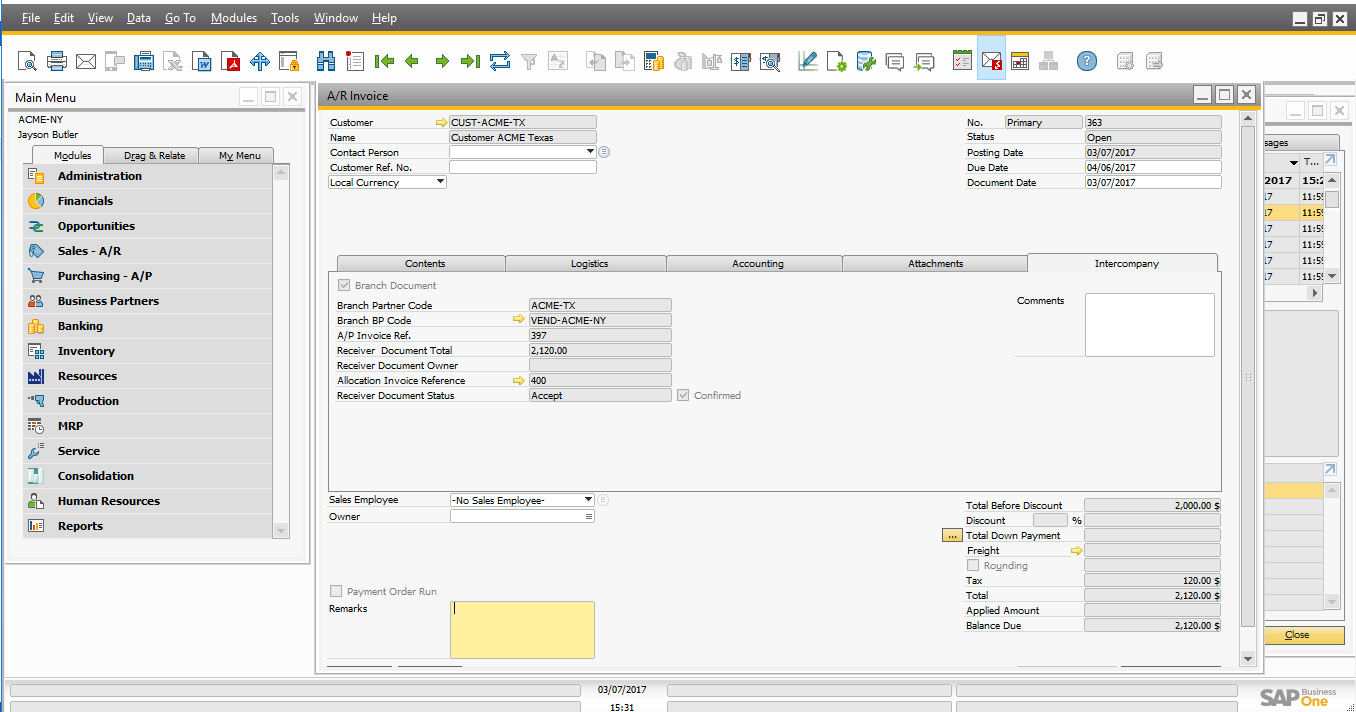
- From the A/R Invoice ,user can open the allocated A/P Invoice by clicking the allocation Invoice reference number.

- Also, the receiver companies A/P Invoice information is updated in the bottom matrix of the Allocation window in the sender system.

Steps to create the G/L Type Allocation:
- Navigate to an open A/P Service Invoice and choose the Open Allocation button.
- In the Top matrix, select allocation type as G/L. All other fields in the top matrix are drawn automatically from the A/P service invoice.
- In the bottom matrix, specify the branch codes of the companies in bottom matrix to which the allocation is to be made. You can use the Load All Branches button to automatically populate the branch codes of all branch companies.
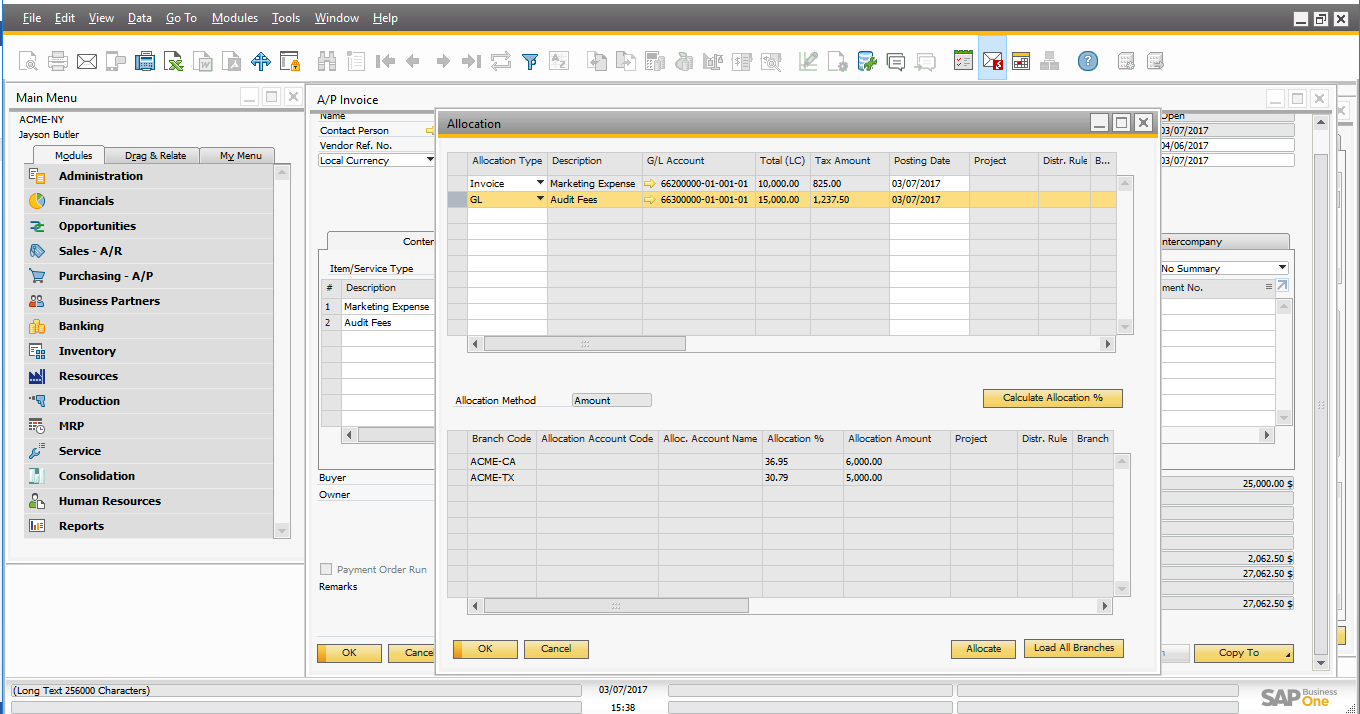
- Choose Allocate button.
- The system creates a separate journal entry corresponding to each row in the top matrix.
- A journal voucher / journal entry is automatically created in the receiver systems – companies to which allocation is made.
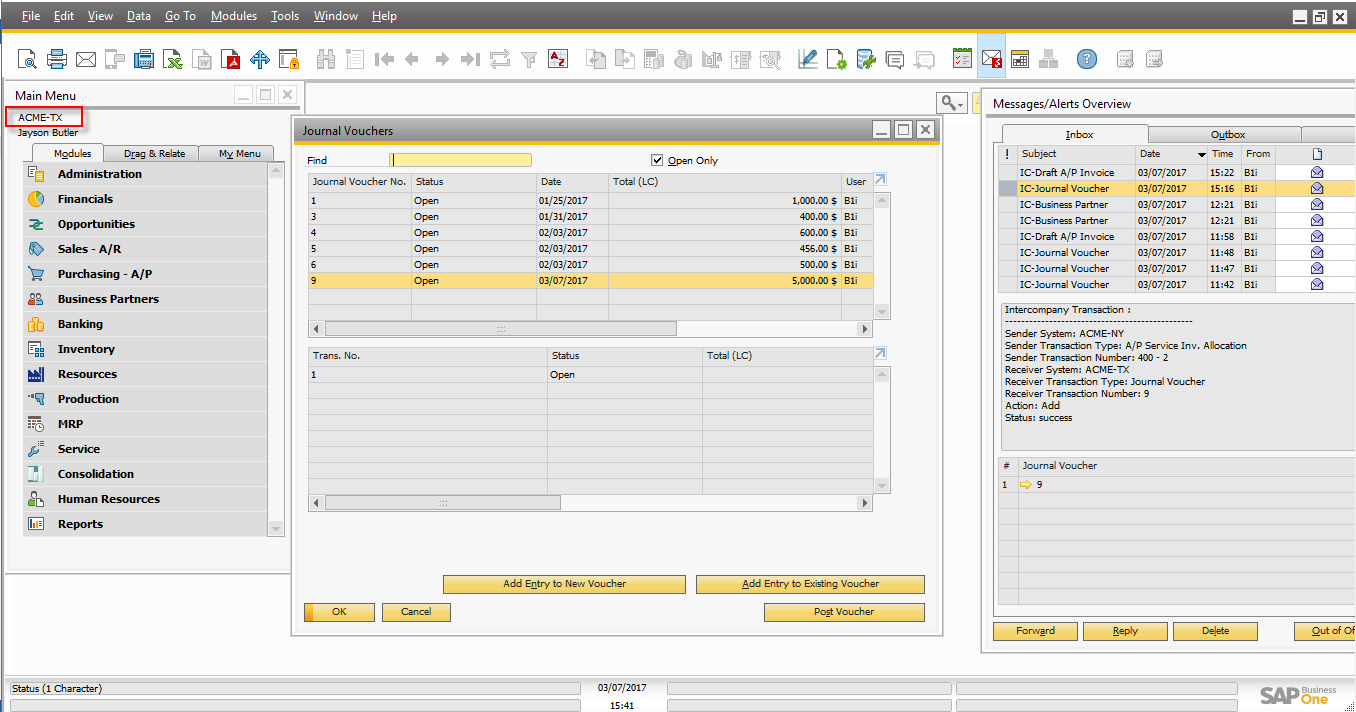
- Before posting the journal voucher, you can change the default expense account or the default income account to any other specific G/L account.
- Change the Status field to Accept or Reject depending on your decision.
- In the journal voucher/journal entry, user can click the Intercompany detail button to see the sender company details and allocation information

- If you choose the status as Accept and update the journal voucher, the system sends an alert message to the Alert User of the sender system, indicating an update of the journal voucher.
- Post the voucher.
- The journal voucher is saved as a journal entry.
- The status of the journal voucher is updated in the bottom matrix of the Allocation window in the sender system.

(This blog content was created by the development team of the intercompany integration solution for SAP Business One)
Find a list of all blogs on Intercompany integration solution for SAP Business One in this central blog.
- SAP Managed Tags:
- SAP Business One,
- the intercompany integration solution for SAP Business One
9 Comments
You must be a registered user to add a comment. If you've already registered, sign in. Otherwise, register and sign in.
Labels in this area
-
Artificial Intelligence (AI)
1 -
Business Trends
363 -
Business Trends
21 -
Customer COE Basics and Fundamentals
1 -
Digital Transformation with Cloud ERP (DT)
1 -
Event Information
461 -
Event Information
24 -
Expert Insights
114 -
Expert Insights
152 -
General
1 -
Governance and Organization
1 -
Introduction
1 -
Life at SAP
415 -
Life at SAP
2 -
Product Updates
4,685 -
Product Updates
208 -
Roadmap and Strategy
1 -
Technology Updates
1,502 -
Technology Updates
88
Related Content
- Intercompany Execution of Services (aka "Dual Order") in Enterprise Resource Planning Blogs by SAP
- An introduction into Service Management in S/4HANA Cloud Private Edition in Enterprise Resource Planning Blogs by SAP
- Enhancing Performance in SAP Web Applications: Strategies and Best Practices in Enterprise Resource Planning Blogs by Members
- Deep Dive into SAP Build Process Automation with SAP S/4HANA Cloud Public Edition - Retail in Enterprise Resource Planning Blogs by SAP
- Functional Highlights of the New 3.0 Release of PLM System Integration for SAP S/4HANA in Enterprise Resource Planning Blogs by SAP
Top kudoed authors
| User | Count |
|---|---|
| 8 | |
| 6 | |
| 5 | |
| 4 | |
| 4 | |
| 3 | |
| 3 | |
| 2 | |
| 2 | |
| 2 |