SAP Widget Development Tools is an Eclipse based graphical widget construction environment for building enterprise widgets based on Component Library.Component Library contains the predefined widget templates for creating common widget types.
This blog focuses mainly on the usage of UI elements in SAP Widget Development Tools.
In this application the main view contains few buttons and these buttons are used to trigger various events.
Here it is assumed that you have a basic knowledge of working with widgets.
Lets’ start building the widget.
Open SAP Widget Development kit.
Create a new project by navigating to File – New - Project.
Select SAP Widget Project from SAP Widgets and click Next.
Enter the name for the project: for example ButtonWD.
Select Custom Widget Template for creating the widget from scratch.
Click Finish.
Adding buttons to the view.
For the created widget project, in the Outline View select Component cMainFooter from View main-view.

In the Properties of footer select Basic.
(If Properties tab is not visible Select Window -Show View -Other.
Select Properties and click OK.)
From the Property View select footerview-buttons in the Drop down list.
This allows buttons to be shown on the footer.
Save your project periodically by clicking on the Save Button.


Select Componet - Properties.
Enter the name for the buttons as Button1\nShow View\nShow Web Page.
Use ‘\n’ to separate the button names.
That means that three buttons will be added to the Footer.
Now double click on ButtonWD-Main-Blue tab and enlarge the main-view by dragging from the corners to make the buttons clearly visible.
Run the Widget by selecting Run from the Run option or clicking on Debug button. The widget appears as follows.

Event handling with buttons.
I. To display a message on button click.
Now lets see how we can display a simple message by clicking a button.
Select Component cMainFooter from Outline view.
In the Properties tab select Component -Events.

Select button-1 and click on the button in the right corner to open the editor.
The Component Event Handler Editor opens. Select Template: Show Message and
Enter the message to be displayed as shown.Click on OK.

Now save and run the widget and click on Button1 for which we have assigned a event.
The message is displayed as follows.

II. Navigating to a view on clicking a button.
To create a view, select View from the palette (to the right of the editor)
and click on the editor.


Enlarge the view by dragging from the corners.
Select the newly created view and change the name to
CalView in the properties as shown.

Select CalView and right click on it to insert a row.

Two rows are created in the view.
To insert a button in the first row select c.Button from the Palette and click on the first row.
In the similar way select c.Calculator from the palette and insert in the second row.
You can enlarge the view so that both the UI elements become clearly visible.
Now upon clicking the button Show View in the main view, Calview has to be displayed.
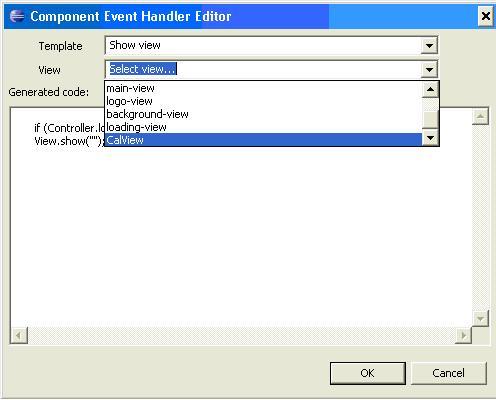
To do this, again select Component cMainFooter from the Outline view and assign the event as done before.
Template: Show View.
View: CalView and click on OK.
In the Calview we have inserted a button.
Change its name as Back by changing its title in Components – Properties – title.
Select Events from its property and set the properties as follows.
Select Template: Show View
View: main-view.
Click on OK.

Run the widget and click on Show View button.
The following screen is displayed.


Change the Outline property so that the Back button is seen exactly above the calculator.
III. To Open a Web Page
Now in the main view there is a Show Web Page button.
Again select Component cMainFooter from Outline and in the properties select Events as done before.
From button3 we want to open a web page.
So select template as Open Web Page and enter the required URL
For example “www.gooogle.com” and click on OK.


Now again run the widget and on clicking Show Web Page button the Google page is displayed.
This ends this blog along with the completion of widget.
Hope this has given a basic understanding of using SAP Widget Development Tools.
This is my first blog. Any comments or suggestions regarding this blog are always welcomed.
