
- SAP Community
- Products and Technology
- Additional Blogs by Members
- How To… Integrate ADOBE form on WebdynPro for ABAP...
Additional Blogs by Members
Turn on suggestions
Auto-suggest helps you quickly narrow down your search results by suggesting possible matches as you type.
Showing results for
Former Member
Options
- Subscribe to RSS Feed
- Mark as New
- Mark as Read
- Bookmark
- Subscribe
- Printer Friendly Page
- Report Inappropriate Content
11-15-2007
5:31 AM
How To… Integrate ADOBE form on WebdynPro for ABAP and Deploy it on portal.
1. Scenario
You want to show Employee CV on the Portal. The output format in which you want to display his / her CV should be PDF file (ADOBE Print forms) and you wanted it to display under ESS on the Portal.
2. Prerequisites for Employee
a. HR Master data is maintained for the employee
b. ESS User ID is maintained in Infotype 0105 Subtype 0001.
c. Employee has the specific role attached where he has the authorization to view the custom development on the Portal.
d. Has ADOBE reader installed on the system.
3. Prerequisites for Developer
a. Knowledge of OOPS
b. Familiar with WEBDynPro for ABAP Concepts (MVC – Model, View and Controller)
c. SAP NetWeaver AS System with Adobe Document Services (ADS)
d. Has ADLC installed.
e. Adobe Reader (>= 7.0) installed on your local computer See also note 834573.
f. Have rights as content administrator for creating custom I-view.
4. Connection Test
Execute program FP_PDF_TEST_00 to ensure that the ADS was configured correctly. If the configuration is correct, the out put of the test program will be the version number of the installed ADS.
This document will provide step-by step guide how to create ADOBE Print forms and integrate it with WebDynPro for ABAP and later attach it to custom WebdynPro I-View so that it appears on the portal.
Due to the constraint that this document is prepared as an example to know what’s needed to do the development, I won’t be able to show the whole development done but will cover all the critical point needed you to develop the same in future. This document is not complete when compared to development done and thus has room for improvement.
Getting Started with the Development:
The example that I’ll be demonstrating today will be:
- Display Employee First name and Last name
- Display His / her photograph on the CV, the photograph will be fetched at the run depending upon the employees personnel number and then will be displayed on the ADOBE form.
A. Creating ADOBE Form:
Check Point: Please make sure that you have installed ALCD - ADOBE Life Cycle Designer on your work station. It comes with the SAP pack with the entire installation guide… please approach your basis team for more details, it can also be download from http://www.adobe.com/
- Type the transaction code SFP in your command box.
- Select the radio button Interface enter the name of the interface starting with “Z” (here as creating as Z_IF_TEST_CV)
- Click on create button
- Enter description and let the interface type be as it is. (default interface type)
![]()

- Save the interface and assign it a transport request (here I am saving as local object)
- Create 2 Import parameters as im_vorna and im_nachn and 1 import parameter for employee photograph as im_photo.

- Save and activate the interface and come back on the main screen
- Create Form : select the radio button form
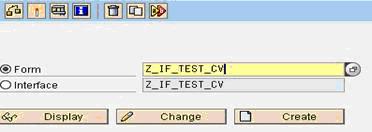
Figure A3 – Creating form
- Click on create button and Enter description, specify the interface that you have create above in step 8.
![]()

- Enter save assign to the transport request (here we have assigned it to local package)
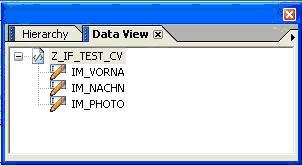
- The new screen will appear with 3 tab pages and 2 panes can be seen in context tab page.
- The left hand pane is the interface and the right hand pane is the context of the adobe form. The interface needs to be mapped with the context of the form. This can be done by drag and drop of the fields from interface to context of the ADOBE form.

- Once the mapping is done click on the layout tab. In this tab you may design your ADOBE form layout.
Note: If ADLC is not installed on your workstation then you will get error message.
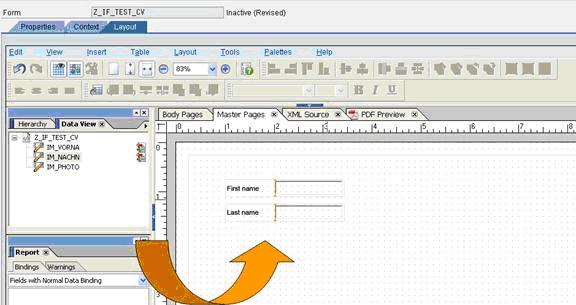
- Once you are in the layout tab click on the Data Window. (if you cant see this window select Menu Option Palette à Data View)
- To design the layout drag and drop the filed im_vorna and im_nachn on the master page of the form.
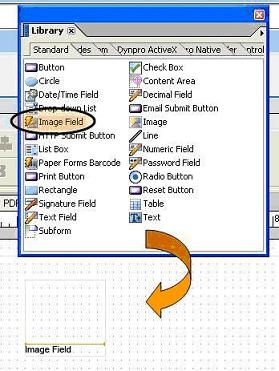
- Create UI element for Photograph. Select menu option Palettes à Library.

- Drag and drop the UI Element Image Field on the form master page.
- Binding the Image Filed. The UI Element needs to be bind so that if can receive the image at run time. For binding the fields select the UI Element … select the menu option Palette à Object.
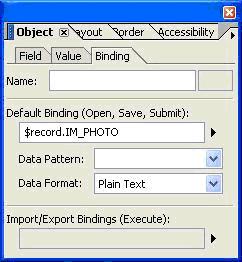
- Click on Binding tab on the object window.

Figure A11 - Binding
- As you have dragged and dropped the field im_vorna and im_nachn binding automatically takes place or else you may also bind the fields as done for im_photo.
- Save and Activate the ADOBE Form.
Basic knowledge of OOPS and concept of MVC required for creating WebDynPro Application.
- Go To SE80 transaction code (object navigator)
- In the Drop Down field select Web Dynpro Comp./Inft.
- Enter the name in the free text fields starting with “Z” in this case we have the same name as in ADOBE form. (Z_IF_TEST_CV) and hit the enter key.

- Click on Yes button to proceed further.

- Enter Description and enter.
- Assign it to transport request (in our case we are saving it as local object)
- Create View where you can display your custom ADOBE Form.
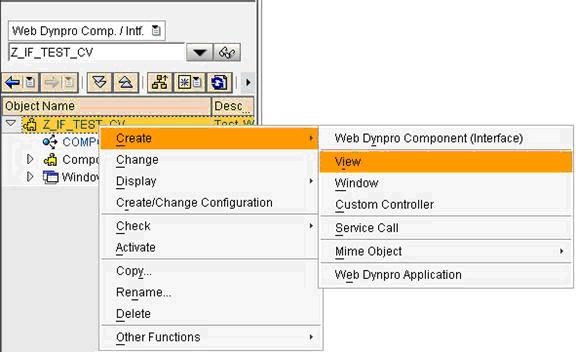
- Enter the name and the description of the view

Figure B3a – Create View.
- Enter and proceed further
- Click on the layout of the View which you have created. ROOTUIELEMENTCONTAINER is the default UI element that gets created, right click and select Insert Element.

- For the templateSource property, enter the name of the form. You can select an existing form (via F4, for example) or enter a name to create a new form. Based on the interface of the selected form, a context node with attributes is automatically created for the UI element InteractiveForm. The dataSource property of the UI element is automatically bound to this context node.
- Specify whether the form is a PDF-based print form or an interactive form.
· If it is a non-interactive form usage, that is. the form is a PDF-based print form, make sure that the property enabled is not selected in the property table. This is the default setting.
· If it is an interactive form usage, activate the property enabled in the property table

Figure B5 – UI Adobe Form Properties.

Figure B6 – Context of the View the node z_if_test_cv automatically gets created with all the 3 fields which were created in the interface of the ADOBE form.
- Click on the method tab page and double click on the method WDDOINIT.
- Now you got to read the context node that was automatically created when defining the ADOBE form.
- Click on the Icon “WebDynPro Code Wizard (Ctrl+F7)”.
- New screen will appear select radio button Read Context… select F4 to select the node “Z_IF_TEST_CV” press enter.

Figure B7 – Web DynPro statement structure

Figure B8 – Context Viewer
- After pressing enter you will be back to your method and this piece of code will be automatically generated for you.

- Currently we will Hard Code the fields Vorna and Nachn and will use the standard method to get the photographs form SE78 (Form Graphics).
- Add this piece of code
CONSTANTS: c_graphics TYPE tdobjectgr VALUE 'GRAPHICS',
c_bmap TYPE tdidgr VALUE 'BMAP' ,
c_bcol TYPE tdbtype VALUE 'BCOL'.
DATA: lv_pernr1 TYPE tdobname.
*** Vorna and Nachn.
ls_z_if_test_cv-im_vorna = 'Bhawanidutt'.
ls_z_if_test_cv-im_nachn = 'Dabral'.
*** Get the Photographs.
lv_pernr1 = '00000028'. " Employee Number
CALL METHOD cl_ssf_xsf_utilities=>get_bds_graphic_as_bmp
EXPORTING
p_object = c_graphics
p_name = lv_pernr1
p_id = c_bmap
p_btype = c_bcol
RECEIVING
p_bmp = ls_z_if_test_cv-im_photo
EXCEPTIONS
not_found = 1
internal_error = 2
OTHERS = 3.
*** Send the values back to the node
lo_el_z_if_test_cv->set_static_attributes(
EXPORTING
static_attributes = ls_z_if_test_cv ).
- Save and Activate the Method.
- Making the View as Default view or else nothing will appear on the portal.
- On the left hand side pane of your WebdynPro Component, double click on the Window. Now Drag and drop the view from left hand side under the window on the right hand side.

- Creating Web DynPro Application: Right click on the Web DynPro Component à click on create à select Web DynPro Application.

- Enter the description name and press enter.

- Save the Application assign it to a transport request.
- Test the Web DynPro Application. Right click Web DynPro Application and click on Test to test the application.

- The output gets generated in the Browser and the content gets displayed in the ADOBE Print form with the browser.

- Ask your portal team to Create WebDynPro for ABAP I-view and assign the WebdynPro application to the I-view, I-view can be assigned to page a page to a role, a role to your user id so that you can test it on the portal.

Figure B14 - Snapshot of Actual Development.
HAPPY ADOBE and Web DynProing … hope this document will help you to swim in the world of ADOBE print forms and WebdynPro Application.
32 Comments
Related Content
- SAP Business Network for Logistics 2404 Release – What’s New? in Supply Chain Management Blogs by SAP
- Accelerate Business Process Development with SAP Build Process Automation Pre-Built Content in Technology Blogs by SAP
- Switch on gCTS (for existing packages) in Technology Blogs by SAP
- Quick Start guide for PLM system integration 3.0 Implementation in Product Lifecycle Management Blogs by SAP
- Quick Start guide for PLM system integration 3.0 Implementation/Installation in Enterprise Resource Planning Blogs by SAP