ABAP Report Wizard V1.0 is live!

Today, during the Vegas Community day, we launched officially the ABAP Report Wizard. Simultaneously we are launching it on SDN as well so we can reach even more people.
This has been a community project and we hope it is just the beginning, bringing even more volunteers to improve this tool.
This Weblog will present the tool in a similar way the session at the Community day.
IMPORTANT: As of now, the tool was created for and tested on Netweaver 2004s or 7.0. It needs to be ported to older versions and for that, we welcome volunteers.
ABAP Report Wizard
History
During the SDN day in Vegas last year (2006), I presented a concept/tool to automate creation of ABAP reports. It was in very early stages, but it was a very good experience for me and I had the opportunity to meet Rich Heilman . He attended to the session and since then we've kept in contact.
Another developer who I have worked with in the past has also shown interest in the initiative. His name is Alexandre Giguère. So the three of us formed a team.
Alex, Rich and I have improved the initial concept to a much more powerful tool.
We'll be presenting a tool that can be used "right out of the box". Also, we expect to spark the discussion of what could be added to it.
Objectives
Reduce development cost by reducing time required to create reports;
Reduce maintenance costs by proposing use of company standards;
Leverage your own development team by using a state-of-the-art report;
Leverage Allow development team to work on more important activities like designing business improvements;
Allow development team to work on more important activities like designing business improvements
The tool
Using this tool you can create ABAP report structure including the following parts:
Documentation header;
Selection screen;
Data Declaration;
Initialization;
Start-of-selection;
End-of-selection
This report supports data from the following data sources:
Table join (using graphical join editor);
Single table
Benefits:
Use the latest global ALV classes for report generation;
The use the same global class template that encapsulates the report structure and functionalities, making not only simpler to use but also making all reports having the same “look and feel”;
Allow developer to choose if the user is going to be allowed to save the layout or not;
Allow the deleloper to choose if the event handlers (shell) are to be created or not.
The tool, step by step
Starting the Wizard In SE80 or SE38, put your cursor on an empty line within the source code editor, and click the pattern button. In the dialog, select the radiobutton for “Pattern” and enter the name of the pattern as Z_REPORT_WIZARD and click the green check. The wizard will then be triggered. Using the ABAP Report Wizard This first screen of the wizard is simply for information purposes. Here you will see all the steps that will be processed by the Wizard.

Click continue to go to the first step of the wizard. The first step is called “Define Report Type”. In this step, you will define the title of the report and the data source.

Enter the report name and select the data Source.

You can either do a single table read, or a table join. If you select “Table”, you will be asked to enter the name of the table. If you select “Table Join”, you will be asked to define the table join by clicking the “Define” button.

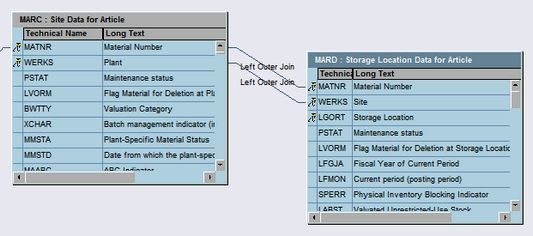
The Graphical Join editor is called. This is exactly the same functionality available on ABAP Queries and ABAP List viewer.

Click the “Insert Table” icon on the application toolbar. Enter the name of the first table in the join.

The table will then be added to the display.

Next, click the “Insert Table” icon on the application toolbar again to add the second table in the join.

Again, give the name of the table and hit enter. The graphical editor will then display both tables as well as the join condition between the two. Repeat this procedure to add another table.

Once it is done, you will see that the 3 tables are displayed and they are joined. IMPORTANT: The sequence of the screens affect the final result.

OPTIONAL: See that the join may be even further refined and changed to a Left outer join. To do so, right-click on the link and set it so.

OPTIONAL: See the result. The join is defined as requested.
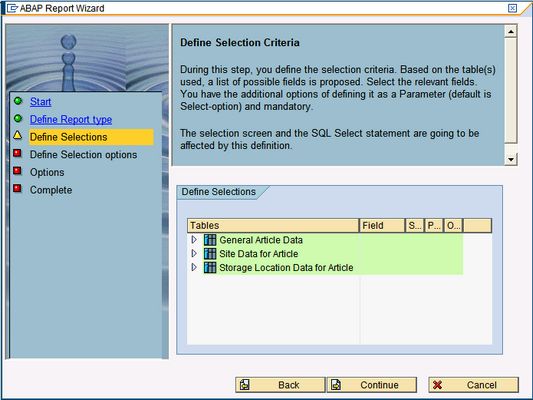
Click the “Back” button to leave the editor. Continuing to the next step of the wizard, you will need to define the selection criteria. This is where you will define what SELECT-OPTIONS or PARAMETERS will be created in your finalprogram. By default, the selections, will be SELECT-OPTIONS, you must check the checkbox for “Parameters” in order to switch to a PARAMETERS statement. You can also define them as obligatory.
Click “Continue” when finished defining your selection screen.


The next step of the wizard is to define the output fields in your report.

Open the node of the specific table an select the fields that you want to be displayed in the ALV Output.


Click “Continue” when finished selecting your output fields. The next step in the wizard is to define some options for your generated report program. Currently there is only two options, event handler generation, and save layout functionality.

If you select the “Create Event Handler” option, the wizard with then create a local class for handling events raised by the ALV Grid. If you select “Allow user to save the layout”, the ALV layout functionality will be turned on. Select both and Click “Continue”.

The last screen is a “Completion” screen. Simply click the complete button.

The required source code will then be written to your program from where you called the pattern.

Save the report. Details of the generated code: Header Comments – Self-explanatory…

Tables Statement – To support the select-options statement (further in the code)

Selection screen – Notice that the screen in created grouping the parameters (or select-options) by table.

Data Declaration – The definition of the target structure is created based on the selected output fields.

Based on this type definition, we will have workarea WA_DATA and an internal table IT_DATA.

Initilization – description for the selection screen from the dictionary

Event Handler section

And maybe most importantly, the select statement (join)

And the end-of-selection event with the global ALV class call (through a custom class)

Activate and run your program. The output will resemble the image below.

The community project
This is now a community project. Please feel to propose changes, report bugs or just volunteer to help.
Community project site
Please refer to the other Weblog posted on how to install this tool on your system.
How to Install the ABAP Report Wizard
