
- SAP Community
- Products and Technology
- CRM and Customer Experience
- CRM and CX Blogs by Members
- Configuration & Implementation of CRM Access Contr...
CRM and CX Blogs by Members
Find insights on SAP customer relationship management and customer experience products in blog posts from community members. Post your own perspective today!
Turn on suggestions
Auto-suggest helps you quickly narrow down your search results by suggesting possible matches as you type.
Showing results for
Former Member
Options
- Subscribe to RSS Feed
- Mark as New
- Mark as Read
- Bookmark
- Subscribe
- Printer Friendly Page
- Report Inappropriate Content
09-19-2007
12:36 AM
As a newbie to SAP CRM, I had a chance to implement Access Control Engine in one of my recent assignments. In this blog I would like to share my experiences with configuration and implementation of ACE.
First of all I would thank boris.dingenouts/blog for his excellent blog which explains the concept and implementation of CRM ACE, without which I would have lost way in the start.
So, in what way my blog would be different to that blog? This blog will explain in detail each and every step involved in configuration, the implementation of ABAP class and finally maintenance activities involved. We will go through this taking a business scenario as an example. As such it would be very helpful to starters… We will start of with Account’s scenario…
Business Scenario: Any particular account and its Contacts can be displayed / edited / deleted by the employee who has created that account and the other employees who are related to that Account with the relationship type “Is the Responsible Colleague Of”.
To provide detailed steps, I would like to split this blog into two. The first one would involve various configuration steps and second will explain the implementation with its code & finally maintenance related activities.
First of all let’s see what needs to be maintained in the General parameters:
- DISPATCHER_DESTINATION parameter should have the name of RFC destination through which ACE update job is scheduled. The default entry is “ACE_ACCESS”.
- Then to deactivate/activate ACE you need to include the parameter “ACE_IS_INACTIVE” which when set to “X” makes ACE inactive and if blank then ACE is active.
To start with these parameters are enough to work and based on the requirement one can use the others. Detailed help is provided in Customization documentation.

Then the next step is to “Create Rules”.
1. Add Super Object Type: You see default entries already maintained for our object ACCOUNTCRM. If the need arises one can add a new super object type too. We fill in the ACL table name, then GRP table name and UCT table name.
These are the runtime tables where in the authorization data is stored. You can have a look at the data of these tables from SE16. Because an individual set of runtime tables is created for each super object type, authorizations are spread across several tables. This enhances the performance.
![]()
![]()

2. Add Object Type: For each CRM object type used in ACE, a default BOR object type is assigned in table CRMC_PRT_OTYPE. Say for example object type “ACCOUNTCRM” the corresponding BOR object type is “BUS1006”. To define an object type, refer to the screen shot below.
Then you have the concept of Action and Action group. Actions are summarized in action groups, and used in connection with rights, they grant users specific authorizations such as READ, CHANGE, or DELETE.

3. Create Actor Type: An actor type describes the relationship type between the user and an object, for example, contact person, responsible employee. Where as actor is an attribute of Actor Type. Refer to the screen shot below to create an Actor Type. Here we have created an Actor type “ZACC_EMP_RESP” for Employee Responsible as per our scenario explained in the start.

4. Add AFO Class: AFO stands for 'Actors for objects'. Here we define AFO class ID for our Actor type created in the previous step. The class “ZCL_CRM_ACERULE_ACCOUNT” implements the interface “IF_CRM_ACE_ACTORS_FROM_OBJECT”.

5. Add OBF Class: OBF stands for ‘Objects by filter’. Here also we define the same ABAP class we defined in the previous step. We need to implement the interface “IF_CRM_ACE_OBJECTS_BY_FILTER“in that class.

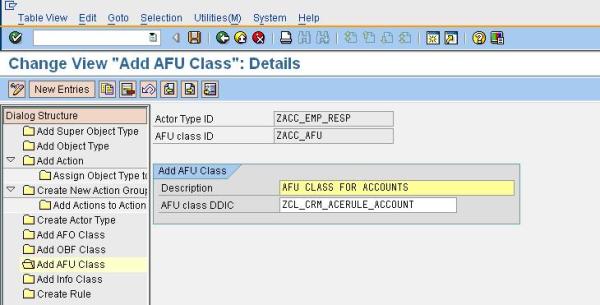
6. Add AFU Class: AFU stands for ‘Actors for User’. We need to implement the interface IF_CRM_ACE_ACTORS_FROM_USER in the class “ZCL_CRM_ACERULE_ACCOUNT”.
7. Create Rule: This is the final step in creation of ACE Rule. This rule would be used in the Right definition step. Refer to the screen shot below:

Create Rights
1. Work Package Definition: A work package is an organizational unit of the ACE, which combines user groups and enables them for one or several object types. We define a work package for all our Account Related ACE Rules. The super object type assignment ensures that users of the user group(s) are only active ACE users of the respective super object types and their sub objects.

2. Object Type Assignment for Work Packages: Assign the super object type to a work package. Refer to the screen shot below:

3. User Group Definition - A user group contains users who should get authorizations for objects. User groups can contain single users, as well as roles. Furthermore, they can be nested. User groups are assigned to work packages.
Please have a look at the below note, which is mentioned in the documentation.
Note: Because a user group can be assigned to one work package only, nesting of user groups may result in non-unique assignments. For example, Group G1 is assigned to Package P1. Additionally, Group G1 is nested in Group G2, which in turn is assigned to Package P2. The user group in Package P1 is therefore not valid, because assignment to a package of Group G1 via nesting in Group G2 is not unique.

4. User Group Entries: The entries in the User group can be defined as a User, Role and a User group. Normally it makes sense if you create a role for which ACE authorization is applied and add that here. For demo purposes I have added a set of user IDs here.

5. Right Definition: Right definition makes the connection between a rule, which provides the objects as well as the actors, and the users, who are stored in the right via the user group. The right also defines the possible actions that the user can execute with the objects of the rule. Furthermore, you can specify a validity period for the rights and hence control them chronologically. Refer to the below screen shot which shows the Right we had created.

ACE Design Report
Finally once the entire configuration is done, then our design can be verfied using the transaction “ACE_DESIGN” by giving the Right Name as input. Refer to the below screen shot where in you can check out the whole lot of things we had created in the previous steps.

So, far we have seen the entire configuration part involved in our scenario. In the Configuration & Implementation of CRM Access Control Engine (ACE)-Part 2 I will show you the entire implementation involved.
You have very good documentation for each step in the Customization transaction. One can refer to that for better understanding.
This blog was just an attempt to put on all things at a single place which would be really helpful to starters.
Hope this blog serves its purpose!
- SAP Managed Tags:
- SAP Customer Relationship Management
5 Comments
You must be a registered user to add a comment. If you've already registered, sign in. Otherwise, register and sign in.
Labels in this area
-
ABAP
1 -
API Rules
1 -
CRM
1 -
Custom Key Metrics
1 -
Customer Data
1 -
Determination
1 -
Determinations
1 -
Introduction
1 -
KYMA
1 -
Kyma Functions
1 -
open SAP
1 -
Sales and Service Cloud Version 2
1 -
Sales Cloud v2
1 -
SAP
1 -
SAP Community
1 -
SAP CPQ
1 -
SAP CRM Web UI
1 -
SAP Customer Data Cloud
1 -
SAP Customer Experience
1 -
SAP Integration Suite
1 -
SAP Sales Cloud v2
1 -
SAP Service Cloud v2
1 -
SAP Service Cloud Version 2
1 -
Service Cloud v2
1 -
Validation
1 -
Validations
1
Related Content
- Utility Product Integration Layer (UPIL) in S/4HANA Utilities for Customer Engagement – Part 1 in CRM and CX Blogs by Members
- SAP CRM IC - End Button disabled in CRM and CX Questions
- How to Extend Order Integration from SAP Order Management Foundation to SAP S/4HANA in CRM and CX Blogs by SAP
- SAP Commerce Cloud Q1 ‘24 Release Highlights in CRM and CX Blogs by SAP
- Hybris user not authenticated after SAML successful round trip in CRM and CX Questions