
- SAP Community
- Products and Technology
- Additional Blogs by SAP
- Web Page Composer – how easy it is to create and p...
Additional Blogs by SAP
Turn on suggestions
Auto-suggest helps you quickly narrow down your search results by suggesting possible matches as you type.
Showing results for
former_member19
Active Participant
Options
- Subscribe to RSS Feed
- Mark as New
- Mark as Read
- Bookmark
- Subscribe
- Printer Friendly Page
- Report Inappropriate Content
05-04-2007
2:05 PM
Preface
This new blog series tries to highlight the most interesting aspects and capabilities of Web Page Composer (WPC). If you're also interested in other, already published blogs of this series, please follow these links:
In the next part of the blog series we’ll discuss more details about the page layout.
This new blog series tries to highlight the most interesting aspects and capabilities of Web Page Composer (WPC). If you're also interested in other, already published blogs of this series, please follow these links:
- Web Page Composer - a new Way to create and publish Web Pages in the Portal (Part I)
- Web Page Composer - the XML Editor Framework (Part II)
- Web Page Composer - Web Page Layout (Part IV)
Introduction to Web Page Composer
As shown in figure 1 the Web Page Composer consists of three major components. The first one, the XML Editor Framework, already explained in more detail in the previous blog Web Page Composer - the XML Editor Framework (Part II), defines the different document types. Based on these document types, the editor uses the Web Page design time, the Page Editor, to create a web page based on existing page layouts and, e.g. in larger scenarios, based on existing web content. 
Figure 1: Major components of Web Page Composer
Finally, after publishing the page, the page is processed by the runtime. Users can now access the page as long as the page is part of their navigation. In this blog a new role is created and assigned to the users who should have access to the page. Of course, it is also possible to use existing roles.
As you see, the process of creating web pages consists of several tasks. To make the difference of the tasks clearer, let’s examine them in more detail:
- Design of document types
- Design of page layouts
- Creation of web content
- Creation of web pages
This tasks consists of designing the corresponding definition and style sheet files for a document type. Typically, this task is done at the beginning of a project when the document types are defined and designed.
As for the document types the page layouts are typically defined at the beginning of projects.
In larger projects there might be dedicated editors who create the web content, e.g. create the news or other kind of articles based on the supplied document types. Obviously, this task is an ongoing process.
In larger projects several persons write the web content and provide it to the editors. Later on, the page editor takes the provided web content and put it together to a page, which then will be published.
Technically, there is no restriction at which point in time the document types and the page layouts are defined and designed. However, usually these kind of tasks occur at the beginning of implementation projects.
Now, in this blog, we’ll focus on the last task, the creation of web pages.
Creating a page
Now, after understanding the major building blocks of Web Page Composer and of the different tasks during the creation of a web page, let's create a page step by step.
In Web Page Composer all content is organized in Web Sites, which offers the possibility to reflect the organizational needs of a company e.g. by setting specific permissions.
A web site, technically a folder in KM, consists of several subfolders which are created automatically when setting up a new web site. Figure 2 shows the typical folder structure of a web site. All these folders take WPC specific content and offer specific UI commands, e.g. to create Web Pages.
The folder Web Pages e.g. offers the UI command New/Web Page as shown in figure 2. Please keep in mind that this command is only visible in the corresponding folder of your site. After entering a name of the Web Page a new page is created. Here it is called “Blog Web Page”.
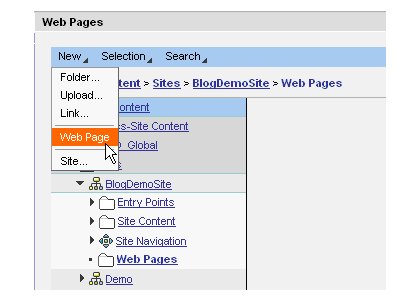

Figure 2: New Web Page UI command
Now, after the page is created, the next step is to fill the page with content. As mentioned above, in larger companies dedicated editors might be assigned to create this material, whereas in smaller scenarios the content is created during the page creation.. However, Web Page Composer offers both approaches.
Adding content to a page
Select Edit Page in the hover menu of the web page. The Page Editor will be opened in a new window as shown in figure 3. Beside the standard page layout a menu bar is shown for page specific functionalities. Before going into more detail just let me mention that this blog is not intended to provide a complete documentation of the whole functionality. So, we’ll focus on only few functionalities which gives you an overview into the page editing process.
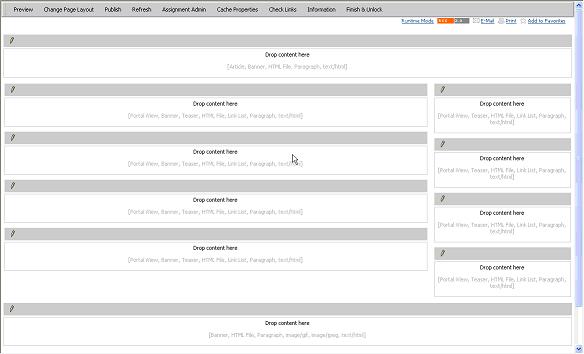
Figure 3: The Page Editor
The page layout shown in figure 3 is set up of a header and footer area with a two column content area, which holds 4 separate containers in a 70%-30% width layout. Just have a look at the header container. Obviously, content needed to be provided there. Which kind of content could be added to the containers? The answer is pretty easy: the allowed content is listed in brackets in every container. E.g. for the header container the document types Article, Banner, HTML File, Paragraph, and text/html are allowed and could therefore be put into this container.
To add content select the pencil of the container, in our example of the header container (see figure 4). The Web Content Browser is shown in the same window. The browser allows you to navigate to several folders where other content is stored, e.g. already created by dedicated content authors. In our example a new banner should be created. Just select in the hover menu of the folder New, then Banner to create a new banner.
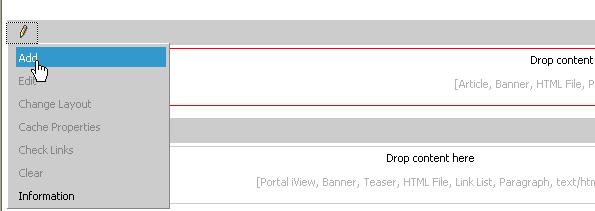

Figure 4: Add content to a container using the Web Content Browser
Typically, a banner consists of an image and, optionally, a link which will be followed after clicking on the image. The only document property is the file name of the new banner document. Figure 5 shows an example. After saving the banner close the editor by selecting the close button.

Figure 5: The WPC banner
Now, how could the new created banner be added to our web page? This task is a pretty easy thing since you just select the banner icon in the document browser and drag it to the container where the banner should be. Then drop it and that’s it (see figure 6).

Figure 6: Drag and drop web content into the container
Did you notice the orange color frame of the containers? Just comparethe frames to the ones in figure 4. When you drag web content and move it over the container, their frames will change their color to orange as soon as the content could be dropped there. Pretty useful, isn’t it?
Moreover, if you decide to fill several containers with content, it is possible to stick the Web Content Browser. In this case it does not close after dragging and dropping of e.g. a banner but keeps open.

Figure 7: The new created banner in our page
Figure 7 shows the page editor after the banner has been dropped into the header container. The page editor shows already the content in a kind of preview. It is not a fully preview since the portal navigation is still missing.
Filling the other container works the same as for the header container. Select the pencil in the left corner of the container, select Add and choose existent content or create new one, and, finally, drag and drop it to the container. That’s all. Before closing the page editor don’t forget to publish it! Otherwise, it would not be visible to the users.
Let the users see the page
After filling all containers or just the ones you like – so it is not necessary to fill them all – it is necessary to make the page visible to the users. This is implemented with fully integration into the portal architecture in mind, which means that you don’t need to learn new stuff but could just reuse all your knowledge about portal roles and portal navigation.
Basically, you need to create page navigation nodes, then a role with a folder for each web site. A lot of information? No, definitively not. Just have a look at these steps in detail.
Create page navigation nodes
Every web page you created needs it’s own navigation node. To create a navigation node navigate to the folder Site Navigation of your site and select New, then Navigation Node in the menu bar. Enter a name and select the corresponding web page. Save the navigation node. Figure 8 illustrates the steps. By the way: the name of your navigation node will be used later on in the portal navigation, so choose it carefully.


Figure 8: Creating a navigation node
To finish the KM related task concerning portal navigation you need to create a navigation connector by choosing, you might already guess, a specific UI command. In this case it is the Publish Site Navigation UI command. After that all KM related steps are done. Now, let’s have a look at the portal specific tasks.
Portal specific navigation tasks
As mentioned above the navigation to the web pages need to be configured via roles. In this example, we create a new role and add there a folder. In this blog, we just have one site so we only need one folder. Figure 9 shows the new role with a folder in the portal content editor. Again, this part is a standard configuration step and not something new coming with Web Page Composer.

Figure 9: A new role with a corresponding folder
Now, edit the navigation related properties of the folder Blog Web Folder, namely the property External Connector and Entry Point.
The first one, the External Connector property gets the path to the navigation connector created in the previous chapter Create page navigation nodes. In our example, the parameter would contain the value wpcnavigation:///wpccontent/Sites/BlogDemoSite/Site Navigation/navigation.wpc. Is there any support from WPC to enter this value? Yes, and you might already know how. There is a specific UI command which copies the target url except the component wpcnavigation:// into the clipboard. So you really do not need to worry about this step. It is pretty simple.
The second parameter, Entry Point should be set to Yes to show the folder as a navigation entry in the portal navigation, in this case in the first level. The second level is defined by the name of the page.
Figure 10 shows the result of our demo page based on the previous steps.
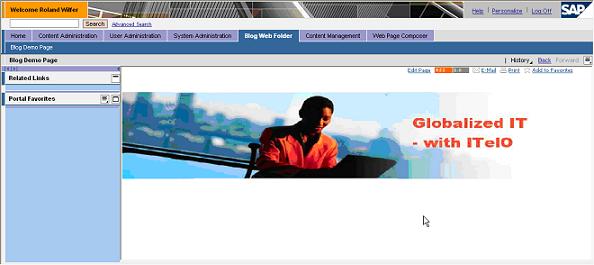
Figure 10: How the blog demo web page looks like
As you see the creation of web pages is a pretty simple task. Basically, create a new web site, or just use an existing one, create a new web page, drag and drop already existing content there or just create new one. Publish the web page and configure the navigation.
However, there are still missing tasks which need to be explained in more detail, e.g. how to use the powerful search functionality, how to administer web sites, or how to set up a more complicated navigation.
So stay tuned to not miss any part of this blog!
Feature Summary (Part 3)
- The layout of Web Pages is customizable and based on standard portal technology
- Web Pages are created by using a specific editor, the Web Page Editor
- Web content could be created during the page editing process or by dedicated content contributors
- Several UI commands do exist to facilitate the page navigation configuration process
In the next part of the blog series we’ll discuss more details about the page layout.
12 Comments
Related Content
- Developer extendibility for custom table and publish oDATA in Technology Q&A
- SAP Enable Now setup in Technology Blogs by Members
- Cloud Integration: Manually Sign / Verify XML payload based on XML Signature Standard in Technology Blogs by SAP
- Futuristic Aerospace or Defense BTP Data Mesh Layer using Collibra, Next Labs ABAC/DAM, IAG and GRC in Enterprise Resource Planning Blogs by Members
- Manage dates-driven planning processes with SAP Analytics Cloud in Financial Management Blogs by SAP