http://www.sdn.sap.com/irj/servlet/prt/portal/prtroot/docs/webcontent/uuid/925b02f9-0b01-0010-bbbf-c... http://www.sdn.sap.com/irj/servlet/prt/portal/prtroot/docs/webcontent/uuid/7ec202f9-0b01-0010-589e-a... 1. Configuration Overview.
To successfully configure the CCMS agents and Email alerts to be sent from a Central System (CEN) it’s necessary to complete the following additional tasks: a. Configure SMTP in the Central system (CEN) by enabling the built-in SMTP plug-in (as of BASIS release 6.x). This step in not part on this configuration guide, please refer to OSS Note 455140 for installation instructions and additional information. b. Install the CCMS agents in each satellite system you want to enable alerts and emails; this is necessary because CEN alerts are handled by the remote CCMS agents; this step will be covered in another forthcoming configuration guide. c. Configure the alerts in the CEN system by enabling the emails selecting the correct monitoring object and configuring email destinations properly. 2. CEN and Alerts Configuration.
a. Logon to Solution Manager and call transaction RZ21, from this screen select the following options and hit Display Overview button.  Note: This will show all the remote CCMS agents with its current status, look for the SID you currently have registered at Solution Manager system. If you didn’t find an entry please check the registration procedures again (this will be shown in other configuration guide).
 3. Email and Alert configuration.
As of Release 6.x, you can define central auto-reaction methods as part of the central monitoring of NetWeaver components in the CCMS monitoring architecture. The auto-reaction methods are not started in the system in which the alert occurs, but in the central monitoring system. a. Logon to the CEN system, in our case this is the Solution Manager instance and call transaction RZ21 and select Technical infrastructure -> Assign central auto-reactions. In this screen, you can execute all the steps for defining, assigning and processing central auto-reaction methods. 
- Defining the central auto-reaction method:
a. Select the Create pushbutton in the Defined Central Auto Reactions sub window. In the following dialog box, enter the desired name for the method in the input field next to the Create pushbutton and then select the Create pushbutton. 
 b. You reach the Monitoring: Methods screen. Enter the desired settings of the method (report/function module to be executed, corresponding parameters) and ensure that you leave the checkbox Only in the central system, triggered via CCMS agents activated; see screens below:


 c. Save your entries. The method is then immediately displayed in the Defined Central Auto-Reaction sub window.
- Assigning the central auto-reaction method:
d. Specify the MTE classes and the systems that you want to assign to a central auto-reaction method. The system regularly checks the assignment. 
 e. In the System ID sub window, select the systems and in the MTEclass sub window, select the MTE classes that you want to assign to a central auto-reaction method. You can also select several systems and MTE classes in each case.
  f. In the Defined Central Auto-Reaction sub window, select the method that you want to assign to the selected MTE classes of the selected systems. g. Select the Assign central auto-reaction pushbutton. The corresponding assignments are immediately displayed in the lower sub window. h. Execute these steps for all desired central auto-reaction methods you want to configure alerting. The central auto-reaction methods are always started under the user in the client that activated the central method dispatcher. To do this, select the Technical infrastructure menu option in transaction RZ21 Method execution -> Activate central system dispatching. Since the client is also extremely important for automatic alert notification, make sure you are in the client from which mails are to be sent when you activate the central system dispatching.
 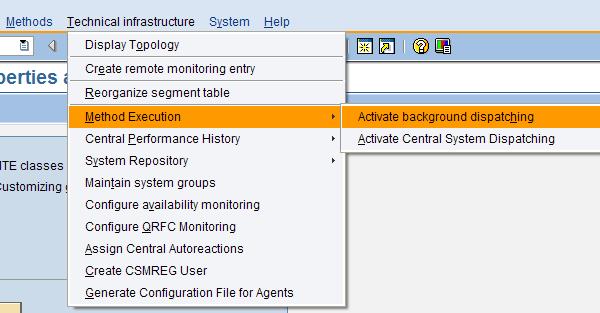 If you activated the central system dispatching under the incorrect user or client, deactivate it by deleting the SAP_CCMS_CENSYS_DISPATCHER job in transaction SM37. The job is controlled by the SAP_CSM_TRIGGER_CENSYS_DISPATCH event. Afterwards, activate the central system dispatching again under the correct user in the required client.
 Related Solution Manager configuration guides on SDN
System Monitoring configuration guide for Dummies
Service Desk configuration guide for dummies.
SDCC - Service Data Control Center configuration guide for Dummies.
CCMS Rule Based Monitors configuration guide for Dummies
