Introduction A little over a year ago, I wrote Develop a Web Service that sends an Email - in ABAP that detailed the process for creating an ABAP Web Service. This weblog was based upon the Netweaver 04 release.
Prompted by a question about the differences between this process in Netweaver 04 and Netweaver 04S, I thought I would return to the subject and compare the process between the two releases.
I will say up front that the differences between the two releases are not as drastic as the changes that occurred between WebAS 620 and Netweaver 04. What you will see here is that SAP has streamlined and simplified the process in preparation for this technology to be a key part of Enterprise Services Architecture.
In this example we will create a very simple Web Service for the sending of an Email
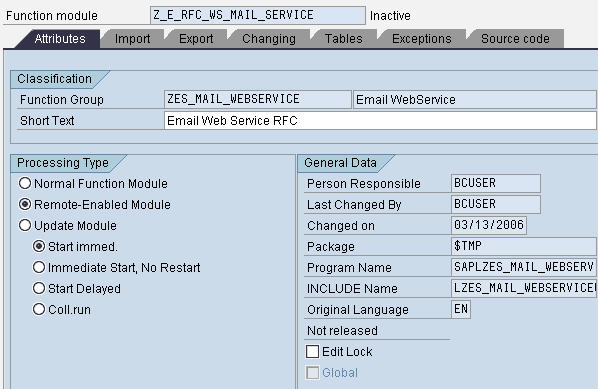
Create an ABAP Function Module The steps for creating the function module have not changed from Netweaver 04 to Netweaver 04S, however I will include them for the sake of completeness. 1. Go to SE80. 2. Create a new RFC enabled Function Module
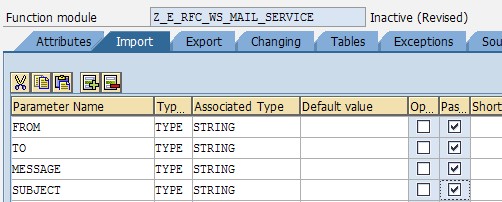
3. Importing Parameters
4. Exporting Parameters
5. Program Coding
6. Test Function Module
Just to be safe, let's use the function tester to make sure that the RFC works before wrapping it in a Web Service.
Create a Service Definition 1. From SE80 Choose other Object 2. Go to the Enterprise Services Tab 3. Choose Service Definition - This is where we begin to depart from the processing within the earlier release. Gone are the two separate entries for Web Service Definition and Virtual Interface. Instead you have a single entry called Service Definition. This new single object now contains the functionality of the two separate previous objects.
4. The creation will actually just start a Create Service Wizard.
The first step of the wizard is quite similar to the first step of creating the Virtual Interface. We will supply the name of the service, a short description and an Endpoint Type.
If we look at the possible values for the endpoint type, we see that we can still use a BAPI, a function group or a single function module. The entry for XI has been renamed ESI Repository Service Interface.
5. In the next step of the wizard we will specify the function module that we want to use as the starting point of our Web service.
6. Finally we reach the step for choosing a security profile. This step is the same as what used to be the separate Web Service Definition creation. We can choose between two basic profiles. Later we can further tweak the settings contained in either of these profiles.
Notice the checkbox at the bottom of the wizard screen. We used to have to go into WSCONFIG and release the Web Service definition after its creation. However by selecting this checkbox, this step can be done automatically for us.
7. We now have our completed service definition displayed in the ABAP Workbench.
8. This new object display is a combination of the old Virtual Interface and Web Service Definition screens. We have the Properties, Interface, and Types tabs that have not really changed. However we also have the new Variants tab. A Variant is the replacement for the separate Web Service Definition. The initial variant has been created for us. The former settings of the Web Service Definition have been set via the profile that we choose in the wizard. It is this screen where they can be further maintained.
9. We can create additional variants, all of which will be contained within the single Service Definition we have created.
10. We can also still publish directly to a UDDI from this screen as well.
11. Although the release of our Service Definition can be triggered by the wizard, we can still go to transaction WSCONFIG and create releases manually. Now the keys for creating a release are a combination of the Service Definition and the Variant.
12. Likewise all the test tool and WSDL functionality is still available from transaction WSADMIN.
13. Finally to complete the update of the previous weblog, we can also call our Web Service from another programming tool. In the screen shot below we see it in use in Visual Studio .Net.