Overview
In this entry I describe the process of testing the NetWeaver development environment you set up in Part 1 by building and then deploying it on the Portal. We will use the most basic building block for Java iViews, the AbstractPortalComponent. I will show you how to create the iView, add it to a Portal page.
As a pre-requisite, make sure you have at least Java Developer and Content Administrator access in a Portal. If you have the opportunity to do so, I suggest you install the Full Java Edition of the preview edition of SAP NetWeaver as I outlined in my previous blog entry in this series.
Step 1. Build and deploy a simple Java iView
So if you've rolled up your sleeves, here are the steps to build and deploy a simple lava iView:
1. Create a Portal Project
i. File > New > Other and choose Portal Application > Create a Portal Application Project and click Next
ii. Type a name for the Project and leave the default project root folder as is and click Finish
iii. NDS will create a Project for you, complete with all the necessary folder structure
2. Create a Portal Object
i. File > New > Other and choose Portal Application > Create a Portal Application Object and click Next
ii. Select the Portal Project you created in Step 1 above and click Next
iii.Select AbstractPortalComponent and click Next. I will go over each component type listed in the screenshot below in detail in the next blog entry in this series.

iv. Type HelloPortalWorld as the name and type a package name such as com.yourcompany.something and click Next
v. NDS will automatically create and add the necessary files to your project. Additionally, it will automatically add generic code that is required by the Portal to these files. This is an extremely valuable time saving feature, as you can imagine!
vi. In the HelloPortalWorld.java file, add a couple of lines of response.write code as shown (the editor has autocomplete functionality and will try to give you valuable and time-saving suggestions)

This is the code that I use for this simple Java iView:
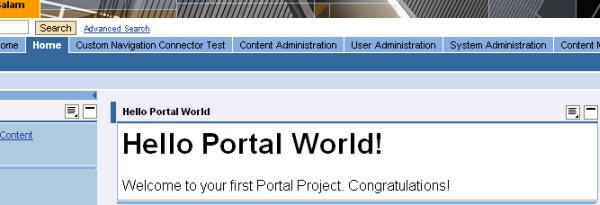
Hello Portal World!
"); response.write("Welcome to your first Portal Project. Congratulations!
"); /* End of custom code All the rest of the code in this project is auto generated by NDS */ } vii. Save and click on Project > Rebuild Project (or Rebuild All)
viii. Click on the create and upload PAR file button or click on File > Export > PAR File and click Next
ix. Select the Portal environment you'd like to upload this project to and click Finish
If the upload worked, you will see a message at the bottom pane (Deploy Output view) indicating successful deployment. If it didn't work, pay close attention to the error message. Most likely messages have to do with either the server not running or the port being incorrect. Revisit the settings one more time to make sure they are correct. If you've followed the installation and configuration steps outlined in this and the previous blog in this series, the settings should be as follows:
J2EE server: localhost J2EE port: 3601
Portal Server: localhost Portal Port: 50000
If you use a user other than the default admin, you have to give that user Java Developer role to be able to upload and deploy the iView. I will write more on User Administration and Content Administration in a future entry.
If you are still encountering problems with the configuration try searching the SDN Forums for an answer or leave a comment below this entry.
Step 2: Creating the iView
If you have successfully deployed your first Java iView into the Portal, the next step is to verify it in the Portal by logging on and seeing if the PAR file actually made it to the Portal. If it did, you can create an iView based on the PAR file and place it on a Page. As I will be covering the details of Content Administration processes (such as creating Folders, Roles, Worksets, Pages, iViews) later in this series, I will list the steps here briefly for completion. I have created screenshots for these activities as well and I will email them to you if you are interested in looking at them.
i. Log on to the Portal with an account that has Content Administrator privileges
ii. Go to Content Administration > Portal Content and expand the Portal Content folder
iii. Within the Portal Content Folder choose a folder of your choice (or create a new folder) and from the context menu choose New from PAR > iView
iv. Select MyFirstPortalProject (or the name you gave it instead) and click Next
v. Give the iView a Name (say Hello Portal World! or whatever else that strikes your fancy) and an ID – both the Name and the ID can be changed later, the ID cannot contain spaces or illegal characters (use something out of the ordinary and you'll see which ones are illegal) and click Next
vi. The Summary page displays the details of what you've done so far and gives you chance to either Cancel or go back and amend something, in case you were day dreaming before, click Finish if you are satisfied
vii. Click OK and you're done!
viii. You can either right click on the iView you just created and click on Preview or add it to a page
Step 3. Customizing NDS to your liking
Now that you've installed and configured your NDS, you are ready to customize it to your liking so you can be as efficient as possible. Every developer has his or her own preferences when developing. NDS, which is really based on the Eclipse platform, offers you the most flexibility in customization that I have seen so far. Almost everything in NDS is controlled by Plug-ins. With the right plug-ins, you can actually build PHP or ColdFusion applications, write JavaScript code, develop in C/C++ or COBOL or whatever else is available these days. If there isn't already a plug-in for your particular need, you can build it yourself and extend the functionality of NDS. Granted NDS is already a highly customized environment with a lot of tools for SAP EP Developers, the only limit to how much more you can tweak it is your own imagination. That said, let's see how we do it.
The way NDS looks at any given time is determined by the Perspective or the View you've chosen. There are some predefined Perspectives and Views available to choose from. For example, if you choose the Web Dynpro Perspective, all the tools you need while working in a Web Dynpro project become available and all the tools you used in the above Java iView are hidden. Explore the various Perspectives and Views by clicking on Window > Open Perspective or Show View. You can further enhance the way a Perspective or a View looks by customizing it yourself. My next blog entry on Java development methodologies talks about the Perspectives available in NDS for SAP EP development in more detail.
Jar Class Finder
In additionto the Perspectives and Views, you can add tools to your NDS installation. One of the most widely used tools is the Jar Class Finder. There already are a lot of material written on it so, as an exercise, I'll leave you to do a quick SDN search for “Jar Class Finder” and find the two excellent blog entries on how to get, install and use the Jar Class Finder.
Summary
This part 2 of the 4th blog entry in the Beginning EP Development series concludes the installation, setup and configuration steps for SAP NetWeaver SP 15, Sneak Preview (Full Java Edition). If you've been following the series so far as a new EP developer, congratulations! You've come a long way! There's lots more work to do before you can be a confident developer. My next few entries will focus on the development methodologies a Portal developer can use.
