Overview
In this entry I describe the process of setting up the NetWeaver development environment. If you've downloaded and installed the preview edition of EP and NDS as described in the last entry in this series, then you can do most of these activities yourself. If you're trying to configure your work installation of NDS, you may need the help of your System Administrator to provide the configuration parameters you'll need.
As a pre-requisite, make sure you have at least Java Developer, Content Administrator and some System Administrator access to an installation of the Portal. If you have the opportunity to do so, I suggest you install the Full Java Edition of the preview edition of SAP NetWeaver as I outlined in my Installing and configuring the preview edition of EP in this series.
Step 1. First Steps and Workspace setup
One of the first steps after you've downloaded and installed SAP NetWeaver Developer Studio (NDS) is to configure a local workspace for your development environment. A workspace, as the name might suggest, is a space on your local computer (or a network drive) in which to store your work and any user specific settings. You can have only one workspace for NDS at a time. In other words, you can have more than one, but only be able to use one or the other. You can, however, change the workspace location at a later time, if need be.
When you launch NDS for the first time, you will be presented with a dialog box as shown in the screenshot below where you will select a default workspace (or change it to something else if you feel rebellious.

Choosing the workspace location on first launch of NDS
Once you've set it up, NDS will start and show you a welcome screen as shown below, showing you the default perspective of Resources (more on SAP NDS Perspectives below) and some links to the Help contained with the installation as a guide! What a nice gesture from the good folks at SAP, eh? Now you know why the installation took so long: you get a wealth of development resources right at your fingertips.

The SAP NDS welcome screen
The Help contained in NDS is an amazing, often overlooked, feature: it is all available to you locally on your PC and comes complete with examples, screenshots and the ability to let you search. The most updated version of this help is available online, of course, at http://help.sap.com/

The SAP NDS Help screen. Note the search box on the top left.
Step 2. Configure Development environment
As you work with NDS, you will find that it is very customizable. Click on the Window > Preferences menu to access most of the customization options. There is a dizzying number of options available. Your safest bet is to stay with the default settings for most of them - but where's the fun in that, eh? Live a little and change the settings around to see how things change in this new environment. There is a “Restore Defaults” button on every screen where there are default settings set by the software installation!
Workspace
The workspace that you setup in the previous step is shown in the screenshot below. If you decide to change the workspace for whatever reason, you can do it on this screen and it will take effect once you've restarted NDS. As indicated in the screenshot, you can use a workspace other than your default, by using the “data” command line parameter.

The default workspace for NDS.
Java Runtime Environment (JRE) version
Another fundamental setting is the Java Runtime Environment (JRE) that you use for your development. As of this release of NetWeaver, stick with j2sdk1.4.2_08 as recommended by SAP. As you can see from the screenshot, you can add multiple JRE's here. You may add them here if you have a need to develop something other than for the SAP Enterprise Portal using NDS, which is really based on IBM's Eclipse platform. So if you wanted to write a Java application or an applet, using the latest Java Swing classes, you can do so by adding a newer JRE to your instance of NDS. I told you NDS is customizable, but this is nothing. Wait till you see what else you can do!

The default JRE for NDS.
J2EE Engine settings
The SAP J2EE Engine setting is another one that needs a quick look. If you've installed the Preview Edition of the NDS and EP on your Desktop or Local, you may just leave the default values set by the installation, server name localhost on port 3601. Alternatively, if you're developing from your PC but the J2EE server is on a separate server, you will need to enter the name of the server (possibly the full qualifying name such as myportalserver01.mycompany.com instead of the default localhost value.

The default J2EE for NDS.
Portal Settings, multiple environments
You can setup multiple Portal environments into your NDS for quick deployment of your applications. For example, you can configure NDS for your local, Development and QA testing environments and deploy applications directly. Normally, you wouldn't deploy directly to the QA environment, since the recommended method is to export content once (from the Development environment) and to import twice (into QA testing and Production environments), but that's a totally different discussion. You don't have to deploy directly from NDS. You also have the option of uploading your Portal project PAR files from within the Portal (from Java Developer > PRT Admin Console or from System Administration > Support > Portal Runtime > Archive Uploader). In SP15, there is a cool Portal Archive Deployer and Remover page under Java Developer.
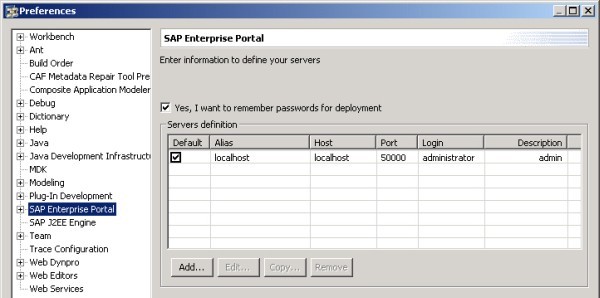
Multiple Portal Environments in NDS.
Step 3. Test and troubleshoot your settings
There is only one way to really test your settings: build and deploy something simple. If the process works, it generally means that your configuration settings are correct and you can breathe a sigh of relief. If, however, you messed up (notice how I remove myself from the equation) there will be some troubleshooting to do. Part 2 of this entry, will talk about how to build a Hello Portal World Java iView, just to test the installation and configuration.
Summary
This blog entry covered a lot of ground for a beginner. You have now configured a development environment for yourself to start developing for the Portal. The next part of this entry will walk you through building and deploying a simple Java iView, just to test your settings.
