
- SAP Community
- Products and Technology
- Technology
- Technology Blogs by SAP
- Customise Document Centric Approval Pre Built Cont...
Technology Blogs by SAP
Learn how to extend and personalize SAP applications. Follow the SAP technology blog for insights into SAP BTP, ABAP, SAP Analytics Cloud, SAP HANA, and more.
Turn on suggestions
Auto-suggest helps you quickly narrow down your search results by suggesting possible matches as you type.
Showing results for
Product and Topic Expert
Options
- Subscribe to RSS Feed
- Mark as New
- Mark as Read
- Bookmark
- Subscribe
- Printer Friendly Page
- Report Inappropriate Content
08-26-2022
9:32 AM
Hello,
This is continuation of the topic of customisation of Document Centric Approval Pre-Built content package. You may review Part 1 of this blog in case you wanted to know our little problem and the simple solution suggestion from my side.
I will be making changes to the sample project used with this Workflow Content Package. You can review this sample project from our SAP GIthub.com Cloud Workflow Sample Collections.
This blog details a more permanent solution using SAP Business Rules.
Per our documentation
We will use Business Rules to dynamically determine approvers based on an input region or a department. As part of this blog, I will be showing how to create such a business rule and use it with the Document Centric Approval Process's Start UI code.
As a first step, I created a business rule.

Save, Validate each attribute and make sure the data objects are activated.
As a next step, create a business rule service that takes in an input data object and returns a result object. Here we will be using the just created data objects.
I wanted to create individual rules for processing departmental and region input.
Here is how processRegion Rule is designed, it is a text rule. The meta data is designed for sample purpose only. When you implement, you have to use right IAS groups as approverGroup response. i.e use your IAS specific group name instead of 'apjApprovers'
Here is how processDepartment rule is designed. it is a text rule. Here I am using a short string 'PCH' to indicate Purchase department. The meta data is designed for sample purpose only. When you implement, you have to use right IAS groups as approverGroup response. i.e use your IAS specific group name instead of 'purchasingApprovers'
The final step is to create a rule set. per our documentation
At each step, you need to save, validate and activate the various artefacts related to this Business Rule.
We are now ready to deploy and release this new Business Rule.
From the Business Rule service you can click deploy and select cloud runtime
From the Details tab, activate the project. if every object is validated and activated, this step also will clear.
As we will be using API to process this business rule, from the rule service screen, access the settings icon and enable ID to be included in the displayed table. and copy and paste Rule Service ID, Released Revision and Version to be used during API calls.
Updating Document Centric Approval Sample code
Having created the business rule, now we need to modify the startUI code to read the approverGroup based on either Region or Department. In order to achieve this, you can consider using text fields in the form. Please customise this part to suite your need.
Modify RequestApproval.view.xml, especially tags below <!-- Add Region --> and <!-- Add Department -->. I provided the before and after tags as well so you know where I inserted these fields.
Corresponding i18.properties needs to be amended
And for this blog purpose, I need either Region or Department to be provided. So we will handle field validation. Again when you implement this logic, you may wanted to make both fields mandatory.
and in place where you persist workflow context, below code changes are needed
and I have added a new method to process this Business Rule depending on the user input
as you can see result of the Business Rule API call is stored in the model value /ApproverGroup. this will be used in the filter value.
Here are the modified code when filters are used.
and in the Pagination code section
Save the project, build and deploy the same.
The new UI will look like this. As per Validation, either Region or Department needs to be entered.
Try entering Region or Department and browse the list of approvers or watchers, it should work dynamically depending on how your Business Rule is setup.
With this blog post, you understand how it is easy to customise the prebuilt content Document Centric Approval Process.
For More Information on SAP Process Automation:
This is continuation of the topic of customisation of Document Centric Approval Pre-Built content package. You may review Part 1 of this blog in case you wanted to know our little problem and the simple solution suggestion from my side.
I will be making changes to the sample project used with this Workflow Content Package. You can review this sample project from our SAP GIthub.com Cloud Workflow Sample Collections.
Solution 2: Using SAP Business Rules to determine approvers
This blog details a more permanent solution using SAP Business Rules.
Per our documentation
What Is Business Rules Capability?
The business rules capability within the SAP Workflow Management service lets you digitize and automate decision making. It encapsulates dynamic decision logic from application logic. It also provides web-based tools to model business vocabulary and decision interfaces to integrate with SaaS applications and business services.
Business rules let you automate the decision-making process for a business scenario. For example, in an employee onboarding scenario, you can model business rules for the HR team to automate the equipment determination step for a new hire. Depending on the employee’s designation, the required equipment can be automatically determined without the intervention of the HR team.
We will use Business Rules to dynamically determine approvers based on an input region or a department. As part of this blog, I will be showing how to create such a business rule and use it with the Document Centric Approval Process's Start UI code.
Note: this is just a sample implementation with sample data. You may wanted to customise this to your organization specific needs.
Create a Business Rule Project
As a first step, I created a business rule.
In my explanation, I will be using screenshots to denote each step I followed, Kindly get familiarise yourself designing Business Rules. In case you are new to this topic, I encourage you to explore our tutorials on this topic.
- From the various applications of Workflow Management app, find "Manage Rule Projects" app

Access Manage Rule Projects from within Workflow Management apps
- Create a new Business Rule by clicking the + icon

Create a new Business Rule Project
- Provide appropriate details for the project creation form.
 Business Rule Project Creation - Project Details
Create a Data Object
- In Business Rules, we need to create Data Objects first. the one Business Rule will be using as Input and one it will respond after processing. In the next steps, we will be creating 2 data objects.
- First object is created a structure as I wanted to keep the input flexible. Requester can either fill in a region value or a departmental value.
- Output of this business rule is a single approver group name. In future if you decide to extend this to more group of approver group names, you can make it into a structure.

Design your Data Objects
- Here is how I designed InputAttributes Data Object
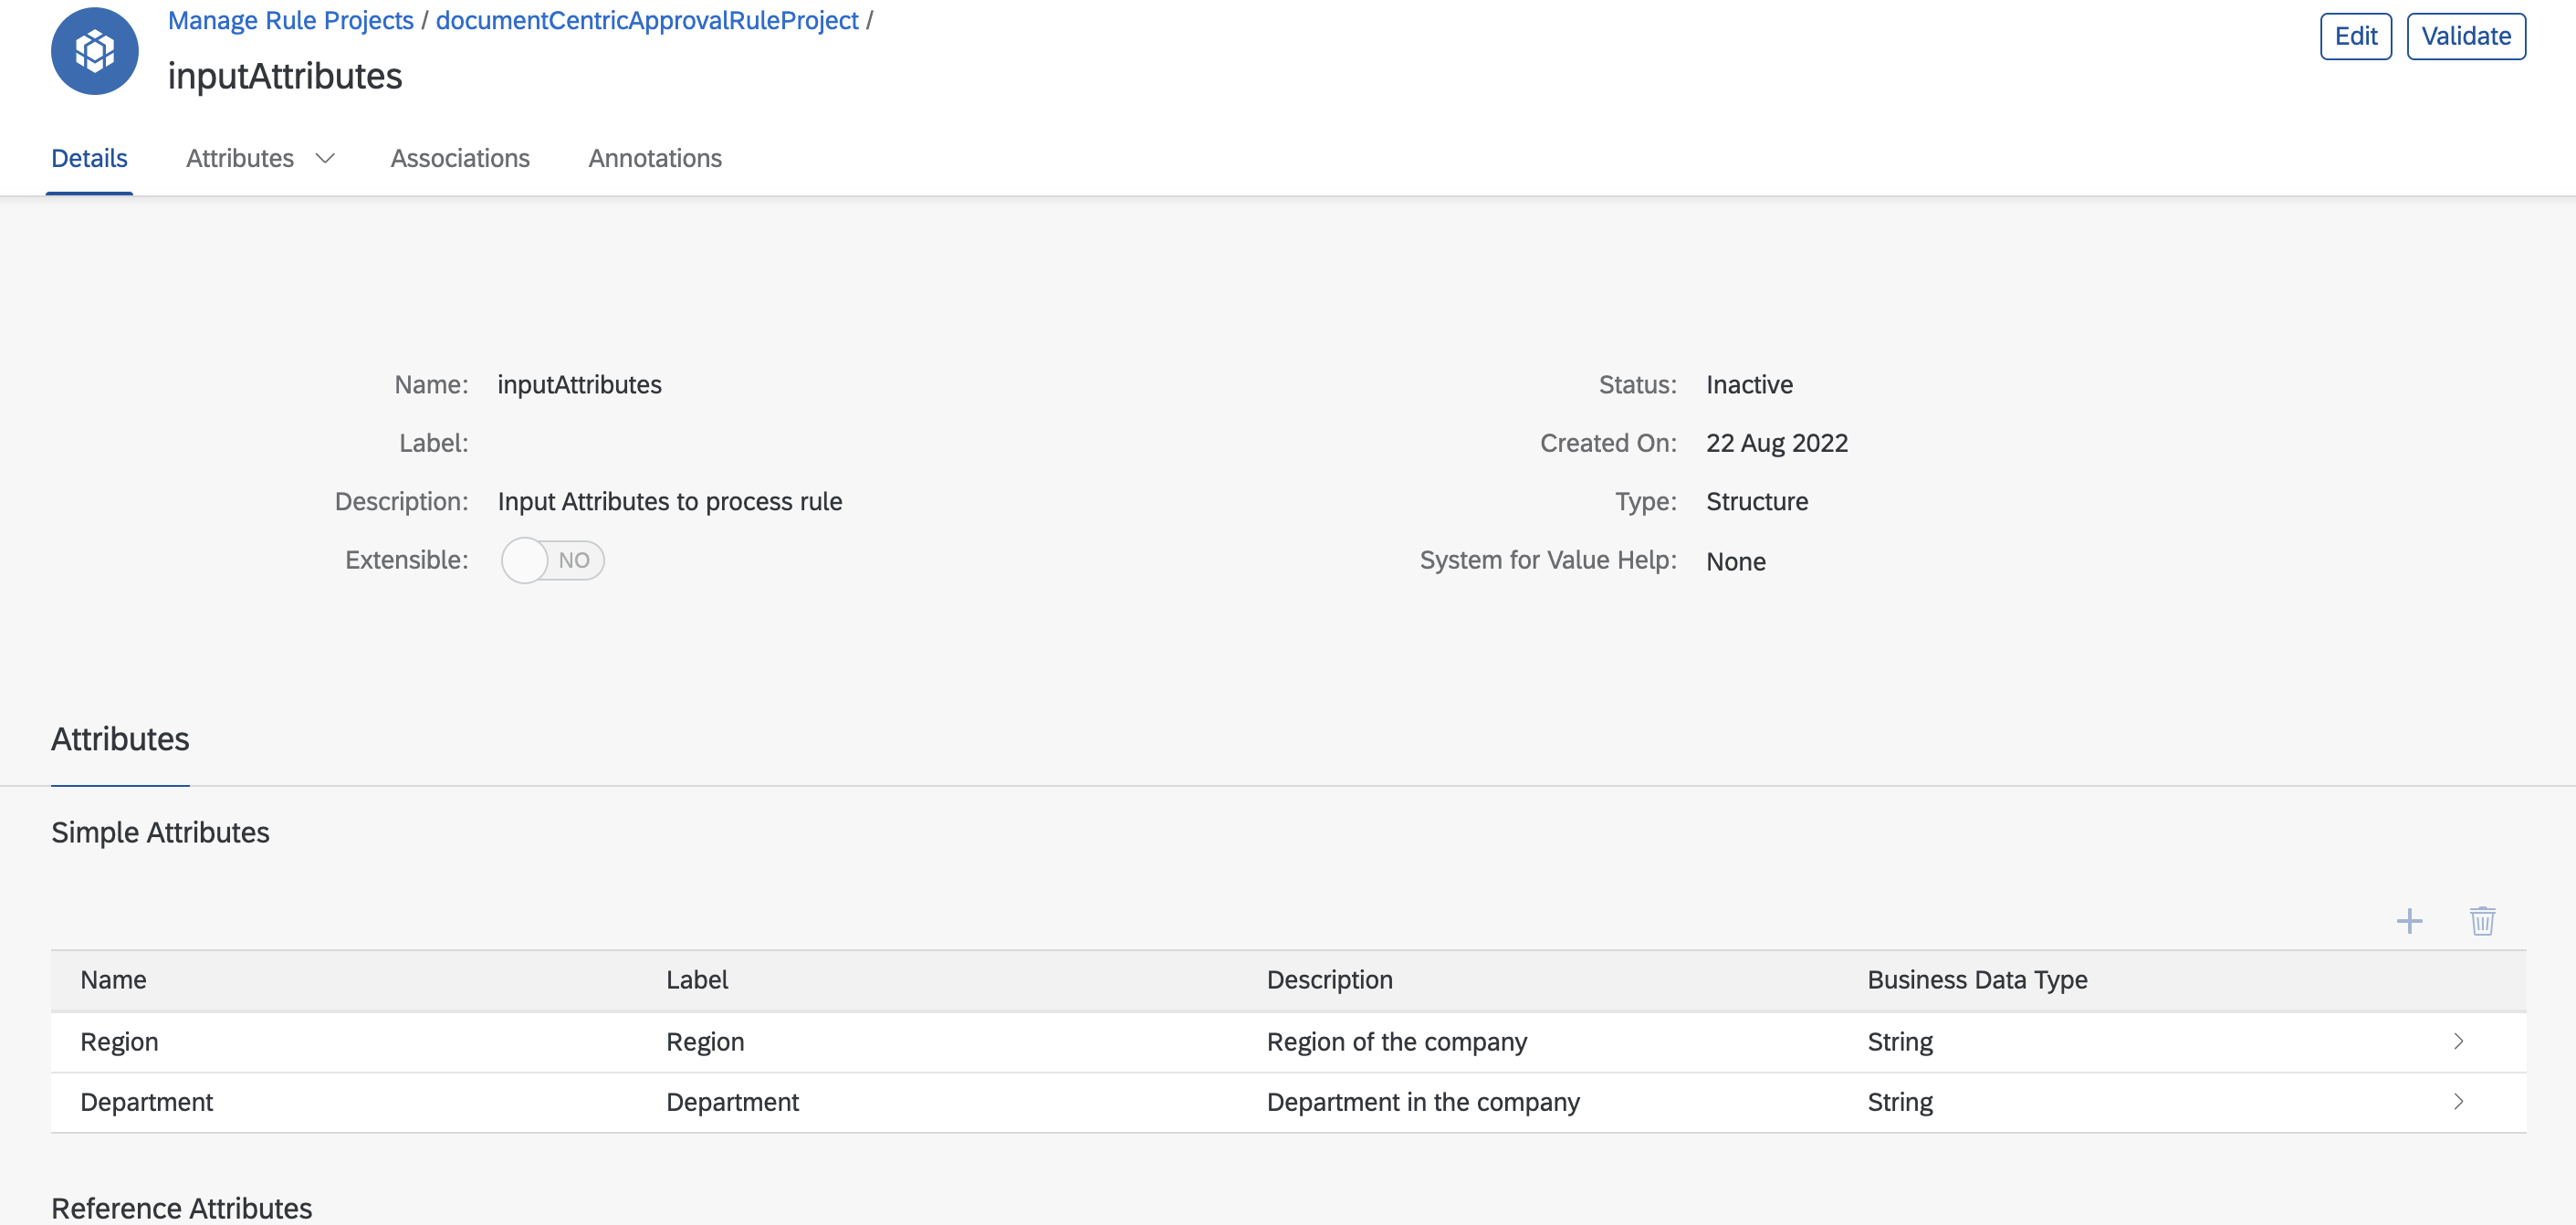
- In case you wanted to use valueHelpers for any of these objects you can do so now. Value Help can be handy during your rule design . I tried to create Value Help for Region attribute
- Similarly create approverGroup as a standard string element attribute.
Save, Validate each attribute and make sure the data objects are activated.
Create a Business Rule Service
As a next step, create a business rule service that takes in an input data object and returns a result object. Here we will be using the just created data objects.

determineApprover Rule Service
Create the Business Rules
I wanted to create individual rules for processing departmental and region input.

Business Rule Design
Here is how processRegion Rule is designed, it is a text rule. The meta data is designed for sample purpose only. When you implement, you have to use right IAS groups as approverGroup response. i.e use your IAS specific group name instead of 'apjApprovers'

ProcessRegion
Here is how processDepartment rule is designed. it is a text rule. Here I am using a short string 'PCH' to indicate Purchase department. The meta data is designed for sample purpose only. When you implement, you have to use right IAS groups as approverGroup response. i.e use your IAS specific group name instead of 'purchasingApprovers'

processDepartment
Create a Rule Set
The final step is to create a rule set. per our documentation
A ruleset is a logical collection of rules that helps you group business logic that govern a specific function.

At each step, you need to save, validate and activate the various artefacts related to this Business Rule.
We are now ready to deploy and release this new Business Rule.
Deploying the Business Rule
From the Business Rule service you can click deploy and select cloud runtime

Release the Business Rule
From the Details tab, activate the project. if every object is validated and activated, this step also will clear.

As we will be using API to process this business rule, from the rule service screen, access the settings icon and enable ID to be included in the displayed table. and copy and paste Rule Service ID, Released Revision and Version to be used during API calls.

Updating Document Centric Approval Sample code
Having created the business rule, now we need to modify the startUI code to read the approverGroup based on either Region or Department. In order to achieve this, you can consider using text fields in the form. Please customise this part to suite your need.
Modify RequestApproval.view.xml, especially tags below <!-- Add Region --> and <!-- Add Department -->. I provided the before and after tags as well so you know where I inserted these fields.
<Label text="{i18n>USER_ID}" required="true"/>

<Input id="requesterUserId" value="{mCommon>/oRequesterDetails/sRequesterUserId}" placeholder="P000123" valueState="{mCommon>/sRequesterUserIdState}"

    valueStateText="{mCommon>/sRequesterUserIdStateText}" change="onChange" enabled="{mCommon>/oEnable/sInput}"/>

<!-- Add Region -->

<Label text="{i18n>REGION}" required="true"/>

<Input id="requesterRegion" value="{mCommon>/oRequesterDetails/sRequesterRegion}" placeholder="APJ" valueState="{mCommon>/sRequesterRegionState}"

    valueStateText="{mCommon>/sRequesterRegionStateText}" change="onChange" enabled="{mCommon>/oEnable/sInput}"/>

<!-- Add Department -->

<Label text="{i18n>DEPARTMENT}" required="true"/>

<Input id="requesterDepartment" value="{mCommon>/oRequesterDetails/sRequesterDepartment}" placeholder="PCH" valueState="{mCommon>/sRequesterDepartmentState}"

    valueStateText="{mCommon>/sRequesterDepartmentStateText}" change="onChange" enabled="{mCommon>/oEnable/sInput}"/>

<Label text="{i18n>COMMENT_FROM_REQUESTER}" required="false"/>

<TextArea id="requesterComment" rows="5" value="{mCommon>/oRequesterDetails/sRequesterComment}" enabled="{mCommon>/oEnable/sInput}"/>
Corresponding i18.properties needs to be amended
#XFLD:

USER_ID=User ID


#XFLD:

REGION=Region


#XFLD:

DEPARTMENT=Department


...

...

...


#XMSG:

FIELD_VALIDATION_ERROR_TITLE = Title is a required field(*)


#XMSG:

FIELD_VALIDATION_ERROR_USER_REGION_OR_DEPARTMENT = You need to enter Region or Department
And for this blog purpose, I need either Region or Department to be provided. So we will handle field validation. Again when you implement this logic, you may wanted to make both fields mandatory.
onPressRequestApproval: function (oEvent) {


    var errorExist = false,

        oThisController = this,

        oMdlCommon = oThisController.getParentModel("mCommon");


    oThisController.getView().setBusy(true);


    // Checking Requester Fields

    var requesterFields = [

        "sRequesterFirstName",

        "sRequesterLastName",

        "sRequesterEmail",

        "sRequesterUserId",

        // modified code -- Start

        "sRequesterRegion",

        "sRequesterDepartment"

        // modified code -- end

    ];

    var requesterValue;

    for (var i = 0; i < requesterFields.length; i++) {

        requesterValue = oMdlCommon.getProperty("/" + "oRequesterDetails" + "/" + requesterFields[i]);

        if (requesterValue && requesterValue.trim() && requesterValue !== "" && requesterValue !== "undefined" && requesterValue !==

            "null") {

            oMdlCommon.setProperty("/" + requesterFields[i] + "State", "None");

        } else {

            errorExist = true;

            if (requesterFields[i] === "sRequesterFirstName") {

                oMdlCommon.setProperty("/" + requesterFields[i] + "StateText", oThisController.getMessage("FIELD_VALIDATION_ERROR_FIRST_NAME"));

            }

            if (requesterFields[i] === "sRequesterLastName") {

                oMdlCommon.setProperty("/" + requesterFields[i] + "StateText", oThisController.getMessage("FIELD_VALIDATION_ERROR_LAST_NAME"));

            }

            if (requesterFields[i] === "sRequesterEmail") {

                oMdlCommon.setProperty("/" + requesterFields[i] + "StateText", oThisController.getMessage("FIELD_VALIDATION_ERROR_EMAIL"));

            }

            if (requesterFields[i] === "sRequesterUserId") {

                oMdlCommon.setProperty("/" + requesterFields[i] + "StateText", oThisController.getMessage("FIELD_VALIDATION_ERROR_USER_ID"));

            }

            // modified code -- Start

            if (requesterFields[i] === "sRequesterRegion") {

                bRegionOrDepartmentIsEmpty = true;

            }

            if (requesterFields[i] === "sRequesterDepartment" && bRegionOrDepartmentIsEmpty) {

                oMdlCommon.setProperty("/" + requesterFields[i] + "StateText", oThisController.getMessage("FIELD_VALIDATION_ERROR_USER_DEPARTMENT"));

            }

            // modified code -- end

            oMdlCommon.setProperty("/" + requesterFields[i] + "State", "Error");


        }

    }


    ...

    // more code

    ...
and in place where you persist workflow context, below code changes are needed
startInstance: function (workflowtoken) {

    ...

    //  code

    ...


    var sPayload = {

        "definitionId": sDefinitionId,

        "context": {

            "RequestId": oMdlCommon.getProperty("/sRequestId").toString(),

            "Title": oMdlCommon.getProperty("/sTitle"),

            "Requester": {

                "FirstName": oMdlCommon.getProperty("/oRequesterDetails/sRequesterFirstName"),

                "LastName": oMdlCommon.getProperty("/oRequesterDetails/sRequesterLastName"),

                "Email": oMdlCommon.getProperty("/oRequesterDetails/sRequesterEmail"),

                "UserId": oMdlCommon.getProperty("/oRequesterDetails/sRequesterUserId"),

                // change start

                "Region": oMdlCommon.getProperty("/oRequesterDetails/sRequesterRegion"),

                "Department": oMdlCommon.getProperty("/oRequesterDetails/sRequesterDepartment"),

                // change end

                "Comments": oMdlCommon.getProperty("/oRequesterDetails/sRequesterComment")

            },

            "ApprovalSteps": aApprovalSteps,

            "Attachments": aAttachments

        }

    };

    ...

    //  code

    ...

}
and I have added a new method to process this Business Rule depending on the user input
_getApproverGroup : function() {

    var oThisController = this;

    var oMdlCommon = this.getParentModel("mCommon");

    var sRequesterRegion = oMdlCommon.getProperty("/oRequesterDetails/sRequesterRegion");

    var sRequesterDepartment = oMdlCommon.getProperty("/oRequesterDetails/sRequesterDepartment");

    var sInputAttribute = "";

    if(sRequesterRegion !== "" && sRequesterRegion !== undefined && sRequesterRegion!==

    "null"){

        sInputAttribute += '"Region": "' + sRequesterRegion + '"';

    }else if(sRequesterDepartment !== "" && sRequesterDepartment !== undefined && sRequesterDepartment!==

    "null"){

        sInputAttribute += '"Department": "' + sRequesterDepartment + '"';

    }else{

        var noInput = oThisController.getMessage("FIELD_VALIDATION_ERROR_USER_REGION_OR_DEPARTMENT")

        oMdlCommon.setProperty("/sRequesterRegionState", "Error");

        oMdlCommon.setProperty("/sRequesterRegionStateText", noInput);

        oMdlCommon.setProperty("/sRequesterDepartmentState", "Error");

        oMdlCommon.setProperty("/sRequesterDepartmentStateText", noInput);

        var sGenericErrorText = oThisController.getMessage("FIELD_VALIDATION_ERROR_GENERIC");

        MessageToast.show(sGenericErrorText)

        oThisController.getView().setBusy(false);

        return true;

    }


    var sUrl = this._getBusinessRulesRuntimeBaseURL()+ '/rule-services';

    var jsonData = "{" +

        '"RuleServiceId": "c4a96475ddc2445294698234bbf609ad",' +

        '"RuleServiceRevision": "initial",'+

        '"Vocabulary": ['+

        '{' +

            '"inputAttributes": {'+sInputAttribute+

            '}' +

        '}' +

        ']' +

    '}';


    var oSettings = {

        "url": sUrl,

        "method": "POST",

        "async": false,

        "headers": {

            "Content-Type": "application/json",

            "Accept": "application/json",

        },

        "data" : jsonData

    };


    $.ajax(oSettings)

        .done(function (results, textStatus, request) {

            console.log("execution successfull");

            var oMdlCommon = oThisController.getParentModel("mCommon");

            oMdlCommon.setProperty("/sApproverGroup",results.Result[0].approverGroup);

            oMdlCommon.refresh();

        })

        .fail(function (err) {

            console.log("execution failed");

        });

    return false;

}
as you can see result of the Business Rule API call is stored in the model value /ApproverGroup. this will be used in the filter value.
Here are the modified code when filters are used.
getUsers: function (oColumns, sInputField) {

    var oThisController = this;

    this._getApproverGroup();

    var oMdlCommon = this.getParentModel("mCommon");


    var oView = oThisController.getView();

    oView.setBusy(true);

    var scimbaseurl = this._getSCIMBaseURL();


    var sRole = oMdlCommon.getProperty("/sApproverGroup");

    var sFilter = 'filter=groups.display eq "' + sRole + '"';


    var sUrl = this._getSCIMBaseURL() + '/service/scim/Users?'+ encodeURIComponent(sFilter);

    var oSettings = {

        "url": sUrl,

        "method": "GET"

    };


    ...

    // more code

    ...

}
and in the Pagination code section
getUsersAdd: function (iteration, oColumns, sInputField) {

    var oThisController = this;


    var oView = oThisController.getView();

    oView.setBusy(true);


    var startIndex = (100 * iteration) + 1;

    var scimbaseurl = this._getSCIMBaseURL();


    var sRole = oMdlCommon.getProperty("/sApproverGroup");

    var sFilter = 'filter=groups.display eq "' + sRole + '"';


    var sUrl = scimbaseurl+ '/service/scim/Users?startIndex=' + startIndex + '&' + encodeURIComponent(sFilter);

    var oSettings = {

        "url": sUrl,

        "method": "GET",

        "async": false

    };


    ...

    // more code

    ...

}
Save the project, build and deploy the same.
The new UI will look like this. As per Validation, either Region or Department needs to be entered.

Try entering Region or Department and browse the list of approvers or watchers, it should work dynamically depending on how your Business Rule is setup.
Conclusion
With this blog post, you understand how it is easy to customise the prebuilt content Document Centric Approval Process.
For More Information on SAP Process Automation:
- Exchange knowledge: SAP Community | Q&A| Blogs
- Explore: SAP Product Page | Product Demo
- Learn more: SAP Help Portal | SAP Learning Journey
- Try SAP Process Automation For Free: Get Started | Set-Up Guide
- Follow us on: LinkedIn, Twitter and YouTube
Labels:
You must be a registered user to add a comment. If you've already registered, sign in. Otherwise, register and sign in.
Labels in this area
-
ABAP CDS Views - CDC (Change Data Capture)
2 -
AI
1 -
Analyze Workload Data
1 -
BTP
1 -
Business and IT Integration
2 -
Business application stu
1 -
Business Technology Platform
1 -
Business Trends
1,658 -
Business Trends
92 -
CAP
1 -
cf
1 -
Cloud Foundry
1 -
Confluent
1 -
Customer COE Basics and Fundamentals
1 -
Customer COE Latest and Greatest
3 -
Customer Data Browser app
1 -
Data Analysis Tool
1 -
data migration
1 -
data transfer
1 -
Datasphere
2 -
Event Information
1,400 -
Event Information
66 -
Expert
1 -
Expert Insights
177 -
Expert Insights
298 -
General
1 -
Google cloud
1 -
Google Next'24
1 -
Kafka
1 -
Life at SAP
780 -
Life at SAP
13 -
Migrate your Data App
1 -
MTA
1 -
Network Performance Analysis
1 -
NodeJS
1 -
PDF
1 -
POC
1 -
Product Updates
4,577 -
Product Updates
344 -
Replication Flow
1 -
RisewithSAP
1 -
SAP BTP
1 -
SAP BTP Cloud Foundry
1 -
SAP Cloud ALM
1 -
SAP Cloud Application Programming Model
1 -
SAP Datasphere
2 -
SAP S4HANA Cloud
1 -
SAP S4HANA Migration Cockpit
1 -
Technology Updates
6,873 -
Technology Updates
421 -
Workload Fluctuations
1
Related Content
- SAP Build Process Automation Pre-built content for Finance Use cases in Technology Blogs by SAP
- Hack2Build on Business AI – Highlighted Use Cases in Technology Blogs by SAP
- Unify your process and task mining insights: How SAP UEM by Knoa integrates with SAP Signavio in Technology Blogs by SAP
- Workflow CC Role email notification issue in Technology Q&A
- Trigger a process in SAP Build Process Automation from SAP Build Apps without using API in Technology Blogs by SAP
Top kudoed authors
| User | Count |
|---|---|
| 39 | |
| 25 | |
| 17 | |
| 13 | |
| 7 | |
| 7 | |
| 7 | |
| 7 | |
| 6 | |
| 6 |