
- SAP Community
- Products and Technology
- Technology
- Technology Blogs by SAP
- Create Fiori app using CDS with BOPF- For beginner...
Technology Blogs by SAP
Learn how to extend and personalize SAP applications. Follow the SAP technology blog for insights into SAP BTP, ABAP, SAP Analytics Cloud, SAP HANA, and more.
Turn on suggestions
Auto-suggest helps you quickly narrow down your search results by suggesting possible matches as you type.
Showing results for
Former Member
Options
- Subscribe to RSS Feed
- Mark as New
- Mark as Read
- Bookmark
- Subscribe
- Printer Friendly Page
- Report Inappropriate Content
09-20-2016
10:06 AM
This blog is on continuation to Part 1.
In this part we shall create the BOPF action and display the sale order scenario in the Fiori App using Smart Template.
For the BOPF action, go to BOPF Business Object ZDEMO_I_SALESORDER from Tcode BOBX. Click on change mode. Under the Node Elements, traverse to node ZDEMO_I_SALESORDER and select Action element. Right Click on Action and Click "Create".


Go to Class Builder and create the class ZCL_A-DEMO_SALESORDER.


Implement the method Execute.


Save and Activate. Below is code for Action. Basically the code reads the selected sales order and then change the corresponding BOPF node instance with the new lifecycle status value.
  method /bobf/if_frw_action~execute.


    case is_ctx-act_key.


        "Action - Set overall status

      when zif_demo_i_salesorder_c=>sc_action-zdemo_i_salesorder-set_lifecycle_status_to_paid.

        " Get output structure of Action

        data(lt_sales_order) = value ztdemo_i_salesorder( ).


        "Read UI clicked sale order

        io_read->retrieve(

          exporting

            iv_node                 =  is_ctx-node_key   " BO Node Name

            it_key                  =  it_key            " BO Key

          importing

            et_data                 =  lt_sales_order ).   " Data Return Structure


        "Assuming single instance for a action

        read table lt_sales_order assigning field-symbol(<fs_sales_order>) index 1.

        if sy-subrc = 0.

          "Set the over all status to Paid ie 'P'

          if <fs_sales_order>-lifecyclestatus is initial.

            <fs_sales_order>-lifecyclestatus  = 'P'.

          endif.

        endif.


        "Now update the BO instance

        io_modify->update(

          exporting

            iv_node           = is_ctx-node_key    " Node

            iv_key            = <fs_sales_order>-key    " Key

            iv_root_key       = <fs_sales_order>-root_key     " NodeID

            is_data           = ref #( <fs_sales_order>-node_data )    " Data

            it_changed_fields = value #(

                                ( zif_demo_i_salesorder_c=>sc_node_attribute-zdemo_i_salesorder-lifecyclestatus ) )

                        ).


        et_data = lt_sales_order.


      when others.

        "Nothing


    endcase.


endmethod.
Okay we are done with all the backend stuff.
Lets display this using as Fiori App using Smart Template.
If all the Web IDE set up explained in Part 1 is fine, we can proceed. Go to Web IDE. Click on File.

Click on File --> New --> Project from template
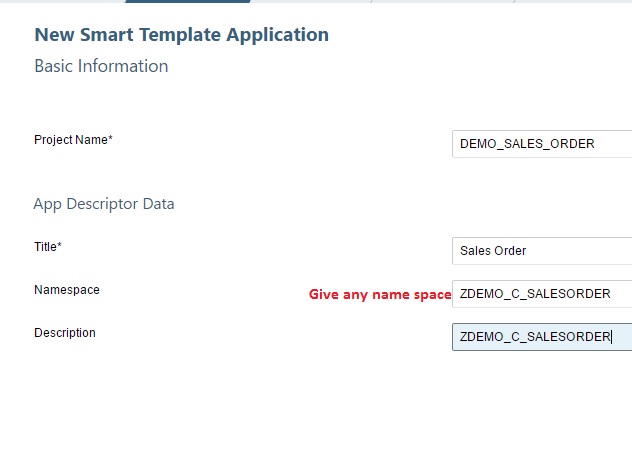
On next screen, Select Service Catalog. Click on the dropdown and select your backend system.

Once the backend system is selected, OData services in the system are listed. Look for our OData generated service ZDEMO_C_SALESPRDER_CDS ie <final consump CDS view>_CDS

Select the Odata service. Click on Show details to check if the OData is up and running
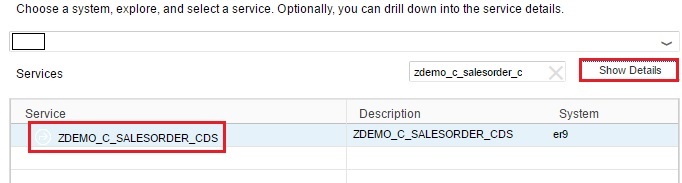
Here we see the OData service is running fine.

Click on Next. In the Next screen the system will read and the OData service metadata file and also the CDS Annotations file(final consumption CDS). These are necessary to display the app.
The annotations in the final consumption CDS view (ZDEMO_C_SALESORDER) contain the UI line position which shall form the basis for field positioning in the app.

Click Next. In OData collection, select the consumption view(where OData was published). Our final consumption view has an association to Item. Hence here the OData navigation refers to "_item".

Click Next or Finish and its done !

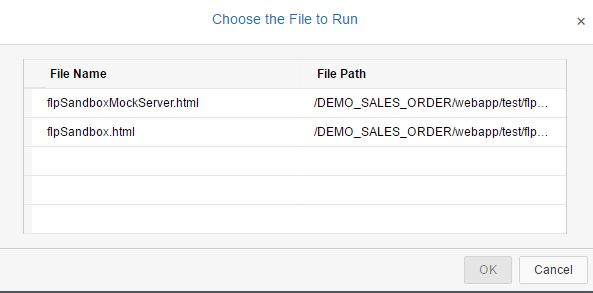
The project name is visible under the workspace. Right click on the project. Click Run as -> Web Application

If prompted, choose flp sandbox.html. These are used to for test data basically.
Click Ok. If prompted, for login credentials, enter the backend system details. Finally the app icon is displayed in the Catalog Tile.

Click on the App. If prompted for the login credentials, enter the back-end system details.
Click on Go in the app to display the sales order records.

Select the record by selecting the radio button and clicking. The navigation happens to the detail screen.

Click on Edit. For example, lets update the Gross Amount and click on Save.

The Gross amount value is edited to 3500 INR. Click Save.
"Object saved" message appears. Go back to previous app page.
The new Gross amount is reflected here.

The Edit is excuted in BOPF via CDS and the particular BOPF node instance is edited. This is achieved as we have given the create/update/delete enabled in the final consumption CDS which delegates to the Basic CDS and then to BOPF.

Create a new record.
In the basic CDS ZDEMO_I_SALESORDER, we have maintained the annotation @objectmodel.create enabled: true which means the create logic is taken care by BOPF.
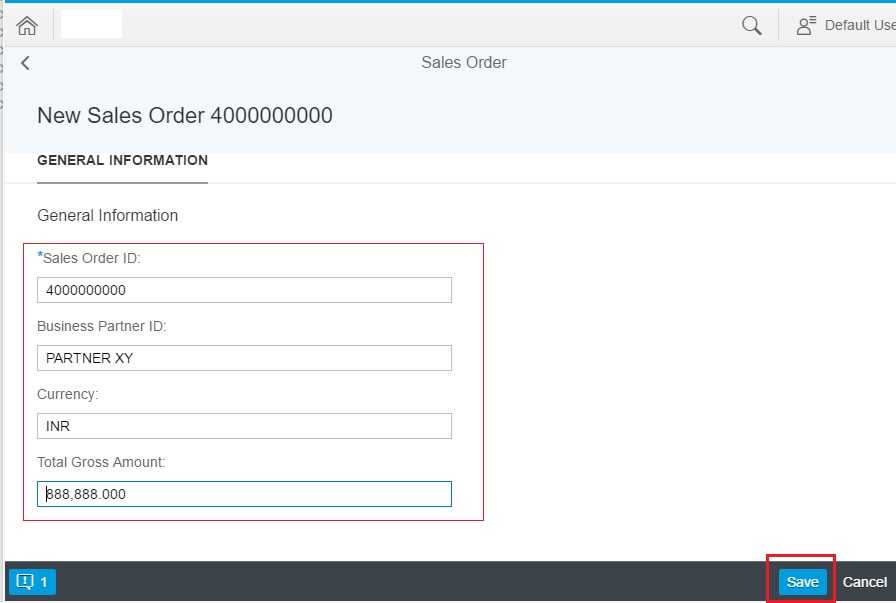
Click on + icon in the app to create a new sales header record.
Enter the values and click on Save.
An object saved message appears. The record is saved. Go to previous page and see the newly created record.

The delete icon works the same way. Just select an record and click on delete.
Change the sales order Lifecycle status
Select an sales order which has initial status and click on icon "Set Lifecycle Status to Paid". The code which we have written for the BOPF Action is triggered and the status is changed to P.
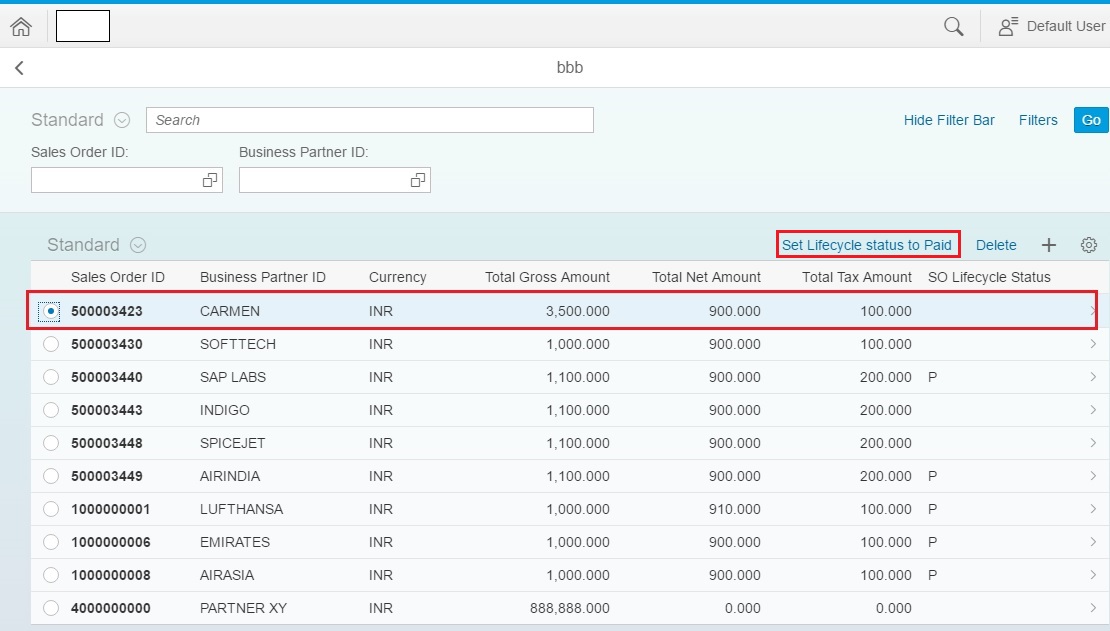
Lifecycle status has changed to P(Paid)

That's it. Hope this is helpful.
The same technique can be used for SAP Standard tables. Below is an quick example of using Standard tables VBAK and VBAP.
Basic Sales Order header CDS
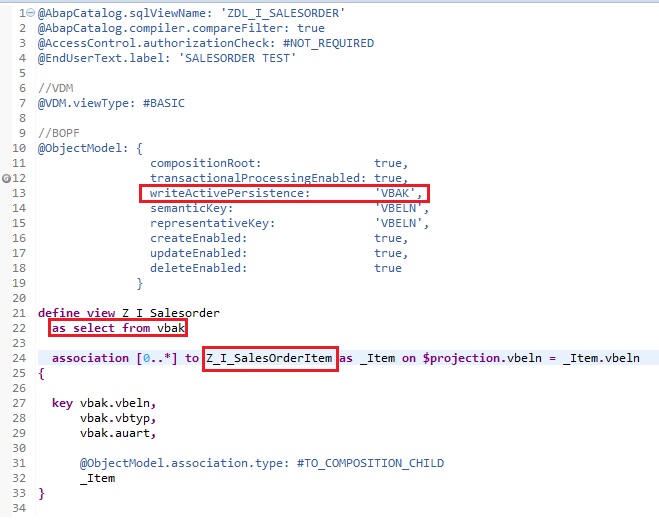
Basic Sales Order Item CDS

And here are corresponding BOPF objects generated using the CDS annotations.

These are just the Basic CDS views. Use these in the consumption CDS similar to the example demonstrated in Part 1.
- SAP Managed Tags:
- SAP Fiori,
- ABAP Development,
- SAPUI5
13 Comments
You must be a registered user to add a comment. If you've already registered, sign in. Otherwise, register and sign in.
Labels in this area
-
ABAP CDS Views - CDC (Change Data Capture)
2 -
AI
1 -
Analyze Workload Data
1 -
BTP
1 -
Business and IT Integration
2 -
Business application stu
1 -
Business Technology Platform
1 -
Business Trends
1,661 -
Business Trends
86 -
CAP
1 -
cf
1 -
Cloud Foundry
1 -
Confluent
1 -
Customer COE Basics and Fundamentals
1 -
Customer COE Latest and Greatest
3 -
Customer Data Browser app
1 -
Data Analysis Tool
1 -
data migration
1 -
data transfer
1 -
Datasphere
2 -
Event Information
1,400 -
Event Information
64 -
Expert
1 -
Expert Insights
178 -
Expert Insights
270 -
General
1 -
Google cloud
1 -
Google Next'24
1 -
Kafka
1 -
Life at SAP
784 -
Life at SAP
11 -
Migrate your Data App
1 -
MTA
1 -
Network Performance Analysis
1 -
NodeJS
1 -
PDF
1 -
POC
1 -
Product Updates
4,578 -
Product Updates
323 -
Replication Flow
1 -
RisewithSAP
1 -
SAP BTP
1 -
SAP BTP Cloud Foundry
1 -
SAP Cloud ALM
1 -
SAP Cloud Application Programming Model
1 -
SAP Datasphere
2 -
SAP S4HANA Cloud
1 -
SAP S4HANA Migration Cockpit
1 -
Technology Updates
6,886 -
Technology Updates
395 -
Workload Fluctuations
1
Related Content
- Developer extendibility for custom table and publish oDATA in Technology Q&A
- Integrate an external task system to Cloud ALM. in Technology Q&A
- Integration object creation with one to one relation with same item type. in Technology Q&A
- BTP Apps, F4 Help and Personal Value Lists in Technology Q&A
- Partitioning a table in HANA using Range Partitioning using multiple values from Partitioning column in Technology Q&A
Top kudoed authors
| User | Count |
|---|---|
| 11 | |
| 10 | |
| 10 | |
| 9 | |
| 8 | |
| 7 | |
| 7 | |
| 7 | |
| 7 | |
| 6 |