
- SAP Community
- Products and Technology
- Technology
- Technology Blogs by SAP
- HCP IoT Showcase using Sphero - Part 6: Integratio...
Technology Blogs by SAP
Learn how to extend and personalize SAP applications. Follow the SAP technology blog for insights into SAP BTP, ABAP, SAP Analytics Cloud, SAP HANA, and more.
Turn on suggestions
Auto-suggest helps you quickly narrow down your search results by suggesting possible matches as you type.
Showing results for
Advisor
Options
- Subscribe to RSS Feed
- Mark as New
- Mark as Read
- Bookmark
- Subscribe
- Printer Friendly Page
- Report Inappropriate Content
09-07-2016
9:41 AM
Hello again. This is the sixth blog post based on the following table.
This blog explains the highlighted section in the overall architecture below.

Now we integrate all tests into one. So, gathered sensor data will be published via MQTT and sent to IoT Services simultaneously.
For this, SAP Korea team merged GPIOtest.py (Part 4) and mqtt-wss-sample.py (Part 5) then slightly modified the code as below.
integration_test.py
As you can see in line 70, publishing interval is 5 seconds but you can change it if needed. And in line 102, the topic name is /xyz and I just used my Raspberry Pi's IP to connect Mosquitto on it.
Before running this Python code, please check everything is ready for testing as below.
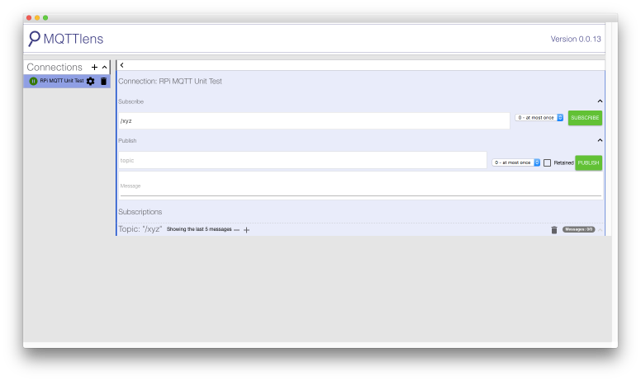


Similar to my previous blog, 3 clients (MQTTLens, Python and Javascript) are ready for subscribing /xyz topic. Then run the code as below.

As I explained, this code will publish messages from GPIO sensors to Mosquitto via /xyz and also send data to HCP IoT Services at the same time.
If everything goes well, you will see following results.


3 clients now get all messages from GPIO.

You will see HCP IoT Services also successfully receive data.
That's it. Thank you for reading this blog. Let me get back to you soon with next posting.
Best,
Seungjoon
| HCP IoT Showcase using Sphero • Part 1: Overview • Part 2: Controlling Sphero using Raspberry Pi and Xbox 360 controller • Part 3: Maze Setup (Hardware) • Part 4: Unit Test (Gathering & Sending Data) • Part 5: Unit Test (MQTT) • Part 6: Integration Test • Part 7: XS Application • |
This blog explains the highlighted section in the overall architecture below.
Now we integrate all tests into one. So, gathered sensor data will be published via MQTT and sent to IoT Services simultaneously.
For this, SAP Korea team merged GPIOtest.py (Part 4) and mqtt-wss-sample.py (Part 5) then slightly modified the code as below.
integration_test.py
# all configuration settings come from config.py

try:

  import config

except ImportError:

  print("Please copy template-config.py to config.py and configure appropriately !"); exit();

import RPi.GPIO as GPIO

import sys

import paho.mqtt.client as mqtt

import time

import random

import paho.mqtt.publish as pubmosq

# init RPi GPIO

GPIO.setmode(GPIO.BCM)

GPIO.setup(4, GPIO.IN)

GPIO.setup(5, GPIO.IN)

GPIO.setup(6, GPIO.IN)

GPIO.setup(7, GPIO.IN)

GPIO.setup(8, GPIO.IN)

GPIO.setup(9, GPIO.IN)

GPIO.setup(10, GPIO.IN)

GPIO.setup(11, GPIO.IN)

GPIO.setup(12, GPIO.IN)

GPIO.setup(13, GPIO.IN)

GPIO.setup(14, GPIO.IN)

GPIO.setup(15, GPIO.IN)

GPIO.setup(16, GPIO.IN)

GPIO.setup(17, GPIO.IN)

GPIO.setup(18, GPIO.IN)

GPIO.setup(19, GPIO.IN)

# === START === values set from the config.py file ===

my_endpoint            = "iotmms" + config.hcp_account_id + config.hcp_landscape_host

my_endpoint_certificate = config.endpoint_certificate

my_device_id            = config.device_id

my_client_id            = my_device_id

my_username            = my_device_id

my_password            = config.oauth_credentials_for_device

my_message_type_upstream = config.message_type_id_From_device

# === END ===== values set from the config.py file ===

my_endpoint_url_path    = "/com.sap.iotservices.mms/v1/api/ws/mqtt"

# for upstream communication

my_publish_topic      = "iot/data/" + my_device_id

# for downstream communication

my_subscription_topic = "iot/push/" + my_device_id

is_connected = False

def on_connect(mqttc, obj, flags, rc):

  print("on_connect  - rc: " + str(rc))

  global is_connected

  is_connected = True

# you can use the push API (e.g. also from the built-in sample UI) to send to the device

def on_message(mqttc, obj, msg):

  print("on_message  - " + msg.topic + " " + str(msg.qos) + " " + str(msg.payload))

def on_publish(mqttc, obj, message_id):

  print("on_publish  - message_id: " + str(message_id))

def on_subscribe(mqttc, obj, message_id, granted_qos):

  print("on_subscribe - message_id: " + str(message_id) + " / qos: " + str(granted_qos))

def on_log(mqttc, obj, level, string):

  print(string)

mqttc = mqtt.Client(client_id=my_client_id, transport='websockets')

mqttc.on_message = on_message

mqttc.on_connect = on_connect

mqttc.on_publish = on_publish

mqttc.on_subscribe = on_subscribe

mqttc.tls_set(my_endpoint_certificate)

mqttc.username_pw_set(my_username, my_password)

mqttc.endpoint_url_path_set(my_endpoint_url_path)

mqttc.connect(my_endpoint, 443, 60)

# you can use the push API (e.g. also from the built-in sample UI) to send to the device

mqttc.subscribe(my_subscription_topic, 0)

mqttc.loop_start()

publish_interval=5

value=0

while 1==1:

  if is_connected == True:

  timestamp = int(time.time())

  oSensor_data_4 = GPIO.input(4)

  oSensor_data_5 = GPIO.input(5)

  oSensor_data_6 = GPIO.input(6)

  oSensor_data_7 = GPIO.input(7)

  oSensor_data_8 = GPIO.input(8)

  oSensor_data_9 = GPIO.input(9)

  oSensor_data_10 = GPIO.input(10)

  oSensor_data_11 = GPIO.input(11)

  oSensor_data_12 = GPIO.input(12)

  oSensor_data_13 = GPIO.input(13)

  oSensor_data_14 = GPIO.input(14)

  oSensor_data_15 = GPIO.input(15)

  oSensor_data_16 = GPIO.input(16)

  oSensor_data_17 = GPIO.input(17)

  oSensor_data_18 = GPIO.input(18)

  oSensor_data_19 = GPIO.input(19)

  oSensor_data = str(oSensor_data_4) + str(oSensor_data_5) + str(oSensor_data_6) + str(oSensor_data_7) + str(oSensor_data_8) + str(oSensor_data_9) + str(oSensor_data_10) + str(oSensor_data_11) + str(oSensor_data_12) + str(oSensor_data_13) + str(oSensor_data_14) + str(oSensor_data_15) + str(oSensor_data_16) + str(oSensor_data_17) + str(oSensor_data_18) + str(oSensor_data_19)

  print oSensor_data

  # == START ==== fill the payload now - in this example we use the typical IoT Starterkit payload ======

  my_mqtt_payload='{"messageType":"' + my_message_type_upstream + '","messages":[{'

  my_mqtt_payload=my_mqtt_payload + '"username":"test user", '

  my_mqtt_payload=my_mqtt_payload + '"companyname":"SAP", '

  my_mqtt_payload=my_mqtt_payload + '"sensordata":"' + str(oSensor_data) + '", '

  my_mqtt_payload=my_mqtt_payload + '"timestamp":' + str(timestamp)

  my_mqtt_payload=my_mqtt_payload + '}]}'

  # == END ====== fill the payload now - in this example we use the typical IoT Starterkit payload ======

  print(my_mqtt_payload)

  pubmosq.single("/xyz", oSensor_data, hostname="192.168.2.2")

  mqttc.publish(my_publish_topic, my_mqtt_payload, qos=0)

  else:

  print("still waiting for connection")

  time.sleep(publish_interval)
As you can see in line 70, publishing interval is 5 seconds but you can change it if needed. And in line 102, the topic name is /xyz and I just used my Raspberry Pi's IP to connect Mosquitto on it.
Before running this Python code, please check everything is ready for testing as below.
Similar to my previous blog, 3 clients (MQTTLens, Python and Javascript) are ready for subscribing /xyz topic. Then run the code as below.
python integration_test.py
As I explained, this code will publish messages from GPIO sensors to Mosquitto via /xyz and also send data to HCP IoT Services at the same time.
If everything goes well, you will see following results.
3 clients now get all messages from GPIO.
You will see HCP IoT Services also successfully receive data.
That's it. Thank you for reading this blog. Let me get back to you soon with next posting.
Best,
Seungjoon
- SAP Managed Tags:
- SAP Business Technology Platform
Labels:
You must be a registered user to add a comment. If you've already registered, sign in. Otherwise, register and sign in.
Labels in this area
-
ABAP CDS Views - CDC (Change Data Capture)
2 -
AI
1 -
Analyze Workload Data
1 -
BTP
1 -
Business and IT Integration
2 -
Business application stu
1 -
Business Technology Platform
1 -
Business Trends
1,658 -
Business Trends
91 -
CAP
1 -
cf
1 -
Cloud Foundry
1 -
Confluent
1 -
Customer COE Basics and Fundamentals
1 -
Customer COE Latest and Greatest
3 -
Customer Data Browser app
1 -
Data Analysis Tool
1 -
data migration
1 -
data transfer
1 -
Datasphere
2 -
Event Information
1,400 -
Event Information
66 -
Expert
1 -
Expert Insights
177 -
Expert Insights
296 -
General
1 -
Google cloud
1 -
Google Next'24
1 -
Kafka
1 -
Life at SAP
780 -
Life at SAP
13 -
Migrate your Data App
1 -
MTA
1 -
Network Performance Analysis
1 -
NodeJS
1 -
PDF
1 -
POC
1 -
Product Updates
4,577 -
Product Updates
342 -
Replication Flow
1 -
RisewithSAP
1 -
SAP BTP
1 -
SAP BTP Cloud Foundry
1 -
SAP Cloud ALM
1 -
SAP Cloud Application Programming Model
1 -
SAP Datasphere
2 -
SAP S4HANA Cloud
1 -
SAP S4HANA Migration Cockpit
1 -
Technology Updates
6,873 -
Technology Updates
420 -
Workload Fluctuations
1
Related Content
- Cloud Integration: Manually Sign / Verify XML payload based on XML Signature Standard in Technology Blogs by SAP
- SAP Sustainability Footprint Management: Q1-24 Updates & Highlights in Technology Blogs by SAP
- Custom data as table, CDS, Domain, Business object and all that jazz... in Technology Blogs by SAP
- Harnessing Generative AI Capabilities with SAP HANA Cloud Vector Engine - Part 1 [Architecture] in Technology Blogs by SAP
- Advanced Event Mesh Connectors and Easy Event-Driven Example of S/4HANA with Amazon S3 Integration in Technology Blogs by Members
Top kudoed authors
| User | Count |
|---|---|
| 36 | |
| 25 | |
| 17 | |
| 13 | |
| 8 | |
| 7 | |
| 7 | |
| 6 | |
| 6 | |
| 6 |