
- SAP Community
- Products and Technology
- Technology
- Technology Blogs by SAP
- HCP IoT Showcase using Sphero - Part 4: Unit Test ...
Technology Blogs by SAP
Learn how to extend and personalize SAP applications. Follow the SAP technology blog for insights into SAP BTP, ABAP, SAP Analytics Cloud, SAP HANA, and more.
Turn on suggestions
Auto-suggest helps you quickly narrow down your search results by suggesting possible matches as you type.
Showing results for
Advisor
Options
- Subscribe to RSS Feed
- Mark as New
- Mark as Read
- Bookmark
- Subscribe
- Printer Friendly Page
- Report Inappropriate Content
08-19-2016
3:38 PM
Hello everyone! This is the forth blog post based on the following table.
In this table, I slightly changed names and add one more part to clarify the process clearly.
This blog also explains the highlighted section in the overall architecture.

For your reference, the architecture was also slightly modified because HCP IoT Services recently started to support MQTT protocol (WSS) and I believe adjusting our architecture and codes accordingly would be better.
Through previous blog posts, now we're ready to do some unit tests for gathering sensor data and sending data to HCP IoT Services.
Let's do those 2 unit tests and then bind a new data source (HANA MDC) with IoT MMS (Message Management Service) for developing XS application.
In order to test on gathering sensor data via GPIO, the first thing you need to do is connecting prepared cables to Rapsberry Pi.
Since there are 16 pairs of infrared sensors, I'll use GPIO 4 to 19. And here is the Python code SAP Korea team used for testing.
GPIOtest.py
Once you run the code as below, you can test whether each infrared sensor works correctly or not.
If the sensor detect something such as Sphero, it will show 1 otherwise it will show 0 as below.
All data will be updated every second as below.
...
0000000000000000
0000000000000000
0000000000000000
0000000000000000
0000000000000000
0000000000000000
0010000000000000 < if the third infrared sensor (GPIO 6) detects Sphero on the maze
0000000000000000
0000000000000000
...
Now, let's sending data to HCP IoT Services. The first thing you need to do is activating HCP IoT Services as below.
Then Go to Service and Create Message Types, a Device Type and a Device.

Here are what we created.
Each message type will generate ID. Please copy them somewhere such as notepad.
Please also copy generated ID, Token somewhere.
For this testing, since I'll leverage Python examples in iot-starterkit, clone it on your Rapsberry Pi as below.
Now, what we will use is under ~/iot-starterkit/src/examples/python/mqtt-over-python.
In addition to that, installing Python MQTT library is required. Please see the instruction in the below link.
Instructions for installing / using the MQTT client
After installing library, we modified the code based on what we created on HCP IoT Services as below (line 74 to 79).

And you also need to rename or copy template-config.py to config.py and modify it according to your information as below.
Once you run the mqtt-wss-sample.py as below, you'll see messages are sending to HCP IoT Services.
If you check the table from HCP IoT Services Cockpit, you can find the data sent from Raspberry Pi as below.

Then if you click OData API upper right, it provides API that you can easily consume OData from this table.


In this way, we did 2 unit tests for gathering and sending data.
The next thing is unbind current data source for IoT MMS and bind a new data source for developing XS application.
We will create some additional tables in upcoming blog post to build our XS application by joining tables. And the first thing you need to do is creating a new database/schema using HANA MDC.

Since SYSTEM don't have enough roles for SAP HANA Web-based Development Workbench, you need to assign roles.
In my case, I just assigned all roles with "ide" via SAP HANA Cockpit as below.

Then delete the current binding in your_hcp_account_id.iotmms.web via Persistence - Databases & Schemas - your_hcp_account_id.iotmms.web - Data Source Bindings as below.

In the same menu, Persistence - Databases & Schemas, choose HANA MDC you created this time and bind the iotmms with your HANA MDC.

Then restart your iotmms via Applications - Java Applications and do the run mqtt-wss-sample.py again on your Raspberry Pi.
If you check HCP IoT Services Cockpit again, you can see the data as below.


Now, you can also check the data via SAP HANA Web-based Development Workbench - Catalog as below.

That's it. Thank you for reading this blog. Let me get back to you soon with next posting.
Best,
Seungjoon
| HCP IoT Showcase using Sphero • Part 1: Overview • Part 2: Controlling Sphero using Raspberry Pi and Xbox 360 controller • Part 3: Maze Setup (Hardware) • Part 4: Unit Test (Gathering & Sending Data) • Part 5: Unit Test (MQTT) • Part 6: Integration Test • Part 7: XS Application • |
In this table, I slightly changed names and add one more part to clarify the process clearly.
This blog also explains the highlighted section in the overall architecture.
For your reference, the architecture was also slightly modified because HCP IoT Services recently started to support MQTT protocol (WSS) and I believe adjusting our architecture and codes accordingly would be better.
Through previous blog posts, now we're ready to do some unit tests for gathering sensor data and sending data to HCP IoT Services.
Let's do those 2 unit tests and then bind a new data source (HANA MDC) with IoT MMS (Message Management Service) for developing XS application.
Unit Test 1: Gathering Sensor Data
In order to test on gathering sensor data via GPIO, the first thing you need to do is connecting prepared cables to Rapsberry Pi.
Since there are 16 pairs of infrared sensors, I'll use GPIO 4 to 19. And here is the Python code SAP Korea team used for testing.
GPIOtest.py
import RPi.GPIO as GPIO

import time

# init RPi GPIO

GPIO.setmode(GPIO.BCM)

GPIO.setup(4, GPIO.IN)

GPIO.setup(5, GPIO.IN)

GPIO.setup(6, GPIO.IN)

GPIO.setup(7, GPIO.IN)

GPIO.setup(8, GPIO.IN)

GPIO.setup(9, GPIO.IN)

GPIO.setup(10, GPIO.IN)

GPIO.setup(11, GPIO.IN)

GPIO.setup(12, GPIO.IN)

GPIO.setup(13, GPIO.IN)

GPIO.setup(14, GPIO.IN)

GPIO.setup(15, GPIO.IN)

GPIO.setup(16, GPIO.IN)

GPIO.setup(17, GPIO.IN)

GPIO.setup(18, GPIO.IN)

GPIO.setup(19, GPIO.IN)

# display GPIO input data every second

try:

  while 1:

    oSensor_data_4 = GPIO.input(4)

    oSensor_data_5 = GPIO.input(5)

    oSensor_data_6 = GPIO.input(6)

    oSensor_data_7 = GPIO.input(7)

    oSensor_data_8 = GPIO.input(8)

    oSensor_data_9 = GPIO.input(9)

    oSensor_data_10 = GPIO.input(10)

    oSensor_data_11 = GPIO.input(11)

    oSensor_data_12 = GPIO.input(12)

    oSensor_data_13 = GPIO.input(13)

    oSensor_data_14 = GPIO.input(14)

    oSensor_data_15 = GPIO.input(15)

    oSensor_data_16 = GPIO.input(16)

    oSensor_data_17 = GPIO.input(17)

    oSensor_data_18 = GPIO.input(18)

    oSensor_data_19 = GPIO.input(19)

    oSensor_data = str(oSensor_data_4) + str(oSensor_data_5) + str(oSensor_data_6) + str(oSensor_data_7) + str(oSensor_data_8) + str(oSensor_data_9) + str(oSensor_data_10) + str(oSensor_data_11) + str(oSensor_data_12) + str(oSensor_data_13) + str(oSensor_data_14) + str(oSensor_data_15) + str(oSensor_data_16) + str(oSensor_data_17) + str(oSensor_data_18) + str(oSensor_data_19)

    print oSensor_data

    time.sleep(1)

except KeyboardInterrupt:

GPIO.cleanup()
Once you run the code as below, you can test whether each infrared sensor works correctly or not.
python GPIOtest.py
If the sensor detect something such as Sphero, it will show 1 otherwise it will show 0 as below.
All data will be updated every second as below.
...
0000000000000000
0000000000000000
0000000000000000
0000000000000000
0000000000000000
0000000000000000
0010000000000000 < if the third infrared sensor (GPIO 6) detects Sphero on the maze
0000000000000000
0000000000000000
...
Unit Test 2: Sending Data to HCP IoT Services
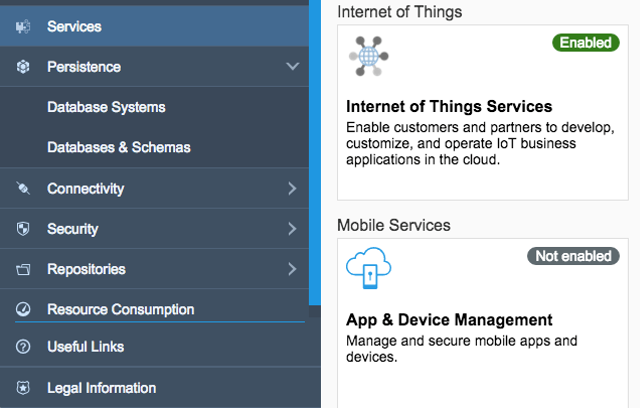
Now, let's sending data to HCP IoT Services. The first thing you need to do is activating HCP IoT Services as below.
Then Go to Service and Create Message Types, a Device Type and a Device.
Here are what we created.
- Message Type for Gathering Data
- - Name: Sphero_msg
- - Field 1: username, string (30)
- - Field 2: companyname, string (30)
- - Field 3: sensordata, string (30)
- - Field 4: timestamp, date
- Message Type for Pushing Data (Not used in this IoT showcase but we just created)
- - Name: Sphero_push
- - Field 1: pushvalue, string (50)
- - Field 2: timestamp, date
Each message type will generate ID. Please copy them somewhere such as notepad.
- Device Type
- - Name: Sphero_devicetype
- - Assigned Message Type 1: Sphero_msg, From Device
- - Assigned Message Type 2: Sphero_push, To Device
- Device
- - Name: Sphero_devices
- - Device Type: Sphero_devicetype
Please also copy generated ID, Token somewhere.
For this testing, since I'll leverage Python examples in iot-starterkit, clone it on your Rapsberry Pi as below.
git clone https://github.com/SAP/iot-starterkit.git
Now, what we will use is under ~/iot-starterkit/src/examples/python/mqtt-over-python.
In addition to that, installing Python MQTT library is required. Please see the instruction in the below link.
Instructions for installing / using the MQTT client
After installing library, we modified the code based on what we created on HCP IoT Services as below (line 74 to 79).
sudo nano mqtt-wss-sample.py
And you also need to rename or copy template-config.py to config.py and modify it according to your information as below.
# print("Please configure appropriately and then remove this line !"); exit();

# ===== Your specific configuration goes below / please adapt ========

# the HCP account id - trial accounts typically look like p[0-9]*trial

hcp_account_id='your_hcp_account_id'

# you only need to adapt this part of the URL if you are NOT ON TRIAL but e.g. on PROD

hcp_landscape_host='.hanatrial.ondemand.com'

# hcp_landscape_host='.hana.ondemand.com' # this is used on PROD

ndpoint_certificate = "./hanatrial.ondemand.com.crt"

# you can download this certificate file with your browser from the app server in your landscape - it is used to check that the server is authentic

# we also provide the certificate that is valid in July 2016 at our github repo

# the following values need to be taken from the IoT Cockpit

device_id='the_id_of_the_device_you_created_in_the_iot_cockpit'

# the device specific OAuth token is used as MQTT password

oauth_credentials_for_device='the_oauth_token_shown_for_the_created_device'

message_type_id_From_device='the_message_type_id_From_device_you_created_in_the_iot_cockpit'

# ===== nothing to be changed / configured below this line ===========
Once you run the mqtt-wss-sample.py as below, you'll see messages are sending to HCP IoT Services.
python mqtt-wss-sample.py
If you check the table from HCP IoT Services Cockpit, you can find the data sent from Raspberry Pi as below.
Then if you click OData API upper right, it provides API that you can easily consume OData from this table.
In this way, we did 2 unit tests for gathering and sending data.
Binding a new data source (HANA MDC) with IoT MMS
The next thing is unbind current data source for IoT MMS and bind a new data source for developing XS application.
We will create some additional tables in upcoming blog post to build our XS application by joining tables. And the first thing you need to do is creating a new database/schema using HANA MDC.
Since SYSTEM don't have enough roles for SAP HANA Web-based Development Workbench, you need to assign roles.
In my case, I just assigned all roles with "ide" via SAP HANA Cockpit as below.
Then delete the current binding in your_hcp_account_id.iotmms.web via Persistence - Databases & Schemas - your_hcp_account_id.iotmms.web - Data Source Bindings as below.
In the same menu, Persistence - Databases & Schemas, choose HANA MDC you created this time and bind the iotmms with your HANA MDC.
Then restart your iotmms via Applications - Java Applications and do the run mqtt-wss-sample.py again on your Raspberry Pi.
If you check HCP IoT Services Cockpit again, you can see the data as below.
Now, you can also check the data via SAP HANA Web-based Development Workbench - Catalog as below.
That's it. Thank you for reading this blog. Let me get back to you soon with next posting.
Best,
Seungjoon
- SAP Managed Tags:
- SAP Business Technology Platform
Labels:
You must be a registered user to add a comment. If you've already registered, sign in. Otherwise, register and sign in.
Labels in this area
-
ABAP CDS Views - CDC (Change Data Capture)
2 -
AI
1 -
Analyze Workload Data
1 -
BTP
1 -
Business and IT Integration
2 -
Business application stu
1 -
Business Technology Platform
1 -
Business Trends
1,658 -
Business Trends
92 -
CAP
1 -
cf
1 -
Cloud Foundry
1 -
Confluent
1 -
Customer COE Basics and Fundamentals
1 -
Customer COE Latest and Greatest
3 -
Customer Data Browser app
1 -
Data Analysis Tool
1 -
data migration
1 -
data transfer
1 -
Datasphere
2 -
Event Information
1,400 -
Event Information
66 -
Expert
1 -
Expert Insights
177 -
Expert Insights
295 -
General
1 -
Google cloud
1 -
Google Next'24
1 -
Kafka
1 -
Life at SAP
780 -
Life at SAP
13 -
Migrate your Data App
1 -
MTA
1 -
Network Performance Analysis
1 -
NodeJS
1 -
PDF
1 -
POC
1 -
Product Updates
4,576 -
Product Updates
341 -
Replication Flow
1 -
RisewithSAP
1 -
SAP BTP
1 -
SAP BTP Cloud Foundry
1 -
SAP Cloud ALM
1 -
SAP Cloud Application Programming Model
1 -
SAP Datasphere
2 -
SAP S4HANA Cloud
1 -
SAP S4HANA Migration Cockpit
1 -
Technology Updates
6,873 -
Technology Updates
419 -
Workload Fluctuations
1
Related Content
- Automatic Creation of One Time Payments from Time Collectors Using Integration Center in Technology Blogs by Members
- What’s New for SAP Integration Suite – February 2024 in Technology Blogs by SAP
- Handling Mail Attachments in SAP Process Orchestration and SAP Cloud Integration in Technology Blogs by SAP
- Automating Advanced Event Mesh Broker Creation in Technology Blogs by Members
- Fiori launchpad integrated GPT assistant: UI in Technology Blogs by Members
Top kudoed authors
| User | Count |
|---|---|
| 35 | |
| 25 | |
| 17 | |
| 13 | |
| 8 | |
| 7 | |
| 6 | |
| 6 | |
| 6 | |
| 6 |