
- SAP Community
- Products and Technology
- Enterprise Resource Planning
- ERP Blogs by Members
- SuccessFactors Recruiting Legacy Data Migration – ...
Enterprise Resource Planning Blogs by Members
Gain new perspectives and knowledge about enterprise resource planning in blog posts from community members. Share your own comments and ERP insights today!
Turn on suggestions
Auto-suggest helps you quickly narrow down your search results by suggesting possible matches as you type.
Showing results for
Former Member
Options
- Subscribe to RSS Feed
- Mark as New
- Mark as Read
- Bookmark
- Subscribe
- Printer Friendly Page
- Report Inappropriate Content
08-13-2016
12:14 AM
Data conversion process is a vital part of any implementation project, whether it is On-Premise or Cloud.
Cloud transformation has resulted in reduced implementation time thus increasing productivity in any SuccessFactors implementation life cycle.
Although it sounds simple and uncomplicated, most new cloud initiatives will have data conversion issues that need to be remedied.
Without a proper approach and thorough data analysis, data conversions can become an ordeal.
This write up is aimed in explaining the practical steps that can be followed in migrating Recruiting data from legacy/3rd party system to SAP SuccessFactors Recruiting BizX system.
It is highly recommended to read implementation guide, practice and test with few records before finally uploading bulk data. This can be an arduous process but at the same time a great learning experience. I have documented our experiences in the cloud journey and created them in to best practices and definitions which can also be shared as a blog.
The following steps will help you in eliminating or at least minimizing conversion iterations when followed correctly. It is often good practice to learn from best practices from other sources.
This article is intended for the SAP SF RCM Consultants who are familiar of the data models and system configurations. Therefore I have stressed much in practical steps rather than outlining from basics.
Conversion Process Flow

Who will do what?
HRIS Analyst (Client Side): Extraction of data from Client Legacy System and Data Cleanup
SF RCM Consultant : Data Conversion in SF Import Format, Data load in SuccessFactors through SFTP
This blog illustrates the process to upload following:
- Candidate Profiles
- Job Requisitions
- Applications
We have also stressed upon making a Quantum file (or Working file/Temp file whatever you name it) for each template and also suggested some methods and tools which we have used, however they are not mandatory for conversion process, but nice to have if it does not violate your organization’s policies.
What is Quantum File and why it’s required?
Import files are made in CSV format which do not preserve formatting, validation etc. Quantum file will be your main database where you will create your import template format, highlight required/mandatory fields, validate data through sorting filtering etc. Track uploaded, failed records and reimport after making changes.
There were lot of instances when client provided data which we have used to upload and faced many errors at cascading picklists, userid with missing permissions, invalid characters, missing value in mandatory fields etc. We realized a requirement of a main file where we can store all data provided by client, validate, color code errors, track status (uploaded /erroneous records etc.,) and sent it over to client.
Preparations
- Key recommended tools before you start working on data import:
- MS Office (specially Excel)
- Apache Open Office (if multiple languages are used)
- XML Pad (Freeware)
- Required System Access:
- Provisioning
- BizX Instance
- Career Site
- SFTP Server
- Keep followings ready as preparation:
- XMLs of the templates you wish to import data of (CPT, JRDM, CDM etc.)
- Picklists (as exported from instance)
- Sample data for upload (as provided by client)
- Screen shots of (template you want to upload) on screen fields as displayed to end users.
- CSV file export of Field Definition section of XML (explained in next section)
- Field Definition Export from XML:
- This is a highly recommended step as this will help you create a Quantum File before making final import file:
- Steps to export Field Definition section of XML in a table format:
- Open XML Template in XMLPad
- By default it will open in a source view, you need to click “Table View”

- Arrive to field-definition section by clicking + sign in the tree view

- After expanding field-definition area, right click and click export (ensure entire field-definition section is selected)

- Save the file in a CSV format (click Save as type = CSV files (delimiter + comma) (*.csv)

- While preparing the import file, you will be working on following files simultaneously so you may keep them ready and close all other applications (to avoid getting confused with many windows).
- Import File (Excel sheet which you will save as CSV)
- Field-Definition Export File (which you exported from XMLPad in previous step)
- Quantum File (Excel sheet in which you will prepare data and do validations etc.)
- Picklist file
- SFTP Site
- Provisioning
Import File Preparations (Quantum File)
- Key preparation for making an import file is making a “Quantum File”:
- Followings are the steps to make "Quantum File":
- Field-definition export file: Set Auto Filter > Type field > Select all types except “instruction”
- This will display a list of fields which should be there in the import file
- Copy following fields (end to end data):
- Id
- Type
- Required
- Picklist-id
- Create a new excel worksheet (this will be a Quantum File)> Paste Special > select “Values” under Paste section and select “Transpose” under Operation section > Click OK

- This will paste values in the Quantum File horizontally (all the four columns copied will get pasted as rows). Pls. save the file.
- Ensure that your data follow below mentioned order:
- Row 1 : Field ID
- Row 2 : Field Type
- Row 3 : Required
- Row 4 : Picklist IDs
- You will now need to insert the system/mandatory fields prior to pasted fields, which are not part of XML but required for legacy data upload (for example GUID, creation date etc.), such fields will differ for different data models. We shall explain those in next section
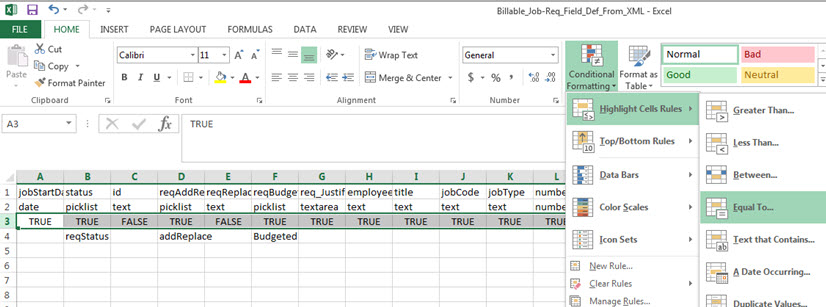
- Row 3: Add conditional formatting to highlight “required” fields, this will help you to ensure that these fields are not having empty values in import file
- Open Picklist file, filter active values (by filtering “ACTIVE” in the status column)
- Row 2 and 4: Ensure wherever field type (row no.2) = picklist, picklistid (row no. 4) is maintained
- In case of cascading picklist, if the field has child picklist this could be missing
- Refer to XML file to search for the field and copy the picklist Id manually in such case
- Row 4: wherever picklistid is mentioned, search for the corresponding active values in picklist file > copy them and paste below the picklist id mentioned in the Quantum File.

- In the screen shot pasted above, row no.4 contains picklistid and below them are picklist values copied from picklists downloaded.
- Insert one row between field id and field type (between row no. 1 and 2)
- In this row you will add values which you want to import for that specific field by ensuring following conditions are met
- Field value is corresponding to field type:
- Picklist: ensure value is mentioned in the picklist values pasted below:
- In case of cascading picklists, ensure the cascading values are mentioned by validating option Id mentioned in the child picklist
- Enum: you will need to refer to XML to verify field values
- Date fields must be in the format of "yyyy-MM-dd'T'HH:mm:ss". Example: 7:01:59 p.m. on January 31 2009 would be represented as 2009-01-31T19:01:59.
- Bool: TRUE / FALSE
- Field value is corresponding to field type:
- You should proceed for last step of Quantum File preparation i.e. adding field labels above Field IDs.
- Insert one row above field ID (Row 1)
- In the inserted row, Mention respective Field Label value, you will need to access XML file and copy values manually for each field. This will make it very easy for end user and you to identify and mention relevant value.
- After performing this action data will be in following order:
- Row 1 : Field Label
- Row 2 : Field ID
- Row 3 : Field Value to be imported
- Row 4 : Field Type
- Row 5 : Required
- Row 6 : Picklist IDs
- Row 7 to …. : Picklist values
- This action makes your Quantum File ready
- It's time to work on the import file now.
Import Files Preparation
- It’s very important to understand from where to start, so order to be followed for importing legacy data is as follows:
- Candidate Profile
- Job Requisition
- Application
- General rules applicable to all imports:
- File Format must be CSV
- Columns can be in any order
- In each import file, there will be a field (a unique identifier) which will have value that makes that record unique. Ensure you do not mention duplicate value in it
- Please check picklist values especially where cascading picklists have been used. This is one of the error prone areas.
Prepare an import file for “Candidate Profile”:
- Key Facts before we move on:
- Candidate profiles store general information about a candidate, it is as good as a detailed resume of a candidate in the instance in client’s format.
- This import file supports external candidate profiles only, not profiles for current company employees.
- Prepare Quantum File using instructions provided in the “Import File Preparations (Quantum File)” section above
- Primary Email – ensure that this field is there in the upload file since this value is a unique identifier for the candidate. Always mandatory.
- resume - enter the file path of candidate’s resume on SuccessFactors’ ftp server; attachments can be .doc, .pdf, .txt
- The resume files must be located in the same directory as the csv file.
- Do not include cover letter, background elements etc. as there’s a separate upload for it.
Prepare an import file for "Job Requisition":
- Following are the fields which are mandatory to have in each import file:
- JobReqGuid : mention a unique identifier
- jobReqTemplateId : TemplateID as created in the provisioning
- templateType : JOB_REQ
- jobReqLocale : language (Example: en_US)
- formDueDate : ensure to mention date in yyyy-MM-ddTHH:mm:ss format
- jobReqStatus : unapproved, approved or closed
- creationDate : ensure to mention date in yyyy-MM-ddTHH:mm:ss format
- lastUpdatedDate : ensure to mention date in yyyy-MM-ddTHH:mm:ss format
- jobOpenDate : ensure to mention date in yyyy-MM-ddTHH:mm:ss format
- jobCloseDate : ensure to mention date in yyyy-MM-ddTHH:mm:ss format
- title : Internal Job Title
- originator : Creator of the job req ("O" role) – SF User ID – Ensure this user has permission to create the job-req template
- Above mentioned mandatory fields may not be there in your Quantum File and hence you need to add them.
- Error Prone areas to take care while preparing import files:
- User ID mentioned in originator - Ensure job req creation permission exist
- Cascading picklist - Best way to validate is to do try entering this field in a job req from front end
- JobReqId - Use “Remove Duplicates”/ Conditional formatting to identify if any duplicate value exist in this field.
Prepare an import file for "Application":
- Notes:
- Related Job requistions and candidate profiles must have been imported.
- There is a separate import for attachments so do not include that in this import
- Use only one job req+application template combination per import file.
- Following are the fields which are mandatory to have in each import file:
- JobAppGuid - Unique identifier for all applications.
- jobReqGuid - Refer to the respective file of Job Req
- candidateEmailAddress - This should be similar to Email Address mentioned in candidate profile import
- jobAppLocale - Ideally should be similar to Job Req
- internalstatusId - General Status: options are open, disqualified, or closed
- statusItem - Value should match a status name in the status set defined in the Jobreq.
- applicationDate - mention date in yyyy-MM-ddTHH:mm:ss format
- lastModified - mention date in yyyy-MM-ddTHH:mm:ss format
- Above mentioned mandatory fields may not be there in your Quantum File and hence you need to add them.
Schedule Import Job in SF Provision:
- Upload import file and attachments/resumes (as applicable) to a folder on the SuccessFactors ftp server
- Schedule a candidate import job in the provisioning tool:
- Go to Managing Job Scheduler > Manage Scheduled Jobs > Create New Job, and select the appropriate Job type of Candidate Import / JobRequisition Import / Application Import from the Job type drop-down menu.
- A sub menu will open with radio button to choose which type of import you wish to setup.
- The host address, ftp login and password need to be entered.
- Click Test Connection button to check connectivity
- Enter the file path of where the uploaded files are located and the filename.
- Click Create Job to save your information.
- Repeat this process for each of the file types that will be imported.


- Last but not the least, pls validate imported records in instance randomly after importing
- Track records that could not get imported due to error and re-import them
Conclusion with key learning:
- Do it First Time Right: The key to successful conversion is to do it First Time Right as you do not have option to update the records through mass upload
- Accuracy : Validate each aspect for each field to ensure data accuracy so that you have less or no record to track and re-import
- SAP Managed Tags:
- HCM (Human Capital Management)
3 Comments
You must be a registered user to add a comment. If you've already registered, sign in. Otherwise, register and sign in.
Labels in this area
-
"mm02"
1 -
A_PurchaseOrderItem additional fields
1 -
ABAP
1 -
ABAP Extensibility
1 -
ACCOSTRATE
1 -
ACDOCP
1 -
Adding your country in SPRO - Project Administration
1 -
Advance Return Management
1 -
AI and RPA in SAP Upgrades
1 -
Approval Workflows
1 -
ARM
1 -
ASN
1 -
Asset Management
1 -
Associations in CDS Views
1 -
auditlog
1 -
Authorization
1 -
Availability date
1 -
Azure Center for SAP Solutions
1 -
AzureSentinel
2 -
Bank
1 -
BAPI_SALESORDER_CREATEFROMDAT2
1 -
BRF+
1 -
BRFPLUS
1 -
Bundled Cloud Services
1 -
business participation
1 -
Business Processes
1 -
CAPM
1 -
Carbon
1 -
Cental Finance
1 -
CFIN
1 -
CFIN Document Splitting
1 -
Cloud ALM
1 -
Cloud Integration
1 -
condition contract management
1 -
Connection - The default connection string cannot be used.
1 -
Custom Table Creation
1 -
Customer Screen in Production Order
1 -
Data Quality Management
1 -
Date required
1 -
Decisions
1 -
desafios4hana
1 -
Developing with SAP Integration Suite
1 -
Direct Outbound Delivery
1 -
DMOVE2S4
1 -
EAM
1 -
EDI
2 -
EDI 850
1 -
EDI 856
1 -
edocument
1 -
EHS Product Structure
1 -
Emergency Access Management
1 -
Energy
1 -
EPC
1 -
Financial Operations
1 -
Find
1 -
FINSSKF
1 -
Fiori
1 -
Flexible Workflow
1 -
Gas
1 -
Gen AI enabled SAP Upgrades
1 -
General
1 -
generate_xlsx_file
1 -
Getting Started
1 -
HomogeneousDMO
1 -
IDOC
2 -
Integration
1 -
learning content
2 -
LogicApps
2 -
low touchproject
1 -
Maintenance
1 -
management
1 -
Material creation
1 -
Material Management
1 -
MD04
1 -
MD61
1 -
methodology
1 -
Microsoft
2 -
MicrosoftSentinel
2 -
Migration
1 -
MRP
1 -
MS Teams
2 -
MT940
1 -
Newcomer
1 -
Notifications
1 -
Oil
1 -
open connectors
1 -
Order Change Log
1 -
ORDERS
2 -
OSS Note 390635
1 -
outbound delivery
1 -
outsourcing
1 -
PCE
1 -
Permit to Work
1 -
PIR Consumption Mode
1 -
PIR's
1 -
PIRs
1 -
PIRs Consumption
1 -
PIRs Reduction
1 -
Plan Independent Requirement
1 -
Premium Plus
1 -
pricing
1 -
Primavera P6
1 -
Process Excellence
1 -
Process Management
1 -
Process Order Change Log
1 -
Process purchase requisitions
1 -
Product Information
1 -
Production Order Change Log
1 -
Purchase requisition
1 -
Purchasing Lead Time
1 -
Redwood for SAP Job execution Setup
1 -
RISE with SAP
1 -
RisewithSAP
1 -
Rizing
1 -
S4 Cost Center Planning
1 -
S4 HANA
1 -
S4HANA
3 -
Sales and Distribution
1 -
Sales Commission
1 -
sales order
1 -
SAP
2 -
SAP Best Practices
1 -
SAP Build
1 -
SAP Build apps
1 -
SAP Cloud ALM
1 -
SAP Data Quality Management
1 -
SAP Maintenance resource scheduling
2 -
SAP Note 390635
1 -
SAP S4HANA
2 -
SAP S4HANA Cloud private edition
1 -
SAP Upgrade Automation
1 -
SAP WCM
1 -
SAP Work Clearance Management
1 -
Schedule Agreement
1 -
SDM
1 -
security
2 -
Settlement Management
1 -
soar
2 -
SSIS
1 -
SU01
1 -
SUM2.0SP17
1 -
SUMDMO
1 -
Teams
2 -
User Administration
1 -
User Participation
1 -
Utilities
1 -
va01
1 -
vendor
1 -
vl01n
1 -
vl02n
1 -
WCM
1 -
X12 850
1 -
xlsx_file_abap
1 -
YTD|MTD|QTD in CDs views using Date Function
1
- « Previous
- Next »
Related Content
- Deep Dive - SAP Payroll Lösungen für die Schweiz in Enterprise Resource Planning Blogs by SAP
- Mehrfachbeschäftigung mit SAP SuccessFactors in Enterprise Resource Planning Blogs by SAP
- Deciphering Seamless SAML Single Sign-On: A Comprehensive Guide to Multi-Identity Provider Integration with SAP IAS as Your Proxy for S/4 HANA and Beyond (Part 1) in Enterprise Resource Planning Blogs by Members
- Decoding Data Types and Security in SAP Cloud Services in Enterprise Resource Planning Blogs by SAP
- 5 talent management strategies to overcome recruiting and onboarding challenges in a hybrid workforce in Enterprise Resource Planning Blogs by Members
Top kudoed authors
| User | Count |
|---|---|
| 2 | |
| 2 | |
| 2 | |
| 2 | |
| 2 | |
| 2 | |
| 2 | |
| 2 | |
| 1 | |
| 1 |