
- SAP Community
- Products and Technology
- Enterprise Resource Planning
- ERP Blogs by Members
- SAP S/4HANA Embedded Analytics – A detailed Walkth...
Enterprise Resource Planning Blogs by Members
Gain new perspectives and knowledge about enterprise resource planning in blog posts from community members. Share your own comments and ERP insights today!
Turn on suggestions
Auto-suggest helps you quickly narrow down your search results by suggesting possible matches as you type.
Showing results for
Prabhith
Active Contributor
Options
- Subscribe to RSS Feed
- Mark as New
- Mark as Read
- Bookmark
- Subscribe
- Printer Friendly Page
- Report Inappropriate Content
07-15-2016
10:06 AM
Hi All,
S/4HANA is steadily gaining shape in the market and so is the S/4HANA Embedded Analytics.
Part1 of the Blog can be found here --> SAP S/4HANA Embedded Analytics – A detailed Walkthrough (Part 1)
Part2 of the Blog can be found here --> SAP S/4HANA Embedded Analytics – A detailed Walkthrough (Part 2)
Part3 of the Blog can be found here --> SAP S/4HANA Embedded Analytics – A detailed Walkthrough (Part 3)
Part5 of the Blog can be found here --> SAP S/4HANA Embedded Analytics – A detailed Walkthrough (Part 5)
Part6 of the Blog can be found here --> https://blogs.sap.com/2017/06/30/sap-s4hana-embedded-analytics-a-detailed-walkthrough-part-6/
Part7 of the Blog can be found here --> https://blogs.sap.com/2017/11/23/sap-s4hana-embedded-analytics-a-detailed-walkthrough-part-7/
Introduction:
What is S/4HANA Embedded Analytics?
It is the collection of all Analytical Features integrated in the SAP S/4HANA Suite that enables, Business users or end users to perform real time analytics or operational reporting on the live transactional data. It comes with a set of predefined and prepackaged representations of operational data. These representations called VDM (Virtual Data Models) allows business users to derive good insights into the data.
😎 Through this blog, we will try to see how CDS views are consumed in Fiori Smart Business Framework.
To begin with, we need to have a CDS view (Creation of CDS View in ABAP perspective is out of scope of this blog) with the Annotation @odata.publish=true.
When a CDS view is activated with the above-mentioned annotation, an service is automatically created in the gateway system with naming convention <CDS_VIEW_NAME>_CDS.
Let us have a simple CDS View with the following annotations:

Also, note that we have an annotation @OData.publish: true
After activation of the CDS, you can see the following message in the line in which the above annotation is added.

Note that my CDS view name is ZF_HADOOPCDS and hence the automatically created service name would be ZF_HADOOPCDS_CDS. Now let us go into the Gateway system and add the automatically created service.Enter the transaction /n/IWFND/MAINT_SERVICE and add the service. (Using Get Services option against your backend system).Once the service is added successfully, you will see the service in the service catalog.

Now we need to log into the Fiori Launchpad to configure the Smart Business Tiles.

The above-mentioned tiles (under KPI Design group) are called the Smart Business Tiles and the entire framework is called Smart Business Frame work.
Click on "Create KPI" tile to add the KPI name and CDS related details.

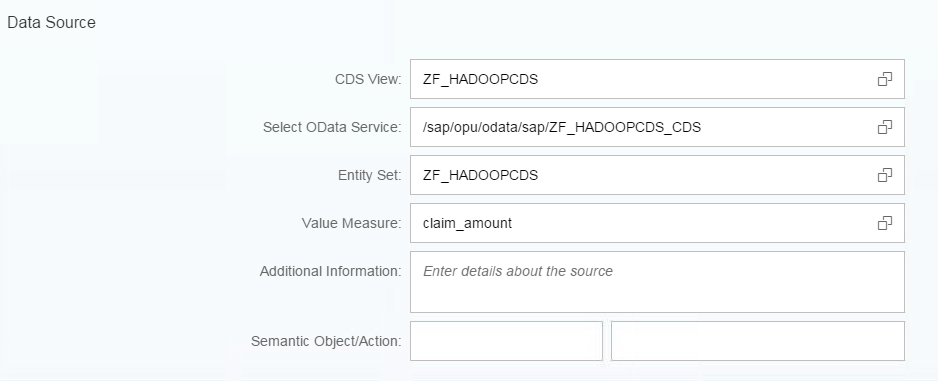
Note that, as soon as you give your CDS View name, the related ODATA service, Entity Set and Value Measure (I have a measure in CDS named 'claim amount' with local annotation @DefaultAggregation: #SUM) will automatically be available in the F4 List.
IMPORTANT POINT TO REMEMBER:
In case, if you were modelling a Smart Business Tile using HANA View in a Suite on HANA (SOH) Scenario, most of the configuration steps mentioned here would be the same except the Data source part. In such a scenario, your source would be HANA view and the Odata service needs to manually created in the HANA Development Perspective using some options like XSODATA.

Now we need to proceed by creating an Evaluation. For that, click on the following option.

In the next screen, you need to provide Evaluation name.

And if interested, show some thresholds (to show some exceptions).
Here I am providing values as below. This will later help in showing different colours in the Numeric tile according to Thresholds.

Now we need to add a Tile. For that, we need to use the following button.

That will take you to the following screen.

In this scenario, we are using a Numeric Tile.Note that you can change the Tile Format, Tile name and Tile Sub Title name according to your requirement. You have different tile formats available.(like Shown Below)
Numeric Tile
Comparison Tile
Trend Tile
Actual Vs Target Tile
Comparison Tile Multiple Measures
Blank Tile
Dual Tile
Please look into Help.Sap.com for details related to each tile type.
In the Add Tile screen, we need to add our tile to a specific Catalog which will later be added to a role and the role will later be added to the Fiori Launchpad user.
I have added the tile to a Catalog named ZCatalog_Hadoop.

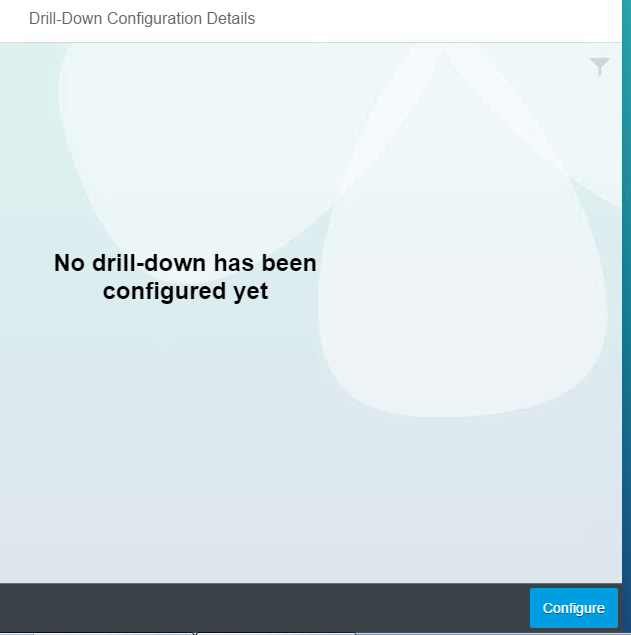
If you would like add some Drill Downs, click on the following:

You will reach the following screen, from where you can configure the drill downs.
Click on 'CONFIGURE' button for the same.
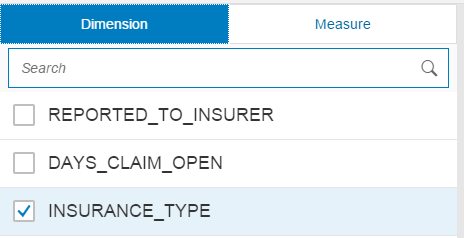
Select the Dimensions and Measures that you would need in the Drill down.
Here I would be adding 2 drill downs and 2 view names would be provided accordingly.
Drill Down 1:


Drill Down 2:


Click save configuration button after completion.

If you want to navigate through all the configurations that we have created till now, you can proceed with the following tile.


Now we need to add the catalog (created earlier) to a role.
For that access PFCG Tcode in the front end server.

- Please note that you need to click on Menu tab and Fiori Launchpad Catalog option
Now we need to add the above role to a Fiori launchpad user who would access this newly created Smart Business tile.

In my case, the user name is S4DEMO
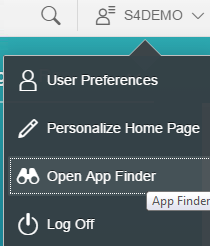
Now log off from the Fiori Launchpad page, do a cache delete and login with the S4DEMO credentials
You have to search for your catalog using the “Open App Finder” option.
Search for your tile and add it to the Home page/or a group name of the user.

NOTE: Green Colour has come up due to the Thresholds that was given earlier.
Click on the Tile and you can see the drill downs.


Thanks for going through the Document. Do let me know your Reviews and Suggestions.
BR
Prabhith
- SAP Managed Tags:
- SAP S/4HANA
6 Comments
You must be a registered user to add a comment. If you've already registered, sign in. Otherwise, register and sign in.
Labels in this area
-
"mm02"
1 -
A_PurchaseOrderItem additional fields
1 -
ABAP
1 -
ABAP Extensibility
1 -
ACCOSTRATE
1 -
ACDOCP
1 -
Adding your country in SPRO - Project Administration
1 -
Advance Return Management
1 -
AI and RPA in SAP Upgrades
1 -
Approval Workflows
1 -
ARM
1 -
ASN
1 -
Asset Management
1 -
Associations in CDS Views
1 -
auditlog
1 -
Authorization
1 -
Availability date
1 -
Azure Center for SAP Solutions
1 -
AzureSentinel
2 -
Bank
1 -
BAPI_SALESORDER_CREATEFROMDAT2
1 -
BRF+
1 -
BRFPLUS
1 -
Bundled Cloud Services
1 -
business participation
1 -
Business Processes
1 -
CAPM
1 -
Carbon
1 -
Cental Finance
1 -
CFIN
1 -
CFIN Document Splitting
1 -
Cloud ALM
1 -
Cloud Integration
1 -
condition contract management
1 -
Connection - The default connection string cannot be used.
1 -
Custom Table Creation
1 -
Customer Screen in Production Order
1 -
Data Quality Management
1 -
Date required
1 -
Decisions
1 -
desafios4hana
1 -
Developing with SAP Integration Suite
1 -
Direct Outbound Delivery
1 -
DMOVE2S4
1 -
EAM
1 -
EDI
2 -
EDI 850
1 -
EDI 856
1 -
EHS Product Structure
1 -
Emergency Access Management
1 -
Energy
1 -
EPC
1 -
Find
1 -
FINSSKF
1 -
Fiori
1 -
Flexible Workflow
1 -
Gas
1 -
Gen AI enabled SAP Upgrades
1 -
General
1 -
generate_xlsx_file
1 -
Getting Started
1 -
HomogeneousDMO
1 -
IDOC
2 -
Integration
1 -
Learning Content
2 -
LogicApps
2 -
low touchproject
1 -
Maintenance
1 -
management
1 -
Material creation
1 -
Material Management
1 -
MD04
1 -
MD61
1 -
methodology
1 -
Microsoft
2 -
MicrosoftSentinel
2 -
Migration
1 -
MRP
1 -
MS Teams
2 -
MT940
1 -
Newcomer
1 -
Notifications
1 -
Oil
1 -
open connectors
1 -
Order Change Log
1 -
ORDERS
2 -
OSS Note 390635
1 -
outbound delivery
1 -
outsourcing
1 -
PCE
1 -
Permit to Work
1 -
PIR Consumption Mode
1 -
PIR's
1 -
PIRs
1 -
PIRs Consumption
1 -
PIRs Reduction
1 -
Plan Independent Requirement
1 -
Premium Plus
1 -
pricing
1 -
Primavera P6
1 -
Process Excellence
1 -
Process Management
1 -
Process Order Change Log
1 -
Process purchase requisitions
1 -
Product Information
1 -
Production Order Change Log
1 -
Purchase requisition
1 -
Purchasing Lead Time
1 -
Redwood for SAP Job execution Setup
1 -
RISE with SAP
1 -
RisewithSAP
1 -
Rizing
1 -
S4 Cost Center Planning
1 -
S4 HANA
1 -
S4HANA
3 -
Sales and Distribution
1 -
Sales Commission
1 -
sales order
1 -
SAP
2 -
SAP Best Practices
1 -
SAP Build
1 -
SAP Build apps
1 -
SAP Cloud ALM
1 -
SAP Data Quality Management
1 -
SAP Maintenance resource scheduling
2 -
SAP Note 390635
1 -
SAP S4HANA
2 -
SAP S4HANA Cloud private edition
1 -
SAP Upgrade Automation
1 -
SAP WCM
1 -
SAP Work Clearance Management
1 -
Schedule Agreement
1 -
SDM
1 -
security
2 -
Settlement Management
1 -
soar
2 -
SSIS
1 -
SU01
1 -
SUM2.0SP17
1 -
SUMDMO
1 -
Teams
2 -
User Administration
1 -
User Participation
1 -
Utilities
1 -
va01
1 -
vendor
1 -
vl01n
1 -
vl02n
1 -
WCM
1 -
X12 850
1 -
xlsx_file_abap
1 -
YTD|MTD|QTD in CDs views using Date Function
1
- « Previous
- Next »
Related Content
- Five Key assessments for a Smooth ECC to S/4HANA Transformation in Enterprise Resource Planning Q&A
- Web Services for Concur Expense - Updating Expense Reports and Entries in Enterprise Resource Planning Blogs by SAP
- Demystifying Transformers and Embeddings: Some GenAI Concepts in Enterprise Resource Planning Blogs by SAP
- Advanced WIP reporting in S/4HANA Cloud Public Edition in Enterprise Resource Planning Blogs by SAP
- Readiness for Universal Parallel Accounting in Enterprise Resource Planning Blogs by SAP
Top kudoed authors
| User | Count |
|---|---|
| 2 | |
| 2 | |
| 2 | |
| 2 | |
| 2 | |
| 1 | |
| 1 | |
| 1 | |
| 1 | |
| 1 |