This is a continuation of How to use SAP HCP, mobile service for SAP Fiori - part 4
Now, before we can send a Push Notification we need to assign our user the Push Notification Role and determine the Push URL to post our message.
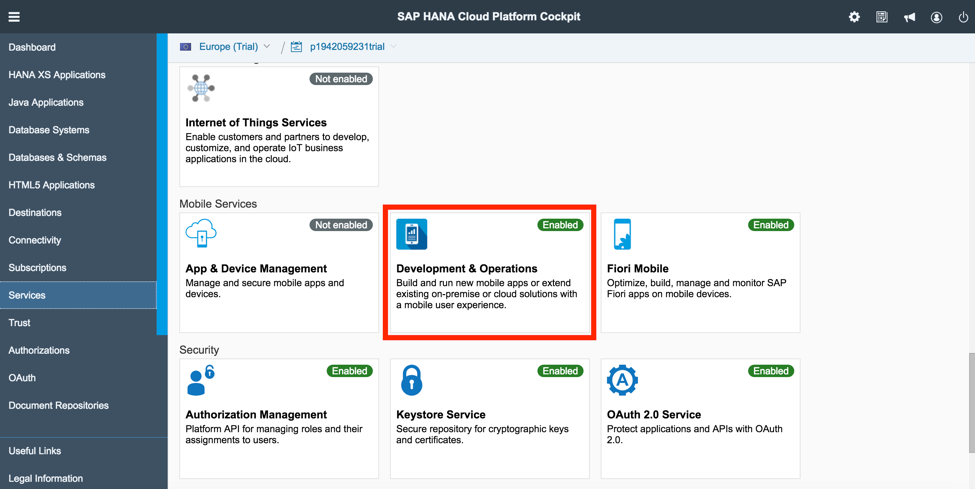
1. Return to the HCP Cockpit and go to Services, Development and Operations.
2. Select Configure Development and Operations.

3. Select Roles, then in the Roles Section select Notification User. In the bottom section assign your HCP trial ID to this Role (your trial ID can be derived from the breadcrumb trail at the top of the screen - p12345678 (without the trial part).

4. Return to the Development and Operations Service in the HCP Cockpit and select Go To Service

5. Select Applications in the Navigator and then on the Product Listing Application, right-click the cog and Select Overview.

6. To send a Push Notification we need to combine the base URL with the Fiori Mobile Application. Begin by coping the Enhanced Push API URL

and paste it into your Notepad or Text Editor. Next, add "/application/" then we need to get the Fiori Mobile App ID.
7. Return to the Fiori Mobile Admin Console and go to the Product Listing Fiori Mobile App. Select App Settings, Notifications, copy the Application ID and append it to your URL in Notepad or Text Editor.

When completed, your URL should look like:
PUSH URL = Enhanced Push API URL for the Product Listing App + “/application/” + The Application ID from the Mobile Mobile App Settings Notification Screen
Example:
https://hcpms-p1942059231trial.hanatrial.ondemand.com/restnotification/application/com.sap.mobilesecure.xd537a04511dd05a0e903ea439f9d4978
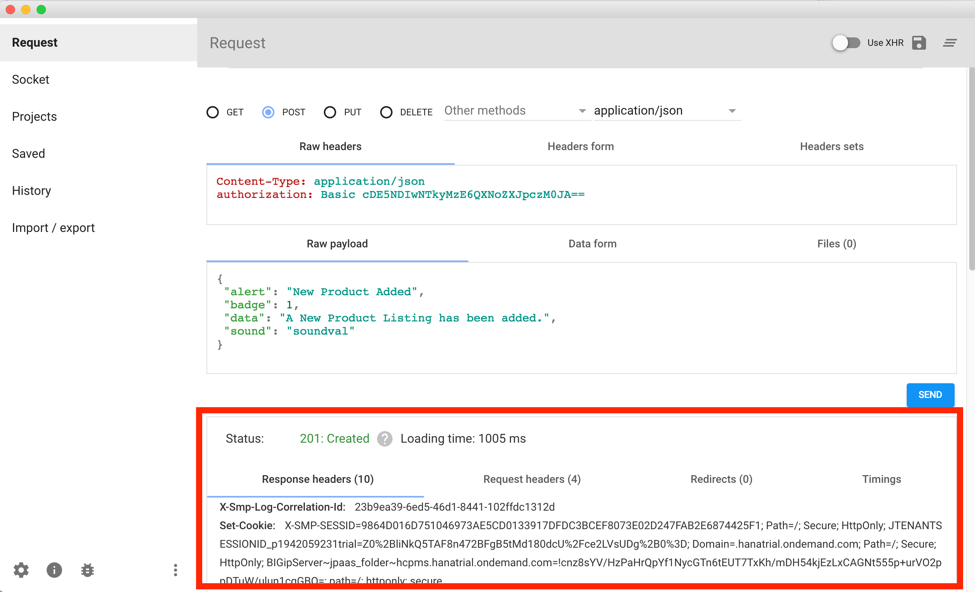
8. Install the Advanced REST Client in Chrome or open your preferred REST Client.

9. Create an HTTP Post with the following attributes:
URL: PUSH URL you created above
Type: Post
Header: Content-Type: application/json
Payload:
{
"alert": "New Product Added",
"badge": 1,
"data": "A New Product Listing has been added.",
"sound": "soundval"
}

10. Click Send. When prompted for Authentication enter your HCP trial ID and password.\

If successful, your should get a 201 Created response.
And a Push Notification on your Android device.

This concludes Part 4 of this blog series.
Check back for more mobile enhancements, including using the camera and turning this into an offline app!
