Target groups, simply put, is a group/list of customers within a pre-defined broader market, identified based on certain criterion and is created with a focus to send out a focused marketing content or activity.
For example, all customers in the state of California which are A – classified or all account in Germany which belong to the industry segment manufacturing.
Prior to 1605 of SAP Hybris Cloud for Customer, it is was possible to create only static target groups, which meant that marketing administrator created target groups manually either using excel upload or selecting members in the target groups .
With SAP Hybris Cloud for Customer 1605 release, the marketing administrator can now define dynamic target groups. This feature enables the marketing administrator to define conditions based on which the members are determined automatically in the target groups.
For example, let us take the use case shared above, ‘all accounts in Germany which belong to the industry segment manufacturing’.
The user can create a dynamic target group defining these conditions and leave it to the system to do the heavy lifting.
The system will automatically query the customer data base and add alls account which have country as Germany and industry segment as manufacturing to the target group.
The user have full control to schedule this determination, which means, he/she can define if this automatically determination needs to be done daily, weekly or monthly. This scheduling capability makes sure that the target group periodically updates the member list and adds/deletes members solely based on the conditions defined .
This capability reduces manual error in adding new accounts which might have been added to customer database and also deleting members which do not satisfy the conditions defined in the target group.
The user has to decide whether the target group is dynamic or not at the time of creation of the target group.
This is done by ticking the checkbox provided on the creation screen.
Once done, the type of the target group (static or dynamic) cannot be changed.
At present, conditions can be maintained for the following business partner types.
- Account
- Contact (with an account assignment)
- Individual Customer
This blog explains in detail, the creation, configuration and scheduling of dynamic Target Groups.
Creation of a dynamic target group
- Go to the Marketing WorkCentre, Target Group WorkCentre view.
- Click on button New.
- You can create a dynamic target group by ticking the checkbox Member Determination on the target group creation screen. The target group will be in status In Preparation.

Fig. 1
Note: Once saved, then you cannot change the type of target group (static or dynamic).
Automatic Member Determination Configuration
I. Maintenance of conditions
1. Open a dynamic target group from the target group worklist.
The dynamic target group can be identified by referring to the column Member Determination on the worklist table. If checked, then the record is a dynamic target group
2. Go to the Member Determination tab.
In this tab, you will see three tables where you can maintain the conditions; each table holds the selection conditions for one type of business partner.
Currently the automatic member determination is supported only for 3 types of business partners.
- Account
- Contact (with account assignment)
- Individual Customers
3.Maintain the appropriate conditions for each business partner type.
For example, if you would like to add all 'A' classified Accounts in US as members to the target group, maintain the conditions as shown in figure Fig. 2.

Fig. 2
II. Maintain the determination schedule
Once the conditions are maintained, you have to schedule the member determination process.
The system provides you the option of scheduling immediately or at a particular date and time as shown in figure Fig. 3.
You can also specify a recurrence for the process. This is particularly helpful if you have a large and dynamic customer base.

Fig. 3
III. Activate the member determination process
Once you have maintained the conditions and the schedule, you can start the member determination process by clicking on the Activate button under the Actions button group.
The activation triggers the member determination process in the background. The progress of this progress is captured in the Execution Status field.
Upon successful activation, the target group status becomes Active and the execution status becomes Scheduled.
Note: The Activate button performs two actions, viz. activating the target group and scheduling the member determination process.
Activation of the target group is a onetime activity. Hence the Activate button remains enabled only when the target group status is In Preparation.
Once the member determination process is completed, the execution status of the target group becomes Finished Successfully.
The members that satisfy the conditions are also added to the target group as shown in figure Fig. 4.

Fig. 4
At any time during the member determination process, if you need to adjust the conditions or the schedule, you can click on the Deactivate Schedule button.
This will stop the determination process and set the execution status to Not Started.
To resume the process, click on the button Activate Schedule.
Please note that the process cannot be stopped if the execution status is Running.
IV. Maintain Conditions for Extension fields
The dynamic target group is designed in such a way that it also allows the user to maintain conditions for extension fields.
However in order to maintain business consistency, the selection criteria for the member determination should be the same in case of both dynamic target group and manual target group.
- i.e. The set of attributes for which conditions can be maintained on the dynamic target group and the set of search fields on the static target group are same.
This is true in case of extension fields as well.
Here’s a step by step explanation on how to maintain conditions for extension fields.
The example considers the member type Account.
Note: In order to add extension fields, the user should have access to the Key User Tool
1. Create an extension field on the Customer Screen
Create an extension field on the customer screen as shown in figure Fig. 5.
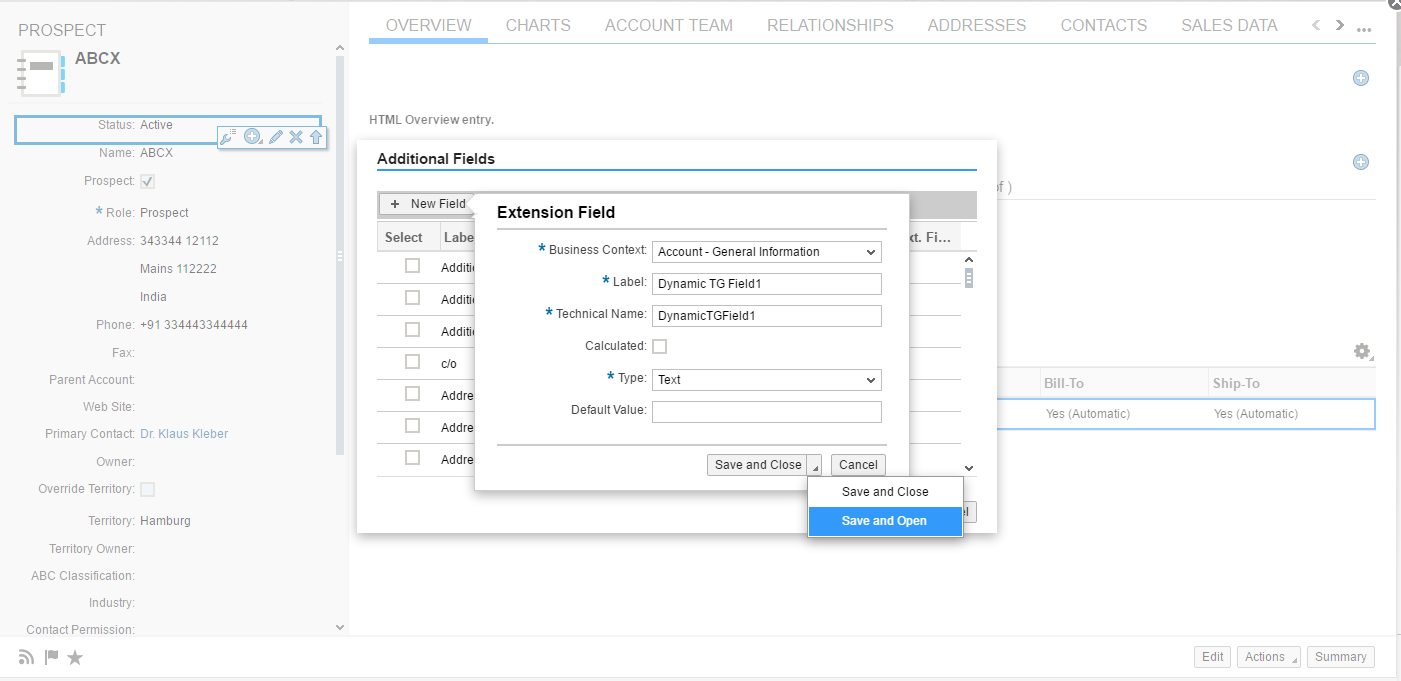
Fig. 5
2. Select the appropriate extension scenario
In order to maintain the conditions for extension fields on the target group, the field needs to be extended in the appropriate extension scenario.
In order to do this, please follow the steps mentioned below.
- Create an extension field, save and open the edit screen.
- Navigate to the Extension Scenarios tab.
- Select the scenario Account - General Information to Target Group - Account Selection and add the field to this scenario as shown in figure Fig. 6.

Fig. 6
3. Add the extension field to the Customer Screen
Once the extension field is created, it is not visible by default on the customer screen.
You have to add the field as shown in figure Fig. 7. Add the extension field and maintain appropriate values.

Fig. 7
4. Add the above added extension field(s) to the search screen of static target group
Open a target group where the member determination is NOT configured, i.e. a manual/static target group.
Go to the members tab and click on the Add Accounts button under the Add button control.
On this pop-up screen, add the extension field that you created for the Account (as shown in figure Fig. 8).
Note: This is an important step. If the extension field is not added to the search pop-up, then the member determination for the extension fields will not work.

Fig. 8
5. Add the extension field to the conditions table.
Now open the dynamic target group where you want to maintain conditions for the extension fields.
In the Account Condition table, add the extension field as shown in figure Fig. 9.

Fig. 9
This completes the configuration process for maintaining the condition for extension fields.
The process is similar for other member types (Contact and Individual Customer).
The extension scenario which correspond to each member is listed below.
Account - Account - General Information to Target Group - Account Selection
Contact - Contact - General Information to Target Group - Contact Selection
Individual Customer - Indivudual Customer - General Information to Target Group - Indivudual Customer Selection
